jcode: Building High-Performance Autonomous AI Coding Agents from Scratch
By EvoMind Tech


jcode: Building High-Performance Autonomous AI Coding Agents from Scratch
The landscape of AI-
jcode: Building High-Performance Autonomous AI Coding Agents from Scratch
The landscape of AI-driven software development is shifting rapidly. While first-generation AI coding tools operated primarily as conversational completions or simple script generators, the
jcode: Building High-Performance Autonomous AI Coding Agents from Scratch
The landscape of AI-driven software development is shifting rapidly. While first-generation AI coding tools operated primarily as conversational completions or simple script generators, the community is moving decisively toward autonomous programming agents. These agents don't just suggest code; they plan, execute tests, ref
jcode: Building High-Performance Autonomous AI Coding Agents from Scratch
The landscape of AI-driven software development is shifting rapidly. While first-generation AI coding tools operated primarily as conversational completions or simple script generators, the community is moving decisively toward autonomous programming agents. These agents don't just suggest code; they plan, execute tests, refactor, and self-correct within a structured harness.
Emerging at the forefront of this shift
jcode: Building High-Performance Autonomous AI Coding Agents from Scratch
The landscape of AI-driven software development is shifting rapidly. While first-generation AI coding tools operated primarily as conversational completions or simple script generators, the community is moving decisively toward autonomous programming agents. These agents don't just suggest code; they plan, execute tests, refactor, and self-correct within a structured harness.
Emerging at the forefront of this shift in May 2026 is jcode, an open-source, Rust-based programming agent framework developed
jcode: Building High-Performance Autonomous AI Coding Agents from Scratch
The landscape of AI-driven software development is shifting rapidly. While first-generation AI coding tools operated primarily as conversational completions or simple script generators, the community is moving decisively toward autonomous programming agents. These agents don't just suggest code; they plan, execute tests, refactor, and self-correct within a structured harness.
Emerging at the forefront of this shift in May 2026 is jcode, an open-source, Rust-based programming agent framework developed by creator 1jehuang. Rapidly climbing the GitHub Trending charts and capturing the attention of autonomous systems developers
jcode: Building High-Performance Autonomous AI Coding Agents from Scratch
The landscape of AI-driven software development is shifting rapidly. While first-generation AI coding tools operated primarily as conversational completions or simple script generators, the community is moving decisively toward autonomous programming agents. These agents don't just suggest code; they plan, execute tests, refactor, and self-correct within a structured harness.
Emerging at the forefront of this shift in May 2026 is jcode, an open-source, Rust-based programming agent framework developed by creator 1jehuang. Rapidly climbing the GitHub Trending charts and capturing the attention of autonomous systems developers, jcode addresses a critical bottleneck in the agentic ecosystem: execution speed, structural reliability, and resource overhead. Written entirely
jcode: Building High-Performance Autonomous AI Coding Agents from Scratch
The landscape of AI-driven software development is shifting rapidly. While first-generation AI coding tools operated primarily as conversational completions or simple script generators, the community is moving decisively toward autonomous programming agents. These agents don't just suggest code; they plan, execute tests, refactor, and self-correct within a structured harness.
Emerging at the forefront of this shift in May 2026 is jcode, an open-source, Rust-based programming agent framework developed by creator 1jehuang. Rapidly climbing the GitHub Trending charts and capturing the attention of autonomous systems developers, jcode addresses a critical bottleneck in the agentic ecosystem: execution speed, structural reliability, and resource overhead. Written entirely in Rust, it provides a high-performance harness designed to run AI coding agents at scale without the typical latency and memory
jcode: Building High-Performance Autonomous AI Coding Agents from Scratch
The landscape of AI-driven software development is shifting rapidly. While first-generation AI coding tools operated primarily as conversational completions or simple script generators, the community is moving decisively toward autonomous programming agents. These agents don't just suggest code; they plan, execute tests, refactor, and self-correct within a structured harness.
Emerging at the forefront of this shift in May 2026 is jcode, an open-source, Rust-based programming agent framework developed by creator 1jehuang. Rapidly climbing the GitHub Trending charts and capturing the attention of autonomous systems developers, jcode addresses a critical bottleneck in the agentic ecosystem: execution speed, structural reliability, and resource overhead. Written entirely in Rust, it provides a high-performance harness designed to run AI coding agents at scale without the typical latency and memory bloat associated with Python-heavy orchestration layers.
In this comprehensive tutorial-style guide, we
jcode: Building High-Performance Autonomous AI Coding Agents from Scratch
The landscape of AI-driven software development is shifting rapidly. While first-generation AI coding tools operated primarily as conversational completions or simple script generators, the community is moving decisively toward autonomous programming agents. These agents don't just suggest code; they plan, execute tests, refactor, and self-correct within a structured harness.
Emerging at the forefront of this shift in May 2026 is jcode, an open-source, Rust-based programming agent framework developed by creator 1jehuang. Rapidly climbing the GitHub Trending charts and capturing the attention of autonomous systems developers, jcode addresses a critical bottleneck in the agentic ecosystem: execution speed, structural reliability, and resource overhead. Written entirely in Rust, it provides a high-performance harness designed to run AI coding agents at scale without the typical latency and memory bloat associated with Python-heavy orchestration layers.
In this comprehensive tutorial-style guide, we will break down what jcode is, analyze its internal architecture, compare it to existing frameworks, and walk through an end-to-end installation
jcode: Building High-Performance Autonomous AI Coding Agents from Scratch
The landscape of AI-driven software development is shifting rapidly. While first-generation AI coding tools operated primarily as conversational completions or simple script generators, the community is moving decisively toward autonomous programming agents. These agents don't just suggest code; they plan, execute tests, refactor, and self-correct within a structured harness.
Emerging at the forefront of this shift in May 2026 is jcode, an open-source, Rust-based programming agent framework developed by creator 1jehuang. Rapidly climbing the GitHub Trending charts and capturing the attention of autonomous systems developers, jcode addresses a critical bottleneck in the agentic ecosystem: execution speed, structural reliability, and resource overhead. Written entirely in Rust, it provides a high-performance harness designed to run AI coding agents at scale without the typical latency and memory bloat associated with Python-heavy orchestration layers.
In this comprehensive tutorial-style guide, we will break down what jcode is, analyze its internal architecture, compare it to existing frameworks, and walk through an end-to-end installation and configuration process to build your very first autonomous coding agent.
---Understanding the jcode Architecture
To build effective applications with jcode, it is essential to understand how it organizes the execution loop of an
jcode: Building High-Performance Autonomous AI Coding Agents from Scratch
The landscape of AI-driven software development is shifting rapidly. While first-generation AI coding tools operated primarily as conversational completions or simple script generators, the community is moving decisively toward autonomous programming agents. These agents don't just suggest code; they plan, execute tests, refactor, and self-correct within a structured harness.
Emerging at the forefront of this shift in May 2026 is jcode, an open-source, Rust-based programming agent framework developed by creator 1jehuang. Rapidly climbing the GitHub Trending charts and capturing the attention of autonomous systems developers, jcode addresses a critical bottleneck in the agentic ecosystem: execution speed, structural reliability, and resource overhead. Written entirely in Rust, it provides a high-performance harness designed to run AI coding agents at scale without the typical latency and memory bloat associated with Python-heavy orchestration layers.
In this comprehensive tutorial-style guide, we will break down what jcode is, analyze its internal architecture, compare it to existing frameworks, and walk through an end-to-end installation and configuration process to build your very first autonomous coding agent.
---Understanding the jcode Architecture
To build effective applications with jcode, it is essential to understand how it organizes the execution loop of an AI agent. Traditional agent frameworks rely on high-level scripting abstractions that introduce significant latency, making deep-tree search algorithms (
jcode: Building High-Performance Autonomous AI Coding Agents from Scratch
The landscape of AI-driven software development is shifting rapidly. While first-generation AI coding tools operated primarily as conversational completions or simple script generators, the community is moving decisively toward autonomous programming agents. These agents don't just suggest code; they plan, execute tests, refactor, and self-correct within a structured harness.
Emerging at the forefront of this shift in May 2026 is jcode, an open-source, Rust-based programming agent framework developed by creator 1jehuang. Rapidly climbing the GitHub Trending charts and capturing the attention of autonomous systems developers, jcode addresses a critical bottleneck in the agentic ecosystem: execution speed, structural reliability, and resource overhead. Written entirely in Rust, it provides a high-performance harness designed to run AI coding agents at scale without the typical latency and memory bloat associated with Python-heavy orchestration layers.
In this comprehensive tutorial-style guide, we will break down what jcode is, analyze its internal architecture, compare it to existing frameworks, and walk through an end-to-end installation and configuration process to build your very first autonomous coding agent.
---Understanding the jcode Architecture
To build effective applications with jcode, it is essential to understand how it organizes the execution loop of an AI agent. Traditional agent frameworks rely on high-level scripting abstractions that introduce significant latency, making deep-tree search algorithms (like Monte Carlo Tree Search or complex reflection loops) painfully slow. jcode solves this by using a compiled Rust backend that exposes
jcode: Building High-Performance Autonomous AI Coding Agents from Scratch
The landscape of AI-driven software development is shifting rapidly. While first-generation AI coding tools operated primarily as conversational completions or simple script generators, the community is moving decisively toward autonomous programming agents. These agents don't just suggest code; they plan, execute tests, refactor, and self-correct within a structured harness.
Emerging at the forefront of this shift in May 2026 is jcode, an open-source, Rust-based programming agent framework developed by creator 1jehuang. Rapidly climbing the GitHub Trending charts and capturing the attention of autonomous systems developers, jcode addresses a critical bottleneck in the agentic ecosystem: execution speed, structural reliability, and resource overhead. Written entirely in Rust, it provides a high-performance harness designed to run AI coding agents at scale without the typical latency and memory bloat associated with Python-heavy orchestration layers.
In this comprehensive tutorial-style guide, we will break down what jcode is, analyze its internal architecture, compare it to existing frameworks, and walk through an end-to-end installation and configuration process to build your very first autonomous coding agent.
---Understanding the jcode Architecture
To build effective applications with jcode, it is essential to understand how it organizes the execution loop of an AI agent. Traditional agent frameworks rely on high-level scripting abstractions that introduce significant latency, making deep-tree search algorithms (like Monte Carlo Tree Search or complex reflection loops) painfully slow. jcode solves this by using a compiled Rust backend that exposes a highly structured execution harness.
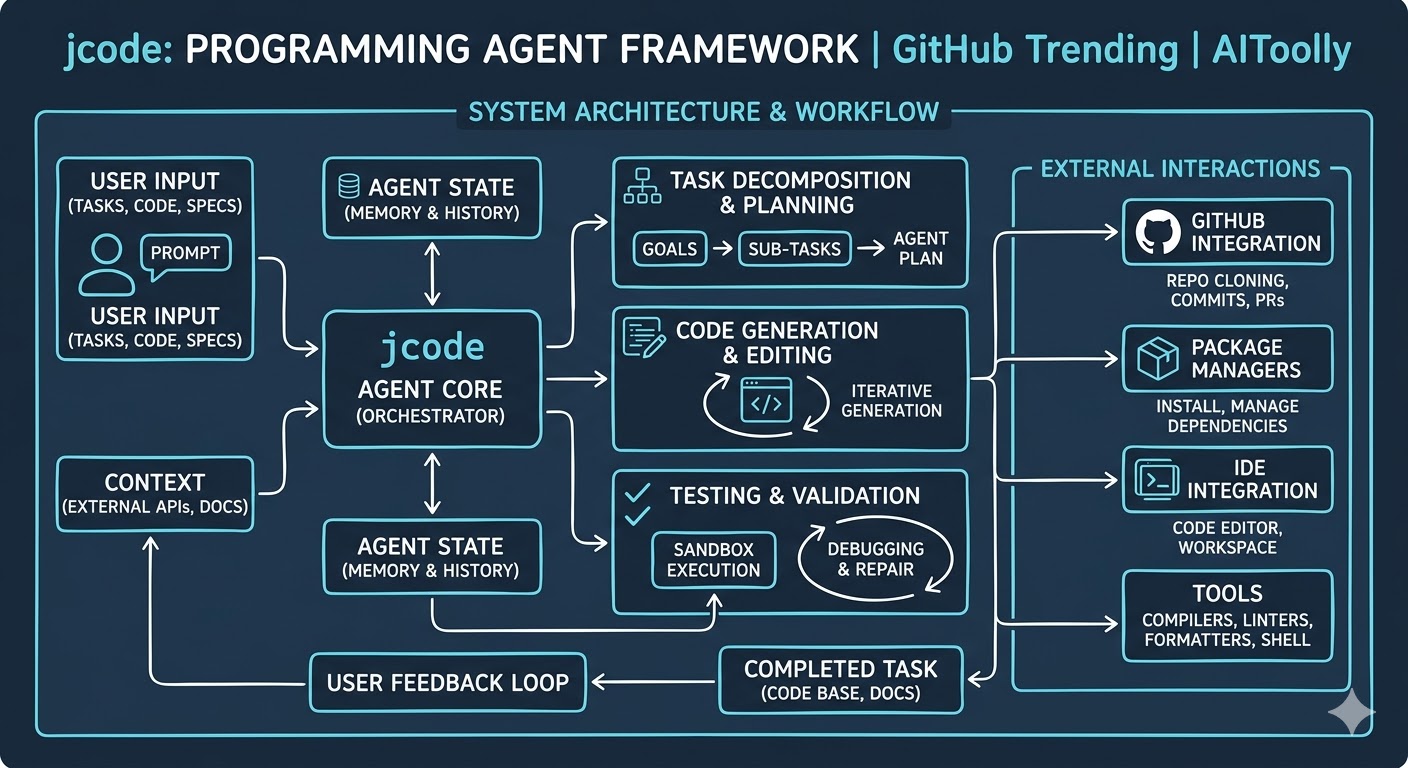
The framework is divided into three primary layers
jcode: Building High-Performance Autonomous AI Coding Agents from Scratch
The landscape of AI-driven software development is shifting rapidly. While first-generation AI coding tools operated primarily as conversational completions or simple script generators, the community is moving decisively toward autonomous programming agents. These agents don't just suggest code; they plan, execute tests, refactor, and self-correct within a structured harness.
Emerging at the forefront of this shift in May 2026 is jcode, an open-source, Rust-based programming agent framework developed by creator 1jehuang. Rapidly climbing the GitHub Trending charts and capturing the attention of autonomous systems developers, jcode addresses a critical bottleneck in the agentic ecosystem: execution speed, structural reliability, and resource overhead. Written entirely in Rust, it provides a high-performance harness designed to run AI coding agents at scale without the typical latency and memory bloat associated with Python-heavy orchestration layers.
In this comprehensive tutorial-style guide, we will break down what jcode is, analyze its internal architecture, compare it to existing frameworks, and walk through an end-to-end installation and configuration process to build your very first autonomous coding agent.
---Understanding the jcode Architecture
To build effective applications with jcode, it is essential to understand how it organizes the execution loop of an AI agent. Traditional agent frameworks rely on high-level scripting abstractions that introduce significant latency, making deep-tree search algorithms (like Monte Carlo Tree Search or complex reflection loops) painfully slow. jcode solves this by using a compiled Rust backend that exposes a highly structured execution harness.
The framework is divided into three primary layers:
- The Environment Layer (The Sandbox): This component manages the operating system context
jcode: Building High-Performance Autonomous AI Coding Agents from Scratch
The landscape of AI-driven software development is shifting rapidly. While first-generation AI coding tools operated primarily as conversational completions or simple script generators, the community is moving decisively toward autonomous programming agents. These agents don't just suggest code; they plan, execute tests, refactor, and self-correct within a structured harness.
Emerging at the forefront of this shift in May 2026 is jcode, an open-source, Rust-based programming agent framework developed by creator
1jehuang. Rapidly climbing the GitHub Trending charts and capturing the attention of autonomous systems developers, jcode addresses a critical bottleneck in the agentic ecosystem: execution speed, structural reliability, and resource overhead. Written entirely in Rust, it provides a high-performance harness designed to run AI coding agents at scale without the typical latency and memory bloat associated with Python-heavy orchestration layers.In this comprehensive tutorial-style guide, we will break down what jcode is, analyze its internal architecture, compare it to existing frameworks, and walk through an end-to-end installation and configuration process to build your very first autonomous coding agent.
---Understanding the jcode Architecture
To build effective applications with jcode, it is essential to understand how it organizes the execution loop of an AI agent. Traditional agent frameworks rely on high-level scripting abstractions that introduce significant latency, making deep-tree search algorithms (like Monte Carlo Tree Search or complex reflection loops) painfully slow. jcode solves this by using a compiled Rust backend that exposes a highly structured execution harness.
The framework is divided into three primary layers:
- The Environment Layer (The Sandbox): This component manages the operating system context, available package managers, and shell environments. It isolates agent actions, preventing rogue scripts from damaging the host system while providing full
jcode: Building High-Performance Autonomous AI Coding Agents from Scratch
The landscape of AI-driven software development is shifting rapidly. While first-generation AI coding tools operated primarily as conversational completions or simple script generators, the community is moving decisively toward autonomous programming agents. These agents don't just suggest code; they plan, execute tests, refactor, and self-correct within a structured harness.
Emerging at the forefront of this shift in May 2026 is jcode, an open-source, Rust-based programming agent framework developed by creator
1jehuang. Rapidly climbing the GitHub Trending charts and capturing the attention of autonomous systems developers, jcode addresses a critical bottleneck in the agentic ecosystem: execution speed, structural reliability, and resource overhead. Written entirely in Rust, it provides a high-performance harness designed to run AI coding agents at scale without the typical latency and memory bloat associated with Python-heavy orchestration layers.In this comprehensive tutorial-style guide, we will break down what jcode is, analyze its internal architecture, compare it to existing frameworks, and walk through an end-to-end installation and configuration process to build your very first autonomous coding agent.
---Understanding the jcode Architecture
To build effective applications with jcode, it is essential to understand how it organizes the execution loop of an AI agent. Traditional agent frameworks rely on high-level scripting abstractions that introduce significant latency, making deep-tree search algorithms (like Monte Carlo Tree Search or complex reflection loops) painfully slow. jcode solves this by using a compiled Rust backend that exposes a highly structured execution harness.
The framework is divided into three primary layers:
- The Environment Layer (The Sandbox): This component manages the operating system context, available package managers, and shell environments. It isolates agent actions, preventing rogue scripts from damaging the host system while providing full feedback loops (stdout, stderr, exit codes) back to the agent.
- The Core Harness (Rust
jcode: Building High-Performance Autonomous AI Coding Agents from Scratch
The landscape of AI-driven software development is shifting rapidly. While first-generation AI coding tools operated primarily as conversational completions or simple script generators, the community is moving decisively toward autonomous programming agents. These agents don't just suggest code; they plan, execute tests, refactor, and self-correct within a structured harness.
Emerging at the forefront of this shift in May 2026 is jcode, an open-source, Rust-based programming agent framework developed by creator
1jehuang. Rapidly climbing the GitHub Trending charts and capturing the attention of autonomous systems developers, jcode addresses a critical bottleneck in the agentic ecosystem: execution speed, structural reliability, and resource overhead. Written entirely in Rust, it provides a high-performance harness designed to run AI coding agents at scale without the typical latency and memory bloat associated with Python-heavy orchestration layers.In this comprehensive tutorial-style guide, we will break down what jcode is, analyze its internal architecture, compare it to existing frameworks, and walk through an end-to-end installation and configuration process to build your very first autonomous coding agent.
---Understanding the jcode Architecture
To build effective applications with jcode, it is essential to understand how it organizes the execution loop of an AI agent. Traditional agent frameworks rely on high-level scripting abstractions that introduce significant latency, making deep-tree search algorithms (like Monte Carlo Tree Search or complex reflection loops) painfully slow. jcode solves this by using a compiled Rust backend that exposes a highly structured execution harness.
The framework is divided into three primary layers:
- The Environment Layer (The Sandbox): This component manages the operating system context, available package managers, and shell environments. It isolates agent actions, preventing rogue scripts from damaging the host system while providing full feedback loops (stdout, stderr, exit codes) back to the agent.
- The Core Harness (Rust Engine): Written in Rust for maximum concurrency and memory safety, this engine manages agent state transitions, prompt token streaming pipelines, and workspace
jcode: Building High-Performance Autonomous AI Coding Agents from Scratch
The landscape of AI-driven software development is shifting rapidly. While first-generation AI coding tools operated primarily as conversational completions or simple script generators, the community is moving decisively toward autonomous programming agents. These agents don't just suggest code; they plan, execute tests, refactor, and self-correct within a structured harness.
Emerging at the forefront of this shift in May 2026 is jcode, an open-source, Rust-based programming agent framework developed by creator
1jehuang. Rapidly climbing the GitHub Trending charts and capturing the attention of autonomous systems developers, jcode addresses a critical bottleneck in the agentic ecosystem: execution speed, structural reliability, and resource overhead. Written entirely in Rust, it provides a high-performance harness designed to run AI coding agents at scale without the typical latency and memory bloat associated with Python-heavy orchestration layers.In this comprehensive tutorial-style guide, we will break down what jcode is, analyze its internal architecture, compare it to existing frameworks, and walk through an end-to-end installation and configuration process to build your very first autonomous coding agent.
---Understanding the jcode Architecture
To build effective applications with jcode, it is essential to understand how it organizes the execution loop of an AI agent. Traditional agent frameworks rely on high-level scripting abstractions that introduce significant latency, making deep-tree search algorithms (like Monte Carlo Tree Search or complex reflection loops) painfully slow. jcode solves this by using a compiled Rust backend that exposes a highly structured execution harness.
The framework is divided into three primary layers:
- The Environment Layer (The Sandbox): This component manages the operating system context, available package managers, and shell environments. It isolates agent actions, preventing rogue scripts from damaging the host system while providing full feedback loops (stdout, stderr, exit codes) back to the agent.
- The Core Harness (Rust Engine): Written in Rust for maximum concurrency and memory safety, this engine manages agent state transitions, prompt token streaming pipelines, and workspace file parsing. It abstracts token budgets and tool call translations natively.
- The Agent Interface (Extensible Profiles
jcode: Building High-Performance Autonomous AI Coding Agents from Scratch
The landscape of AI-driven software development is shifting rapidly. While first-generation AI coding tools operated primarily as conversational completions or simple script generators, the community is moving decisively toward autonomous programming agents. These agents don't just suggest code; they plan, execute tests, refactor, and self-correct within a structured harness.
Emerging at the forefront of this shift in May 2026 is jcode, an open-source, Rust-based programming agent framework developed by creator
1jehuang. Rapidly climbing the GitHub Trending charts and capturing the attention of autonomous systems developers, jcode addresses a critical bottleneck in the agentic ecosystem: execution speed, structural reliability, and resource overhead. Written entirely in Rust, it provides a high-performance harness designed to run AI coding agents at scale without the typical latency and memory bloat associated with Python-heavy orchestration layers.In this comprehensive tutorial-style guide, we will break down what jcode is, analyze its internal architecture, compare it to existing frameworks, and walk through an end-to-end installation and configuration process to build your very first autonomous coding agent.
---Understanding the jcode Architecture
To build effective applications with jcode, it is essential to understand how it organizes the execution loop of an AI agent. Traditional agent frameworks rely on high-level scripting abstractions that introduce significant latency, making deep-tree search algorithms (like Monte Carlo Tree Search or complex reflection loops) painfully slow. jcode solves this by using a compiled Rust backend that exposes a highly structured execution harness.
The framework is divided into three primary layers:
- The Environment Layer (The Sandbox): This component manages the operating system context, available package managers, and shell environments. It isolates agent actions, preventing rogue scripts from damaging the host system while providing full feedback loops (stdout, stderr, exit codes) back to the agent.
- The Core Harness (Rust Engine): Written in Rust for maximum concurrency and memory safety, this engine manages agent state transitions, prompt token streaming pipelines, and workspace file parsing. It abstracts token budgets and tool call translations natively.
- The Agent Interface (Extensible Profiles): This layer allows developers to write custom planning algorithms, definition maps, and system instructions. It defines how the agent approaches
jcode: Building High-Performance Autonomous AI Coding Agents from Scratch
The landscape of AI-driven software development is shifting rapidly. While first-generation AI coding tools operated primarily as conversational completions or simple script generators, the community is moving decisively toward autonomous programming agents. These agents don't just suggest code; they plan, execute tests, refactor, and self-correct within a structured harness.
Emerging at the forefront of this shift in May 2026 is jcode, an open-source, Rust-based programming agent framework developed by creator
1jehuang. Rapidly climbing the GitHub Trending charts and capturing the attention of autonomous systems developers, jcode addresses a critical bottleneck in the agentic ecosystem: execution speed, structural reliability, and resource overhead. Written entirely in Rust, it provides a high-performance harness designed to run AI coding agents at scale without the typical latency and memory bloat associated with Python-heavy orchestration layers.In this comprehensive tutorial-style guide, we will break down what jcode is, analyze its internal architecture, compare it to existing frameworks, and walk through an end-to-end installation and configuration process to build your very first autonomous coding agent.
---Understanding the jcode Architecture
To build effective applications with jcode, it is essential to understand how it organizes the execution loop of an AI agent. Traditional agent frameworks rely on high-level scripting abstractions that introduce significant latency, making deep-tree search algorithms (like Monte Carlo Tree Search or complex reflection loops) painfully slow. jcode solves this by using a compiled Rust backend that exposes a highly structured execution harness.
The framework is divided into three primary layers:
- The Environment Layer (The Sandbox): This component manages the operating system context, available package managers, and shell environments. It isolates agent actions, preventing rogue scripts from damaging the host system while providing full feedback loops (stdout, stderr, exit codes) back to the agent.
- The Core Harness (Rust Engine): Written in Rust for maximum concurrency and memory safety, this engine manages agent state transitions, prompt token streaming pipelines, and workspace file parsing. It abstracts token budgets and tool call translations natively.
- The Agent Interface (Extensible Profiles): This layer allows developers to write custom planning algorithms, definition maps, and system instructions. It defines how the agent approaches a problem, splits tasks, and evaluates success.
Feature Comparison: jcode vs.
jcode: Building High-Performance Autonomous AI Coding Agents from Scratch
The landscape of AI-driven software development is shifting rapidly. While first-generation AI coding tools operated primarily as conversational completions or simple script generators, the community is moving decisively toward autonomous programming agents. These agents don't just suggest code; they plan, execute tests, refactor, and self-correct within a structured harness.
Emerging at the forefront of this shift in May 2026 is jcode, an open-source, Rust-based programming agent framework developed by creator
1jehuang. Rapidly climbing the GitHub Trending charts and capturing the attention of autonomous systems developers, jcode addresses a critical bottleneck in the agentic ecosystem: execution speed, structural reliability, and resource overhead. Written entirely in Rust, it provides a high-performance harness designed to run AI coding agents at scale without the typical latency and memory bloat associated with Python-heavy orchestration layers.In this comprehensive tutorial-style guide, we will break down what jcode is, analyze its internal architecture, compare it to existing frameworks, and walk through an end-to-end installation and configuration process to build your very first autonomous coding agent.
---Understanding the jcode Architecture
To build effective applications with jcode, it is essential to understand how it organizes the execution loop of an AI agent. Traditional agent frameworks rely on high-level scripting abstractions that introduce significant latency, making deep-tree search algorithms (like Monte Carlo Tree Search or complex reflection loops) painfully slow. jcode solves this by using a compiled Rust backend that exposes a highly structured execution harness.
The framework is divided into three primary layers:
- The Environment Layer (The Sandbox): This component manages the operating system context, available package managers, and shell environments. It isolates agent actions, preventing rogue scripts from damaging the host system while providing full feedback loops (stdout, stderr, exit codes) back to the agent.
- The Core Harness (Rust Engine): Written in Rust for maximum concurrency and memory safety, this engine manages agent state transitions, prompt token streaming pipelines, and workspace file parsing. It abstracts token budgets and tool call translations natively.
- The Agent Interface (Extensible Profiles): This layer allows developers to write custom planning algorithms, definition maps, and system instructions. It defines how the agent approaches a problem, splits tasks, and evaluates success.
Feature Comparison: jcode vs. Traditional Frameworks
Before diving into the implementation details, let's look at how jcode positions
jcode: Building High-Performance Autonomous AI Coding Agents from Scratch
The landscape of AI-driven software development is shifting rapidly. While first-generation AI coding tools operated primarily as conversational completions or simple script generators, the community is moving decisively toward autonomous programming agents. These agents don't just suggest code; they plan, execute tests, refactor, and self-correct within a structured harness.
Emerging at the forefront of this shift in May 2026 is jcode, an open-source, Rust-based programming agent framework developed by creator
1jehuang. Rapidly climbing the GitHub Trending charts and capturing the attention of autonomous systems developers, jcode addresses a critical bottleneck in the agentic ecosystem: execution speed, structural reliability, and resource overhead. Written entirely in Rust, it provides a high-performance harness designed to run AI coding agents at scale without the typical latency and memory bloat associated with Python-heavy orchestration layers.In this comprehensive tutorial-style guide, we will break down what jcode is, analyze its internal architecture, compare it to existing frameworks, and walk through an end-to-end installation and configuration process to build your very first autonomous coding agent.
---Understanding the jcode Architecture
To build effective applications with jcode, it is essential to understand how it organizes the execution loop of an AI agent. Traditional agent frameworks rely on high-level scripting abstractions that introduce significant latency, making deep-tree search algorithms (like Monte Carlo Tree Search or complex reflection loops) painfully slow. jcode solves this by using a compiled Rust backend that exposes a highly structured execution harness.
The framework is divided into three primary layers:
- The Environment Layer (The Sandbox): This component manages the operating system context, available package managers, and shell environments. It isolates agent actions, preventing rogue scripts from damaging the host system while providing full feedback loops (stdout, stderr, exit codes) back to the agent.
- The Core Harness (Rust Engine): Written in Rust for maximum concurrency and memory safety, this engine manages agent state transitions, prompt token streaming pipelines, and workspace file parsing. It abstracts token budgets and tool call translations natively.
- The Agent Interface (Extensible Profiles): This layer allows developers to write custom planning algorithms, definition maps, and system instructions. It defines how the agent approaches a problem, splits tasks, and evaluates success.
Feature Comparison: jcode vs. Traditional Frameworks
Before diving into the implementation details, let's look at how jcode positions itself against traditional Python-based agent architectures and standard LLM orchestration environments.
Feature / Metric jcode (1jehuang) Python-
jcode: Building High-Performance Autonomous AI Coding Agents from Scratch
The landscape of AI-driven software development is shifting rapidly. While first-generation AI coding tools operated primarily as conversational completions or simple script generators, the community is moving decisively toward autonomous programming agents. These agents don't just suggest code; they plan, execute tests, refactor, and self-correct within a structured harness.
Emerging at the forefront of this shift in May 2026 is jcode, an open-source, Rust-based programming agent framework developed by creator
1jehuang. Rapidly climbing the GitHub Trending charts and capturing the attention of autonomous systems developers, jcode addresses a critical bottleneck in the agentic ecosystem: execution speed, structural reliability, and resource overhead. Written entirely in Rust, it provides a high-performance harness designed to run AI coding agents at scale without the typical latency and memory bloat associated with Python-heavy orchestration layers.In this comprehensive tutorial-style guide, we will break down what jcode is, analyze its internal architecture, compare it to existing frameworks, and walk through an end-to-end installation and configuration process to build your very first autonomous coding agent.
---Understanding the jcode Architecture
To build effective applications with jcode, it is essential to understand how it organizes the execution loop of an AI agent. Traditional agent frameworks rely on high-level scripting abstractions that introduce significant latency, making deep-tree search algorithms (like Monte Carlo Tree Search or complex reflection loops) painfully slow. jcode solves this by using a compiled Rust backend that exposes a highly structured execution harness.
The framework is divided into three primary layers:
- The Environment Layer (The Sandbox): This component manages the operating system context, available package managers, and shell environments. It isolates agent actions, preventing rogue scripts from damaging the host system while providing full feedback loops (stdout, stderr, exit codes) back to the agent.
- The Core Harness (Rust Engine): Written in Rust for maximum concurrency and memory safety, this engine manages agent state transitions, prompt token streaming pipelines, and workspace file parsing. It abstracts token budgets and tool call translations natively.
- The Agent Interface (Extensible Profiles): This layer allows developers to write custom planning algorithms, definition maps, and system instructions. It defines how the agent approaches a problem, splits tasks, and evaluates success.
Feature Comparison: jcode vs. Traditional Frameworks
Before diving into the implementation details, let's look at how jcode positions itself against traditional Python-based agent architectures and standard LLM orchestration environments.
Feature / Metric jcode (1jehuang) Python-based Agent Frameworks Standard LLM Chat Hooks
jcode: Building High-Performance Autonomous AI Coding Agents from Scratch
The landscape of AI-driven software development is shifting rapidly. While first-generation AI coding tools operated primarily as conversational completions or simple script generators, the community is moving decisively toward autonomous programming agents. These agents don't just suggest code; they plan, execute tests, refactor, and self-correct within a structured harness.
Emerging at the forefront of this shift in May 2026 is jcode, an open-source, Rust-based programming agent framework developed by creator
1jehuang. Rapidly climbing the GitHub Trending charts and capturing the attention of autonomous systems developers, jcode addresses a critical bottleneck in the agentic ecosystem: execution speed, structural reliability, and resource overhead. Written entirely in Rust, it provides a high-performance harness designed to run AI coding agents at scale without the typical latency and memory bloat associated with Python-heavy orchestration layers.In this comprehensive tutorial-style guide, we will break down what jcode is, analyze its internal architecture, compare it to existing frameworks, and walk through an end-to-end installation and configuration process to build your very first autonomous coding agent.
---Understanding the jcode Architecture
To build effective applications with jcode, it is essential to understand how it organizes the execution loop of an AI agent. Traditional agent frameworks rely on high-level scripting abstractions that introduce significant latency, making deep-tree search algorithms (like Monte Carlo Tree Search or complex reflection loops) painfully slow. jcode solves this by using a compiled Rust backend that exposes a highly structured execution harness.
The framework is divided into three primary layers:
- The Environment Layer (The Sandbox): This component manages the operating system context, available package managers, and shell environments. It isolates agent actions, preventing rogue scripts from damaging the host system while providing full feedback loops (stdout, stderr, exit codes) back to the agent.
- The Core Harness (Rust Engine): Written in Rust for maximum concurrency and memory safety, this engine manages agent state transitions, prompt token streaming pipelines, and workspace file parsing. It abstracts token budgets and tool call translations natively.
- The Agent Interface (Extensible Profiles): This layer allows developers to write custom planning algorithms, definition maps, and system instructions. It defines how the agent approaches a problem, splits tasks, and evaluates success.
Feature Comparison: jcode vs. Traditional Frameworks
Before diving into the implementation details, let's look at how jcode positions itself against traditional Python-based agent architectures and standard LLM orchestration environments.
Feature / Metric jcode (1jehuang) Python-based Agent Frameworks Standard LLM Chat Hooks Core Language Rust Python Python / TypeScript
jcode: Building High-Performance Autonomous AI Coding Agents from Scratch
The landscape of AI-driven software development is shifting rapidly. While first-generation AI coding tools operated primarily as conversational completions or simple script generators, the community is moving decisively toward autonomous programming agents. These agents don't just suggest code; they plan, execute tests, refactor, and self-correct within a structured harness.
Emerging at the forefront of this shift in May 2026 is jcode, an open-source, Rust-based programming agent framework developed by creator
1jehuang. Rapidly climbing the GitHub Trending charts and capturing the attention of autonomous systems developers, jcode addresses a critical bottleneck in the agentic ecosystem: execution speed, structural reliability, and resource overhead. Written entirely in Rust, it provides a high-performance harness designed to run AI coding agents at scale without the typical latency and memory bloat associated with Python-heavy orchestration layers.In this comprehensive tutorial-style guide, we will break down what jcode is, analyze its internal architecture, compare it to existing frameworks, and walk through an end-to-end installation and configuration process to build your very first autonomous coding agent.
---Understanding the jcode Architecture
To build effective applications with jcode, it is essential to understand how it organizes the execution loop of an AI agent. Traditional agent frameworks rely on high-level scripting abstractions that introduce significant latency, making deep-tree search algorithms (like Monte Carlo Tree Search or complex reflection loops) painfully slow. jcode solves this by using a compiled Rust backend that exposes a highly structured execution harness.
The framework is divided into three primary layers:
- The Environment Layer (The Sandbox): This component manages the operating system context, available package managers, and shell environments. It isolates agent actions, preventing rogue scripts from damaging the host system while providing full feedback loops (stdout, stderr, exit codes) back to the agent.
- The Core Harness (Rust Engine): Written in Rust for maximum concurrency and memory safety, this engine manages agent state transitions, prompt token streaming pipelines, and workspace file parsing. It abstracts token budgets and tool call translations natively.
- The Agent Interface (Extensible Profiles): This layer allows developers to write custom planning algorithms, definition maps, and system instructions. It defines how the agent approaches a problem, splits tasks, and evaluates success.
Feature Comparison: jcode vs. Traditional Frameworks
Before diving into the implementation details, let's look at how jcode positions itself against traditional Python-based agent architectures and standard LLM orchestration environments.
Feature / Metric jcode (1jehuang) Python-based Agent Frameworks Standard LLM Chat Hooks Core Language Rust Python Python / TypeScript Execution Speed Ultra-high (Compiled, Native
jcode: Building High-Performance Autonomous AI Coding Agents from Scratch
The landscape of AI-driven software development is shifting rapidly. While first-generation AI coding tools operated primarily as conversational completions or simple script generators, the community is moving decisively toward autonomous programming agents. These agents don't just suggest code; they plan, execute tests, refactor, and self-correct within a structured harness.
Emerging at the forefront of this shift in May 2026 is jcode, an open-source, Rust-based programming agent framework developed by creator
1jehuang. Rapidly climbing the GitHub Trending charts and capturing the attention of autonomous systems developers, jcode addresses a critical bottleneck in the agentic ecosystem: execution speed, structural reliability, and resource overhead. Written entirely in Rust, it provides a high-performance harness designed to run AI coding agents at scale without the typical latency and memory bloat associated with Python-heavy orchestration layers.In this comprehensive tutorial-style guide, we will break down what jcode is, analyze its internal architecture, compare it to existing frameworks, and walk through an end-to-end installation and configuration process to build your very first autonomous coding agent.
---Understanding the jcode Architecture
To build effective applications with jcode, it is essential to understand how it organizes the execution loop of an AI agent. Traditional agent frameworks rely on high-level scripting abstractions that introduce significant latency, making deep-tree search algorithms (like Monte Carlo Tree Search or complex reflection loops) painfully slow. jcode solves this by using a compiled Rust backend that exposes a highly structured execution harness.
The framework is divided into three primary layers:
- The Environment Layer (The Sandbox): This component manages the operating system context, available package managers, and shell environments. It isolates agent actions, preventing rogue scripts from damaging the host system while providing full feedback loops (stdout, stderr, exit codes) back to the agent.
- The Core Harness (Rust Engine): Written in Rust for maximum concurrency and memory safety, this engine manages agent state transitions, prompt token streaming pipelines, and workspace file parsing. It abstracts token budgets and tool call translations natively.
- The Agent Interface (Extensible Profiles): This layer allows developers to write custom planning algorithms, definition maps, and system instructions. It defines how the agent approaches a problem, splits tasks, and evaluates success.
Feature Comparison: jcode vs. Traditional Frameworks
Before diving into the implementation details, let's look at how jcode positions itself against traditional Python-based agent architectures and standard LLM orchestration environments.
Feature / Metric jcode (1jehuang) Python-based Agent Frameworks Standard LLM Chat Hooks Core Language Rust Python Python / TypeScript Execution Speed Ultra-high (Compiled, Native Threading) Moderate (Interpreted, Async Overheads) Low (Network
jcode: Building High-Performance Autonomous AI Coding Agents from Scratch
The landscape of AI-driven software development is shifting rapidly. While first-generation AI coding tools operated primarily as conversational completions or simple script generators, the community is moving decisively toward autonomous programming agents. These agents don't just suggest code; they plan, execute tests, refactor, and self-correct within a structured harness.
Emerging at the forefront of this shift in May 2026 is jcode, an open-source, Rust-based programming agent framework developed by creator
1jehuang. Rapidly climbing the GitHub Trending charts and capturing the attention of autonomous systems developers, jcode addresses a critical bottleneck in the agentic ecosystem: execution speed, structural reliability, and resource overhead. Written entirely in Rust, it provides a high-performance harness designed to run AI coding agents at scale without the typical latency and memory bloat associated with Python-heavy orchestration layers.In this comprehensive tutorial-style guide, we will break down what jcode is, analyze its internal architecture, compare it to existing frameworks, and walk through an end-to-end installation and configuration process to build your very first autonomous coding agent.
---Understanding the jcode Architecture
To build effective applications with jcode, it is essential to understand how it organizes the execution loop of an AI agent. Traditional agent frameworks rely on high-level scripting abstractions that introduce significant latency, making deep-tree search algorithms (like Monte Carlo Tree Search or complex reflection loops) painfully slow. jcode solves this by using a compiled Rust backend that exposes a highly structured execution harness.
The framework is divided into three primary layers:
- The Environment Layer (The Sandbox): This component manages the operating system context, available package managers, and shell environments. It isolates agent actions, preventing rogue scripts from damaging the host system while providing full feedback loops (stdout, stderr, exit codes) back to the agent.
- The Core Harness (Rust Engine): Written in Rust for maximum concurrency and memory safety, this engine manages agent state transitions, prompt token streaming pipelines, and workspace file parsing. It abstracts token budgets and tool call translations natively.
- The Agent Interface (Extensible Profiles): This layer allows developers to write custom planning algorithms, definition maps, and system instructions. It defines how the agent approaches a problem, splits tasks, and evaluates success.
Feature Comparison: jcode vs. Traditional Frameworks
Before diving into the implementation details, let's look at how jcode positions itself against traditional Python-based agent architectures and standard LLM orchestration environments.
Feature / Metric jcode (1jehuang) Python-based Agent Frameworks Standard LLM Chat Hooks Core Language Rust Python Python / TypeScript Execution Speed Ultra-high (Compiled, Native Threading) Moderate (Interpreted, Async Overheads) Low (Network Dependent) Memory Management Strict compile-time safety
jcode: Building High-Performance Autonomous AI Coding Agents from Scratch
The landscape of AI-driven software development is shifting rapidly. While first-generation AI coding tools operated primarily as conversational completions or simple script generators, the community is moving decisively toward autonomous programming agents. These agents don't just suggest code; they plan, execute tests, refactor, and self-correct within a structured harness.
Emerging at the forefront of this shift in May 2026 is jcode, an open-source, Rust-based programming agent framework developed by creator
1jehuang. Rapidly climbing the GitHub Trending charts and capturing the attention of autonomous systems developers, jcode addresses a critical bottleneck in the agentic ecosystem: execution speed, structural reliability, and resource overhead. Written entirely in Rust, it provides a high-performance harness designed to run AI coding agents at scale without the typical latency and memory bloat associated with Python-heavy orchestration layers.In this comprehensive tutorial-style guide, we will break down what jcode is, analyze its internal architecture, compare it to existing frameworks, and walk through an end-to-end installation and configuration process to build your very first autonomous coding agent.
---Understanding the jcode Architecture
To build effective applications with jcode, it is essential to understand how it organizes the execution loop of an AI agent. Traditional agent frameworks rely on high-level scripting abstractions that introduce significant latency, making deep-tree search algorithms (like Monte Carlo Tree Search or complex reflection loops) painfully slow. jcode solves this by using a compiled Rust backend that exposes a highly structured execution harness.
The framework is divided into three primary layers:
- The Environment Layer (The Sandbox): This component manages the operating system context, available package managers, and shell environments. It isolates agent actions, preventing rogue scripts from damaging the host system while providing full feedback loops (stdout, stderr, exit codes) back to the agent.
- The Core Harness (Rust Engine): Written in Rust for maximum concurrency and memory safety, this engine manages agent state transitions, prompt token streaming pipelines, and workspace file parsing. It abstracts token budgets and tool call translations natively.
- The Agent Interface (Extensible Profiles): This layer allows developers to write custom planning algorithms, definition maps, and system instructions. It defines how the agent approaches a problem, splits tasks, and evaluates success.
Feature Comparison: jcode vs. Traditional Frameworks
Before diving into the implementation details, let's look at how jcode positions itself against traditional Python-based agent architectures and standard LLM orchestration environments.
Feature / Metric jcode (1jehuang) Python-based Agent Frameworks Standard LLM Chat Hooks Core Language Rust Python Python / TypeScript Execution Speed Ultra-high (Compiled, Native Threading) Moderate (Interpreted, Async Overheads) Low (Network Dependent) Memory Management Strict compile-time safety, minimal footprint High runtime consumption, garbage collected Variable depending on wrapper
jcode: Building High-Performance Autonomous AI Coding Agents from Scratch
The landscape of AI-driven software development is shifting rapidly. While first-generation AI coding tools operated primarily as conversational completions or simple script generators, the community is moving decisively toward autonomous programming agents. These agents don't just suggest code; they plan, execute tests, refactor, and self-correct within a structured harness.
Emerging at the forefront of this shift in May 2026 is jcode, an open-source, Rust-based programming agent framework developed by creator
1jehuang. Rapidly climbing the GitHub Trending charts and capturing the attention of autonomous systems developers, jcode addresses a critical bottleneck in the agentic ecosystem: execution speed, structural reliability, and resource overhead. Written entirely in Rust, it provides a high-performance harness designed to run AI coding agents at scale without the typical latency and memory bloat associated with Python-heavy orchestration layers.In this comprehensive tutorial-style guide, we will break down what jcode is, analyze its internal architecture, compare it to existing frameworks, and walk through an end-to-end installation and configuration process to build your very first autonomous coding agent.
---Understanding the jcode Architecture
To build effective applications with jcode, it is essential to understand how it organizes the execution loop of an AI agent. Traditional agent frameworks rely on high-level scripting abstractions that introduce significant latency, making deep-tree search algorithms (like Monte Carlo Tree Search or complex reflection loops) painfully slow. jcode solves this by using a compiled Rust backend that exposes a highly structured execution harness.
The framework is divided into three primary layers:
- The Environment Layer (The Sandbox): This component manages the operating system context, available package managers, and shell environments. It isolates agent actions, preventing rogue scripts from damaging the host system while providing full feedback loops (stdout, stderr, exit codes) back to the agent.
- The Core Harness (Rust Engine): Written in Rust for maximum concurrency and memory safety, this engine manages agent state transitions, prompt token streaming pipelines, and workspace file parsing. It abstracts token budgets and tool call translations natively.
- The Agent Interface (Extensible Profiles): This layer allows developers to write custom planning algorithms, definition maps, and system instructions. It defines how the agent approaches a problem, splits tasks, and evaluates success.
Feature Comparison: jcode vs. Traditional Frameworks
Before diving into the implementation details, let's look at how jcode positions itself against traditional Python-based agent architectures and standard LLM orchestration environments.
Feature / Metric jcode (1jehuang) Python-based Agent Frameworks Standard LLM Chat Hooks Core Language Rust Python Python / TypeScript Execution Speed Ultra-high (Compiled, Native Threading) Moderate (Interpreted, Async Overheads) Low (Network Dependent) Memory Management Strict compile-time safety, minimal footprint High runtime consumption, garbage collected Variable depending on wrapper Sandbox Isolation Native OS environment detection & mapping Requires
jcode: Building High-Performance Autonomous AI Coding Agents from Scratch
The landscape of AI-driven software development is shifting rapidly. While first-generation AI coding tools operated primarily as conversational completions or simple script generators, the community is moving decisively toward autonomous programming agents. These agents don't just suggest code; they plan, execute tests, refactor, and self-correct within a structured harness.
Emerging at the forefront of this shift in May 2026 is jcode, an open-source, Rust-based programming agent framework developed by creator
1jehuang. Rapidly climbing the GitHub Trending charts and capturing the attention of autonomous systems developers, jcode addresses a critical bottleneck in the agentic ecosystem: execution speed, structural reliability, and resource overhead. Written entirely in Rust, it provides a high-performance harness designed to run AI coding agents at scale without the typical latency and memory bloat associated with Python-heavy orchestration layers.In this comprehensive tutorial-style guide, we will break down what jcode is, analyze its internal architecture, compare it to existing frameworks, and walk through an end-to-end installation and configuration process to build your very first autonomous coding agent.
---Understanding the jcode Architecture
To build effective applications with jcode, it is essential to understand how it organizes the execution loop of an AI agent. Traditional agent frameworks rely on high-level scripting abstractions that introduce significant latency, making deep-tree search algorithms (like Monte Carlo Tree Search or complex reflection loops) painfully slow. jcode solves this by using a compiled Rust backend that exposes a highly structured execution harness.
The framework is divided into three primary layers:
- The Environment Layer (The Sandbox): This component manages the operating system context, available package managers, and shell environments. It isolates agent actions, preventing rogue scripts from damaging the host system while providing full feedback loops (stdout, stderr, exit codes) back to the agent.
- The Core Harness (Rust Engine): Written in Rust for maximum concurrency and memory safety, this engine manages agent state transitions, prompt token streaming pipelines, and workspace file parsing. It abstracts token budgets and tool call translations natively.
- The Agent Interface (Extensible Profiles): This layer allows developers to write custom planning algorithms, definition maps, and system instructions. It defines how the agent approaches a problem, splits tasks, and evaluates success.
Feature Comparison: jcode vs. Traditional Frameworks
Before diving into the implementation details, let's look at how jcode positions itself against traditional Python-based agent architectures and standard LLM orchestration environments.
Feature / Metric jcode (1jehuang) Python-based Agent Frameworks Standard LLM Chat Hooks Core Language Rust Python Python / TypeScript Execution Speed Ultra-high (Compiled, Native Threading) Moderate (Interpreted, Async Overheads) Low (Network Dependent) Memory Management Strict compile-time safety, minimal footprint High runtime consumption, garbage collected Variable depending on wrapper Sandbox Isolation Native OS environment detection & mapping Requires heavy external Docker wrapper No native execution layer Primary
jcode: Building High-Performance Autonomous AI Coding Agents from Scratch
The landscape of AI-driven software development is shifting rapidly. While first-generation AI coding tools operated primarily as conversational completions or simple script generators, the community is moving decisively toward autonomous programming agents. These agents don't just suggest code; they plan, execute tests, refactor, and self-correct within a structured harness.
Emerging at the forefront of this shift in May 2026 is jcode, an open-source, Rust-based programming agent framework developed by creator
1jehuang. Rapidly climbing the GitHub Trending charts and capturing the attention of autonomous systems developers, jcode addresses a critical bottleneck in the agentic ecosystem: execution speed, structural reliability, and resource overhead. Written entirely in Rust, it provides a high-performance harness designed to run AI coding agents at scale without the typical latency and memory bloat associated with Python-heavy orchestration layers.In this comprehensive tutorial-style guide, we will break down what jcode is, analyze its internal architecture, compare it to existing frameworks, and walk through an end-to-end installation and configuration process to build your very first autonomous coding agent.
---Understanding the jcode Architecture
To build effective applications with jcode, it is essential to understand how it organizes the execution loop of an AI agent. Traditional agent frameworks rely on high-level scripting abstractions that introduce significant latency, making deep-tree search algorithms (like Monte Carlo Tree Search or complex reflection loops) painfully slow. jcode solves this by using a compiled Rust backend that exposes a highly structured execution harness.
The framework is divided into three primary layers:
- The Environment Layer (The Sandbox): This component manages the operating system context, available package managers, and shell environments. It isolates agent actions, preventing rogue scripts from damaging the host system while providing full feedback loops (stdout, stderr, exit codes) back to the agent.
- The Core Harness (Rust Engine): Written in Rust for maximum concurrency and memory safety, this engine manages agent state transitions, prompt token streaming pipelines, and workspace file parsing. It abstracts token budgets and tool call translations natively.
- The Agent Interface (Extensible Profiles): This layer allows developers to write custom planning algorithms, definition maps, and system instructions. It defines how the agent approaches a problem, splits tasks, and evaluates success.
Feature Comparison: jcode vs. Traditional Frameworks
Before diving into the implementation details, let's look at how jcode positions itself against traditional Python-based agent architectures and standard LLM orchestration environments.
Feature / Metric jcode (1jehuang) Python-based Agent Frameworks Standard LLM Chat Hooks Core Language Rust Python Python / TypeScript Execution Speed Ultra-high (Compiled, Native Threading) Moderate (Interpreted, Async Overheads) Low (Network Dependent) Memory Management Strict compile-time safety, minimal footprint High runtime consumption, garbage collected Variable depending on wrapper Sandbox Isolation Native OS environment detection & mapping Requires heavy external Docker wrapper No native execution layer Primary Target Autonomous multi-turn software engineering General purpose task automation agents Single
jcode: Building High-Performance Autonomous AI Coding Agents from Scratch
The landscape of AI-driven software development is shifting rapidly. While first-generation AI coding tools operated primarily as conversational completions or simple script generators, the community is moving decisively toward autonomous programming agents. These agents don't just suggest code; they plan, execute tests, refactor, and self-correct within a structured harness.
Emerging at the forefront of this shift in May 2026 is jcode, an open-source, Rust-based programming agent framework developed by creator
1jehuang. Rapidly climbing the GitHub Trending charts and capturing the attention of autonomous systems developers, jcode addresses a critical bottleneck in the agentic ecosystem: execution speed, structural reliability, and resource overhead. Written entirely in Rust, it provides a high-performance harness designed to run AI coding agents at scale without the typical latency and memory bloat associated with Python-heavy orchestration layers.In this comprehensive tutorial-style guide, we will break down what jcode is, analyze its internal architecture, compare it to existing frameworks, and walk through an end-to-end installation and configuration process to build your very first autonomous coding agent.
---Understanding the jcode Architecture
To build effective applications with jcode, it is essential to understand how it organizes the execution loop of an AI agent. Traditional agent frameworks rely on high-level scripting abstractions that introduce significant latency, making deep-tree search algorithms (like Monte Carlo Tree Search or complex reflection loops) painfully slow. jcode solves this by using a compiled Rust backend that exposes a highly structured execution harness.
The framework is divided into three primary layers:
- The Environment Layer (The Sandbox): This component manages the operating system context, available package managers, and shell environments. It isolates agent actions, preventing rogue scripts from damaging the host system while providing full feedback loops (stdout, stderr, exit codes) back to the agent.
- The Core Harness (Rust Engine): Written in Rust for maximum concurrency and memory safety, this engine manages agent state transitions, prompt token streaming pipelines, and workspace file parsing. It abstracts token budgets and tool call translations natively.
- The Agent Interface (Extensible Profiles): This layer allows developers to write custom planning algorithms, definition maps, and system instructions. It defines how the agent approaches a problem, splits tasks, and evaluates success.
Feature Comparison: jcode vs. Traditional Frameworks
Before diving into the implementation details, let's look at how jcode positions itself against traditional Python-based agent architectures and standard LLM orchestration environments.
---Feature / Metric jcode (1jehuang) Python-based Agent Frameworks Standard LLM Chat Hooks Core Language Rust Python Python / TypeScript Execution Speed Ultra-high (Compiled, Native Threading) Moderate (Interpreted, Async Overheads) Low (Network Dependent) Memory Management Strict compile-time safety, minimal footprint High runtime consumption, garbage collected Variable depending on wrapper Sandbox Isolation Native OS environment detection & mapping Requires heavy external Docker wrapper No native execution layer Primary Target Autonomous multi-turn software engineering General purpose task automation agents Single-turn text/code generation Prerequisites and Environment Verification
Before installing jcode, you need to ensure your machine meets the minimum system requirements for native compilation
jcode: Building High-Performance Autonomous AI Coding Agents from Scratch
The landscape of AI-driven software development is shifting rapidly. While first-generation AI coding tools operated primarily as conversational completions or simple script generators, the community is moving decisively toward autonomous programming agents. These agents don't just suggest code; they plan, execute tests, refactor, and self-correct within a structured harness.
Emerging at the forefront of this shift in May 2026 is jcode, an open-source, Rust-based programming agent framework developed by creator
1jehuang. Rapidly climbing the GitHub Trending charts and capturing the attention of autonomous systems developers, jcode addresses a critical bottleneck in the agentic ecosystem: execution speed, structural reliability, and resource overhead. Written entirely in Rust, it provides a high-performance harness designed to run AI coding agents at scale without the typical latency and memory bloat associated with Python-heavy orchestration layers.In this comprehensive tutorial-style guide, we will break down what jcode is, analyze its internal architecture, compare it to existing frameworks, and walk through an end-to-end installation and configuration process to build your very first autonomous coding agent.
---Understanding the jcode Architecture
To build effective applications with jcode, it is essential to understand how it organizes the execution loop of an AI agent. Traditional agent frameworks rely on high-level scripting abstractions that introduce significant latency, making deep-tree search algorithms (like Monte Carlo Tree Search or complex reflection loops) painfully slow. jcode solves this by using a compiled Rust backend that exposes a highly structured execution harness.
The framework is divided into three primary layers:
- The Environment Layer (The Sandbox): This component manages the operating system context, available package managers, and shell environments. It isolates agent actions, preventing rogue scripts from damaging the host system while providing full feedback loops (stdout, stderr, exit codes) back to the agent.
- The Core Harness (Rust Engine): Written in Rust for maximum concurrency and memory safety, this engine manages agent state transitions, prompt token streaming pipelines, and workspace file parsing. It abstracts token budgets and tool call translations natively.
- The Agent Interface (Extensible Profiles): This layer allows developers to write custom planning algorithms, definition maps, and system instructions. It defines how the agent approaches a problem, splits tasks, and evaluates success.
Feature Comparison: jcode vs. Traditional Frameworks
Before diving into the implementation details, let's look at how jcode positions itself against traditional Python-based agent architectures and standard LLM orchestration environments.
---Feature / Metric jcode (1jehuang) Python-based Agent Frameworks Standard LLM Chat Hooks Core Language Rust Python Python / TypeScript Execution Speed Ultra-high (Compiled, Native Threading) Moderate (Interpreted, Async Overheads) Low (Network Dependent) Memory Management Strict compile-time safety, minimal footprint High runtime consumption, garbage collected Variable depending on wrapper Sandbox Isolation Native OS environment detection & mapping Requires heavy external Docker wrapper No native execution layer Primary Target Autonomous multi-turn software engineering General purpose task automation agents Single-turn text/code generation Prerequisites and Environment Verification
Before installing jcode, you need to ensure your machine meets the minimum system requirements for native compilation and execution. Because jcode evaluates code in real-time, having a stable environment with standard compilers is essential.
System Requirements:
- Operating System: macOS (Intel/Apple Silicon), Linux (Ubuntu
jcode: Building High-Performance Autonomous AI Coding Agents from Scratch
The landscape of AI-driven software development is shifting rapidly. While first-generation AI coding tools operated primarily as conversational completions or simple script generators, the community is moving decisively toward autonomous programming agents. These agents don't just suggest code; they plan, execute tests, refactor, and self-correct within a structured harness.
Emerging at the forefront of this shift in May 2026 is jcode, an open-source, Rust-based programming agent framework developed by creator
1jehuang. Rapidly climbing the GitHub Trending charts and capturing the attention of autonomous systems developers, jcode addresses a critical bottleneck in the agentic ecosystem: execution speed, structural reliability, and resource overhead. Written entirely in Rust, it provides a high-performance harness designed to run AI coding agents at scale without the typical latency and memory bloat associated with Python-heavy orchestration layers.In this comprehensive tutorial-style guide, we will break down what jcode is, analyze its internal architecture, compare it to existing frameworks, and walk through an end-to-end installation and configuration process to build your very first autonomous coding agent.
---Understanding the jcode Architecture
To build effective applications with jcode, it is essential to understand how it organizes the execution loop of an AI agent. Traditional agent frameworks rely on high-level scripting abstractions that introduce significant latency, making deep-tree search algorithms (like Monte Carlo Tree Search or complex reflection loops) painfully slow. jcode solves this by using a compiled Rust backend that exposes a highly structured execution harness.
The framework is divided into three primary layers:
- The Environment Layer (The Sandbox): This component manages the operating system context, available package managers, and shell environments. It isolates agent actions, preventing rogue scripts from damaging the host system while providing full feedback loops (stdout, stderr, exit codes) back to the agent.
- The Core Harness (Rust Engine): Written in Rust for maximum concurrency and memory safety, this engine manages agent state transitions, prompt token streaming pipelines, and workspace file parsing. It abstracts token budgets and tool call translations natively.
- The Agent Interface (Extensible Profiles): This layer allows developers to write custom planning algorithms, definition maps, and system instructions. It defines how the agent approaches a problem, splits tasks, and evaluates success.
Feature Comparison: jcode vs. Traditional Frameworks
Before diving into the implementation details, let's look at how jcode positions itself against traditional Python-based agent architectures and standard LLM orchestration environments.
---Feature / Metric jcode (1jehuang) Python-based Agent Frameworks Standard LLM Chat Hooks Core Language Rust Python Python / TypeScript Execution Speed Ultra-high (Compiled, Native Threading) Moderate (Interpreted, Async Overheads) Low (Network Dependent) Memory Management Strict compile-time safety, minimal footprint High runtime consumption, garbage collected Variable depending on wrapper Sandbox Isolation Native OS environment detection & mapping Requires heavy external Docker wrapper No native execution layer Primary Target Autonomous multi-turn software engineering General purpose task automation agents Single-turn text/code generation Prerequisites and Environment Verification
Before installing jcode, you need to ensure your machine meets the minimum system requirements for native compilation and execution. Because jcode evaluates code in real-time, having a stable environment with standard compilers is essential.
System Requirements:
- Operating System: macOS (Intel/Apple Silicon), Linux (Ubuntu 22.04+, Debian, Fedora), or Windows 11 (with PowerShell or WSL2).
- The Environment Layer (The Sandbox): This component manages the operating system context, available package managers, and shell environments. It isolates agent actions, preventing rogue scripts from damaging the host system while providing full feedback loops (stdout, stderr, exit codes) back to the agent.
- The Core Harness (Rust Engine): Written in Rust for maximum concurrency and memory safety, this engine manages agent state transitions, prompt token streaming pipelines, and workspace file parsing. It abstracts token budgets and tool call translations natively.
- The Agent Interface (Extensible Profiles): This layer allows developers to write custom planning algorithms, definition maps, and system instructions. It defines how the agent approaches a problem, splits tasks, and evaluates success.
- Operating System: macOS (Intel/Apple Silicon), Linux (Ubuntu 22.04+, Debian, Fedora), or Windows 11 (with PowerShell or WSL2).
- Toolchains: Rust Stable (1.75+ recommended) if building from source.
- Network: Active internet connection to pull model endpoints and fetch external crate dependencies.
jcode: Building High-Performance Autonomous AI Coding Agents from Scratch
The landscape of AI-driven software development is shifting rapidly. While first-generation AI coding tools operated primarily as conversational completions or simple script generators, the community is moving decisively toward autonomous programming agents. These agents don't just suggest code; they plan, execute tests, refactor, and self-correct within a structured harness.
Emerging at the forefront of this shift in May 2026 is jcode, an open-source, Rust-based programming agent framework developed by creator
1jehuang. Rapidly climbing the GitHub Trending charts and capturing the attention of autonomous systems developers, jcode addresses a critical bottleneck in the agentic ecosystem: execution speed, structural reliability, and resource overhead. Written entirely in Rust, it provides a high-performance harness designed to run AI coding agents at scale without the typical latency and memory bloat associated with Python-heavy orchestration layers.In this comprehensive tutorial-style guide, we will break down what jcode is, analyze its internal architecture, compare it to existing frameworks, and walk through an end-to-end installation and configuration process to build your very first autonomous coding agent.
---Understanding the jcode Architecture
To build effective applications with jcode, it is essential to understand how it organizes the execution loop of an AI agent. Traditional agent frameworks rely on high-level scripting abstractions that introduce significant latency, making deep-tree search algorithms (like Monte Carlo Tree Search or complex reflection loops) painfully slow. jcode solves this by using a compiled Rust backend that exposes a highly structured execution harness.
The framework is divided into three primary layers:
Feature Comparison: jcode vs. Traditional Frameworks
Before diving into the implementation details, let's look at how jcode positions itself against traditional Python-based agent architectures and standard LLM orchestration environments.
---Feature / Metric jcode (1jehuang) Python-based Agent Frameworks Standard LLM Chat Hooks Core Language Rust Python Python / TypeScript Execution Speed Ultra-high (Compiled, Native Threading) Moderate (Interpreted, Async Overheads) Low (Network Dependent) Memory Management Strict compile-time safety, minimal footprint High runtime consumption, garbage collected Variable depending on wrapper Sandbox Isolation Native OS environment detection & mapping Requires heavy external Docker wrapper No native execution layer Primary Target Autonomous multi-turn software engineering General purpose task automation agents Single-turn text/code generation Prerequisites and Environment Verification
Before installing jcode, you need to ensure your machine meets the minimum system requirements for native compilation and execution. Because jcode evaluates code in real-time, having a stable environment with standard compilers is essential.
System Requirements:
Step-by
jcode: Building High-Performance Autonomous AI Coding Agents from Scratch
The landscape of AI-driven software development is shifting rapidly. While first-generation AI coding tools operated primarily as conversational completions or simple script generators, the community is moving decisively toward autonomous programming agents. These agents don't just suggest code; they plan, execute tests, refactor, and self-correct within a structured harness.
Emerging at the forefront of this shift in May 2026 is jcode, an open-source, Rust-based programming agent framework developed by creator
1jehuang. Rapidly climbing the GitHub Trending charts and capturing the attention of autonomous systems developers, jcode addresses a critical bottleneck in the agentic ecosystem: execution speed, structural reliability, and resource overhead. Written entirely in Rust, it provides a high-performance harness designed to run AI coding agents at scale without the typical latency and memory bloat associated with Python-heavy orchestration layers.In this comprehensive tutorial-style guide, we will break down what jcode is, analyze its internal architecture, compare it to existing frameworks, and walk through an end-to-end installation and configuration process to build your very first autonomous coding agent.
---Understanding the jcode Architecture
To build effective applications with jcode, it is essential to understand how it organizes the execution loop of an AI agent. Traditional agent frameworks rely on high-level scripting abstractions that introduce significant latency, making deep-tree search algorithms (like Monte Carlo Tree Search or complex reflection loops) painfully slow. jcode solves this by using a compiled Rust backend that exposes a highly structured execution harness.
The framework is divided into three primary layers:
Feature Comparison: jcode vs. Traditional Frameworks
Before diving into the implementation details, let's look at how jcode positions itself against traditional Python-based agent architectures and standard LLM orchestration environments.
---Feature / Metric jcode (1jehuang) Python-based Agent Frameworks Standard LLM Chat Hooks Core Language Rust Python Python / TypeScript Execution Speed Ultra-high (Compiled, Native Threading) Moderate (Interpreted, Async Overheads) Low (Network Dependent) Memory Management Strict compile-time safety, minimal footprint High runtime consumption, garbage collected Variable depending on wrapper Sandbox Isolation Native OS environment detection & mapping Requires heavy external Docker wrapper No native execution layer Primary Target Autonomous multi-turn software engineering General purpose task automation agents Single-turn text/code generation Prerequisites and Environment Verification
Before installing jcode, you need to ensure your machine meets the minimum system requirements for native compilation and execution. Because jcode evaluates code in real-time, having a stable environment with standard compilers is essential.
System Requirements:
Step-by-Step Installation Guide
jcode features an adaptive installer that detects your current operating system, available package
jcode: Building High-Performance Autonomous AI Coding Agents from Scratch
The landscape of AI-driven software development is shifting rapidly. While first-generation AI coding tools operated primarily as conversational completions or simple script generators, the community is moving decisively toward autonomous programming agents. These agents don't just suggest code; they plan, execute tests, refactor, and self-correct within a structured harness.
Emerging at the forefront of this shift in May 2026 is jcode, an open-source, Rust-based programming agent framework developed by creator
1jehuang. Rapidly climbing the GitHub Trending charts and capturing the attention of autonomous systems developers, jcode addresses a critical bottleneck in the agentic ecosystem: execution speed, structural reliability, and resource overhead. Written entirely in Rust, it provides a high-performance harness designed to run AI coding agents at scale without the typical latency and memory bloat associated with Python-heavy orchestration layers.In this comprehensive tutorial-style guide, we will break down what jcode is, analyze its internal architecture, compare it to existing frameworks, and walk through an end-to-end installation and configuration process to build your very first autonomous coding agent.
---Understanding the jcode Architecture
To build effective applications with jcode, it is essential to understand how it organizes the execution loop of an AI agent. Traditional agent frameworks rely on high-level scripting abstractions that introduce significant latency, making deep-tree search algorithms (like Monte Carlo Tree Search or complex reflection loops) painfully slow. jcode solves this by using a compiled Rust backend that exposes a highly structured execution harness.
The framework is divided into three primary layers:
Feature Comparison: jcode vs. Traditional Frameworks
Before diving into the implementation details, let's look at how jcode positions itself against traditional Python-based agent architectures and standard LLM orchestration environments.
---Feature / Metric jcode (1jehuang) Python-based Agent Frameworks Standard LLM Chat Hooks Core Language Rust Python Python / TypeScript Execution Speed Ultra-high (Compiled, Native Threading) Moderate (Interpreted, Async Overheads) Low (Network Dependent) Memory Management Strict compile-time safety, minimal footprint High runtime consumption, garbage collected Variable depending on wrapper Sandbox Isolation Native OS environment detection & mapping Requires heavy external Docker wrapper No native execution layer Primary Target Autonomous multi-turn software engineering General purpose task automation agents Single-turn text/code generation Prerequisites and Environment Verification
Before installing jcode, you need to ensure your machine meets the minimum system requirements for native compilation and execution. Because jcode evaluates code in real-time, having a stable environment with standard compilers is essential.
System Requirements:
Step-by-Step Installation Guide
jcode features an adaptive installer that detects your current operating system, available package managers, and active shell configurations. Select the installation track below that best matches your local development system.
Option A: macOS via Homebrew
If you are on macOS and use the Homebrew package manager, you can
jcode: Building High-Performance Autonomous AI Coding Agents from Scratch
The landscape of AI-driven software development is shifting rapidly. While first-generation AI coding tools operated primarily as conversational completions or simple script generators, the community is moving decisively toward autonomous programming agents. These agents don't just suggest code; they plan, execute tests, refactor, and self-correct within a structured harness.
Emerging at the forefront of this shift in May 2026 is jcode, an open-source, Rust-based programming agent framework developed by creator
1jehuang. Rapidly climbing the GitHub Trending charts and capturing the attention of autonomous systems developers, jcode addresses a critical bottleneck in the agentic ecosystem: execution speed, structural reliability, and resource overhead. Written entirely in Rust, it provides a high-performance harness designed to run AI coding agents at scale without the typical latency and memory bloat associated with Python-heavy orchestration layers.In this comprehensive tutorial-style guide, we will break down what jcode is, analyze its internal architecture, compare it to existing frameworks, and walk through an end-to-end installation and configuration process to build your very first autonomous coding agent.
---Understanding the jcode Architecture
To build effective applications with jcode, it is essential to understand how it organizes the execution loop of an AI agent. Traditional agent frameworks rely on high-level scripting abstractions that introduce significant latency, making deep-tree search algorithms (like Monte Carlo Tree Search or complex reflection loops) painfully slow. jcode solves this by using a compiled Rust backend that exposes a highly structured execution harness.
The framework is divided into three primary layers:
Feature Comparison: jcode vs. Traditional Frameworks
Before diving into the implementation details, let's look at how jcode positions itself against traditional Python-based agent architectures and standard LLM orchestration environments.
---Feature / Metric jcode (1jehuang) Python-based Agent Frameworks Standard LLM Chat Hooks Core Language Rust Python Python / TypeScript Execution Speed Ultra-high (Compiled, Native Threading) Moderate (Interpreted, Async Overheads) Low (Network Dependent) Memory Management Strict compile-time safety, minimal footprint High runtime consumption, garbage collected Variable depending on wrapper Sandbox Isolation Native OS environment detection & mapping Requires heavy external Docker wrapper No native execution layer Primary Target Autonomous multi-turn software engineering General purpose task automation agents Single-turn text/code generation Prerequisites and Environment Verification
Before installing jcode, you need to ensure your machine meets the minimum system requirements for native compilation and execution. Because jcode evaluates code in real-time, having a stable environment with standard compilers is essential.
System Requirements:
Step-by-Step Installation Guide
jcode features an adaptive installer that detects your current operating system, available package managers, and active shell configurations. Select the installation track below that best matches your local development system.
Option A: macOS via Homebrew
If you are on macOS and use the Homebrew package manager, you can install the official tap maintained by 1jehuang directly via your terminal:
# Tap
jcode: Building High-Performance Autonomous AI Coding Agents from Scratch
The landscape of AI-driven software development is shifting rapidly. While first-generation AI coding tools operated primarily as conversational completions or simple script generators, the community is moving decisively toward autonomous programming agents. These agents don't just suggest code; they plan, execute tests, refactor, and self-correct within a structured harness.
Emerging at the forefront of this shift in May 2026 is jcode, an open-source, Rust-based programming agent framework developed by creator
1jehuang. Rapidly climbing the GitHub Trending charts and capturing the attention of autonomous systems developers, jcode addresses a critical bottleneck in the agentic ecosystem: execution speed, structural reliability, and resource overhead. Written entirely in Rust, it provides a high-performance harness designed to run AI coding agents at scale without the typical latency and memory bloat associated with Python-heavy orchestration layers.In this comprehensive tutorial-style guide, we will break down what jcode is, analyze its internal architecture, compare it to existing frameworks, and walk through an end-to-end installation and configuration process to build your very first autonomous coding agent.
---Understanding the jcode Architecture
To build effective applications with jcode, it is essential to understand how it organizes the execution loop of an AI agent. Traditional agent frameworks rely on high-level scripting abstractions that introduce significant latency, making deep-tree search algorithms (like Monte Carlo Tree Search or complex reflection loops) painfully slow. jcode solves this by using a compiled Rust backend that exposes a highly structured execution harness.
The framework is divided into three primary layers:
- The Environment Layer (The Sandbox): This component manages the operating system context, available package managers, and shell environments. It isolates agent actions, preventing rogue scripts from damaging the host system while providing full feedback loops (stdout, stderr, exit codes) back to the agent.
- The Core Harness (Rust Engine): Written in Rust for maximum concurrency and memory safety, this engine manages agent state transitions, prompt token streaming pipelines, and workspace file parsing. It abstracts token budgets and tool call translations natively.
- The Agent Interface (Extensible Profiles): This layer allows developers to write custom planning algorithms, definition maps, and system instructions. It defines how the agent approaches a problem, splits tasks, and evaluates success.
Feature Comparison: jcode vs. Traditional Frameworks
Before diving into the implementation details, let's look at how jcode positions itself against traditional Python-based agent architectures and standard LLM orchestration environments.
---Feature / Metric jcode (1jehuang) Python-based Agent Frameworks Standard LLM Chat Hooks Core Language Rust Python Python / TypeScript Execution Speed Ultra-high (Compiled, Native Threading) Moderate (Interpreted, Async Overheads) Low (Network Dependent) Memory Management Strict compile-time safety, minimal footprint High runtime consumption, garbage collected Variable depending on wrapper Sandbox Isolation Native OS environment detection & mapping Requires heavy external Docker wrapper No native execution layer Primary Target Autonomous multi-turn software engineering General purpose task automation agents Single-turn text/code generation Prerequisites and Environment Verification
Before installing jcode, you need to ensure your machine meets the minimum system requirements for native compilation and execution. Because jcode evaluates code in real-time, having a stable environment with standard compilers is essential.
System Requirements:
- Operating System: macOS (Intel/Apple Silicon), Linux (Ubuntu 22.04+, Debian, Fedora), or Windows 11 (with PowerShell or WSL2).
- Toolchains: Rust Stable (1.75+ recommended) if building from source.
- Network: Active internet connection to pull model endpoints and fetch external crate dependencies.
Step-by-Step Installation Guide
jcode features an adaptive installer that detects your current operating system, available package managers, and active shell configurations. Select the installation track below that best matches your local development system.
Option A: macOS via Homebrew
If you are on macOS and use the Homebrew package manager, you can install the official tap maintained by 1jehuang directly via your terminal:
# Tap the jcode formula repository brew tap 1jehuang/jcode # Install the binary package brew install jcode
jcode: Building High-Performance Autonomous AI Coding Agents from Scratch
The landscape of AI-driven software development is shifting rapidly. While first-generation AI coding tools operated primarily as conversational completions or simple script generators, the community is moving decisively toward autonomous programming agents. These agents don't just suggest code; they plan, execute tests, refactor, and self-correct within a structured harness.
Emerging at the forefront of this shift in May 2026 is jcode, an open-source, Rust-based programming agent framework developed by creator
1jehuang. Rapidly climbing the GitHub Trending charts and capturing the attention of autonomous systems developers, jcode addresses a critical bottleneck in the agentic ecosystem: execution speed, structural reliability, and resource overhead. Written entirely in Rust, it provides a high-performance harness designed to run AI coding agents at scale without the typical latency and memory bloat associated with Python-heavy orchestration layers.In this comprehensive tutorial-style guide, we will break down what jcode is, analyze its internal architecture, compare it to existing frameworks, and walk through an end-to-end installation and configuration process to build your very first autonomous coding agent.
---Understanding the jcode Architecture
To build effective applications with jcode, it is essential to understand how it organizes the execution loop of an AI agent. Traditional agent frameworks rely on high-level scripting abstractions that introduce significant latency, making deep-tree search algorithms (like Monte Carlo Tree Search or complex reflection loops) painfully slow. jcode solves this by using a compiled Rust backend that exposes a highly structured execution harness.
The framework is divided into three primary layers:
- The Environment Layer (The Sandbox): This component manages the operating system context, available package managers, and shell environments. It isolates agent actions, preventing rogue scripts from damaging the host system while providing full feedback loops (stdout, stderr, exit codes) back to the agent.
- The Core Harness (Rust Engine): Written in Rust for maximum concurrency and memory safety, this engine manages agent state transitions, prompt token streaming pipelines, and workspace file parsing. It abstracts token budgets and tool call translations natively.
- The Agent Interface (Extensible Profiles): This layer allows developers to write custom planning algorithms, definition maps, and system instructions. It defines how the agent approaches a problem, splits tasks, and evaluates success.
Feature Comparison: jcode vs. Traditional Frameworks
Before diving into the implementation details, let's look at how jcode positions itself against traditional Python-based agent architectures and standard LLM orchestration environments.
---Feature / Metric jcode (1jehuang) Python-based Agent Frameworks Standard LLM Chat Hooks Core Language Rust Python Python / TypeScript Execution Speed Ultra-high (Compiled, Native Threading) Moderate (Interpreted, Async Overheads) Low (Network Dependent) Memory Management Strict compile-time safety, minimal footprint High runtime consumption, garbage collected Variable depending on wrapper Sandbox Isolation Native OS environment detection & mapping Requires heavy external Docker wrapper No native execution layer Primary Target Autonomous multi-turn software engineering General purpose task automation agents Single-turn text/code generation Prerequisites and Environment Verification
Before installing jcode, you need to ensure your machine meets the minimum system requirements for native compilation and execution. Because jcode evaluates code in real-time, having a stable environment with standard compilers is essential.
System Requirements:
- Operating System: macOS (Intel/Apple Silicon), Linux (Ubuntu 22.04+, Debian, Fedora), or Windows 11 (with PowerShell or WSL2).
- Toolchains: Rust Stable (1.75+ recommended) if building from source.
- Network: Active internet connection to pull model endpoints and fetch external crate dependencies.
Step-by-Step Installation Guide
jcode features an adaptive installer that detects your current operating system, available package managers, and active shell configurations. Select the installation track below that best matches your local development system.
Option A: macOS via Homebrew
If you are on macOS and use the Homebrew package manager, you can install the official tap maintained by 1jehuang directly via your terminal:
# Tap the jcode formula repository brew tap 1jehuang/jcode # Install the binary package brew install jcodeOption B: Linux or macOS via Shell Script
For standard Linux distributions or
jcode: Building High-Performance Autonomous AI Coding Agents from Scratch
The landscape of AI-driven software development is shifting rapidly. While first-generation AI coding tools operated primarily as conversational completions or simple script generators, the community is moving decisively toward autonomous programming agents. These agents don't just suggest code; they plan, execute tests, refactor, and self-correct within a structured harness.
Emerging at the forefront of this shift in May 2026 is jcode, an open-source, Rust-based programming agent framework developed by creator
1jehuang. Rapidly climbing the GitHub Trending charts and capturing the attention of autonomous systems developers, jcode addresses a critical bottleneck in the agentic ecosystem: execution speed, structural reliability, and resource overhead. Written entirely in Rust, it provides a high-performance harness designed to run AI coding agents at scale without the typical latency and memory bloat associated with Python-heavy orchestration layers.In this comprehensive tutorial-style guide, we will break down what jcode is, analyze its internal architecture, compare it to existing frameworks, and walk through an end-to-end installation and configuration process to build your very first autonomous coding agent.
---Understanding the jcode Architecture
To build effective applications with jcode, it is essential to understand how it organizes the execution loop of an AI agent. Traditional agent frameworks rely on high-level scripting abstractions that introduce significant latency, making deep-tree search algorithms (like Monte Carlo Tree Search or complex reflection loops) painfully slow. jcode solves this by using a compiled Rust backend that exposes a highly structured execution harness.
The framework is divided into three primary layers:
- The Environment Layer (The Sandbox): This component manages the operating system context, available package managers, and shell environments. It isolates agent actions, preventing rogue scripts from damaging the host system while providing full feedback loops (stdout, stderr, exit codes) back to the agent.
- The Core Harness (Rust Engine): Written in Rust for maximum concurrency and memory safety, this engine manages agent state transitions, prompt token streaming pipelines, and workspace file parsing. It abstracts token budgets and tool call translations natively.
- The Agent Interface (Extensible Profiles): This layer allows developers to write custom planning algorithms, definition maps, and system instructions. It defines how the agent approaches a problem, splits tasks, and evaluates success.
Feature Comparison: jcode vs. Traditional Frameworks
Before diving into the implementation details, let's look at how jcode positions itself against traditional Python-based agent architectures and standard LLM orchestration environments.
---Feature / Metric jcode (1jehuang) Python-based Agent Frameworks Standard LLM Chat Hooks Core Language Rust Python Python / TypeScript Execution Speed Ultra-high (Compiled, Native Threading) Moderate (Interpreted, Async Overheads) Low (Network Dependent) Memory Management Strict compile-time safety, minimal footprint High runtime consumption, garbage collected Variable depending on wrapper Sandbox Isolation Native OS environment detection & mapping Requires heavy external Docker wrapper No native execution layer Primary Target Autonomous multi-turn software engineering General purpose task automation agents Single-turn text/code generation Prerequisites and Environment Verification
Before installing jcode, you need to ensure your machine meets the minimum system requirements for native compilation and execution. Because jcode evaluates code in real-time, having a stable environment with standard compilers is essential.
System Requirements:
- Operating System: macOS (Intel/Apple Silicon), Linux (Ubuntu 22.04+, Debian, Fedora), or Windows 11 (with PowerShell or WSL2).
- Toolchains: Rust Stable (1.75+ recommended) if building from source.
- Network: Active internet connection to pull model endpoints and fetch external crate dependencies.
Step-by-Step Installation Guide
jcode features an adaptive installer that detects your current operating system, available package managers, and active shell configurations. Select the installation track below that best matches your local development system.
Option A: macOS via Homebrew
If you are on macOS and use the Homebrew package manager, you can install the official tap maintained by 1jehuang directly via your terminal:
# Tap the jcode formula repository brew tap 1jehuang/jcode # Install the binary package brew install jcodeOption B: Linux or macOS via Shell Script
For standard Linux distributions or macOS environments without Homebrew, use the automated installation script. This pulls the latest compiled binary corresponding to your architecture:
curl -fsSL [https://raw.githubusercontent.com/1jehuang/jcode/main](https://raw.githubusercontent.com/1jehuang/jcode/main)
jcode: Building High-Performance Autonomous AI Coding Agents from Scratch
The landscape of AI-driven software development is shifting rapidly. While first-generation AI coding tools operated primarily as conversational completions or simple script generators, the community is moving decisively toward autonomous programming agents. These agents don't just suggest code; they plan, execute tests, refactor, and self-correct within a structured harness.
Emerging at the forefront of this shift in May 2026 is jcode, an open-source, Rust-based programming agent framework developed by creator
1jehuang. Rapidly climbing the GitHub Trending charts and capturing the attention of autonomous systems developers, jcode addresses a critical bottleneck in the agentic ecosystem: execution speed, structural reliability, and resource overhead. Written entirely in Rust, it provides a high-performance harness designed to run AI coding agents at scale without the typical latency and memory bloat associated with Python-heavy orchestration layers.In this comprehensive tutorial-style guide, we will break down what jcode is, analyze its internal architecture, compare it to existing frameworks, and walk through an end-to-end installation and configuration process to build your very first autonomous coding agent.
---Understanding the jcode Architecture
To build effective applications with jcode, it is essential to understand how it organizes the execution loop of an AI agent. Traditional agent frameworks rely on high-level scripting abstractions that introduce significant latency, making deep-tree search algorithms (like Monte Carlo Tree Search or complex reflection loops) painfully slow. jcode solves this by using a compiled Rust backend that exposes a highly structured execution harness.
The framework is divided into three primary layers:
- The Environment Layer (The Sandbox): This component manages the operating system context, available package managers, and shell environments. It isolates agent actions, preventing rogue scripts from damaging the host system while providing full feedback loops (stdout, stderr, exit codes) back to the agent.
- The Core Harness (Rust Engine): Written in Rust for maximum concurrency and memory safety, this engine manages agent state transitions, prompt token streaming pipelines, and workspace file parsing. It abstracts token budgets and tool call translations natively.
- The Agent Interface (Extensible Profiles): This layer allows developers to write custom planning algorithms, definition maps, and system instructions. It defines how the agent approaches a problem, splits tasks, and evaluates success.
Feature Comparison: jcode vs. Traditional Frameworks
Before diving into the implementation details, let's look at how jcode positions itself against traditional Python-based agent architectures and standard LLM orchestration environments.
---Feature / Metric jcode (1jehuang) Python-based Agent Frameworks Standard LLM Chat Hooks Core Language Rust Python Python / TypeScript Execution Speed Ultra-high (Compiled, Native Threading) Moderate (Interpreted, Async Overheads) Low (Network Dependent) Memory Management Strict compile-time safety, minimal footprint High runtime consumption, garbage collected Variable depending on wrapper Sandbox Isolation Native OS environment detection & mapping Requires heavy external Docker wrapper No native execution layer Primary Target Autonomous multi-turn software engineering General purpose task automation agents Single-turn text/code generation Prerequisites and Environment Verification
Before installing jcode, you need to ensure your machine meets the minimum system requirements for native compilation and execution. Because jcode evaluates code in real-time, having a stable environment with standard compilers is essential.
System Requirements:
- Operating System: macOS (Intel/Apple Silicon), Linux (Ubuntu 22.04+, Debian, Fedora), or Windows 11 (with PowerShell or WSL2).
- Toolchains: Rust Stable (1.75+ recommended) if building from source.
- Network: Active internet connection to pull model endpoints and fetch external crate dependencies.
Step-by-Step Installation Guide
jcode features an adaptive installer that detects your current operating system, available package managers, and active shell configurations. Select the installation track below that best matches your local development system.
Option A: macOS via Homebrew
If you are on macOS and use the Homebrew package manager, you can install the official tap maintained by 1jehuang directly via your terminal:
# Tap the jcode formula repository brew tap 1jehuang/jcode # Install the binary package brew install jcodeOption B: Linux or macOS via Shell Script
For standard Linux distributions or macOS environments without Homebrew, use the automated installation script. This pulls the latest compiled binary corresponding to your architecture:
curl -fsSL [https://raw.githubusercontent.com/1jehuang/jcode/main/scripts/install.sh](https://raw.githubusercontent.com/1jehuang/jcode/main/scripts/install.sh) | bashOption C: Windows via PowerShell
If you are running natively on a Windows host within a standard administrative PowerShell prompt, execute the following command to download and map
jcode: Building High-Performance Autonomous AI Coding Agents from Scratch
The landscape of AI-driven software development is shifting rapidly. While first-generation AI coding tools operated primarily as conversational completions or simple script generators, the community is moving decisively toward autonomous programming agents. These agents don't just suggest code; they plan, execute tests, refactor, and self-correct within a structured harness.
Emerging at the forefront of this shift in May 2026 is jcode, an open-source, Rust-based programming agent framework developed by creator
1jehuang. Rapidly climbing the GitHub Trending charts and capturing the attention of autonomous systems developers, jcode addresses a critical bottleneck in the agentic ecosystem: execution speed, structural reliability, and resource overhead. Written entirely in Rust, it provides a high-performance harness designed to run AI coding agents at scale without the typical latency and memory bloat associated with Python-heavy orchestration layers.In this comprehensive tutorial-style guide, we will break down what jcode is, analyze its internal architecture, compare it to existing frameworks, and walk through an end-to-end installation and configuration process to build your very first autonomous coding agent.
---Understanding the jcode Architecture
To build effective applications with jcode, it is essential to understand how it organizes the execution loop of an AI agent. Traditional agent frameworks rely on high-level scripting abstractions that introduce significant latency, making deep-tree search algorithms (like Monte Carlo Tree Search or complex reflection loops) painfully slow. jcode solves this by using a compiled Rust backend that exposes a highly structured execution harness.
The framework is divided into three primary layers:
- The Environment Layer (The Sandbox): This component manages the operating system context, available package managers, and shell environments. It isolates agent actions, preventing rogue scripts from damaging the host system while providing full feedback loops (stdout, stderr, exit codes) back to the agent.
- The Core Harness (Rust Engine): Written in Rust for maximum concurrency and memory safety, this engine manages agent state transitions, prompt token streaming pipelines, and workspace file parsing. It abstracts token budgets and tool call translations natively.
- The Agent Interface (Extensible Profiles): This layer allows developers to write custom planning algorithms, definition maps, and system instructions. It defines how the agent approaches a problem, splits tasks, and evaluates success.
Feature Comparison: jcode vs. Traditional Frameworks
Before diving into the implementation details, let's look at how jcode positions itself against traditional Python-based agent architectures and standard LLM orchestration environments.
---Feature / Metric jcode (1jehuang) Python-based Agent Frameworks Standard LLM Chat Hooks Core Language Rust Python Python / TypeScript Execution Speed Ultra-high (Compiled, Native Threading) Moderate (Interpreted, Async Overheads) Low (Network Dependent) Memory Management Strict compile-time safety, minimal footprint High runtime consumption, garbage collected Variable depending on wrapper Sandbox Isolation Native OS environment detection & mapping Requires heavy external Docker wrapper No native execution layer Primary Target Autonomous multi-turn software engineering General purpose task automation agents Single-turn text/code generation Prerequisites and Environment Verification
Before installing jcode, you need to ensure your machine meets the minimum system requirements for native compilation and execution. Because jcode evaluates code in real-time, having a stable environment with standard compilers is essential.
System Requirements:
- Operating System: macOS (Intel/Apple Silicon), Linux (Ubuntu 22.04+, Debian, Fedora), or Windows 11 (with PowerShell or WSL2).
- Toolchains: Rust Stable (1.75+ recommended) if building from source.
- Network: Active internet connection to pull model endpoints and fetch external crate dependencies.
Step-by-Step Installation Guide
jcode features an adaptive installer that detects your current operating system, available package managers, and active shell configurations. Select the installation track below that best matches your local development system.
Option A: macOS via Homebrew
If you are on macOS and use the Homebrew package manager, you can install the official tap maintained by 1jehuang directly via your terminal:
# Tap the jcode formula repository brew tap 1jehuang/jcode # Install the binary package brew install jcodeOption B: Linux or macOS via Shell Script
For standard Linux distributions or macOS environments without Homebrew, use the automated installation script. This pulls the latest compiled binary corresponding to your architecture:
curl -fsSL [https://raw.githubusercontent.com/1jehuang/jcode/main/scripts/install.sh](https://raw.githubusercontent.com/1jehuang/jcode/main/scripts/install.sh) | bashOption C: Windows via PowerShell
If you are running natively on a Windows host within a standard administrative PowerShell prompt, execute the following command to download and map the binaries:
irm [https://raw.githubusercontent.com/1jehuang/](https://raw.githubusercontent.com/1jehuang/)
jcode: Building High-Performance Autonomous AI Coding Agents from Scratch
The landscape of AI-driven software development is shifting rapidly. While first-generation AI coding tools operated primarily as conversational completions or simple script generators, the community is moving decisively toward autonomous programming agents. These agents don't just suggest code; they plan, execute tests, refactor, and self-correct within a structured harness.
Emerging at the forefront of this shift in May 2026 is jcode, an open-source, Rust-based programming agent framework developed by creator
1jehuang. Rapidly climbing the GitHub Trending charts and capturing the attention of autonomous systems developers, jcode addresses a critical bottleneck in the agentic ecosystem: execution speed, structural reliability, and resource overhead. Written entirely in Rust, it provides a high-performance harness designed to run AI coding agents at scale without the typical latency and memory bloat associated with Python-heavy orchestration layers.In this comprehensive tutorial-style guide, we will break down what jcode is, analyze its internal architecture, compare it to existing frameworks, and walk through an end-to-end installation and configuration process to build your very first autonomous coding agent.
---Understanding the jcode Architecture
To build effective applications with jcode, it is essential to understand how it organizes the execution loop of an AI agent. Traditional agent frameworks rely on high-level scripting abstractions that introduce significant latency, making deep-tree search algorithms (like Monte Carlo Tree Search or complex reflection loops) painfully slow. jcode solves this by using a compiled Rust backend that exposes a highly structured execution harness.
The framework is divided into three primary layers:
- The Environment Layer (The Sandbox): This component manages the operating system context, available package managers, and shell environments. It isolates agent actions, preventing rogue scripts from damaging the host system while providing full feedback loops (stdout, stderr, exit codes) back to the agent.
- The Core Harness (Rust Engine): Written in Rust for maximum concurrency and memory safety, this engine manages agent state transitions, prompt token streaming pipelines, and workspace file parsing. It abstracts token budgets and tool call translations natively.
- The Agent Interface (Extensible Profiles): This layer allows developers to write custom planning algorithms, definition maps, and system instructions. It defines how the agent approaches a problem, splits tasks, and evaluates success.
Feature Comparison: jcode vs. Traditional Frameworks
Before diving into the implementation details, let's look at how jcode positions itself against traditional Python-based agent architectures and standard LLM orchestration environments.
---Feature / Metric jcode (1jehuang) Python-based Agent Frameworks Standard LLM Chat Hooks Core Language Rust Python Python / TypeScript Execution Speed Ultra-high (Compiled, Native Threading) Moderate (Interpreted, Async Overheads) Low (Network Dependent) Memory Management Strict compile-time safety, minimal footprint High runtime consumption, garbage collected Variable depending on wrapper Sandbox Isolation Native OS environment detection & mapping Requires heavy external Docker wrapper No native execution layer Primary Target Autonomous multi-turn software engineering General purpose task automation agents Single-turn text/code generation Prerequisites and Environment Verification
Before installing jcode, you need to ensure your machine meets the minimum system requirements for native compilation and execution. Because jcode evaluates code in real-time, having a stable environment with standard compilers is essential.
System Requirements:
- Operating System: macOS (Intel/Apple Silicon), Linux (Ubuntu 22.04+, Debian, Fedora), or Windows 11 (with PowerShell or WSL2).
- Toolchains: Rust Stable (1.75+ recommended) if building from source.
- Network: Active internet connection to pull model endpoints and fetch external crate dependencies.
Step-by-Step Installation Guide
jcode features an adaptive installer that detects your current operating system, available package managers, and active shell configurations. Select the installation track below that best matches your local development system.
Option A: macOS via Homebrew
If you are on macOS and use the Homebrew package manager, you can install the official tap maintained by 1jehuang directly via your terminal:
# Tap the jcode formula repository brew tap 1jehuang/jcode # Install the binary package brew install jcodeOption B: Linux or macOS via Shell Script
For standard Linux distributions or macOS environments without Homebrew, use the automated installation script. This pulls the latest compiled binary corresponding to your architecture:
curl -fsSL [https://raw.githubusercontent.com/1jehuang/jcode/main/scripts/install.sh](https://raw.githubusercontent.com/1jehuang/jcode/main/scripts/install.sh) | bashOption C: Windows via PowerShell
If you are running natively on a Windows host within a standard administrative PowerShell prompt, execute the following command to download and map the binaries:
irm [https://raw.githubusercontent.com/1jehuang/jcode/main/scripts/install.ps1](https://raw.githubusercontent.com/1jehuang/jcode/main/scripts/install.ps1) | iexOption D: Building From Source (
jcode: Building High-Performance Autonomous AI Coding Agents from Scratch
The landscape of AI-driven software development is shifting rapidly. While first-generation AI coding tools operated primarily as conversational completions or simple script generators, the community is moving decisively toward autonomous programming agents. These agents don't just suggest code; they plan, execute tests, refactor, and self-correct within a structured harness.
Emerging at the forefront of this shift in May 2026 is jcode, an open-source, Rust-based programming agent framework developed by creator
1jehuang. Rapidly climbing the GitHub Trending charts and capturing the attention of autonomous systems developers, jcode addresses a critical bottleneck in the agentic ecosystem: execution speed, structural reliability, and resource overhead. Written entirely in Rust, it provides a high-performance harness designed to run AI coding agents at scale without the typical latency and memory bloat associated with Python-heavy orchestration layers.In this comprehensive tutorial-style guide, we will break down what jcode is, analyze its internal architecture, compare it to existing frameworks, and walk through an end-to-end installation and configuration process to build your very first autonomous coding agent.
---Understanding the jcode Architecture
To build effective applications with jcode, it is essential to understand how it organizes the execution loop of an AI agent. Traditional agent frameworks rely on high-level scripting abstractions that introduce significant latency, making deep-tree search algorithms (like Monte Carlo Tree Search or complex reflection loops) painfully slow. jcode solves this by using a compiled Rust backend that exposes a highly structured execution harness.
The framework is divided into three primary layers:
- The Environment Layer (The Sandbox): This component manages the operating system context, available package managers, and shell environments. It isolates agent actions, preventing rogue scripts from damaging the host system while providing full feedback loops (stdout, stderr, exit codes) back to the agent.
- The Core Harness (Rust Engine): Written in Rust for maximum concurrency and memory safety, this engine manages agent state transitions, prompt token streaming pipelines, and workspace file parsing. It abstracts token budgets and tool call translations natively.
- The Agent Interface (Extensible Profiles): This layer allows developers to write custom planning algorithms, definition maps, and system instructions. It defines how the agent approaches a problem, splits tasks, and evaluates success.
Feature Comparison: jcode vs. Traditional Frameworks
Before diving into the implementation details, let's look at how jcode positions itself against traditional Python-based agent architectures and standard LLM orchestration environments.
---Feature / Metric jcode (1jehuang) Python-based Agent Frameworks Standard LLM Chat Hooks Core Language Rust Python Python / TypeScript Execution Speed Ultra-high (Compiled, Native Threading) Moderate (Interpreted, Async Overheads) Low (Network Dependent) Memory Management Strict compile-time safety, minimal footprint High runtime consumption, garbage collected Variable depending on wrapper Sandbox Isolation Native OS environment detection & mapping Requires heavy external Docker wrapper No native execution layer Primary Target Autonomous multi-turn software engineering General purpose task automation agents Single-turn text/code generation Prerequisites and Environment Verification
Before installing jcode, you need to ensure your machine meets the minimum system requirements for native compilation and execution. Because jcode evaluates code in real-time, having a stable environment with standard compilers is essential.
System Requirements:
- Operating System: macOS (Intel/Apple Silicon), Linux (Ubuntu 22.04+, Debian, Fedora), or Windows 11 (with PowerShell or WSL2).
- Toolchains: Rust Stable (1.75+ recommended) if building from source.
- Network: Active internet connection to pull model endpoints and fetch external crate dependencies.
Step-by-Step Installation Guide
jcode features an adaptive installer that detects your current operating system, available package managers, and active shell configurations. Select the installation track below that best matches your local development system.
Option A: macOS via Homebrew
If you are on macOS and use the Homebrew package manager, you can install the official tap maintained by 1jehuang directly via your terminal:
# Tap the jcode formula repository brew tap 1jehuang/jcode # Install the binary package brew install jcodeOption B: Linux or macOS via Shell Script
For standard Linux distributions or macOS environments without Homebrew, use the automated installation script. This pulls the latest compiled binary corresponding to your architecture:
curl -fsSL [https://raw.githubusercontent.com/1jehuang/jcode/main/scripts/install.sh](https://raw.githubusercontent.com/1jehuang/jcode/main/scripts/install.sh) | bashOption C: Windows via PowerShell
If you are running natively on a Windows host within a standard administrative PowerShell prompt, execute the following command to download and map the binaries:
irm [https://raw.githubusercontent.com/1jehuang/jcode/main/scripts/install.ps1](https://raw.githubusercontent.com/1jehuang/jcode/main/scripts/install.ps1) | iexOption D: Building From Source (Recommended for Contributors)
If you want to run the cutting-edge development branch or adapt the core
jcode: Building High-Performance Autonomous AI Coding Agents from Scratch
The landscape of AI-driven software development is shifting rapidly. While first-generation AI coding tools operated primarily as conversational completions or simple script generators, the community is moving decisively toward autonomous programming agents. These agents don't just suggest code; they plan, execute tests, refactor, and self-correct within a structured harness.
Emerging at the forefront of this shift in May 2026 is jcode, an open-source, Rust-based programming agent framework developed by creator
1jehuang. Rapidly climbing the GitHub Trending charts and capturing the attention of autonomous systems developers, jcode addresses a critical bottleneck in the agentic ecosystem: execution speed, structural reliability, and resource overhead. Written entirely in Rust, it provides a high-performance harness designed to run AI coding agents at scale without the typical latency and memory bloat associated with Python-heavy orchestration layers.In this comprehensive tutorial-style guide, we will break down what jcode is, analyze its internal architecture, compare it to existing frameworks, and walk through an end-to-end installation and configuration process to build your very first autonomous coding agent.
---Understanding the jcode Architecture
To build effective applications with jcode, it is essential to understand how it organizes the execution loop of an AI agent. Traditional agent frameworks rely on high-level scripting abstractions that introduce significant latency, making deep-tree search algorithms (like Monte Carlo Tree Search or complex reflection loops) painfully slow. jcode solves this by using a compiled Rust backend that exposes a highly structured execution harness.
The framework is divided into three primary layers:
- The Environment Layer (The Sandbox): This component manages the operating system context, available package managers, and shell environments. It isolates agent actions, preventing rogue scripts from damaging the host system while providing full feedback loops (stdout, stderr, exit codes) back to the agent.
- The Core Harness (Rust Engine): Written in Rust for maximum concurrency and memory safety, this engine manages agent state transitions, prompt token streaming pipelines, and workspace file parsing. It abstracts token budgets and tool call translations natively.
- The Agent Interface (Extensible Profiles): This layer allows developers to write custom planning algorithms, definition maps, and system instructions. It defines how the agent approaches a problem, splits tasks, and evaluates success.
Feature Comparison: jcode vs. Traditional Frameworks
Before diving into the implementation details, let's look at how jcode positions itself against traditional Python-based agent architectures and standard LLM orchestration environments.
---Feature / Metric jcode (1jehuang) Python-based Agent Frameworks Standard LLM Chat Hooks Core Language Rust Python Python / TypeScript Execution Speed Ultra-high (Compiled, Native Threading) Moderate (Interpreted, Async Overheads) Low (Network Dependent) Memory Management Strict compile-time safety, minimal footprint High runtime consumption, garbage collected Variable depending on wrapper Sandbox Isolation Native OS environment detection & mapping Requires heavy external Docker wrapper No native execution layer Primary Target Autonomous multi-turn software engineering General purpose task automation agents Single-turn text/code generation Prerequisites and Environment Verification
Before installing jcode, you need to ensure your machine meets the minimum system requirements for native compilation and execution. Because jcode evaluates code in real-time, having a stable environment with standard compilers is essential.
System Requirements:
- Operating System: macOS (Intel/Apple Silicon), Linux (Ubuntu 22.04+, Debian, Fedora), or Windows 11 (with PowerShell or WSL2).
- Toolchains: Rust Stable (1.75+ recommended) if building from source.
- Network: Active internet connection to pull model endpoints and fetch external crate dependencies.
Step-by-Step Installation Guide
jcode features an adaptive installer that detects your current operating system, available package managers, and active shell configurations. Select the installation track below that best matches your local development system.
Option A: macOS via Homebrew
If you are on macOS and use the Homebrew package manager, you can install the official tap maintained by 1jehuang directly via your terminal:
# Tap the jcode formula repository brew tap 1jehuang/jcode # Install the binary package brew install jcodeOption B: Linux or macOS via Shell Script
For standard Linux distributions or macOS environments without Homebrew, use the automated installation script. This pulls the latest compiled binary corresponding to your architecture:
curl -fsSL [https://raw.githubusercontent.com/1jehuang/jcode/main/scripts/install.sh](https://raw.githubusercontent.com/1jehuang/jcode/main/scripts/install.sh) | bashOption C: Windows via PowerShell
If you are running natively on a Windows host within a standard administrative PowerShell prompt, execute the following command to download and map the binaries:
irm [https://raw.githubusercontent.com/1jehuang/jcode/main/scripts/install.ps1](https://raw.githubusercontent.com/1jehuang/jcode/main/scripts/install.ps1) | iexOption D: Building From Source (Recommended for Contributors)
If you want to run the cutting-edge development branch or adapt the core Rust source code to custom enterprise parameters, clone the official GitHub repository and compile it locally:
# Clone
jcode: Building High-Performance Autonomous AI Coding Agents from Scratch
The landscape of AI-driven software development is shifting rapidly. While first-generation AI coding tools operated primarily as conversational completions or simple script generators, the community is moving decisively toward autonomous programming agents. These agents don't just suggest code; they plan, execute tests, refactor, and self-correct within a structured harness.
Emerging at the forefront of this shift in May 2026 is jcode, an open-source, Rust-based programming agent framework developed by creator
1jehuang. Rapidly climbing the GitHub Trending charts and capturing the attention of autonomous systems developers, jcode addresses a critical bottleneck in the agentic ecosystem: execution speed, structural reliability, and resource overhead. Written entirely in Rust, it provides a high-performance harness designed to run AI coding agents at scale without the typical latency and memory bloat associated with Python-heavy orchestration layers.In this comprehensive tutorial-style guide, we will break down what jcode is, analyze its internal architecture, compare it to existing frameworks, and walk through an end-to-end installation and configuration process to build your very first autonomous coding agent.
---Understanding the jcode Architecture
To build effective applications with jcode, it is essential to understand how it organizes the execution loop of an AI agent. Traditional agent frameworks rely on high-level scripting abstractions that introduce significant latency, making deep-tree search algorithms (like Monte Carlo Tree Search or complex reflection loops) painfully slow. jcode solves this by using a compiled Rust backend that exposes a highly structured execution harness.
The framework is divided into three primary layers:
- The Environment Layer (The Sandbox): This component manages the operating system context, available package managers, and shell environments. It isolates agent actions, preventing rogue scripts from damaging the host system while providing full feedback loops (stdout, stderr, exit codes) back to the agent.
- The Core Harness (Rust Engine): Written in Rust for maximum concurrency and memory safety, this engine manages agent state transitions, prompt token streaming pipelines, and workspace file parsing. It abstracts token budgets and tool call translations natively.
- The Agent Interface (Extensible Profiles): This layer allows developers to write custom planning algorithms, definition maps, and system instructions. It defines how the agent approaches a problem, splits tasks, and evaluates success.
Feature Comparison: jcode vs. Traditional Frameworks
Before diving into the implementation details, let's look at how jcode positions itself against traditional Python-based agent architectures and standard LLM orchestration environments.
---Feature / Metric jcode (1jehuang) Python-based Agent Frameworks Standard LLM Chat Hooks Core Language Rust Python Python / TypeScript Execution Speed Ultra-high (Compiled, Native Threading) Moderate (Interpreted, Async Overheads) Low (Network Dependent) Memory Management Strict compile-time safety, minimal footprint High runtime consumption, garbage collected Variable depending on wrapper Sandbox Isolation Native OS environment detection & mapping Requires heavy external Docker wrapper No native execution layer Primary Target Autonomous multi-turn software engineering General purpose task automation agents Single-turn text/code generation Prerequisites and Environment Verification
Before installing jcode, you need to ensure your machine meets the minimum system requirements for native compilation and execution. Because jcode evaluates code in real-time, having a stable environment with standard compilers is essential.
System Requirements:
- Operating System: macOS (Intel/Apple Silicon), Linux (Ubuntu 22.04+, Debian, Fedora), or Windows 11 (with PowerShell or WSL2).
- Toolchains: Rust Stable (1.75+ recommended) if building from source.
- Network: Active internet connection to pull model endpoints and fetch external crate dependencies.
Step-by-Step Installation Guide
jcode features an adaptive installer that detects your current operating system, available package managers, and active shell configurations. Select the installation track below that best matches your local development system.
Option A: macOS via Homebrew
If you are on macOS and use the Homebrew package manager, you can install the official tap maintained by 1jehuang directly via your terminal:
# Tap the jcode formula repository brew tap 1jehuang/jcode # Install the binary package brew install jcodeOption B: Linux or macOS via Shell Script
For standard Linux distributions or macOS environments without Homebrew, use the automated installation script. This pulls the latest compiled binary corresponding to your architecture:
curl -fsSL [https://raw.githubusercontent.com/1jehuang/jcode/main/scripts/install.sh](https://raw.githubusercontent.com/1jehuang/jcode/main/scripts/install.sh) | bashOption C: Windows via PowerShell
If you are running natively on a Windows host within a standard administrative PowerShell prompt, execute the following command to download and map the binaries:
irm [https://raw.githubusercontent.com/1jehuang/jcode/main/scripts/install.ps1](https://raw.githubusercontent.com/1jehuang/jcode/main/scripts/install.ps1) | iexOption D: Building From Source (Recommended for Contributors)
If you want to run the cutting-edge development branch or adapt the core Rust source code to custom enterprise parameters, clone the official GitHub repository and compile it locally:
# Clone the project repository git clone [https://github.com/1jehuang/jcode.git](https://github.com/1jehuang/jcode.git) cd jcode # Compile
jcode: Building High-Performance Autonomous AI Coding Agents from Scratch
The landscape of AI-driven software development is shifting rapidly. While first-generation AI coding tools operated primarily as conversational completions or simple script generators, the community is moving decisively toward autonomous programming agents. These agents don't just suggest code; they plan, execute tests, refactor, and self-correct within a structured harness.
Emerging at the forefront of this shift in May 2026 is jcode, an open-source, Rust-based programming agent framework developed by creator
1jehuang. Rapidly climbing the GitHub Trending charts and capturing the attention of autonomous systems developers, jcode addresses a critical bottleneck in the agentic ecosystem: execution speed, structural reliability, and resource overhead. Written entirely in Rust, it provides a high-performance harness designed to run AI coding agents at scale without the typical latency and memory bloat associated with Python-heavy orchestration layers.In this comprehensive tutorial-style guide, we will break down what jcode is, analyze its internal architecture, compare it to existing frameworks, and walk through an end-to-end installation and configuration process to build your very first autonomous coding agent.
---Understanding the jcode Architecture
To build effective applications with jcode, it is essential to understand how it organizes the execution loop of an AI agent. Traditional agent frameworks rely on high-level scripting abstractions that introduce significant latency, making deep-tree search algorithms (like Monte Carlo Tree Search or complex reflection loops) painfully slow. jcode solves this by using a compiled Rust backend that exposes a highly structured execution harness.
The framework is divided into three primary layers:
- The Environment Layer (The Sandbox): This component manages the operating system context, available package managers, and shell environments. It isolates agent actions, preventing rogue scripts from damaging the host system while providing full feedback loops (stdout, stderr, exit codes) back to the agent.
- The Core Harness (Rust Engine): Written in Rust for maximum concurrency and memory safety, this engine manages agent state transitions, prompt token streaming pipelines, and workspace file parsing. It abstracts token budgets and tool call translations natively.
- The Agent Interface (Extensible Profiles): This layer allows developers to write custom planning algorithms, definition maps, and system instructions. It defines how the agent approaches a problem, splits tasks, and evaluates success.
Feature Comparison: jcode vs. Traditional Frameworks
Before diving into the implementation details, let's look at how jcode positions itself against traditional Python-based agent architectures and standard LLM orchestration environments.
---Feature / Metric jcode (1jehuang) Python-based Agent Frameworks Standard LLM Chat Hooks Core Language Rust Python Python / TypeScript Execution Speed Ultra-high (Compiled, Native Threading) Moderate (Interpreted, Async Overheads) Low (Network Dependent) Memory Management Strict compile-time safety, minimal footprint High runtime consumption, garbage collected Variable depending on wrapper Sandbox Isolation Native OS environment detection & mapping Requires heavy external Docker wrapper No native execution layer Primary Target Autonomous multi-turn software engineering General purpose task automation agents Single-turn text/code generation Prerequisites and Environment Verification
Before installing jcode, you need to ensure your machine meets the minimum system requirements for native compilation and execution. Because jcode evaluates code in real-time, having a stable environment with standard compilers is essential.
System Requirements:
- Operating System: macOS (Intel/Apple Silicon), Linux (Ubuntu 22.04+, Debian, Fedora), or Windows 11 (with PowerShell or WSL2).
- Toolchains: Rust Stable (1.75+ recommended) if building from source.
- Network: Active internet connection to pull model endpoints and fetch external crate dependencies.
Step-by-Step Installation Guide
jcode features an adaptive installer that detects your current operating system, available package managers, and active shell configurations. Select the installation track below that best matches your local development system.
Option A: macOS via Homebrew
If you are on macOS and use the Homebrew package manager, you can install the official tap maintained by 1jehuang directly via your terminal:
# Tap the jcode formula repository brew tap 1jehuang/jcode # Install the binary package brew install jcodeOption B: Linux or macOS via Shell Script
For standard Linux distributions or macOS environments without Homebrew, use the automated installation script. This pulls the latest compiled binary corresponding to your architecture:
curl -fsSL [https://raw.githubusercontent.com/1jehuang/jcode/main/scripts/install.sh](https://raw.githubusercontent.com/1jehuang/jcode/main/scripts/install.sh) | bashOption C: Windows via PowerShell
If you are running natively on a Windows host within a standard administrative PowerShell prompt, execute the following command to download and map the binaries:
irm [https://raw.githubusercontent.com/1jehuang/jcode/main/scripts/install.ps1](https://raw.githubusercontent.com/1jehuang/jcode/main/scripts/install.ps1) | iexOption D: Building From Source (Recommended for Contributors)
If you want to run the cutting-edge development branch or adapt the core Rust source code to custom enterprise parameters, clone the official GitHub repository and compile it locally:
# Clone the project repository git clone [https://github.com/1jehuang/jcode.git](https://github.com/1jehuang/jcode.git) cd jcode # Compile a highly optimized release binary using Cargo cargo build --release # Execute the local release install configuration script ./scripts/install_release.
jcode: Building High-Performance Autonomous AI Coding Agents from Scratch
The landscape of AI-driven software development is shifting rapidly. While first-generation AI coding tools operated primarily as conversational completions or simple script generators, the community is moving decisively toward autonomous programming agents. These agents don't just suggest code; they plan, execute tests, refactor, and self-correct within a structured harness.
Emerging at the forefront of this shift in May 2026 is jcode, an open-source, Rust-based programming agent framework developed by creator
1jehuang. Rapidly climbing the GitHub Trending charts and capturing the attention of autonomous systems developers, jcode addresses a critical bottleneck in the agentic ecosystem: execution speed, structural reliability, and resource overhead. Written entirely in Rust, it provides a high-performance harness designed to run AI coding agents at scale without the typical latency and memory bloat associated with Python-heavy orchestration layers.In this comprehensive tutorial-style guide, we will break down what jcode is, analyze its internal architecture, compare it to existing frameworks, and walk through an end-to-end installation and configuration process to build your very first autonomous coding agent.
---Understanding the jcode Architecture
To build effective applications with jcode, it is essential to understand how it organizes the execution loop of an AI agent. Traditional agent frameworks rely on high-level scripting abstractions that introduce significant latency, making deep-tree search algorithms (like Monte Carlo Tree Search or complex reflection loops) painfully slow. jcode solves this by using a compiled Rust backend that exposes a highly structured execution harness.
The framework is divided into three primary layers:
- The Environment Layer (The Sandbox): This component manages the operating system context, available package managers, and shell environments. It isolates agent actions, preventing rogue scripts from damaging the host system while providing full feedback loops (stdout, stderr, exit codes) back to the agent.
- The Core Harness (Rust Engine): Written in Rust for maximum concurrency and memory safety, this engine manages agent state transitions, prompt token streaming pipelines, and workspace file parsing. It abstracts token budgets and tool call translations natively.
- The Agent Interface (Extensible Profiles): This layer allows developers to write custom planning algorithms, definition maps, and system instructions. It defines how the agent approaches a problem, splits tasks, and evaluates success.
Feature Comparison: jcode vs. Traditional Frameworks
Before diving into the implementation details, let's look at how jcode positions itself against traditional Python-based agent architectures and standard LLM orchestration environments.
---Feature / Metric jcode (1jehuang) Python-based Agent Frameworks Standard LLM Chat Hooks Core Language Rust Python Python / TypeScript Execution Speed Ultra-high (Compiled, Native Threading) Moderate (Interpreted, Async Overheads) Low (Network Dependent) Memory Management Strict compile-time safety, minimal footprint High runtime consumption, garbage collected Variable depending on wrapper Sandbox Isolation Native OS environment detection & mapping Requires heavy external Docker wrapper No native execution layer Primary Target Autonomous multi-turn software engineering General purpose task automation agents Single-turn text/code generation Prerequisites and Environment Verification
Before installing jcode, you need to ensure your machine meets the minimum system requirements for native compilation and execution. Because jcode evaluates code in real-time, having a stable environment with standard compilers is essential.
System Requirements:
- Operating System: macOS (Intel/Apple Silicon), Linux (Ubuntu 22.04+, Debian, Fedora), or Windows 11 (with PowerShell or WSL2).
- Toolchains: Rust Stable (1.75+ recommended) if building from source.
- Network: Active internet connection to pull model endpoints and fetch external crate dependencies.
Step-by-Step Installation Guide
jcode features an adaptive installer that detects your current operating system, available package managers, and active shell configurations. Select the installation track below that best matches your local development system.
Option A: macOS via Homebrew
If you are on macOS and use the Homebrew package manager, you can install the official tap maintained by 1jehuang directly via your terminal:
# Tap the jcode formula repository brew tap 1jehuang/jcode # Install the binary package brew install jcodeOption B: Linux or macOS via Shell Script
For standard Linux distributions or macOS environments without Homebrew, use the automated installation script. This pulls the latest compiled binary corresponding to your architecture:
curl -fsSL [https://raw.githubusercontent.com/1jehuang/jcode/main/scripts/install.sh](https://raw.githubusercontent.com/1jehuang/jcode/main/scripts/install.sh) | bashOption C: Windows via PowerShell
If you are running natively on a Windows host within a standard administrative PowerShell prompt, execute the following command to download and map the binaries:
irm [https://raw.githubusercontent.com/1jehuang/jcode/main/scripts/install.ps1](https://raw.githubusercontent.com/1jehuang/jcode/main/scripts/install.ps1) | iexOption D: Building From Source (Recommended for Contributors)
If you want to run the cutting-edge development branch or adapt the core Rust source code to custom enterprise parameters, clone the official GitHub repository and compile it locally:
# Clone the project repository git clone [https://github.com/1jehuang/jcode.git](https://github.com/1jehuang/jcode.git) cd jcode # Compile a highly optimized release binary using Cargo cargo build --release # Execute the local release install configuration script ./scripts/install_release.shVerify that your installation was successful by checking the current version of the harness:
---jcode --versionQuickstart: Configuring and Initializing Your Agent Workspace
With jcode successfully installed, the next stage is configuring your active LLM providers and preparing a localized
jcode: Building High-Performance Autonomous AI Coding Agents from Scratch
The landscape of AI-driven software development is shifting rapidly. While first-generation AI coding tools operated primarily as conversational completions or simple script generators, the community is moving decisively toward autonomous programming agents. These agents don't just suggest code; they plan, execute tests, refactor, and self-correct within a structured harness.
Emerging at the forefront of this shift in May 2026 is jcode, an open-source, Rust-based programming agent framework developed by creator
1jehuang. Rapidly climbing the GitHub Trending charts and capturing the attention of autonomous systems developers, jcode addresses a critical bottleneck in the agentic ecosystem: execution speed, structural reliability, and resource overhead. Written entirely in Rust, it provides a high-performance harness designed to run AI coding agents at scale without the typical latency and memory bloat associated with Python-heavy orchestration layers.In this comprehensive tutorial-style guide, we will break down what jcode is, analyze its internal architecture, compare it to existing frameworks, and walk through an end-to-end installation and configuration process to build your very first autonomous coding agent.
---Understanding the jcode Architecture
To build effective applications with jcode, it is essential to understand how it organizes the execution loop of an AI agent. Traditional agent frameworks rely on high-level scripting abstractions that introduce significant latency, making deep-tree search algorithms (like Monte Carlo Tree Search or complex reflection loops) painfully slow. jcode solves this by using a compiled Rust backend that exposes a highly structured execution harness.
The framework is divided into three primary layers:
- The Environment Layer (The Sandbox): This component manages the operating system context, available package managers, and shell environments. It isolates agent actions, preventing rogue scripts from damaging the host system while providing full feedback loops (stdout, stderr, exit codes) back to the agent.
- The Core Harness (Rust Engine): Written in Rust for maximum concurrency and memory safety, this engine manages agent state transitions, prompt token streaming pipelines, and workspace file parsing. It abstracts token budgets and tool call translations natively.
- The Agent Interface (Extensible Profiles): This layer allows developers to write custom planning algorithms, definition maps, and system instructions. It defines how the agent approaches a problem, splits tasks, and evaluates success.
Feature Comparison: jcode vs. Traditional Frameworks
Before diving into the implementation details, let's look at how jcode positions itself against traditional Python-based agent architectures and standard LLM orchestration environments.
---Feature / Metric jcode (1jehuang) Python-based Agent Frameworks Standard LLM Chat Hooks Core Language Rust Python Python / TypeScript Execution Speed Ultra-high (Compiled, Native Threading) Moderate (Interpreted, Async Overheads) Low (Network Dependent) Memory Management Strict compile-time safety, minimal footprint High runtime consumption, garbage collected Variable depending on wrapper Sandbox Isolation Native OS environment detection & mapping Requires heavy external Docker wrapper No native execution layer Primary Target Autonomous multi-turn software engineering General purpose task automation agents Single-turn text/code generation Prerequisites and Environment Verification
Before installing jcode, you need to ensure your machine meets the minimum system requirements for native compilation and execution. Because jcode evaluates code in real-time, having a stable environment with standard compilers is essential.
System Requirements:
- Operating System: macOS (Intel/Apple Silicon), Linux (Ubuntu 22.04+, Debian, Fedora), or Windows 11 (with PowerShell or WSL2).
- Toolchains: Rust Stable (1.75+ recommended) if building from source.
- Network: Active internet connection to pull model endpoints and fetch external crate dependencies.
Step-by-Step Installation Guide
jcode features an adaptive installer that detects your current operating system, available package managers, and active shell configurations. Select the installation track below that best matches your local development system.
Option A: macOS via Homebrew
If you are on macOS and use the Homebrew package manager, you can install the official tap maintained by 1jehuang directly via your terminal:
# Tap the jcode formula repository brew tap 1jehuang/jcode # Install the binary package brew install jcodeOption B: Linux or macOS via Shell Script
For standard Linux distributions or macOS environments without Homebrew, use the automated installation script. This pulls the latest compiled binary corresponding to your architecture:
curl -fsSL [https://raw.githubusercontent.com/1jehuang/jcode/main/scripts/install.sh](https://raw.githubusercontent.com/1jehuang/jcode/main/scripts/install.sh) | bashOption C: Windows via PowerShell
If you are running natively on a Windows host within a standard administrative PowerShell prompt, execute the following command to download and map the binaries:
irm [https://raw.githubusercontent.com/1jehuang/jcode/main/scripts/install.ps1](https://raw.githubusercontent.com/1jehuang/jcode/main/scripts/install.ps1) | iexOption D: Building From Source (Recommended for Contributors)
If you want to run the cutting-edge development branch or adapt the core Rust source code to custom enterprise parameters, clone the official GitHub repository and compile it locally:
# Clone the project repository git clone [https://github.com/1jehuang/jcode.git](https://github.com/1jehuang/jcode.git) cd jcode # Compile a highly optimized release binary using Cargo cargo build --release # Execute the local release install configuration script ./scripts/install_release.shVerify that your installation was successful by checking the current version of the harness:
---jcode --versionQuickstart: Configuring and Initializing Your Agent Workspace
With jcode successfully installed, the next stage is configuring your active LLM providers and preparing a localized project workspace where your programming agent can safely read, write, and test applications.
Step 1: Export
jcode: Building High-Performance Autonomous AI Coding Agents from Scratch
The landscape of AI-driven software development is shifting rapidly. While first-generation AI coding tools operated primarily as conversational completions or simple script generators, the community is moving decisively toward autonomous programming agents. These agents don't just suggest code; they plan, execute tests, refactor, and self-correct within a structured harness.
Emerging at the forefront of this shift in May 2026 is jcode, an open-source, Rust-based programming agent framework developed by creator
1jehuang. Rapidly climbing the GitHub Trending charts and capturing the attention of autonomous systems developers, jcode addresses a critical bottleneck in the agentic ecosystem: execution speed, structural reliability, and resource overhead. Written entirely in Rust, it provides a high-performance harness designed to run AI coding agents at scale without the typical latency and memory bloat associated with Python-heavy orchestration layers.In this comprehensive tutorial-style guide, we will break down what jcode is, analyze its internal architecture, compare it to existing frameworks, and walk through an end-to-end installation and configuration process to build your very first autonomous coding agent.
---Understanding the jcode Architecture
To build effective applications with jcode, it is essential to understand how it organizes the execution loop of an AI agent. Traditional agent frameworks rely on high-level scripting abstractions that introduce significant latency, making deep-tree search algorithms (like Monte Carlo Tree Search or complex reflection loops) painfully slow. jcode solves this by using a compiled Rust backend that exposes a highly structured execution harness.
The framework is divided into three primary layers:
- The Environment Layer (The Sandbox): This component manages the operating system context, available package managers, and shell environments. It isolates agent actions, preventing rogue scripts from damaging the host system while providing full feedback loops (stdout, stderr, exit codes) back to the agent.
- The Core Harness (Rust Engine): Written in Rust for maximum concurrency and memory safety, this engine manages agent state transitions, prompt token streaming pipelines, and workspace file parsing. It abstracts token budgets and tool call translations natively.
- The Agent Interface (Extensible Profiles): This layer allows developers to write custom planning algorithms, definition maps, and system instructions. It defines how the agent approaches a problem, splits tasks, and evaluates success.
Feature Comparison: jcode vs. Traditional Frameworks
Before diving into the implementation details, let's look at how jcode positions itself against traditional Python-based agent architectures and standard LLM orchestration environments.
---Feature / Metric jcode (1jehuang) Python-based Agent Frameworks Standard LLM Chat Hooks Core Language Rust Python Python / TypeScript Execution Speed Ultra-high (Compiled, Native Threading) Moderate (Interpreted, Async Overheads) Low (Network Dependent) Memory Management Strict compile-time safety, minimal footprint High runtime consumption, garbage collected Variable depending on wrapper Sandbox Isolation Native OS environment detection & mapping Requires heavy external Docker wrapper No native execution layer Primary Target Autonomous multi-turn software engineering General purpose task automation agents Single-turn text/code generation Prerequisites and Environment Verification
Before installing jcode, you need to ensure your machine meets the minimum system requirements for native compilation and execution. Because jcode evaluates code in real-time, having a stable environment with standard compilers is essential.
System Requirements:
- Operating System: macOS (Intel/Apple Silicon), Linux (Ubuntu 22.04+, Debian, Fedora), or Windows 11 (with PowerShell or WSL2).
- Toolchains: Rust Stable (1.75+ recommended) if building from source.
- Network: Active internet connection to pull model endpoints and fetch external crate dependencies.
Step-by-Step Installation Guide
jcode features an adaptive installer that detects your current operating system, available package managers, and active shell configurations. Select the installation track below that best matches your local development system.
Option A: macOS via Homebrew
If you are on macOS and use the Homebrew package manager, you can install the official tap maintained by 1jehuang directly via your terminal:
# Tap the jcode formula repository brew tap 1jehuang/jcode # Install the binary package brew install jcodeOption B: Linux or macOS via Shell Script
For standard Linux distributions or macOS environments without Homebrew, use the automated installation script. This pulls the latest compiled binary corresponding to your architecture:
curl -fsSL [https://raw.githubusercontent.com/1jehuang/jcode/main/scripts/install.sh](https://raw.githubusercontent.com/1jehuang/jcode/main/scripts/install.sh) | bashOption C: Windows via PowerShell
If you are running natively on a Windows host within a standard administrative PowerShell prompt, execute the following command to download and map the binaries:
irm [https://raw.githubusercontent.com/1jehuang/jcode/main/scripts/install.ps1](https://raw.githubusercontent.com/1jehuang/jcode/main/scripts/install.ps1) | iexOption D: Building From Source (Recommended for Contributors)
If you want to run the cutting-edge development branch or adapt the core Rust source code to custom enterprise parameters, clone the official GitHub repository and compile it locally:
# Clone the project repository git clone [https://github.com/1jehuang/jcode.git](https://github.com/1jehuang/jcode.git) cd jcode # Compile a highly optimized release binary using Cargo cargo build --release # Execute the local release install configuration script ./scripts/install_release.shVerify that your installation was successful by checking the current version of the harness:
---jcode --versionQuickstart: Configuring and Initializing Your Agent Workspace
With jcode successfully installed, the next stage is configuring your active LLM providers and preparing a localized project workspace where your programming agent can safely read, write, and test applications.
Step 1: Exporting LLM API Credentials
jcode acts as an execution harness that routes logic through state-of-the-art
jcode: Building High-Performance Autonomous AI Coding Agents from Scratch
The landscape of AI-driven software development is shifting rapidly. While first-generation AI coding tools operated primarily as conversational completions or simple script generators, the community is moving decisively toward autonomous programming agents. These agents don't just suggest code; they plan, execute tests, refactor, and self-correct within a structured harness.
Emerging at the forefront of this shift in May 2026 is jcode, an open-source, Rust-based programming agent framework developed by creator
1jehuang. Rapidly climbing the GitHub Trending charts and capturing the attention of autonomous systems developers, jcode addresses a critical bottleneck in the agentic ecosystem: execution speed, structural reliability, and resource overhead. Written entirely in Rust, it provides a high-performance harness designed to run AI coding agents at scale without the typical latency and memory bloat associated with Python-heavy orchestration layers.In this comprehensive tutorial-style guide, we will break down what jcode is, analyze its internal architecture, compare it to existing frameworks, and walk through an end-to-end installation and configuration process to build your very first autonomous coding agent.
---Understanding the jcode Architecture
To build effective applications with jcode, it is essential to understand how it organizes the execution loop of an AI agent. Traditional agent frameworks rely on high-level scripting abstractions that introduce significant latency, making deep-tree search algorithms (like Monte Carlo Tree Search or complex reflection loops) painfully slow. jcode solves this by using a compiled Rust backend that exposes a highly structured execution harness.
The framework is divided into three primary layers:
- The Environment Layer (The Sandbox): This component manages the operating system context, available package managers, and shell environments. It isolates agent actions, preventing rogue scripts from damaging the host system while providing full feedback loops (stdout, stderr, exit codes) back to the agent.
- The Core Harness (Rust Engine): Written in Rust for maximum concurrency and memory safety, this engine manages agent state transitions, prompt token streaming pipelines, and workspace file parsing. It abstracts token budgets and tool call translations natively.
- The Agent Interface (Extensible Profiles): This layer allows developers to write custom planning algorithms, definition maps, and system instructions. It defines how the agent approaches a problem, splits tasks, and evaluates success.
Feature Comparison: jcode vs. Traditional Frameworks
Before diving into the implementation details, let's look at how jcode positions itself against traditional Python-based agent architectures and standard LLM orchestration environments.
---Feature / Metric jcode (1jehuang) Python-based Agent Frameworks Standard LLM Chat Hooks Core Language Rust Python Python / TypeScript Execution Speed Ultra-high (Compiled, Native Threading) Moderate (Interpreted, Async Overheads) Low (Network Dependent) Memory Management Strict compile-time safety, minimal footprint High runtime consumption, garbage collected Variable depending on wrapper Sandbox Isolation Native OS environment detection & mapping Requires heavy external Docker wrapper No native execution layer Primary Target Autonomous multi-turn software engineering General purpose task automation agents Single-turn text/code generation Prerequisites and Environment Verification
Before installing jcode, you need to ensure your machine meets the minimum system requirements for native compilation and execution. Because jcode evaluates code in real-time, having a stable environment with standard compilers is essential.
System Requirements:
- Operating System: macOS (Intel/Apple Silicon), Linux (Ubuntu 22.04+, Debian, Fedora), or Windows 11 (with PowerShell or WSL2).
- Toolchains: Rust Stable (1.75+ recommended) if building from source.
- Network: Active internet connection to pull model endpoints and fetch external crate dependencies.
Step-by-Step Installation Guide
jcode features an adaptive installer that detects your current operating system, available package managers, and active shell configurations. Select the installation track below that best matches your local development system.
Option A: macOS via Homebrew
If you are on macOS and use the Homebrew package manager, you can install the official tap maintained by 1jehuang directly via your terminal:
# Tap the jcode formula repository brew tap 1jehuang/jcode # Install the binary package brew install jcodeOption B: Linux or macOS via Shell Script
For standard Linux distributions or macOS environments without Homebrew, use the automated installation script. This pulls the latest compiled binary corresponding to your architecture:
curl -fsSL [https://raw.githubusercontent.com/1jehuang/jcode/main/scripts/install.sh](https://raw.githubusercontent.com/1jehuang/jcode/main/scripts/install.sh) | bashOption C: Windows via PowerShell
If you are running natively on a Windows host within a standard administrative PowerShell prompt, execute the following command to download and map the binaries:
irm [https://raw.githubusercontent.com/1jehuang/jcode/main/scripts/install.ps1](https://raw.githubusercontent.com/1jehuang/jcode/main/scripts/install.ps1) | iexOption D: Building From Source (Recommended for Contributors)
If you want to run the cutting-edge development branch or adapt the core Rust source code to custom enterprise parameters, clone the official GitHub repository and compile it locally:
# Clone the project repository git clone [https://github.com/1jehuang/jcode.git](https://github.com/1jehuang/jcode.git) cd jcode # Compile a highly optimized release binary using Cargo cargo build --release # Execute the local release install configuration script ./scripts/install_release.shVerify that your installation was successful by checking the current version of the harness:
---jcode --versionQuickstart: Configuring and Initializing Your Agent Workspace
With jcode successfully installed, the next stage is configuring your active LLM providers and preparing a localized project workspace where your programming agent can safely read, write, and test applications.
Step 1: Exporting LLM API Credentials
jcode acts as an execution harness that routes logic through state-of-the-art coding LLMs. You must supply your preferred model API keys as environment variables. Add these to your shell profile (e.g.,
.bashrcor.zshrc):export OPENAI_API_KEY
jcode: Building High-Performance Autonomous AI Coding Agents from Scratch
The landscape of AI-driven software development is shifting rapidly. While first-generation AI coding tools operated primarily as conversational completions or simple script generators, the community is moving decisively toward autonomous programming agents. These agents don't just suggest code; they plan, execute tests, refactor, and self-correct within a structured harness.
Emerging at the forefront of this shift in May 2026 is jcode, an open-source, Rust-based programming agent framework developed by creator
1jehuang. Rapidly climbing the GitHub Trending charts and capturing the attention of autonomous systems developers, jcode addresses a critical bottleneck in the agentic ecosystem: execution speed, structural reliability, and resource overhead. Written entirely in Rust, it provides a high-performance harness designed to run AI coding agents at scale without the typical latency and memory bloat associated with Python-heavy orchestration layers.In this comprehensive tutorial-style guide, we will break down what jcode is, analyze its internal architecture, compare it to existing frameworks, and walk through an end-to-end installation and configuration process to build your very first autonomous coding agent.
---Understanding the jcode Architecture
To build effective applications with jcode, it is essential to understand how it organizes the execution loop of an AI agent. Traditional agent frameworks rely on high-level scripting abstractions that introduce significant latency, making deep-tree search algorithms (like Monte Carlo Tree Search or complex reflection loops) painfully slow. jcode solves this by using a compiled Rust backend that exposes a highly structured execution harness.
The framework is divided into three primary layers:
- The Environment Layer (The Sandbox): This component manages the operating system context, available package managers, and shell environments. It isolates agent actions, preventing rogue scripts from damaging the host system while providing full feedback loops (stdout, stderr, exit codes) back to the agent.
- The Core Harness (Rust Engine): Written in Rust for maximum concurrency and memory safety, this engine manages agent state transitions, prompt token streaming pipelines, and workspace file parsing. It abstracts token budgets and tool call translations natively.
- The Agent Interface (Extensible Profiles): This layer allows developers to write custom planning algorithms, definition maps, and system instructions. It defines how the agent approaches a problem, splits tasks, and evaluates success.
Feature Comparison: jcode vs. Traditional Frameworks
Before diving into the implementation details, let's look at how jcode positions itself against traditional Python-based agent architectures and standard LLM orchestration environments.
---Feature / Metric jcode (1jehuang) Python-based Agent Frameworks Standard LLM Chat Hooks Core Language Rust Python Python / TypeScript Execution Speed Ultra-high (Compiled, Native Threading) Moderate (Interpreted, Async Overheads) Low (Network Dependent) Memory Management Strict compile-time safety, minimal footprint High runtime consumption, garbage collected Variable depending on wrapper Sandbox Isolation Native OS environment detection & mapping Requires heavy external Docker wrapper No native execution layer Primary Target Autonomous multi-turn software engineering General purpose task automation agents Single-turn text/code generation Prerequisites and Environment Verification
Before installing jcode, you need to ensure your machine meets the minimum system requirements for native compilation and execution. Because jcode evaluates code in real-time, having a stable environment with standard compilers is essential.
System Requirements:
- Operating System: macOS (Intel/Apple Silicon), Linux (Ubuntu 22.04+, Debian, Fedora), or Windows 11 (with PowerShell or WSL2).
- Toolchains: Rust Stable (1.75+ recommended) if building from source.
- Network: Active internet connection to pull model endpoints and fetch external crate dependencies.
Step-by-Step Installation Guide
jcode features an adaptive installer that detects your current operating system, available package managers, and active shell configurations. Select the installation track below that best matches your local development system.
Option A: macOS via Homebrew
If you are on macOS and use the Homebrew package manager, you can install the official tap maintained by 1jehuang directly via your terminal:
# Tap the jcode formula repository brew tap 1jehuang/jcode # Install the binary package brew install jcodeOption B: Linux or macOS via Shell Script
For standard Linux distributions or macOS environments without Homebrew, use the automated installation script. This pulls the latest compiled binary corresponding to your architecture:
curl -fsSL [https://raw.githubusercontent.com/1jehuang/jcode/main/scripts/install.sh](https://raw.githubusercontent.com/1jehuang/jcode/main/scripts/install.sh) | bashOption C: Windows via PowerShell
If you are running natively on a Windows host within a standard administrative PowerShell prompt, execute the following command to download and map the binaries:
irm [https://raw.githubusercontent.com/1jehuang/jcode/main/scripts/install.ps1](https://raw.githubusercontent.com/1jehuang/jcode/main/scripts/install.ps1) | iexOption D: Building From Source (Recommended for Contributors)
If you want to run the cutting-edge development branch or adapt the core Rust source code to custom enterprise parameters, clone the official GitHub repository and compile it locally:
# Clone the project repository git clone [https://github.com/1jehuang/jcode.git](https://github.com/1jehuang/jcode.git) cd jcode # Compile a highly optimized release binary using Cargo cargo build --release # Execute the local release install configuration script ./scripts/install_release.shVerify that your installation was successful by checking the current version of the harness:
---jcode --versionQuickstart: Configuring and Initializing Your Agent Workspace
With jcode successfully installed, the next stage is configuring your active LLM providers and preparing a localized project workspace where your programming agent can safely read, write, and test applications.
Step 1: Exporting LLM API Credentials
jcode acts as an execution harness that routes logic through state-of-the-art coding LLMs. You must supply your preferred model API keys as environment variables. Add these to your shell profile (e.g.,
.bashrcor.zshrc):export OPENAI_API_KEY="sk-proj-xxxxxxxxxxxxxxxxxxxxxxxxxxxxxxxx" export ANTHROPIC_API_KEY="sk-ant
jcode: Building High-Performance Autonomous AI Coding Agents from Scratch
The landscape of AI-driven software development is shifting rapidly. While first-generation AI coding tools operated primarily as conversational completions or simple script generators, the community is moving decisively toward autonomous programming agents. These agents don't just suggest code; they plan, execute tests, refactor, and self-correct within a structured harness.
Emerging at the forefront of this shift in May 2026 is jcode, an open-source, Rust-based programming agent framework developed by creator
1jehuang. Rapidly climbing the GitHub Trending charts and capturing the attention of autonomous systems developers, jcode addresses a critical bottleneck in the agentic ecosystem: execution speed, structural reliability, and resource overhead. Written entirely in Rust, it provides a high-performance harness designed to run AI coding agents at scale without the typical latency and memory bloat associated with Python-heavy orchestration layers.In this comprehensive tutorial-style guide, we will break down what jcode is, analyze its internal architecture, compare it to existing frameworks, and walk through an end-to-end installation and configuration process to build your very first autonomous coding agent.
---Understanding the jcode Architecture
To build effective applications with jcode, it is essential to understand how it organizes the execution loop of an AI agent. Traditional agent frameworks rely on high-level scripting abstractions that introduce significant latency, making deep-tree search algorithms (like Monte Carlo Tree Search or complex reflection loops) painfully slow. jcode solves this by using a compiled Rust backend that exposes a highly structured execution harness.
The framework is divided into three primary layers:
- The Environment Layer (The Sandbox): This component manages the operating system context, available package managers, and shell environments. It isolates agent actions, preventing rogue scripts from damaging the host system while providing full feedback loops (stdout, stderr, exit codes) back to the agent.
- The Core Harness (Rust Engine): Written in Rust for maximum concurrency and memory safety, this engine manages agent state transitions, prompt token streaming pipelines, and workspace file parsing. It abstracts token budgets and tool call translations natively.
- The Agent Interface (Extensible Profiles): This layer allows developers to write custom planning algorithms, definition maps, and system instructions. It defines how the agent approaches a problem, splits tasks, and evaluates success.
Feature Comparison: jcode vs. Traditional Frameworks
Before diving into the implementation details, let's look at how jcode positions itself against traditional Python-based agent architectures and standard LLM orchestration environments.
---Feature / Metric jcode (1jehuang) Python-based Agent Frameworks Standard LLM Chat Hooks Core Language Rust Python Python / TypeScript Execution Speed Ultra-high (Compiled, Native Threading) Moderate (Interpreted, Async Overheads) Low (Network Dependent) Memory Management Strict compile-time safety, minimal footprint High runtime consumption, garbage collected Variable depending on wrapper Sandbox Isolation Native OS environment detection & mapping Requires heavy external Docker wrapper No native execution layer Primary Target Autonomous multi-turn software engineering General purpose task automation agents Single-turn text/code generation Prerequisites and Environment Verification
Before installing jcode, you need to ensure your machine meets the minimum system requirements for native compilation and execution. Because jcode evaluates code in real-time, having a stable environment with standard compilers is essential.
System Requirements:
- Operating System: macOS (Intel/Apple Silicon), Linux (Ubuntu 22.04+, Debian, Fedora), or Windows 11 (with PowerShell or WSL2).
- Toolchains: Rust Stable (1.75+ recommended) if building from source.
- Network: Active internet connection to pull model endpoints and fetch external crate dependencies.
Step-by-Step Installation Guide
jcode features an adaptive installer that detects your current operating system, available package managers, and active shell configurations. Select the installation track below that best matches your local development system.
Option A: macOS via Homebrew
If you are on macOS and use the Homebrew package manager, you can install the official tap maintained by 1jehuang directly via your terminal:
# Tap the jcode formula repository brew tap 1jehuang/jcode # Install the binary package brew install jcodeOption B: Linux or macOS via Shell Script
For standard Linux distributions or macOS environments without Homebrew, use the automated installation script. This pulls the latest compiled binary corresponding to your architecture:
curl -fsSL [https://raw.githubusercontent.com/1jehuang/jcode/main/scripts/install.sh](https://raw.githubusercontent.com/1jehuang/jcode/main/scripts/install.sh) | bashOption C: Windows via PowerShell
If you are running natively on a Windows host within a standard administrative PowerShell prompt, execute the following command to download and map the binaries:
irm [https://raw.githubusercontent.com/1jehuang/jcode/main/scripts/install.ps1](https://raw.githubusercontent.com/1jehuang/jcode/main/scripts/install.ps1) | iexOption D: Building From Source (Recommended for Contributors)
If you want to run the cutting-edge development branch or adapt the core Rust source code to custom enterprise parameters, clone the official GitHub repository and compile it locally:
# Clone the project repository git clone [https://github.com/1jehuang/jcode.git](https://github.com/1jehuang/jcode.git) cd jcode # Compile a highly optimized release binary using Cargo cargo build --release # Execute the local release install configuration script ./scripts/install_release.shVerify that your installation was successful by checking the current version of the harness:
---jcode --versionQuickstart: Configuring and Initializing Your Agent Workspace
With jcode successfully installed, the next stage is configuring your active LLM providers and preparing a localized project workspace where your programming agent can safely read, write, and test applications.
Step 1: Exporting LLM API Credentials
jcode acts as an execution harness that routes logic through state-of-the-art coding LLMs. You must supply your preferred model API keys as environment variables. Add these to your shell profile (e.g.,
.bashrcor.zshrc):export OPENAI_API_KEY="sk-proj-xxxxxxxxxxxxxxxxxxxxxxxxxxxxxxxx" export ANTHROPIC_API_KEY="sk-ant-xxxxxxxxxxxxxxxxxxxxxxxxxxxxxxxx"Step 2: Initialize a New jcode Workspace
Navigate to an empty folder or your target repository and run the workspace initialization command. This tells jcode to parse the
jcode: Building High-Performance Autonomous AI Coding Agents from Scratch
The landscape of AI-driven software development is shifting rapidly. While first-generation AI coding tools operated primarily as conversational completions or simple script generators, the community is moving decisively toward autonomous programming agents. These agents don't just suggest code; they plan, execute tests, refactor, and self-correct within a structured harness.
Emerging at the forefront of this shift in May 2026 is jcode, an open-source, Rust-based programming agent framework developed by creator
1jehuang. Rapidly climbing the GitHub Trending charts and capturing the attention of autonomous systems developers, jcode addresses a critical bottleneck in the agentic ecosystem: execution speed, structural reliability, and resource overhead. Written entirely in Rust, it provides a high-performance harness designed to run AI coding agents at scale without the typical latency and memory bloat associated with Python-heavy orchestration layers.In this comprehensive tutorial-style guide, we will break down what jcode is, analyze its internal architecture, compare it to existing frameworks, and walk through an end-to-end installation and configuration process to build your very first autonomous coding agent.
---Understanding the jcode Architecture
To build effective applications with jcode, it is essential to understand how it organizes the execution loop of an AI agent. Traditional agent frameworks rely on high-level scripting abstractions that introduce significant latency, making deep-tree search algorithms (like Monte Carlo Tree Search or complex reflection loops) painfully slow. jcode solves this by using a compiled Rust backend that exposes a highly structured execution harness.
The framework is divided into three primary layers:
- The Environment Layer (The Sandbox): This component manages the operating system context, available package managers, and shell environments. It isolates agent actions, preventing rogue scripts from damaging the host system while providing full feedback loops (stdout, stderr, exit codes) back to the agent.
- The Core Harness (Rust Engine): Written in Rust for maximum concurrency and memory safety, this engine manages agent state transitions, prompt token streaming pipelines, and workspace file parsing. It abstracts token budgets and tool call translations natively.
- The Agent Interface (Extensible Profiles): This layer allows developers to write custom planning algorithms, definition maps, and system instructions. It defines how the agent approaches a problem, splits tasks, and evaluates success.
Feature Comparison: jcode vs. Traditional Frameworks
Before diving into the implementation details, let's look at how jcode positions itself against traditional Python-based agent architectures and standard LLM orchestration environments.
---Feature / Metric jcode (1jehuang) Python-based Agent Frameworks Standard LLM Chat Hooks Core Language Rust Python Python / TypeScript Execution Speed Ultra-high (Compiled, Native Threading) Moderate (Interpreted, Async Overheads) Low (Network Dependent) Memory Management Strict compile-time safety, minimal footprint High runtime consumption, garbage collected Variable depending on wrapper Sandbox Isolation Native OS environment detection & mapping Requires heavy external Docker wrapper No native execution layer Primary Target Autonomous multi-turn software engineering General purpose task automation agents Single-turn text/code generation Prerequisites and Environment Verification
Before installing jcode, you need to ensure your machine meets the minimum system requirements for native compilation and execution. Because jcode evaluates code in real-time, having a stable environment with standard compilers is essential.
System Requirements:
- Operating System: macOS (Intel/Apple Silicon), Linux (Ubuntu 22.04+, Debian, Fedora), or Windows 11 (with PowerShell or WSL2).
- Toolchains: Rust Stable (1.75+ recommended) if building from source.
- Network: Active internet connection to pull model endpoints and fetch external crate dependencies.
Step-by-Step Installation Guide
jcode features an adaptive installer that detects your current operating system, available package managers, and active shell configurations. Select the installation track below that best matches your local development system.
Option A: macOS via Homebrew
If you are on macOS and use the Homebrew package manager, you can install the official tap maintained by 1jehuang directly via your terminal:
# Tap the jcode formula repository brew tap 1jehuang/jcode # Install the binary package brew install jcodeOption B: Linux or macOS via Shell Script
For standard Linux distributions or macOS environments without Homebrew, use the automated installation script. This pulls the latest compiled binary corresponding to your architecture:
curl -fsSL [https://raw.githubusercontent.com/1jehuang/jcode/main/scripts/install.sh](https://raw.githubusercontent.com/1jehuang/jcode/main/scripts/install.sh) | bashOption C: Windows via PowerShell
If you are running natively on a Windows host within a standard administrative PowerShell prompt, execute the following command to download and map the binaries:
irm [https://raw.githubusercontent.com/1jehuang/jcode/main/scripts/install.ps1](https://raw.githubusercontent.com/1jehuang/jcode/main/scripts/install.ps1) | iexOption D: Building From Source (Recommended for Contributors)
If you want to run the cutting-edge development branch or adapt the core Rust source code to custom enterprise parameters, clone the official GitHub repository and compile it locally:
# Clone the project repository git clone [https://github.com/1jehuang/jcode.git](https://github.com/1jehuang/jcode.git) cd jcode # Compile a highly optimized release binary using Cargo cargo build --release # Execute the local release install configuration script ./scripts/install_release.shVerify that your installation was successful by checking the current version of the harness:
---jcode --versionQuickstart: Configuring and Initializing Your Agent Workspace
With jcode successfully installed, the next stage is configuring your active LLM providers and preparing a localized project workspace where your programming agent can safely read, write, and test applications.
Step 1: Exporting LLM API Credentials
jcode acts as an execution harness that routes logic through state-of-the-art coding LLMs. You must supply your preferred model API keys as environment variables. Add these to your shell profile (e.g.,
.bashrcor.zshrc):export OPENAI_API_KEY="sk-proj-xxxxxxxxxxxxxxxxxxxxxxxxxxxxxxxx" export ANTHROPIC_API_KEY="sk-ant-xxxxxxxxxxxxxxxxxxxxxxxxxxxxxxxx"Step 2: Initialize a New jcode Workspace
Navigate to an empty folder or your target repository and run the workspace initialization command. This tells jcode to parse the local layout and prepare an isolated runtime manifest:
mkdir my-agent-project cd my-agent-
jcode: Building High-Performance Autonomous AI Coding Agents from Scratch
The landscape of AI-driven software development is shifting rapidly. While first-generation AI coding tools operated primarily as conversational completions or simple script generators, the community is moving decisively toward autonomous programming agents. These agents don't just suggest code; they plan, execute tests, refactor, and self-correct within a structured harness.
Emerging at the forefront of this shift in May 2026 is jcode, an open-source, Rust-based programming agent framework developed by creator
1jehuang. Rapidly climbing the GitHub Trending charts and capturing the attention of autonomous systems developers, jcode addresses a critical bottleneck in the agentic ecosystem: execution speed, structural reliability, and resource overhead. Written entirely in Rust, it provides a high-performance harness designed to run AI coding agents at scale without the typical latency and memory bloat associated with Python-heavy orchestration layers.In this comprehensive tutorial-style guide, we will break down what jcode is, analyze its internal architecture, compare it to existing frameworks, and walk through an end-to-end installation and configuration process to build your very first autonomous coding agent.
---Understanding the jcode Architecture
To build effective applications with jcode, it is essential to understand how it organizes the execution loop of an AI agent. Traditional agent frameworks rely on high-level scripting abstractions that introduce significant latency, making deep-tree search algorithms (like Monte Carlo Tree Search or complex reflection loops) painfully slow. jcode solves this by using a compiled Rust backend that exposes a highly structured execution harness.
The framework is divided into three primary layers:
- The Environment Layer (The Sandbox): This component manages the operating system context, available package managers, and shell environments. It isolates agent actions, preventing rogue scripts from damaging the host system while providing full feedback loops (stdout, stderr, exit codes) back to the agent.
- The Core Harness (Rust Engine): Written in Rust for maximum concurrency and memory safety, this engine manages agent state transitions, prompt token streaming pipelines, and workspace file parsing. It abstracts token budgets and tool call translations natively.
- The Agent Interface (Extensible Profiles): This layer allows developers to write custom planning algorithms, definition maps, and system instructions. It defines how the agent approaches a problem, splits tasks, and evaluates success.
Feature Comparison: jcode vs. Traditional Frameworks
Before diving into the implementation details, let's look at how jcode positions itself against traditional Python-based agent architectures and standard LLM orchestration environments.
---Feature / Metric jcode (1jehuang) Python-based Agent Frameworks Standard LLM Chat Hooks Core Language Rust Python Python / TypeScript Execution Speed Ultra-high (Compiled, Native Threading) Moderate (Interpreted, Async Overheads) Low (Network Dependent) Memory Management Strict compile-time safety, minimal footprint High runtime consumption, garbage collected Variable depending on wrapper Sandbox Isolation Native OS environment detection & mapping Requires heavy external Docker wrapper No native execution layer Primary Target Autonomous multi-turn software engineering General purpose task automation agents Single-turn text/code generation Prerequisites and Environment Verification
Before installing jcode, you need to ensure your machine meets the minimum system requirements for native compilation and execution. Because jcode evaluates code in real-time, having a stable environment with standard compilers is essential.
System Requirements:
- Operating System: macOS (Intel/Apple Silicon), Linux (Ubuntu 22.04+, Debian, Fedora), or Windows 11 (with PowerShell or WSL2).
- Toolchains: Rust Stable (1.75+ recommended) if building from source.
- Network: Active internet connection to pull model endpoints and fetch external crate dependencies.
Step-by-Step Installation Guide
jcode features an adaptive installer that detects your current operating system, available package managers, and active shell configurations. Select the installation track below that best matches your local development system.
Option A: macOS via Homebrew
If you are on macOS and use the Homebrew package manager, you can install the official tap maintained by 1jehuang directly via your terminal:
# Tap the jcode formula repository brew tap 1jehuang/jcode # Install the binary package brew install jcodeOption B: Linux or macOS via Shell Script
For standard Linux distributions or macOS environments without Homebrew, use the automated installation script. This pulls the latest compiled binary corresponding to your architecture:
curl -fsSL [https://raw.githubusercontent.com/1jehuang/jcode/main/scripts/install.sh](https://raw.githubusercontent.com/1jehuang/jcode/main/scripts/install.sh) | bashOption C: Windows via PowerShell
If you are running natively on a Windows host within a standard administrative PowerShell prompt, execute the following command to download and map the binaries:
irm [https://raw.githubusercontent.com/1jehuang/jcode/main/scripts/install.ps1](https://raw.githubusercontent.com/1jehuang/jcode/main/scripts/install.ps1) | iexOption D: Building From Source (Recommended for Contributors)
If you want to run the cutting-edge development branch or adapt the core Rust source code to custom enterprise parameters, clone the official GitHub repository and compile it locally:
# Clone the project repository git clone [https://github.com/1jehuang/jcode.git](https://github.com/1jehuang/jcode.git) cd jcode # Compile a highly optimized release binary using Cargo cargo build --release # Execute the local release install configuration script ./scripts/install_release.shVerify that your installation was successful by checking the current version of the harness:
---jcode --versionQuickstart: Configuring and Initializing Your Agent Workspace
With jcode successfully installed, the next stage is configuring your active LLM providers and preparing a localized project workspace where your programming agent can safely read, write, and test applications.
Step 1: Exporting LLM API Credentials
jcode acts as an execution harness that routes logic through state-of-the-art coding LLMs. You must supply your preferred model API keys as environment variables. Add these to your shell profile (e.g.,
.bashrcor.zshrc):export OPENAI_API_KEY="sk-proj-xxxxxxxxxxxxxxxxxxxxxxxxxxxxxxxx" export ANTHROPIC_API_KEY="sk-ant-xxxxxxxxxxxxxxxxxxxxxxxxxxxxxxxx"Step 2: Initialize a New jcode Workspace
Navigate to an empty folder or your target repository and run the workspace initialization command. This tells jcode to parse the local layout and prepare an isolated runtime manifest:
mkdir my-agent-project cd my-agent-project jcode initThis command creates a hidden configuration workspace called
.jcode
jcode: Building High-Performance Autonomous AI Coding Agents from Scratch
The landscape of AI-driven software development is shifting rapidly. While first-generation AI coding tools operated primarily as conversational completions or simple script generators, the community is moving decisively toward autonomous programming agents. These agents don't just suggest code; they plan, execute tests, refactor, and self-correct within a structured harness.
Emerging at the forefront of this shift in May 2026 is jcode, an open-source, Rust-based programming agent framework developed by creator
1jehuang. Rapidly climbing the GitHub Trending charts and capturing the attention of autonomous systems developers, jcode addresses a critical bottleneck in the agentic ecosystem: execution speed, structural reliability, and resource overhead. Written entirely in Rust, it provides a high-performance harness designed to run AI coding agents at scale without the typical latency and memory bloat associated with Python-heavy orchestration layers.In this comprehensive tutorial-style guide, we will break down what jcode is, analyze its internal architecture, compare it to existing frameworks, and walk through an end-to-end installation and configuration process to build your very first autonomous coding agent.
---Understanding the jcode Architecture
To build effective applications with jcode, it is essential to understand how it organizes the execution loop of an AI agent. Traditional agent frameworks rely on high-level scripting abstractions that introduce significant latency, making deep-tree search algorithms (like Monte Carlo Tree Search or complex reflection loops) painfully slow. jcode solves this by using a compiled Rust backend that exposes a highly structured execution harness.
The framework is divided into three primary layers:
- The Environment Layer (The Sandbox): This component manages the operating system context, available package managers, and shell environments. It isolates agent actions, preventing rogue scripts from damaging the host system while providing full feedback loops (stdout, stderr, exit codes) back to the agent.
- The Core Harness (Rust Engine): Written in Rust for maximum concurrency and memory safety, this engine manages agent state transitions, prompt token streaming pipelines, and workspace file parsing. It abstracts token budgets and tool call translations natively.
- The Agent Interface (Extensible Profiles): This layer allows developers to write custom planning algorithms, definition maps, and system instructions. It defines how the agent approaches a problem, splits tasks, and evaluates success.
Feature Comparison: jcode vs. Traditional Frameworks
Before diving into the implementation details, let's look at how jcode positions itself against traditional Python-based agent architectures and standard LLM orchestration environments.
---Feature / Metric jcode (1jehuang) Python-based Agent Frameworks Standard LLM Chat Hooks Core Language Rust Python Python / TypeScript Execution Speed Ultra-high (Compiled, Native Threading) Moderate (Interpreted, Async Overheads) Low (Network Dependent) Memory Management Strict compile-time safety, minimal footprint High runtime consumption, garbage collected Variable depending on wrapper Sandbox Isolation Native OS environment detection & mapping Requires heavy external Docker wrapper No native execution layer Primary Target Autonomous multi-turn software engineering General purpose task automation agents Single-turn text/code generation Prerequisites and Environment Verification
Before installing jcode, you need to ensure your machine meets the minimum system requirements for native compilation and execution. Because jcode evaluates code in real-time, having a stable environment with standard compilers is essential.
System Requirements:
- Operating System: macOS (Intel/Apple Silicon), Linux (Ubuntu 22.04+, Debian, Fedora), or Windows 11 (with PowerShell or WSL2).
- Toolchains: Rust Stable (1.75+ recommended) if building from source.
- Network: Active internet connection to pull model endpoints and fetch external crate dependencies.
Step-by-Step Installation Guide
jcode features an adaptive installer that detects your current operating system, available package managers, and active shell configurations. Select the installation track below that best matches your local development system.
Option A: macOS via Homebrew
If you are on macOS and use the Homebrew package manager, you can install the official tap maintained by 1jehuang directly via your terminal:
# Tap the jcode formula repository brew tap 1jehuang/jcode # Install the binary package brew install jcodeOption B: Linux or macOS via Shell Script
For standard Linux distributions or macOS environments without Homebrew, use the automated installation script. This pulls the latest compiled binary corresponding to your architecture:
curl -fsSL [https://raw.githubusercontent.com/1jehuang/jcode/main/scripts/install.sh](https://raw.githubusercontent.com/1jehuang/jcode/main/scripts/install.sh) | bashOption C: Windows via PowerShell
If you are running natively on a Windows host within a standard administrative PowerShell prompt, execute the following command to download and map the binaries:
irm [https://raw.githubusercontent.com/1jehuang/jcode/main/scripts/install.ps1](https://raw.githubusercontent.com/1jehuang/jcode/main/scripts/install.ps1) | iexOption D: Building From Source (Recommended for Contributors)
If you want to run the cutting-edge development branch or adapt the core Rust source code to custom enterprise parameters, clone the official GitHub repository and compile it locally:
# Clone the project repository git clone [https://github.com/1jehuang/jcode.git](https://github.com/1jehuang/jcode.git) cd jcode # Compile a highly optimized release binary using Cargo cargo build --release # Execute the local release install configuration script ./scripts/install_release.shVerify that your installation was successful by checking the current version of the harness:
---jcode --versionQuickstart: Configuring and Initializing Your Agent Workspace
With jcode successfully installed, the next stage is configuring your active LLM providers and preparing a localized project workspace where your programming agent can safely read, write, and test applications.
Step 1: Exporting LLM API Credentials
jcode acts as an execution harness that routes logic through state-of-the-art coding LLMs. You must supply your preferred model API keys as environment variables. Add these to your shell profile (e.g.,
.bashrcor.zshrc):export OPENAI_API_KEY="sk-proj-xxxxxxxxxxxxxxxxxxxxxxxxxxxxxxxx" export ANTHROPIC_API_KEY="sk-ant-xxxxxxxxxxxxxxxxxxxxxxxxxxxxxxxx"Step 2: Initialize a New jcode Workspace
Navigate to an empty folder or your target repository and run the workspace initialization command. This tells jcode to parse the local layout and prepare an isolated runtime manifest:
mkdir my-agent-project cd my-agent-project jcode initThis command creates a hidden configuration workspace called
.jcode/containing a primary configuration file namedconfig.toml. Let's inspect and modify a standard setup configuration:jcode: Building High-Performance Autonomous AI Coding Agents from Scratch
The landscape of AI-driven software development is shifting rapidly. While first-generation AI coding tools operated primarily as conversational completions or simple script generators, the community is moving decisively toward autonomous programming agents. These agents don't just suggest code; they plan, execute tests, refactor, and self-correct within a structured harness.
Emerging at the forefront of this shift in May 2026 is jcode, an open-source, Rust-based programming agent framework developed by creator
1jehuang. Rapidly climbing the GitHub Trending charts and capturing the attention of autonomous systems developers, jcode addresses a critical bottleneck in the agentic ecosystem: execution speed, structural reliability, and resource overhead. Written entirely in Rust, it provides a high-performance harness designed to run AI coding agents at scale without the typical latency and memory bloat associated with Python-heavy orchestration layers.In this comprehensive tutorial-style guide, we will break down what jcode is, analyze its internal architecture, compare it to existing frameworks, and walk through an end-to-end installation and configuration process to build your very first autonomous coding agent.
---Understanding the jcode Architecture
To build effective applications with jcode, it is essential to understand how it organizes the execution loop of an AI agent. Traditional agent frameworks rely on high-level scripting abstractions that introduce significant latency, making deep-tree search algorithms (like Monte Carlo Tree Search or complex reflection loops) painfully slow. jcode solves this by using a compiled Rust backend that exposes a highly structured execution harness.
The framework is divided into three primary layers:
- The Environment Layer (The Sandbox): This component manages the operating system context, available package managers, and shell environments. It isolates agent actions, preventing rogue scripts from damaging the host system while providing full feedback loops (stdout, stderr, exit codes) back to the agent.
- The Core Harness (Rust Engine): Written in Rust for maximum concurrency and memory safety, this engine manages agent state transitions, prompt token streaming pipelines, and workspace file parsing. It abstracts token budgets and tool call translations natively.
- The Agent Interface (Extensible Profiles): This layer allows developers to write custom planning algorithms, definition maps, and system instructions. It defines how the agent approaches a problem, splits tasks, and evaluates success.
Feature Comparison: jcode vs. Traditional Frameworks
Before diving into the implementation details, let's look at how jcode positions itself against traditional Python-based agent architectures and standard LLM orchestration environments.
---Feature / Metric jcode (1jehuang) Python-based Agent Frameworks Standard LLM Chat Hooks Core Language Rust Python Python / TypeScript Execution Speed Ultra-high (Compiled, Native Threading) Moderate (Interpreted, Async Overheads) Low (Network Dependent) Memory Management Strict compile-time safety, minimal footprint High runtime consumption, garbage collected Variable depending on wrapper Sandbox Isolation Native OS environment detection & mapping Requires heavy external Docker wrapper No native execution layer Primary Target Autonomous multi-turn software engineering General purpose task automation agents Single-turn text/code generation Prerequisites and Environment Verification
Before installing jcode, you need to ensure your machine meets the minimum system requirements for native compilation and execution. Because jcode evaluates code in real-time, having a stable environment with standard compilers is essential.
System Requirements:
- Operating System: macOS (Intel/Apple Silicon), Linux (Ubuntu 22.04+, Debian, Fedora), or Windows 11 (with PowerShell or WSL2).
- Toolchains: Rust Stable (1.75+ recommended) if building from source.
- Network: Active internet connection to pull model endpoints and fetch external crate dependencies.
Step-by-Step Installation Guide
jcode features an adaptive installer that detects your current operating system, available package managers, and active shell configurations. Select the installation track below that best matches your local development system.
Option A: macOS via Homebrew
If you are on macOS and use the Homebrew package manager, you can install the official tap maintained by 1jehuang directly via your terminal:
# Tap the jcode formula repository brew tap 1jehuang/jcode # Install the binary package brew install jcodeOption B: Linux or macOS via Shell Script
For standard Linux distributions or macOS environments without Homebrew, use the automated installation script. This pulls the latest compiled binary corresponding to your architecture:
curl -fsSL [https://raw.githubusercontent.com/1jehuang/jcode/main/scripts/install.sh](https://raw.githubusercontent.com/1jehuang/jcode/main/scripts/install.sh) | bashOption C: Windows via PowerShell
If you are running natively on a Windows host within a standard administrative PowerShell prompt, execute the following command to download and map the binaries:
irm [https://raw.githubusercontent.com/1jehuang/jcode/main/scripts/install.ps1](https://raw.githubusercontent.com/1jehuang/jcode/main/scripts/install.ps1) | iexOption D: Building From Source (Recommended for Contributors)
If you want to run the cutting-edge development branch or adapt the core Rust source code to custom enterprise parameters, clone the official GitHub repository and compile it locally:
# Clone the project repository git clone [https://github.com/1jehuang/jcode.git](https://github.com/1jehuang/jcode.git) cd jcode # Compile a highly optimized release binary using Cargo cargo build --release # Execute the local release install configuration script ./scripts/install_release.shVerify that your installation was successful by checking the current version of the harness:
---jcode --versionQuickstart: Configuring and Initializing Your Agent Workspace
With jcode successfully installed, the next stage is configuring your active LLM providers and preparing a localized project workspace where your programming agent can safely read, write, and test applications.
Step 1: Exporting LLM API Credentials
jcode acts as an execution harness that routes logic through state-of-the-art coding LLMs. You must supply your preferred model API keys as environment variables. Add these to your shell profile (e.g.,
.bashrcor.zshrc):export OPENAI_API_KEY="sk-proj-xxxxxxxxxxxxxxxxxxxxxxxxxxxxxxxx" export ANTHROPIC_API_KEY="sk-ant-xxxxxxxxxxxxxxxxxxxxxxxxxxxxxxxx"Step 2: Initialize a New jcode Workspace
Navigate to an empty folder or your target repository and run the workspace initialization command. This tells jcode to parse the local layout and prepare an isolated runtime manifest:
mkdir my-agent-project cd my-agent-project jcode initThis command creates a hidden configuration workspace called
.jcode/containing a primary configuration file namedconfig.toml. Let's inspect and modify a standard setup configuration:# .jcode/config.toml [workspace] name = "my
jcode: Building High-Performance Autonomous AI Coding Agents from Scratch
The landscape of AI-driven software development is shifting rapidly. While first-generation AI coding tools operated primarily as conversational completions or simple script generators, the community is moving decisively toward autonomous programming agents. These agents don't just suggest code; they plan, execute tests, refactor, and self-correct within a structured harness.
Emerging at the forefront of this shift in May 2026 is jcode, an open-source, Rust-based programming agent framework developed by creator
1jehuang. Rapidly climbing the GitHub Trending charts and capturing the attention of autonomous systems developers, jcode addresses a critical bottleneck in the agentic ecosystem: execution speed, structural reliability, and resource overhead. Written entirely in Rust, it provides a high-performance harness designed to run AI coding agents at scale without the typical latency and memory bloat associated with Python-heavy orchestration layers.In this comprehensive tutorial-style guide, we will break down what jcode is, analyze its internal architecture, compare it to existing frameworks, and walk through an end-to-end installation and configuration process to build your very first autonomous coding agent.
---Understanding the jcode Architecture
To build effective applications with jcode, it is essential to understand how it organizes the execution loop of an AI agent. Traditional agent frameworks rely on high-level scripting abstractions that introduce significant latency, making deep-tree search algorithms (like Monte Carlo Tree Search or complex reflection loops) painfully slow. jcode solves this by using a compiled Rust backend that exposes a highly structured execution harness.
The framework is divided into three primary layers:
- The Environment Layer (The Sandbox): This component manages the operating system context, available package managers, and shell environments. It isolates agent actions, preventing rogue scripts from damaging the host system while providing full feedback loops (stdout, stderr, exit codes) back to the agent.
- The Core Harness (Rust Engine): Written in Rust for maximum concurrency and memory safety, this engine manages agent state transitions, prompt token streaming pipelines, and workspace file parsing. It abstracts token budgets and tool call translations natively.
- The Agent Interface (Extensible Profiles): This layer allows developers to write custom planning algorithms, definition maps, and system instructions. It defines how the agent approaches a problem, splits tasks, and evaluates success.
Feature Comparison: jcode vs. Traditional Frameworks
Before diving into the implementation details, let's look at how jcode positions itself against traditional Python-based agent architectures and standard LLM orchestration environments.
---Feature / Metric jcode (1jehuang) Python-based Agent Frameworks Standard LLM Chat Hooks Core Language Rust Python Python / TypeScript Execution Speed Ultra-high (Compiled, Native Threading) Moderate (Interpreted, Async Overheads) Low (Network Dependent) Memory Management Strict compile-time safety, minimal footprint High runtime consumption, garbage collected Variable depending on wrapper Sandbox Isolation Native OS environment detection & mapping Requires heavy external Docker wrapper No native execution layer Primary Target Autonomous multi-turn software engineering General purpose task automation agents Single-turn text/code generation Prerequisites and Environment Verification
Before installing jcode, you need to ensure your machine meets the minimum system requirements for native compilation and execution. Because jcode evaluates code in real-time, having a stable environment with standard compilers is essential.
System Requirements:
- Operating System: macOS (Intel/Apple Silicon), Linux (Ubuntu 22.04+, Debian, Fedora), or Windows 11 (with PowerShell or WSL2).
- Toolchains: Rust Stable (1.75+ recommended) if building from source.
- Network: Active internet connection to pull model endpoints and fetch external crate dependencies.
Step-by-Step Installation Guide
jcode features an adaptive installer that detects your current operating system, available package managers, and active shell configurations. Select the installation track below that best matches your local development system.
Option A: macOS via Homebrew
If you are on macOS and use the Homebrew package manager, you can install the official tap maintained by 1jehuang directly via your terminal:
# Tap the jcode formula repository brew tap 1jehuang/jcode # Install the binary package brew install jcodeOption B: Linux or macOS via Shell Script
For standard Linux distributions or macOS environments without Homebrew, use the automated installation script. This pulls the latest compiled binary corresponding to your architecture:
curl -fsSL [https://raw.githubusercontent.com/1jehuang/jcode/main/scripts/install.sh](https://raw.githubusercontent.com/1jehuang/jcode/main/scripts/install.sh) | bashOption C: Windows via PowerShell
If you are running natively on a Windows host within a standard administrative PowerShell prompt, execute the following command to download and map the binaries:
irm [https://raw.githubusercontent.com/1jehuang/jcode/main/scripts/install.ps1](https://raw.githubusercontent.com/1jehuang/jcode/main/scripts/install.ps1) | iexOption D: Building From Source (Recommended for Contributors)
If you want to run the cutting-edge development branch or adapt the core Rust source code to custom enterprise parameters, clone the official GitHub repository and compile it locally:
# Clone the project repository git clone [https://github.com/1jehuang/jcode.git](https://github.com/1jehuang/jcode.git) cd jcode # Compile a highly optimized release binary using Cargo cargo build --release # Execute the local release install configuration script ./scripts/install_release.shVerify that your installation was successful by checking the current version of the harness:
---jcode --versionQuickstart: Configuring and Initializing Your Agent Workspace
With jcode successfully installed, the next stage is configuring your active LLM providers and preparing a localized project workspace where your programming agent can safely read, write, and test applications.
Step 1: Exporting LLM API Credentials
jcode acts as an execution harness that routes logic through state-of-the-art coding LLMs. You must supply your preferred model API keys as environment variables. Add these to your shell profile (e.g.,
.bashrcor.zshrc):export OPENAI_API_KEY="sk-proj-xxxxxxxxxxxxxxxxxxxxxxxxxxxxxxxx" export ANTHROPIC_API_KEY="sk-ant-xxxxxxxxxxxxxxxxxxxxxxxxxxxxxxxx"Step 2: Initialize a New jcode Workspace
Navigate to an empty folder or your target repository and run the workspace initialization command. This tells jcode to parse the local layout and prepare an isolated runtime manifest:
mkdir my-agent-project cd my-agent-project jcode initThis command creates a hidden configuration workspace called
.jcode/containing a primary configuration file namedconfig.toml. Let's inspect and modify a standard setup configuration:# .jcode/config.toml [workspace] name = "my-agent-project" allowed_commands =
jcode: Building High-Performance Autonomous AI Coding Agents from Scratch
The landscape of AI-driven software development is shifting rapidly. While first-generation AI coding tools operated primarily as conversational completions or simple script generators, the community is moving decisively toward autonomous programming agents. These agents don't just suggest code; they plan, execute tests, refactor, and self-correct within a structured harness.
Emerging at the forefront of this shift in May 2026 is jcode, an open-source, Rust-based programming agent framework developed by creator
1jehuang. Rapidly climbing the GitHub Trending charts and capturing the attention of autonomous systems developers, jcode addresses a critical bottleneck in the agentic ecosystem: execution speed, structural reliability, and resource overhead. Written entirely in Rust, it provides a high-performance harness designed to run AI coding agents at scale without the typical latency and memory bloat associated with Python-heavy orchestration layers.In this comprehensive tutorial-style guide, we will break down what jcode is, analyze its internal architecture, compare it to existing frameworks, and walk through an end-to-end installation and configuration process to build your very first autonomous coding agent.
---Understanding the jcode Architecture
To build effective applications with jcode, it is essential to understand how it organizes the execution loop of an AI agent. Traditional agent frameworks rely on high-level scripting abstractions that introduce significant latency, making deep-tree search algorithms (like Monte Carlo Tree Search or complex reflection loops) painfully slow. jcode solves this by using a compiled Rust backend that exposes a highly structured execution harness.
The framework is divided into three primary layers:
- The Environment Layer (The Sandbox): This component manages the operating system context, available package managers, and shell environments. It isolates agent actions, preventing rogue scripts from damaging the host system while providing full feedback loops (stdout, stderr, exit codes) back to the agent.
- The Core Harness (Rust Engine): Written in Rust for maximum concurrency and memory safety, this engine manages agent state transitions, prompt token streaming pipelines, and workspace file parsing. It abstracts token budgets and tool call translations natively.
- The Agent Interface (Extensible Profiles): This layer allows developers to write custom planning algorithms, definition maps, and system instructions. It defines how the agent approaches a problem, splits tasks, and evaluates success.
Feature Comparison: jcode vs. Traditional Frameworks
Before diving into the implementation details, let's look at how jcode positions itself against traditional Python-based agent architectures and standard LLM orchestration environments.
---Feature / Metric jcode (1jehuang) Python-based Agent Frameworks Standard LLM Chat Hooks Core Language Rust Python Python / TypeScript Execution Speed Ultra-high (Compiled, Native Threading) Moderate (Interpreted, Async Overheads) Low (Network Dependent) Memory Management Strict compile-time safety, minimal footprint High runtime consumption, garbage collected Variable depending on wrapper Sandbox Isolation Native OS environment detection & mapping Requires heavy external Docker wrapper No native execution layer Primary Target Autonomous multi-turn software engineering General purpose task automation agents Single-turn text/code generation Prerequisites and Environment Verification
Before installing jcode, you need to ensure your machine meets the minimum system requirements for native compilation and execution. Because jcode evaluates code in real-time, having a stable environment with standard compilers is essential.
System Requirements:
- Operating System: macOS (Intel/Apple Silicon), Linux (Ubuntu 22.04+, Debian, Fedora), or Windows 11 (with PowerShell or WSL2).
- Toolchains: Rust Stable (1.75+ recommended) if building from source.
- Network: Active internet connection to pull model endpoints and fetch external crate dependencies.
Step-by-Step Installation Guide
jcode features an adaptive installer that detects your current operating system, available package managers, and active shell configurations. Select the installation track below that best matches your local development system.
Option A: macOS via Homebrew
If you are on macOS and use the Homebrew package manager, you can install the official tap maintained by 1jehuang directly via your terminal:
# Tap the jcode formula repository brew tap 1jehuang/jcode # Install the binary package brew install jcodeOption B: Linux or macOS via Shell Script
For standard Linux distributions or macOS environments without Homebrew, use the automated installation script. This pulls the latest compiled binary corresponding to your architecture:
curl -fsSL [https://raw.githubusercontent.com/1jehuang/jcode/main/scripts/install.sh](https://raw.githubusercontent.com/1jehuang/jcode/main/scripts/install.sh) | bashOption C: Windows via PowerShell
If you are running natively on a Windows host within a standard administrative PowerShell prompt, execute the following command to download and map the binaries:
irm [https://raw.githubusercontent.com/1jehuang/jcode/main/scripts/install.ps1](https://raw.githubusercontent.com/1jehuang/jcode/main/scripts/install.ps1) | iexOption D: Building From Source (Recommended for Contributors)
If you want to run the cutting-edge development branch or adapt the core Rust source code to custom enterprise parameters, clone the official GitHub repository and compile it locally:
# Clone the project repository git clone [https://github.com/1jehuang/jcode.git](https://github.com/1jehuang/jcode.git) cd jcode # Compile a highly optimized release binary using Cargo cargo build --release # Execute the local release install configuration script ./scripts/install_release.shVerify that your installation was successful by checking the current version of the harness:
---jcode --versionQuickstart: Configuring and Initializing Your Agent Workspace
With jcode successfully installed, the next stage is configuring your active LLM providers and preparing a localized project workspace where your programming agent can safely read, write, and test applications.
Step 1: Exporting LLM API Credentials
jcode acts as an execution harness that routes logic through state-of-the-art coding LLMs. You must supply your preferred model API keys as environment variables. Add these to your shell profile (e.g.,
.bashrcor.zshrc):export OPENAI_API_KEY="sk-proj-xxxxxxxxxxxxxxxxxxxxxxxxxxxxxxxx" export ANTHROPIC_API_KEY="sk-ant-xxxxxxxxxxxxxxxxxxxxxxxxxxxxxxxx"Step 2: Initialize a New jcode Workspace
Navigate to an empty folder or your target repository and run the workspace initialization command. This tells jcode to parse the local layout and prepare an isolated runtime manifest:
mkdir my-agent-project cd my-agent-project jcode initThis command creates a hidden configuration workspace called
.jcode/containing a primary configuration file namedconfig.toml. Let's inspect and modify a standard setup configuration:# .jcode/config.toml [workspace] name = "my-agent-project" allowed_commands = ["cargo", "npm", "python", "git", "pytest", "go"] max_iterations = 15 [model] provider = "anthropic" default_model = "claude
jcode: Building High-Performance Autonomous AI Coding Agents from Scratch
The landscape of AI-driven software development is shifting rapidly. While first-generation AI coding tools operated primarily as conversational completions or simple script generators, the community is moving decisively toward autonomous programming agents. These agents don't just suggest code; they plan, execute tests, refactor, and self-correct within a structured harness.
Emerging at the forefront of this shift in May 2026 is jcode, an open-source, Rust-based programming agent framework developed by creator
1jehuang. Rapidly climbing the GitHub Trending charts and capturing the attention of autonomous systems developers, jcode addresses a critical bottleneck in the agentic ecosystem: execution speed, structural reliability, and resource overhead. Written entirely in Rust, it provides a high-performance harness designed to run AI coding agents at scale without the typical latency and memory bloat associated with Python-heavy orchestration layers.In this comprehensive tutorial-style guide, we will break down what jcode is, analyze its internal architecture, compare it to existing frameworks, and walk through an end-to-end installation and configuration process to build your very first autonomous coding agent.
---Understanding the jcode Architecture
To build effective applications with jcode, it is essential to understand how it organizes the execution loop of an AI agent. Traditional agent frameworks rely on high-level scripting abstractions that introduce significant latency, making deep-tree search algorithms (like Monte Carlo Tree Search or complex reflection loops) painfully slow. jcode solves this by using a compiled Rust backend that exposes a highly structured execution harness.
The framework is divided into three primary layers:
- The Environment Layer (The Sandbox): This component manages the operating system context, available package managers, and shell environments. It isolates agent actions, preventing rogue scripts from damaging the host system while providing full feedback loops (stdout, stderr, exit codes) back to the agent.
- The Core Harness (Rust Engine): Written in Rust for maximum concurrency and memory safety, this engine manages agent state transitions, prompt token streaming pipelines, and workspace file parsing. It abstracts token budgets and tool call translations natively.
- The Agent Interface (Extensible Profiles): This layer allows developers to write custom planning algorithms, definition maps, and system instructions. It defines how the agent approaches a problem, splits tasks, and evaluates success.
Feature Comparison: jcode vs. Traditional Frameworks
Before diving into the implementation details, let's look at how jcode positions itself against traditional Python-based agent architectures and standard LLM orchestration environments.
---Feature / Metric jcode (1jehuang) Python-based Agent Frameworks Standard LLM Chat Hooks Core Language Rust Python Python / TypeScript Execution Speed Ultra-high (Compiled, Native Threading) Moderate (Interpreted, Async Overheads) Low (Network Dependent) Memory Management Strict compile-time safety, minimal footprint High runtime consumption, garbage collected Variable depending on wrapper Sandbox Isolation Native OS environment detection & mapping Requires heavy external Docker wrapper No native execution layer Primary Target Autonomous multi-turn software engineering General purpose task automation agents Single-turn text/code generation Prerequisites and Environment Verification
Before installing jcode, you need to ensure your machine meets the minimum system requirements for native compilation and execution. Because jcode evaluates code in real-time, having a stable environment with standard compilers is essential.
System Requirements:
- Operating System: macOS (Intel/Apple Silicon), Linux (Ubuntu 22.04+, Debian, Fedora), or Windows 11 (with PowerShell or WSL2).
- Toolchains: Rust Stable (1.75+ recommended) if building from source.
- Network: Active internet connection to pull model endpoints and fetch external crate dependencies.
Step-by-Step Installation Guide
jcode features an adaptive installer that detects your current operating system, available package managers, and active shell configurations. Select the installation track below that best matches your local development system.
Option A: macOS via Homebrew
If you are on macOS and use the Homebrew package manager, you can install the official tap maintained by 1jehuang directly via your terminal:
# Tap the jcode formula repository brew tap 1jehuang/jcode # Install the binary package brew install jcodeOption B: Linux or macOS via Shell Script
For standard Linux distributions or macOS environments without Homebrew, use the automated installation script. This pulls the latest compiled binary corresponding to your architecture:
curl -fsSL [https://raw.githubusercontent.com/1jehuang/jcode/main/scripts/install.sh](https://raw.githubusercontent.com/1jehuang/jcode/main/scripts/install.sh) | bashOption C: Windows via PowerShell
If you are running natively on a Windows host within a standard administrative PowerShell prompt, execute the following command to download and map the binaries:
irm [https://raw.githubusercontent.com/1jehuang/jcode/main/scripts/install.ps1](https://raw.githubusercontent.com/1jehuang/jcode/main/scripts/install.ps1) | iexOption D: Building From Source (Recommended for Contributors)
If you want to run the cutting-edge development branch or adapt the core Rust source code to custom enterprise parameters, clone the official GitHub repository and compile it locally:
# Clone the project repository git clone [https://github.com/1jehuang/jcode.git](https://github.com/1jehuang/jcode.git) cd jcode # Compile a highly optimized release binary using Cargo cargo build --release # Execute the local release install configuration script ./scripts/install_release.shVerify that your installation was successful by checking the current version of the harness:
---jcode --versionQuickstart: Configuring and Initializing Your Agent Workspace
With jcode successfully installed, the next stage is configuring your active LLM providers and preparing a localized project workspace where your programming agent can safely read, write, and test applications.
Step 1: Exporting LLM API Credentials
jcode acts as an execution harness that routes logic through state-of-the-art coding LLMs. You must supply your preferred model API keys as environment variables. Add these to your shell profile (e.g.,
.bashrcor.zshrc):export OPENAI_API_KEY="sk-proj-xxxxxxxxxxxxxxxxxxxxxxxxxxxxxxxx" export ANTHROPIC_API_KEY="sk-ant-xxxxxxxxxxxxxxxxxxxxxxxxxxxxxxxx"Step 2: Initialize a New jcode Workspace
Navigate to an empty folder or your target repository and run the workspace initialization command. This tells jcode to parse the local layout and prepare an isolated runtime manifest:
mkdir my-agent-project cd my-agent-project jcode initThis command creates a hidden configuration workspace called
.jcode/containing a primary configuration file namedconfig.toml. Let's inspect and modify a standard setup configuration:# .jcode/config.toml [workspace] name = "my-agent-project" allowed_commands = ["cargo", "npm", "python", "git", "pytest", "go"] max_iterations = 15 [model] provider = "anthropic" default_model = "claude-3-5-sonnet-20241022" temperature = 0.2
jcode: Building High-Performance Autonomous AI Coding Agents from Scratch
The landscape of AI-driven software development is shifting rapidly. While first-generation AI coding tools operated primarily as conversational completions or simple script generators, the community is moving decisively toward autonomous programming agents. These agents don't just suggest code; they plan, execute tests, refactor, and self-correct within a structured harness.
Emerging at the forefront of this shift in May 2026 is jcode, an open-source, Rust-based programming agent framework developed by creator
1jehuang. Rapidly climbing the GitHub Trending charts and capturing the attention of autonomous systems developers, jcode addresses a critical bottleneck in the agentic ecosystem: execution speed, structural reliability, and resource overhead. Written entirely in Rust, it provides a high-performance harness designed to run AI coding agents at scale without the typical latency and memory bloat associated with Python-heavy orchestration layers.In this comprehensive tutorial-style guide, we will break down what jcode is, analyze its internal architecture, compare it to existing frameworks, and walk through an end-to-end installation and configuration process to build your very first autonomous coding agent.
---Understanding the jcode Architecture
To build effective applications with jcode, it is essential to understand how it organizes the execution loop of an AI agent. Traditional agent frameworks rely on high-level scripting abstractions that introduce significant latency, making deep-tree search algorithms (like Monte Carlo Tree Search or complex reflection loops) painfully slow. jcode solves this by using a compiled Rust backend that exposes a highly structured execution harness.
The framework is divided into three primary layers:
- The Environment Layer (The Sandbox): This component manages the operating system context, available package managers, and shell environments. It isolates agent actions, preventing rogue scripts from damaging the host system while providing full feedback loops (stdout, stderr, exit codes) back to the agent.
- The Core Harness (Rust Engine): Written in Rust for maximum concurrency and memory safety, this engine manages agent state transitions, prompt token streaming pipelines, and workspace file parsing. It abstracts token budgets and tool call translations natively.
- The Agent Interface (Extensible Profiles): This layer allows developers to write custom planning algorithms, definition maps, and system instructions. It defines how the agent approaches a problem, splits tasks, and evaluates success.
Feature Comparison: jcode vs. Traditional Frameworks
Before diving into the implementation details, let's look at how jcode positions itself against traditional Python-based agent architectures and standard LLM orchestration environments.
---Feature / Metric jcode (1jehuang) Python-based Agent Frameworks Standard LLM Chat Hooks Core Language Rust Python Python / TypeScript Execution Speed Ultra-high (Compiled, Native Threading) Moderate (Interpreted, Async Overheads) Low (Network Dependent) Memory Management Strict compile-time safety, minimal footprint High runtime consumption, garbage collected Variable depending on wrapper Sandbox Isolation Native OS environment detection & mapping Requires heavy external Docker wrapper No native execution layer Primary Target Autonomous multi-turn software engineering General purpose task automation agents Single-turn text/code generation Prerequisites and Environment Verification
Before installing jcode, you need to ensure your machine meets the minimum system requirements for native compilation and execution. Because jcode evaluates code in real-time, having a stable environment with standard compilers is essential.
System Requirements:
- Operating System: macOS (Intel/Apple Silicon), Linux (Ubuntu 22.04+, Debian, Fedora), or Windows 11 (with PowerShell or WSL2).
- Toolchains: Rust Stable (1.75+ recommended) if building from source.
- Network: Active internet connection to pull model endpoints and fetch external crate dependencies.
Step-by-Step Installation Guide
jcode features an adaptive installer that detects your current operating system, available package managers, and active shell configurations. Select the installation track below that best matches your local development system.
Option A: macOS via Homebrew
If you are on macOS and use the Homebrew package manager, you can install the official tap maintained by 1jehuang directly via your terminal:
# Tap the jcode formula repository brew tap 1jehuang/jcode # Install the binary package brew install jcodeOption B: Linux or macOS via Shell Script
For standard Linux distributions or macOS environments without Homebrew, use the automated installation script. This pulls the latest compiled binary corresponding to your architecture:
curl -fsSL [https://raw.githubusercontent.com/1jehuang/jcode/main/scripts/install.sh](https://raw.githubusercontent.com/1jehuang/jcode/main/scripts/install.sh) | bashOption C: Windows via PowerShell
If you are running natively on a Windows host within a standard administrative PowerShell prompt, execute the following command to download and map the binaries:
irm [https://raw.githubusercontent.com/1jehuang/jcode/main/scripts/install.ps1](https://raw.githubusercontent.com/1jehuang/jcode/main/scripts/install.ps1) | iexOption D: Building From Source (Recommended for Contributors)
If you want to run the cutting-edge development branch or adapt the core Rust source code to custom enterprise parameters, clone the official GitHub repository and compile it locally:
# Clone the project repository git clone [https://github.com/1jehuang/jcode.git](https://github.com/1jehuang/jcode.git) cd jcode # Compile a highly optimized release binary using Cargo cargo build --release # Execute the local release install configuration script ./scripts/install_release.shVerify that your installation was successful by checking the current version of the harness:
---jcode --versionQuickstart: Configuring and Initializing Your Agent Workspace
With jcode successfully installed, the next stage is configuring your active LLM providers and preparing a localized project workspace where your programming agent can safely read, write, and test applications.
Step 1: Exporting LLM API Credentials
jcode acts as an execution harness that routes logic through state-of-the-art coding LLMs. You must supply your preferred model API keys as environment variables. Add these to your shell profile (e.g.,
.bashrcor.zshrc):export OPENAI_API_KEY="sk-proj-xxxxxxxxxxxxxxxxxxxxxxxxxxxxxxxx" export ANTHROPIC_API_KEY="sk-ant-xxxxxxxxxxxxxxxxxxxxxxxxxxxxxxxx"Step 2: Initialize a New jcode Workspace
Navigate to an empty folder or your target repository and run the workspace initialization command. This tells jcode to parse the local layout and prepare an isolated runtime manifest:
mkdir my-agent-project cd my-agent-project jcode initThis command creates a hidden configuration workspace called
.jcode/containing a primary configuration file namedconfig.toml. Let's inspect and modify a standard setup configuration:# .jcode/config.toml [workspace] name = "my-agent-project" allowed_commands = ["cargo", "npm", "python", "git", "pytest", "go"] max_iterations = 15 [model] provider = "anthropic" default_model = "claude-3-5-sonnet-20241022" temperature = 0.2 max_tokens = 4096 [sandbox] isolate_network = false timeout_seconds
jcode: Building High-Performance Autonomous AI Coding Agents from Scratch
The landscape of AI-driven software development is shifting rapidly. While first-generation AI coding tools operated primarily as conversational completions or simple script generators, the community is moving decisively toward autonomous programming agents. These agents don't just suggest code; they plan, execute tests, refactor, and self-correct within a structured harness.
Emerging at the forefront of this shift in May 2026 is jcode, an open-source, Rust-based programming agent framework developed by creator
1jehuang. Rapidly climbing the GitHub Trending charts and capturing the attention of autonomous systems developers, jcode addresses a critical bottleneck in the agentic ecosystem: execution speed, structural reliability, and resource overhead. Written entirely in Rust, it provides a high-performance harness designed to run AI coding agents at scale without the typical latency and memory bloat associated with Python-heavy orchestration layers.In this comprehensive tutorial-style guide, we will break down what jcode is, analyze its internal architecture, compare it to existing frameworks, and walk through an end-to-end installation and configuration process to build your very first autonomous coding agent.
---Understanding the jcode Architecture
To build effective applications with jcode, it is essential to understand how it organizes the execution loop of an AI agent. Traditional agent frameworks rely on high-level scripting abstractions that introduce significant latency, making deep-tree search algorithms (like Monte Carlo Tree Search or complex reflection loops) painfully slow. jcode solves this by using a compiled Rust backend that exposes a highly structured execution harness.
The framework is divided into three primary layers:
- The Environment Layer (The Sandbox): This component manages the operating system context, available package managers, and shell environments. It isolates agent actions, preventing rogue scripts from damaging the host system while providing full feedback loops (stdout, stderr, exit codes) back to the agent.
- The Core Harness (Rust Engine): Written in Rust for maximum concurrency and memory safety, this engine manages agent state transitions, prompt token streaming pipelines, and workspace file parsing. It abstracts token budgets and tool call translations natively.
- The Agent Interface (Extensible Profiles): This layer allows developers to write custom planning algorithms, definition maps, and system instructions. It defines how the agent approaches a problem, splits tasks, and evaluates success.
Feature Comparison: jcode vs. Traditional Frameworks
Before diving into the implementation details, let's look at how jcode positions itself against traditional Python-based agent architectures and standard LLM orchestration environments.
---Feature / Metric jcode (1jehuang) Python-based Agent Frameworks Standard LLM Chat Hooks Core Language Rust Python Python / TypeScript Execution Speed Ultra-high (Compiled, Native Threading) Moderate (Interpreted, Async Overheads) Low (Network Dependent) Memory Management Strict compile-time safety, minimal footprint High runtime consumption, garbage collected Variable depending on wrapper Sandbox Isolation Native OS environment detection & mapping Requires heavy external Docker wrapper No native execution layer Primary Target Autonomous multi-turn software engineering General purpose task automation agents Single-turn text/code generation Prerequisites and Environment Verification
Before installing jcode, you need to ensure your machine meets the minimum system requirements for native compilation and execution. Because jcode evaluates code in real-time, having a stable environment with standard compilers is essential.
System Requirements:
- Operating System: macOS (Intel/Apple Silicon), Linux (Ubuntu 22.04+, Debian, Fedora), or Windows 11 (with PowerShell or WSL2).
- Toolchains: Rust Stable (1.75+ recommended) if building from source.
- Network: Active internet connection to pull model endpoints and fetch external crate dependencies.
Step-by-Step Installation Guide
jcode features an adaptive installer that detects your current operating system, available package managers, and active shell configurations. Select the installation track below that best matches your local development system.
Option A: macOS via Homebrew
If you are on macOS and use the Homebrew package manager, you can install the official tap maintained by 1jehuang directly via your terminal:
# Tap the jcode formula repository brew tap 1jehuang/jcode # Install the binary package brew install jcodeOption B: Linux or macOS via Shell Script
For standard Linux distributions or macOS environments without Homebrew, use the automated installation script. This pulls the latest compiled binary corresponding to your architecture:
curl -fsSL [https://raw.githubusercontent.com/1jehuang/jcode/main/scripts/install.sh](https://raw.githubusercontent.com/1jehuang/jcode/main/scripts/install.sh) | bashOption C: Windows via PowerShell
If you are running natively on a Windows host within a standard administrative PowerShell prompt, execute the following command to download and map the binaries:
irm [https://raw.githubusercontent.com/1jehuang/jcode/main/scripts/install.ps1](https://raw.githubusercontent.com/1jehuang/jcode/main/scripts/install.ps1) | iexOption D: Building From Source (Recommended for Contributors)
If you want to run the cutting-edge development branch or adapt the core Rust source code to custom enterprise parameters, clone the official GitHub repository and compile it locally:
# Clone the project repository git clone [https://github.com/1jehuang/jcode.git](https://github.com/1jehuang/jcode.git) cd jcode # Compile a highly optimized release binary using Cargo cargo build --release # Execute the local release install configuration script ./scripts/install_release.shVerify that your installation was successful by checking the current version of the harness:
---jcode --versionQuickstart: Configuring and Initializing Your Agent Workspace
With jcode successfully installed, the next stage is configuring your active LLM providers and preparing a localized project workspace where your programming agent can safely read, write, and test applications.
Step 1: Exporting LLM API Credentials
jcode acts as an execution harness that routes logic through state-of-the-art coding LLMs. You must supply your preferred model API keys as environment variables. Add these to your shell profile (e.g.,
.bashrcor.zshrc):export OPENAI_API_KEY="sk-proj-xxxxxxxxxxxxxxxxxxxxxxxxxxxxxxxx" export ANTHROPIC_API_KEY="sk-ant-xxxxxxxxxxxxxxxxxxxxxxxxxxxxxxxx"Step 2: Initialize a New jcode Workspace
Navigate to an empty folder or your target repository and run the workspace initialization command. This tells jcode to parse the local layout and prepare an isolated runtime manifest:
mkdir my-agent-project cd my-agent-project jcode initThis command creates a hidden configuration workspace called
.jcode/containing a primary configuration file namedconfig.toml. Let's inspect and modify a standard setup configuration:
---# .jcode/config.toml [workspace] name = "my-agent-project" allowed_commands = ["cargo", "npm", "python", "git", "pytest", "go"] max_iterations = 15 [model] provider = "anthropic" default_model = "claude-3-5-sonnet-20241022" temperature = 0.2 max_tokens = 4096 [sandbox] isolate_network = false timeout_seconds = 45Building an Autonomous Programming Workflow
Now that
jcode: Building High-Performance Autonomous AI Coding Agents from Scratch
The landscape of AI-driven software development is shifting rapidly. While first-generation AI coding tools operated primarily as conversational completions or simple script generators, the community is moving decisively toward autonomous programming agents. These agents don't just suggest code; they plan, execute tests, refactor, and self-correct within a structured harness.
Emerging at the forefront of this shift in May 2026 is jcode, an open-source, Rust-based programming agent framework developed by creator
1jehuang. Rapidly climbing the GitHub Trending charts and capturing the attention of autonomous systems developers, jcode addresses a critical bottleneck in the agentic ecosystem: execution speed, structural reliability, and resource overhead. Written entirely in Rust, it provides a high-performance harness designed to run AI coding agents at scale without the typical latency and memory bloat associated with Python-heavy orchestration layers.In this comprehensive tutorial-style guide, we will break down what jcode is, analyze its internal architecture, compare it to existing frameworks, and walk through an end-to-end installation and configuration process to build your very first autonomous coding agent.
---Understanding the jcode Architecture
To build effective applications with jcode, it is essential to understand how it organizes the execution loop of an AI agent. Traditional agent frameworks rely on high-level scripting abstractions that introduce significant latency, making deep-tree search algorithms (like Monte Carlo Tree Search or complex reflection loops) painfully slow. jcode solves this by using a compiled Rust backend that exposes a highly structured execution harness.
The framework is divided into three primary layers:
- The Environment Layer (The Sandbox): This component manages the operating system context, available package managers, and shell environments. It isolates agent actions, preventing rogue scripts from damaging the host system while providing full feedback loops (stdout, stderr, exit codes) back to the agent.
- The Core Harness (Rust Engine): Written in Rust for maximum concurrency and memory safety, this engine manages agent state transitions, prompt token streaming pipelines, and workspace file parsing. It abstracts token budgets and tool call translations natively.
- The Agent Interface (Extensible Profiles): This layer allows developers to write custom planning algorithms, definition maps, and system instructions. It defines how the agent approaches a problem, splits tasks, and evaluates success.
Feature Comparison: jcode vs. Traditional Frameworks
Before diving into the implementation details, let's look at how jcode positions itself against traditional Python-based agent architectures and standard LLM orchestration environments.
---Feature / Metric jcode (1jehuang) Python-based Agent Frameworks Standard LLM Chat Hooks Core Language Rust Python Python / TypeScript Execution Speed Ultra-high (Compiled, Native Threading) Moderate (Interpreted, Async Overheads) Low (Network Dependent) Memory Management Strict compile-time safety, minimal footprint High runtime consumption, garbage collected Variable depending on wrapper Sandbox Isolation Native OS environment detection & mapping Requires heavy external Docker wrapper No native execution layer Primary Target Autonomous multi-turn software engineering General purpose task automation agents Single-turn text/code generation Prerequisites and Environment Verification
Before installing jcode, you need to ensure your machine meets the minimum system requirements for native compilation and execution. Because jcode evaluates code in real-time, having a stable environment with standard compilers is essential.
System Requirements:
- Operating System: macOS (Intel/Apple Silicon), Linux (Ubuntu 22.04+, Debian, Fedora), or Windows 11 (with PowerShell or WSL2).
- Toolchains: Rust Stable (1.75+ recommended) if building from source.
- Network: Active internet connection to pull model endpoints and fetch external crate dependencies.
Step-by-Step Installation Guide
jcode features an adaptive installer that detects your current operating system, available package managers, and active shell configurations. Select the installation track below that best matches your local development system.
Option A: macOS via Homebrew
If you are on macOS and use the Homebrew package manager, you can install the official tap maintained by 1jehuang directly via your terminal:
# Tap the jcode formula repository brew tap 1jehuang/jcode # Install the binary package brew install jcodeOption B: Linux or macOS via Shell Script
For standard Linux distributions or macOS environments without Homebrew, use the automated installation script. This pulls the latest compiled binary corresponding to your architecture:
curl -fsSL [https://raw.githubusercontent.com/1jehuang/jcode/main/scripts/install.sh](https://raw.githubusercontent.com/1jehuang/jcode/main/scripts/install.sh) | bashOption C: Windows via PowerShell
If you are running natively on a Windows host within a standard administrative PowerShell prompt, execute the following command to download and map the binaries:
irm [https://raw.githubusercontent.com/1jehuang/jcode/main/scripts/install.ps1](https://raw.githubusercontent.com/1jehuang/jcode/main/scripts/install.ps1) | iexOption D: Building From Source (Recommended for Contributors)
If you want to run the cutting-edge development branch or adapt the core Rust source code to custom enterprise parameters, clone the official GitHub repository and compile it locally:
# Clone the project repository git clone [https://github.com/1jehuang/jcode.git](https://github.com/1jehuang/jcode.git) cd jcode # Compile a highly optimized release binary using Cargo cargo build --release # Execute the local release install configuration script ./scripts/install_release.shVerify that your installation was successful by checking the current version of the harness:
---jcode --versionQuickstart: Configuring and Initializing Your Agent Workspace
With jcode successfully installed, the next stage is configuring your active LLM providers and preparing a localized project workspace where your programming agent can safely read, write, and test applications.
Step 1: Exporting LLM API Credentials
jcode acts as an execution harness that routes logic through state-of-the-art coding LLMs. You must supply your preferred model API keys as environment variables. Add these to your shell profile (e.g.,
.bashrcor.zshrc):export OPENAI_API_KEY="sk-proj-xxxxxxxxxxxxxxxxxxxxxxxxxxxxxxxx" export ANTHROPIC_API_KEY="sk-ant-xxxxxxxxxxxxxxxxxxxxxxxxxxxxxxxx"Step 2: Initialize a New jcode Workspace
Navigate to an empty folder or your target repository and run the workspace initialization command. This tells jcode to parse the local layout and prepare an isolated runtime manifest:
mkdir my-agent-project cd my-agent-project jcode initThis command creates a hidden configuration workspace called
.jcode/containing a primary configuration file namedconfig.toml. Let's inspect and modify a standard setup configuration:
---# .jcode/config.toml [workspace] name = "my-agent-project" allowed_commands = ["cargo", "npm", "python", "git", "pytest", "go"] max_iterations = 15 [model] provider = "anthropic" default_model = "claude-3-5-sonnet-20241022" temperature = 0.2 max_tokens = 4096 [sandbox] isolate_network = false timeout_seconds = 45Building an Autonomous Programming Workflow
Now that your workspace is instantiated, let's walk through a real-world software maintenance scenario. We will instruct our jcode agent to write a
jcode: Building High-Performance Autonomous AI Coding Agents from Scratch
The landscape of AI-driven software development is shifting rapidly. While first-generation AI coding tools operated primarily as conversational completions or simple script generators, the community is moving decisively toward autonomous programming agents. These agents don't just suggest code; they plan, execute tests, refactor, and self-correct within a structured harness.
Emerging at the forefront of this shift in May 2026 is jcode, an open-source, Rust-based programming agent framework developed by creator
1jehuang. Rapidly climbing the GitHub Trending charts and capturing the attention of autonomous systems developers, jcode addresses a critical bottleneck in the agentic ecosystem: execution speed, structural reliability, and resource overhead. Written entirely in Rust, it provides a high-performance harness designed to run AI coding agents at scale without the typical latency and memory bloat associated with Python-heavy orchestration layers.In this comprehensive tutorial-style guide, we will break down what jcode is, analyze its internal architecture, compare it to existing frameworks, and walk through an end-to-end installation and configuration process to build your very first autonomous coding agent.
---Understanding the jcode Architecture
To build effective applications with jcode, it is essential to understand how it organizes the execution loop of an AI agent. Traditional agent frameworks rely on high-level scripting abstractions that introduce significant latency, making deep-tree search algorithms (like Monte Carlo Tree Search or complex reflection loops) painfully slow. jcode solves this by using a compiled Rust backend that exposes a highly structured execution harness.
The framework is divided into three primary layers:
- The Environment Layer (The Sandbox): This component manages the operating system context, available package managers, and shell environments. It isolates agent actions, preventing rogue scripts from damaging the host system while providing full feedback loops (stdout, stderr, exit codes) back to the agent.
- The Core Harness (Rust Engine): Written in Rust for maximum concurrency and memory safety, this engine manages agent state transitions, prompt token streaming pipelines, and workspace file parsing. It abstracts token budgets and tool call translations natively.
- The Agent Interface (Extensible Profiles): This layer allows developers to write custom planning algorithms, definition maps, and system instructions. It defines how the agent approaches a problem, splits tasks, and evaluates success.
Feature Comparison: jcode vs. Traditional Frameworks
Before diving into the implementation details, let's look at how jcode positions itself against traditional Python-based agent architectures and standard LLM orchestration environments.
---Feature / Metric jcode (1jehuang) Python-based Agent Frameworks Standard LLM Chat Hooks Core Language Rust Python Python / TypeScript Execution Speed Ultra-high (Compiled, Native Threading) Moderate (Interpreted, Async Overheads) Low (Network Dependent) Memory Management Strict compile-time safety, minimal footprint High runtime consumption, garbage collected Variable depending on wrapper Sandbox Isolation Native OS environment detection & mapping Requires heavy external Docker wrapper No native execution layer Primary Target Autonomous multi-turn software engineering General purpose task automation agents Single-turn text/code generation Prerequisites and Environment Verification
Before installing jcode, you need to ensure your machine meets the minimum system requirements for native compilation and execution. Because jcode evaluates code in real-time, having a stable environment with standard compilers is essential.
System Requirements:
- Operating System: macOS (Intel/Apple Silicon), Linux (Ubuntu 22.04+, Debian, Fedora), or Windows 11 (with PowerShell or WSL2).
- Toolchains: Rust Stable (1.75+ recommended) if building from source.
- Network: Active internet connection to pull model endpoints and fetch external crate dependencies.
Step-by-Step Installation Guide
jcode features an adaptive installer that detects your current operating system, available package managers, and active shell configurations. Select the installation track below that best matches your local development system.
Option A: macOS via Homebrew
If you are on macOS and use the Homebrew package manager, you can install the official tap maintained by 1jehuang directly via your terminal:
# Tap the jcode formula repository brew tap 1jehuang/jcode # Install the binary package brew install jcodeOption B: Linux or macOS via Shell Script
For standard Linux distributions or macOS environments without Homebrew, use the automated installation script. This pulls the latest compiled binary corresponding to your architecture:
curl -fsSL [https://raw.githubusercontent.com/1jehuang/jcode/main/scripts/install.sh](https://raw.githubusercontent.com/1jehuang/jcode/main/scripts/install.sh) | bashOption C: Windows via PowerShell
If you are running natively on a Windows host within a standard administrative PowerShell prompt, execute the following command to download and map the binaries:
irm [https://raw.githubusercontent.com/1jehuang/jcode/main/scripts/install.ps1](https://raw.githubusercontent.com/1jehuang/jcode/main/scripts/install.ps1) | iexOption D: Building From Source (Recommended for Contributors)
If you want to run the cutting-edge development branch or adapt the core Rust source code to custom enterprise parameters, clone the official GitHub repository and compile it locally:
# Clone the project repository git clone [https://github.com/1jehuang/jcode.git](https://github.com/1jehuang/jcode.git) cd jcode # Compile a highly optimized release binary using Cargo cargo build --release # Execute the local release install configuration script ./scripts/install_release.shVerify that your installation was successful by checking the current version of the harness:
---jcode --versionQuickstart: Configuring and Initializing Your Agent Workspace
With jcode successfully installed, the next stage is configuring your active LLM providers and preparing a localized project workspace where your programming agent can safely read, write, and test applications.
Step 1: Exporting LLM API Credentials
jcode acts as an execution harness that routes logic through state-of-the-art coding LLMs. You must supply your preferred model API keys as environment variables. Add these to your shell profile (e.g.,
.bashrcor.zshrc):export OPENAI_API_KEY="sk-proj-xxxxxxxxxxxxxxxxxxxxxxxxxxxxxxxx" export ANTHROPIC_API_KEY="sk-ant-xxxxxxxxxxxxxxxxxxxxxxxxxxxxxxxx"Step 2: Initialize a New jcode Workspace
Navigate to an empty folder or your target repository and run the workspace initialization command. This tells jcode to parse the local layout and prepare an isolated runtime manifest:
mkdir my-agent-project cd my-agent-project jcode initThis command creates a hidden configuration workspace called
.jcode/containing a primary configuration file namedconfig.toml. Let's inspect and modify a standard setup configuration:
---# .jcode/config.toml [workspace] name = "my-agent-project" allowed_commands = ["cargo", "npm", "python", "git", "pytest", "go"] max_iterations = 15 [model] provider = "anthropic" default_model = "claude-3-5-sonnet-20241022" temperature = 0.2 max_tokens = 4096 [sandbox] isolate_network = false timeout_seconds = 45Building an Autonomous Programming Workflow
Now that your workspace is instantiated, let's walk through a real-world software maintenance scenario. We will instruct our jcode agent to write a complete Python utility module, write an associated test suit, run the validations, find bugs from execution outputs, and safely refactor the code automatically.
Step 1: Issue the Agent Task
We trigger the agent execution loop by
jcode: Building High-Performance Autonomous AI Coding Agents from Scratch
The landscape of AI-driven software development is shifting rapidly. While first-generation AI coding tools operated primarily as conversational completions or simple script generators, the community is moving decisively toward autonomous programming agents. These agents don't just suggest code; they plan, execute tests, refactor, and self-correct within a structured harness.
Emerging at the forefront of this shift in May 2026 is jcode, an open-source, Rust-based programming agent framework developed by creator
1jehuang. Rapidly climbing the GitHub Trending charts and capturing the attention of autonomous systems developers, jcode addresses a critical bottleneck in the agentic ecosystem: execution speed, structural reliability, and resource overhead. Written entirely in Rust, it provides a high-performance harness designed to run AI coding agents at scale without the typical latency and memory bloat associated with Python-heavy orchestration layers.In this comprehensive tutorial-style guide, we will break down what jcode is, analyze its internal architecture, compare it to existing frameworks, and walk through an end-to-end installation and configuration process to build your very first autonomous coding agent.
---Understanding the jcode Architecture
To build effective applications with jcode, it is essential to understand how it organizes the execution loop of an AI agent. Traditional agent frameworks rely on high-level scripting abstractions that introduce significant latency, making deep-tree search algorithms (like Monte Carlo Tree Search or complex reflection loops) painfully slow. jcode solves this by using a compiled Rust backend that exposes a highly structured execution harness.
The framework is divided into three primary layers:
- The Environment Layer (The Sandbox): This component manages the operating system context, available package managers, and shell environments. It isolates agent actions, preventing rogue scripts from damaging the host system while providing full feedback loops (stdout, stderr, exit codes) back to the agent.
- The Core Harness (Rust Engine): Written in Rust for maximum concurrency and memory safety, this engine manages agent state transitions, prompt token streaming pipelines, and workspace file parsing. It abstracts token budgets and tool call translations natively.
- The Agent Interface (Extensible Profiles): This layer allows developers to write custom planning algorithms, definition maps, and system instructions. It defines how the agent approaches a problem, splits tasks, and evaluates success.
Feature Comparison: jcode vs. Traditional Frameworks
Before diving into the implementation details, let's look at how jcode positions itself against traditional Python-based agent architectures and standard LLM orchestration environments.
---Feature / Metric jcode (1jehuang) Python-based Agent Frameworks Standard LLM Chat Hooks Core Language Rust Python Python / TypeScript Execution Speed Ultra-high (Compiled, Native Threading) Moderate (Interpreted, Async Overheads) Low (Network Dependent) Memory Management Strict compile-time safety, minimal footprint High runtime consumption, garbage collected Variable depending on wrapper Sandbox Isolation Native OS environment detection & mapping Requires heavy external Docker wrapper No native execution layer Primary Target Autonomous multi-turn software engineering General purpose task automation agents Single-turn text/code generation Prerequisites and Environment Verification
Before installing jcode, you need to ensure your machine meets the minimum system requirements for native compilation and execution. Because jcode evaluates code in real-time, having a stable environment with standard compilers is essential.
System Requirements:
- Operating System: macOS (Intel/Apple Silicon), Linux (Ubuntu 22.04+, Debian, Fedora), or Windows 11 (with PowerShell or WSL2).
- Toolchains: Rust Stable (1.75+ recommended) if building from source.
- Network: Active internet connection to pull model endpoints and fetch external crate dependencies.
Step-by-Step Installation Guide
jcode features an adaptive installer that detects your current operating system, available package managers, and active shell configurations. Select the installation track below that best matches your local development system.
Option A: macOS via Homebrew
If you are on macOS and use the Homebrew package manager, you can install the official tap maintained by 1jehuang directly via your terminal:
# Tap the jcode formula repository brew tap 1jehuang/jcode # Install the binary package brew install jcodeOption B: Linux or macOS via Shell Script
For standard Linux distributions or macOS environments without Homebrew, use the automated installation script. This pulls the latest compiled binary corresponding to your architecture:
curl -fsSL [https://raw.githubusercontent.com/1jehuang/jcode/main/scripts/install.sh](https://raw.githubusercontent.com/1jehuang/jcode/main/scripts/install.sh) | bashOption C: Windows via PowerShell
If you are running natively on a Windows host within a standard administrative PowerShell prompt, execute the following command to download and map the binaries:
irm [https://raw.githubusercontent.com/1jehuang/jcode/main/scripts/install.ps1](https://raw.githubusercontent.com/1jehuang/jcode/main/scripts/install.ps1) | iexOption D: Building From Source (Recommended for Contributors)
If you want to run the cutting-edge development branch or adapt the core Rust source code to custom enterprise parameters, clone the official GitHub repository and compile it locally:
# Clone the project repository git clone [https://github.com/1jehuang/jcode.git](https://github.com/1jehuang/jcode.git) cd jcode # Compile a highly optimized release binary using Cargo cargo build --release # Execute the local release install configuration script ./scripts/install_release.shVerify that your installation was successful by checking the current version of the harness:
---jcode --versionQuickstart: Configuring and Initializing Your Agent Workspace
With jcode successfully installed, the next stage is configuring your active LLM providers and preparing a localized project workspace where your programming agent can safely read, write, and test applications.
Step 1: Exporting LLM API Credentials
jcode acts as an execution harness that routes logic through state-of-the-art coding LLMs. You must supply your preferred model API keys as environment variables. Add these to your shell profile (e.g.,
.bashrcor.zshrc):export OPENAI_API_KEY="sk-proj-xxxxxxxxxxxxxxxxxxxxxxxxxxxxxxxx" export ANTHROPIC_API_KEY="sk-ant-xxxxxxxxxxxxxxxxxxxxxxxxxxxxxxxx"Step 2: Initialize a New jcode Workspace
Navigate to an empty folder or your target repository and run the workspace initialization command. This tells jcode to parse the local layout and prepare an isolated runtime manifest:
mkdir my-agent-project cd my-agent-project jcode initThis command creates a hidden configuration workspace called
.jcode/containing a primary configuration file namedconfig.toml. Let's inspect and modify a standard setup configuration:
---# .jcode/config.toml [workspace] name = "my-agent-project" allowed_commands = ["cargo", "npm", "python", "git", "pytest", "go"] max_iterations = 15 [model] provider = "anthropic" default_model = "claude-3-5-sonnet-20241022" temperature = 0.2 max_tokens = 4096 [sandbox] isolate_network = false timeout_seconds = 45Building an Autonomous Programming Workflow
Now that your workspace is instantiated, let's walk through a real-world software maintenance scenario. We will instruct our jcode agent to write a complete Python utility module, write an associated test suit, run the validations, find bugs from execution outputs, and safely refactor the code automatically.
Step 1: Issue the Agent Task
We trigger the agent execution loop by supplying a clear, high-level engineering prompt using the
jcode runinstruction interface:
jcode: Building High-Performance Autonomous AI Coding Agents from Scratch
The landscape of AI-driven software development is shifting rapidly. While first-generation AI coding tools operated primarily as conversational completions or simple script generators, the community is moving decisively toward autonomous programming agents. These agents don't just suggest code; they plan, execute tests, refactor, and self-correct within a structured harness.
Emerging at the forefront of this shift in May 2026 is jcode, an open-source, Rust-based programming agent framework developed by creator
1jehuang. Rapidly climbing the GitHub Trending charts and capturing the attention of autonomous systems developers, jcode addresses a critical bottleneck in the agentic ecosystem: execution speed, structural reliability, and resource overhead. Written entirely in Rust, it provides a high-performance harness designed to run AI coding agents at scale without the typical latency and memory bloat associated with Python-heavy orchestration layers.In this comprehensive tutorial-style guide, we will break down what jcode is, analyze its internal architecture, compare it to existing frameworks, and walk through an end-to-end installation and configuration process to build your very first autonomous coding agent.
---Understanding the jcode Architecture
To build effective applications with jcode, it is essential to understand how it organizes the execution loop of an AI agent. Traditional agent frameworks rely on high-level scripting abstractions that introduce significant latency, making deep-tree search algorithms (like Monte Carlo Tree Search or complex reflection loops) painfully slow. jcode solves this by using a compiled Rust backend that exposes a highly structured execution harness.
The framework is divided into three primary layers:
- The Environment Layer (The Sandbox): This component manages the operating system context, available package managers, and shell environments. It isolates agent actions, preventing rogue scripts from damaging the host system while providing full feedback loops (stdout, stderr, exit codes) back to the agent.
- The Core Harness (Rust Engine): Written in Rust for maximum concurrency and memory safety, this engine manages agent state transitions, prompt token streaming pipelines, and workspace file parsing. It abstracts token budgets and tool call translations natively.
- The Agent Interface (Extensible Profiles): This layer allows developers to write custom planning algorithms, definition maps, and system instructions. It defines how the agent approaches a problem, splits tasks, and evaluates success.
Feature Comparison: jcode vs. Traditional Frameworks
Before diving into the implementation details, let's look at how jcode positions itself against traditional Python-based agent architectures and standard LLM orchestration environments.
---Feature / Metric jcode (1jehuang) Python-based Agent Frameworks Standard LLM Chat Hooks Core Language Rust Python Python / TypeScript Execution Speed Ultra-high (Compiled, Native Threading) Moderate (Interpreted, Async Overheads) Low (Network Dependent) Memory Management Strict compile-time safety, minimal footprint High runtime consumption, garbage collected Variable depending on wrapper Sandbox Isolation Native OS environment detection & mapping Requires heavy external Docker wrapper No native execution layer Primary Target Autonomous multi-turn software engineering General purpose task automation agents Single-turn text/code generation Prerequisites and Environment Verification
Before installing jcode, you need to ensure your machine meets the minimum system requirements for native compilation and execution. Because jcode evaluates code in real-time, having a stable environment with standard compilers is essential.
System Requirements:
- Operating System: macOS (Intel/Apple Silicon), Linux (Ubuntu 22.04+, Debian, Fedora), or Windows 11 (with PowerShell or WSL2).
- Toolchains: Rust Stable (1.75+ recommended) if building from source.
- Network: Active internet connection to pull model endpoints and fetch external crate dependencies.
Step-by-Step Installation Guide
jcode features an adaptive installer that detects your current operating system, available package managers, and active shell configurations. Select the installation track below that best matches your local development system.
Option A: macOS via Homebrew
If you are on macOS and use the Homebrew package manager, you can install the official tap maintained by 1jehuang directly via your terminal:
# Tap the jcode formula repository brew tap 1jehuang/jcode # Install the binary package brew install jcodeOption B: Linux or macOS via Shell Script
For standard Linux distributions or macOS environments without Homebrew, use the automated installation script. This pulls the latest compiled binary corresponding to your architecture:
curl -fsSL [https://raw.githubusercontent.com/1jehuang/jcode/main/scripts/install.sh](https://raw.githubusercontent.com/1jehuang/jcode/main/scripts/install.sh) | bashOption C: Windows via PowerShell
If you are running natively on a Windows host within a standard administrative PowerShell prompt, execute the following command to download and map the binaries:
irm [https://raw.githubusercontent.com/1jehuang/jcode/main/scripts/install.ps1](https://raw.githubusercontent.com/1jehuang/jcode/main/scripts/install.ps1) | iexOption D: Building From Source (Recommended for Contributors)
If you want to run the cutting-edge development branch or adapt the core Rust source code to custom enterprise parameters, clone the official GitHub repository and compile it locally:
# Clone the project repository git clone [https://github.com/1jehuang/jcode.git](https://github.com/1jehuang/jcode.git) cd jcode # Compile a highly optimized release binary using Cargo cargo build --release # Execute the local release install configuration script ./scripts/install_release.shVerify that your installation was successful by checking the current version of the harness:
---jcode --versionQuickstart: Configuring and Initializing Your Agent Workspace
With jcode successfully installed, the next stage is configuring your active LLM providers and preparing a localized project workspace where your programming agent can safely read, write, and test applications.
Step 1: Exporting LLM API Credentials
jcode acts as an execution harness that routes logic through state-of-the-art coding LLMs. You must supply your preferred model API keys as environment variables. Add these to your shell profile (e.g.,
.bashrcor.zshrc):export OPENAI_API_KEY="sk-proj-xxxxxxxxxxxxxxxxxxxxxxxxxxxxxxxx" export ANTHROPIC_API_KEY="sk-ant-xxxxxxxxxxxxxxxxxxxxxxxxxxxxxxxx"Step 2: Initialize a New jcode Workspace
Navigate to an empty folder or your target repository and run the workspace initialization command. This tells jcode to parse the local layout and prepare an isolated runtime manifest:
mkdir my-agent-project cd my-agent-project jcode initThis command creates a hidden configuration workspace called
.jcode/containing a primary configuration file namedconfig.toml. Let's inspect and modify a standard setup configuration:
---# .jcode/config.toml [workspace] name = "my-agent-project" allowed_commands = ["cargo", "npm", "python", "git", "pytest", "go"] max_iterations = 15 [model] provider = "anthropic" default_model = "claude-3-5-sonnet-20241022" temperature = 0.2 max_tokens = 4096 [sandbox] isolate_network = false timeout_seconds = 45Building an Autonomous Programming Workflow
Now that your workspace is instantiated, let's walk through a real-world software maintenance scenario. We will instruct our jcode agent to write a complete Python utility module, write an associated test suit, run the validations, find bugs from execution outputs, and safely refactor the code automatically.
Step 1: Issue the Agent Task
We trigger the agent execution loop by supplying a clear, high-level engineering prompt using the
jcode runinstruction interface:jcode run "Create a robust Python rate limiter using a sliding window log algorithm. Include unit tests using pytest. Ensure
jcode: Building High-Performance Autonomous AI Coding Agents from Scratch
The landscape of AI-driven software development is shifting rapidly. While first-generation AI coding tools operated primarily as conversational completions or simple script generators, the community is moving decisively toward autonomous programming agents. These agents don't just suggest code; they plan, execute tests, refactor, and self-correct within a structured harness.
Emerging at the forefront of this shift in May 2026 is jcode, an open-source, Rust-based programming agent framework developed by creator
1jehuang. Rapidly climbing the GitHub Trending charts and capturing the attention of autonomous systems developers, jcode addresses a critical bottleneck in the agentic ecosystem: execution speed, structural reliability, and resource overhead. Written entirely in Rust, it provides a high-performance harness designed to run AI coding agents at scale without the typical latency and memory bloat associated with Python-heavy orchestration layers.In this comprehensive tutorial-style guide, we will break down what jcode is, analyze its internal architecture, compare it to existing frameworks, and walk through an end-to-end installation and configuration process to build your very first autonomous coding agent.
---Understanding the jcode Architecture
To build effective applications with jcode, it is essential to understand how it organizes the execution loop of an AI agent. Traditional agent frameworks rely on high-level scripting abstractions that introduce significant latency, making deep-tree search algorithms (like Monte Carlo Tree Search or complex reflection loops) painfully slow. jcode solves this by using a compiled Rust backend that exposes a highly structured execution harness.
The framework is divided into three primary layers:
- The Environment Layer (The Sandbox): This component manages the operating system context, available package managers, and shell environments. It isolates agent actions, preventing rogue scripts from damaging the host system while providing full feedback loops (stdout, stderr, exit codes) back to the agent.
- The Core Harness (Rust Engine): Written in Rust for maximum concurrency and memory safety, this engine manages agent state transitions, prompt token streaming pipelines, and workspace file parsing. It abstracts token budgets and tool call translations natively.
- The Agent Interface (Extensible Profiles): This layer allows developers to write custom planning algorithms, definition maps, and system instructions. It defines how the agent approaches a problem, splits tasks, and evaluates success.
Feature Comparison: jcode vs. Traditional Frameworks
Before diving into the implementation details, let's look at how jcode positions itself against traditional Python-based agent architectures and standard LLM orchestration environments.
---Feature / Metric jcode (1jehuang) Python-based Agent Frameworks Standard LLM Chat Hooks Core Language Rust Python Python / TypeScript Execution Speed Ultra-high (Compiled, Native Threading) Moderate (Interpreted, Async Overheads) Low (Network Dependent) Memory Management Strict compile-time safety, minimal footprint High runtime consumption, garbage collected Variable depending on wrapper Sandbox Isolation Native OS environment detection & mapping Requires heavy external Docker wrapper No native execution layer Primary Target Autonomous multi-turn software engineering General purpose task automation agents Single-turn text/code generation Prerequisites and Environment Verification
Before installing jcode, you need to ensure your machine meets the minimum system requirements for native compilation and execution. Because jcode evaluates code in real-time, having a stable environment with standard compilers is essential.
System Requirements:
- Operating System: macOS (Intel/Apple Silicon), Linux (Ubuntu 22.04+, Debian, Fedora), or Windows 11 (with PowerShell or WSL2).
- Toolchains: Rust Stable (1.75+ recommended) if building from source.
- Network: Active internet connection to pull model endpoints and fetch external crate dependencies.
Step-by-Step Installation Guide
jcode features an adaptive installer that detects your current operating system, available package managers, and active shell configurations. Select the installation track below that best matches your local development system.
Option A: macOS via Homebrew
If you are on macOS and use the Homebrew package manager, you can install the official tap maintained by 1jehuang directly via your terminal:
# Tap the jcode formula repository brew tap 1jehuang/jcode # Install the binary package brew install jcodeOption B: Linux or macOS via Shell Script
For standard Linux distributions or macOS environments without Homebrew, use the automated installation script. This pulls the latest compiled binary corresponding to your architecture:
curl -fsSL [https://raw.githubusercontent.com/1jehuang/jcode/main/scripts/install.sh](https://raw.githubusercontent.com/1jehuang/jcode/main/scripts/install.sh) | bashOption C: Windows via PowerShell
If you are running natively on a Windows host within a standard administrative PowerShell prompt, execute the following command to download and map the binaries:
irm [https://raw.githubusercontent.com/1jehuang/jcode/main/scripts/install.ps1](https://raw.githubusercontent.com/1jehuang/jcode/main/scripts/install.ps1) | iexOption D: Building From Source (Recommended for Contributors)
If you want to run the cutting-edge development branch or adapt the core Rust source code to custom enterprise parameters, clone the official GitHub repository and compile it locally:
# Clone the project repository git clone [https://github.com/1jehuang/jcode.git](https://github.com/1jehuang/jcode.git) cd jcode # Compile a highly optimized release binary using Cargo cargo build --release # Execute the local release install configuration script ./scripts/install_release.shVerify that your installation was successful by checking the current version of the harness:
---jcode --versionQuickstart: Configuring and Initializing Your Agent Workspace
With jcode successfully installed, the next stage is configuring your active LLM providers and preparing a localized project workspace where your programming agent can safely read, write, and test applications.
Step 1: Exporting LLM API Credentials
jcode acts as an execution harness that routes logic through state-of-the-art coding LLMs. You must supply your preferred model API keys as environment variables. Add these to your shell profile (e.g.,
.bashrcor.zshrc):export OPENAI_API_KEY="sk-proj-xxxxxxxxxxxxxxxxxxxxxxxxxxxxxxxx" export ANTHROPIC_API_KEY="sk-ant-xxxxxxxxxxxxxxxxxxxxxxxxxxxxxxxx"Step 2: Initialize a New jcode Workspace
Navigate to an empty folder or your target repository and run the workspace initialization command. This tells jcode to parse the local layout and prepare an isolated runtime manifest:
mkdir my-agent-project cd my-agent-project jcode initThis command creates a hidden configuration workspace called
.jcode/containing a primary configuration file namedconfig.toml. Let's inspect and modify a standard setup configuration:
---# .jcode/config.toml [workspace] name = "my-agent-project" allowed_commands = ["cargo", "npm", "python", "git", "pytest", "go"] max_iterations = 15 [model] provider = "anthropic" default_model = "claude-3-5-sonnet-20241022" temperature = 0.2 max_tokens = 4096 [sandbox] isolate_network = false timeout_seconds = 45Building an Autonomous Programming Workflow
Now that your workspace is instantiated, let's walk through a real-world software maintenance scenario. We will instruct our jcode agent to write a complete Python utility module, write an associated test suit, run the validations, find bugs from execution outputs, and safely refactor the code automatically.
Step 1: Issue the Agent Task
We trigger the agent execution loop by supplying a clear, high-level engineering prompt using the
jcode runinstruction interface:jcode run "Create a robust Python rate limiter using a sliding window log algorithm. Include unit tests using pytest. Ensure it handles sub-millisecond timestamps gracefully."Step 2: Reviewing the Agent Autonomous
jcode: Building High-Performance Autonomous AI Coding Agents from Scratch
The landscape of AI-driven software development is shifting rapidly. While first-generation AI coding tools operated primarily as conversational completions or simple script generators, the community is moving decisively toward autonomous programming agents. These agents don't just suggest code; they plan, execute tests, refactor, and self-correct within a structured harness.
Emerging at the forefront of this shift in May 2026 is jcode, an open-source, Rust-based programming agent framework developed by creator
1jehuang. Rapidly climbing the GitHub Trending charts and capturing the attention of autonomous systems developers, jcode addresses a critical bottleneck in the agentic ecosystem: execution speed, structural reliability, and resource overhead. Written entirely in Rust, it provides a high-performance harness designed to run AI coding agents at scale without the typical latency and memory bloat associated with Python-heavy orchestration layers.In this comprehensive tutorial-style guide, we will break down what jcode is, analyze its internal architecture, compare it to existing frameworks, and walk through an end-to-end installation and configuration process to build your very first autonomous coding agent.
---Understanding the jcode Architecture
To build effective applications with jcode, it is essential to understand how it organizes the execution loop of an AI agent. Traditional agent frameworks rely on high-level scripting abstractions that introduce significant latency, making deep-tree search algorithms (like Monte Carlo Tree Search or complex reflection loops) painfully slow. jcode solves this by using a compiled Rust backend that exposes a highly structured execution harness.
The framework is divided into three primary layers:
- The Environment Layer (The Sandbox): This component manages the operating system context, available package managers, and shell environments. It isolates agent actions, preventing rogue scripts from damaging the host system while providing full feedback loops (stdout, stderr, exit codes) back to the agent.
- The Core Harness (Rust Engine): Written in Rust for maximum concurrency and memory safety, this engine manages agent state transitions, prompt token streaming pipelines, and workspace file parsing. It abstracts token budgets and tool call translations natively.
- The Agent Interface (Extensible Profiles): This layer allows developers to write custom planning algorithms, definition maps, and system instructions. It defines how the agent approaches a problem, splits tasks, and evaluates success.
Feature Comparison: jcode vs. Traditional Frameworks
Before diving into the implementation details, let's look at how jcode positions itself against traditional Python-based agent architectures and standard LLM orchestration environments.
---Feature / Metric jcode (1jehuang) Python-based Agent Frameworks Standard LLM Chat Hooks Core Language Rust Python Python / TypeScript Execution Speed Ultra-high (Compiled, Native Threading) Moderate (Interpreted, Async Overheads) Low (Network Dependent) Memory Management Strict compile-time safety, minimal footprint High runtime consumption, garbage collected Variable depending on wrapper Sandbox Isolation Native OS environment detection & mapping Requires heavy external Docker wrapper No native execution layer Primary Target Autonomous multi-turn software engineering General purpose task automation agents Single-turn text/code generation Prerequisites and Environment Verification
Before installing jcode, you need to ensure your machine meets the minimum system requirements for native compilation and execution. Because jcode evaluates code in real-time, having a stable environment with standard compilers is essential.
System Requirements:
- Operating System: macOS (Intel/Apple Silicon), Linux (Ubuntu 22.04+, Debian, Fedora), or Windows 11 (with PowerShell or WSL2).
- Toolchains: Rust Stable (1.75+ recommended) if building from source.
- Network: Active internet connection to pull model endpoints and fetch external crate dependencies.
Step-by-Step Installation Guide
jcode features an adaptive installer that detects your current operating system, available package managers, and active shell configurations. Select the installation track below that best matches your local development system.
Option A: macOS via Homebrew
If you are on macOS and use the Homebrew package manager, you can install the official tap maintained by 1jehuang directly via your terminal:
# Tap the jcode formula repository brew tap 1jehuang/jcode # Install the binary package brew install jcodeOption B: Linux or macOS via Shell Script
For standard Linux distributions or macOS environments without Homebrew, use the automated installation script. This pulls the latest compiled binary corresponding to your architecture:
curl -fsSL [https://raw.githubusercontent.com/1jehuang/jcode/main/scripts/install.sh](https://raw.githubusercontent.com/1jehuang/jcode/main/scripts/install.sh) | bashOption C: Windows via PowerShell
If you are running natively on a Windows host within a standard administrative PowerShell prompt, execute the following command to download and map the binaries:
irm [https://raw.githubusercontent.com/1jehuang/jcode/main/scripts/install.ps1](https://raw.githubusercontent.com/1jehuang/jcode/main/scripts/install.ps1) | iexOption D: Building From Source (Recommended for Contributors)
If you want to run the cutting-edge development branch or adapt the core Rust source code to custom enterprise parameters, clone the official GitHub repository and compile it locally:
# Clone the project repository git clone [https://github.com/1jehuang/jcode.git](https://github.com/1jehuang/jcode.git) cd jcode # Compile a highly optimized release binary using Cargo cargo build --release # Execute the local release install configuration script ./scripts/install_release.shVerify that your installation was successful by checking the current version of the harness:
---jcode --versionQuickstart: Configuring and Initializing Your Agent Workspace
With jcode successfully installed, the next stage is configuring your active LLM providers and preparing a localized project workspace where your programming agent can safely read, write, and test applications.
Step 1: Exporting LLM API Credentials
jcode acts as an execution harness that routes logic through state-of-the-art coding LLMs. You must supply your preferred model API keys as environment variables. Add these to your shell profile (e.g.,
.bashrcor.zshrc):export OPENAI_API_KEY="sk-proj-xxxxxxxxxxxxxxxxxxxxxxxxxxxxxxxx" export ANTHROPIC_API_KEY="sk-ant-xxxxxxxxxxxxxxxxxxxxxxxxxxxxxxxx"Step 2: Initialize a New jcode Workspace
Navigate to an empty folder or your target repository and run the workspace initialization command. This tells jcode to parse the local layout and prepare an isolated runtime manifest:
mkdir my-agent-project cd my-agent-project jcode initThis command creates a hidden configuration workspace called
.jcode/containing a primary configuration file namedconfig.toml. Let's inspect and modify a standard setup configuration:
---# .jcode/config.toml [workspace] name = "my-agent-project" allowed_commands = ["cargo", "npm", "python", "git", "pytest", "go"] max_iterations = 15 [model] provider = "anthropic" default_model = "claude-3-5-sonnet-20241022" temperature = 0.2 max_tokens = 4096 [sandbox] isolate_network = false timeout_seconds = 45Building an Autonomous Programming Workflow
Now that your workspace is instantiated, let's walk through a real-world software maintenance scenario. We will instruct our jcode agent to write a complete Python utility module, write an associated test suit, run the validations, find bugs from execution outputs, and safely refactor the code automatically.
Step 1: Issue the Agent Task
We trigger the agent execution loop by supplying a clear, high-level engineering prompt using the
jcode runinstruction interface:jcode run "Create a robust Python rate limiter using a sliding window log algorithm. Include unit tests using pytest. Ensure it handles sub-millisecond timestamps gracefully."Step 2: Reviewing the Agent Autonomous Execution Trace
Once triggered, the jcode framework takes absolute control over the planning tree. Here is an
jcode: Building High-Performance Autonomous AI Coding Agents from Scratch
The landscape of AI-driven software development is shifting rapidly. While first-generation AI coding tools operated primarily as conversational completions or simple script generators, the community is moving decisively toward autonomous programming agents. These agents don't just suggest code; they plan, execute tests, refactor, and self-correct within a structured harness.
Emerging at the forefront of this shift in May 2026 is jcode, an open-source, Rust-based programming agent framework developed by creator
1jehuang. Rapidly climbing the GitHub Trending charts and capturing the attention of autonomous systems developers, jcode addresses a critical bottleneck in the agentic ecosystem: execution speed, structural reliability, and resource overhead. Written entirely in Rust, it provides a high-performance harness designed to run AI coding agents at scale without the typical latency and memory bloat associated with Python-heavy orchestration layers.In this comprehensive tutorial-style guide, we will break down what jcode is, analyze its internal architecture, compare it to existing frameworks, and walk through an end-to-end installation and configuration process to build your very first autonomous coding agent.
---Understanding the jcode Architecture
To build effective applications with jcode, it is essential to understand how it organizes the execution loop of an AI agent. Traditional agent frameworks rely on high-level scripting abstractions that introduce significant latency, making deep-tree search algorithms (like Monte Carlo Tree Search or complex reflection loops) painfully slow. jcode solves this by using a compiled Rust backend that exposes a highly structured execution harness.
The framework is divided into three primary layers:
- The Environment Layer (The Sandbox): This component manages the operating system context, available package managers, and shell environments. It isolates agent actions, preventing rogue scripts from damaging the host system while providing full feedback loops (stdout, stderr, exit codes) back to the agent.
- The Core Harness (Rust Engine): Written in Rust for maximum concurrency and memory safety, this engine manages agent state transitions, prompt token streaming pipelines, and workspace file parsing. It abstracts token budgets and tool call translations natively.
- The Agent Interface (Extensible Profiles): This layer allows developers to write custom planning algorithms, definition maps, and system instructions. It defines how the agent approaches a problem, splits tasks, and evaluates success.
Feature Comparison: jcode vs. Traditional Frameworks
Before diving into the implementation details, let's look at how jcode positions itself against traditional Python-based agent architectures and standard LLM orchestration environments.
---Feature / Metric jcode (1jehuang) Python-based Agent Frameworks Standard LLM Chat Hooks Core Language Rust Python Python / TypeScript Execution Speed Ultra-high (Compiled, Native Threading) Moderate (Interpreted, Async Overheads) Low (Network Dependent) Memory Management Strict compile-time safety, minimal footprint High runtime consumption, garbage collected Variable depending on wrapper Sandbox Isolation Native OS environment detection & mapping Requires heavy external Docker wrapper No native execution layer Primary Target Autonomous multi-turn software engineering General purpose task automation agents Single-turn text/code generation Prerequisites and Environment Verification
Before installing jcode, you need to ensure your machine meets the minimum system requirements for native compilation and execution. Because jcode evaluates code in real-time, having a stable environment with standard compilers is essential.
System Requirements:
- Operating System: macOS (Intel/Apple Silicon), Linux (Ubuntu 22.04+, Debian, Fedora), or Windows 11 (with PowerShell or WSL2).
- Toolchains: Rust Stable (1.75+ recommended) if building from source.
- Network: Active internet connection to pull model endpoints and fetch external crate dependencies.
Step-by-Step Installation Guide
jcode features an adaptive installer that detects your current operating system, available package managers, and active shell configurations. Select the installation track below that best matches your local development system.
Option A: macOS via Homebrew
If you are on macOS and use the Homebrew package manager, you can install the official tap maintained by 1jehuang directly via your terminal:
# Tap the jcode formula repository brew tap 1jehuang/jcode # Install the binary package brew install jcodeOption B: Linux or macOS via Shell Script
For standard Linux distributions or macOS environments without Homebrew, use the automated installation script. This pulls the latest compiled binary corresponding to your architecture:
curl -fsSL [https://raw.githubusercontent.com/1jehuang/jcode/main/scripts/install.sh](https://raw.githubusercontent.com/1jehuang/jcode/main/scripts/install.sh) | bashOption C: Windows via PowerShell
If you are running natively on a Windows host within a standard administrative PowerShell prompt, execute the following command to download and map the binaries:
irm [https://raw.githubusercontent.com/1jehuang/jcode/main/scripts/install.ps1](https://raw.githubusercontent.com/1jehuang/jcode/main/scripts/install.ps1) | iexOption D: Building From Source (Recommended for Contributors)
If you want to run the cutting-edge development branch or adapt the core Rust source code to custom enterprise parameters, clone the official GitHub repository and compile it locally:
# Clone the project repository git clone [https://github.com/1jehuang/jcode.git](https://github.com/1jehuang/jcode.git) cd jcode # Compile a highly optimized release binary using Cargo cargo build --release # Execute the local release install configuration script ./scripts/install_release.shVerify that your installation was successful by checking the current version of the harness:
---jcode --versionQuickstart: Configuring and Initializing Your Agent Workspace
With jcode successfully installed, the next stage is configuring your active LLM providers and preparing a localized project workspace where your programming agent can safely read, write, and test applications.
Step 1: Exporting LLM API Credentials
jcode acts as an execution harness that routes logic through state-of-the-art coding LLMs. You must supply your preferred model API keys as environment variables. Add these to your shell profile (e.g.,
.bashrcor.zshrc):export OPENAI_API_KEY="sk-proj-xxxxxxxxxxxxxxxxxxxxxxxxxxxxxxxx" export ANTHROPIC_API_KEY="sk-ant-xxxxxxxxxxxxxxxxxxxxxxxxxxxxxxxx"Step 2: Initialize a New jcode Workspace
Navigate to an empty folder or your target repository and run the workspace initialization command. This tells jcode to parse the local layout and prepare an isolated runtime manifest:
mkdir my-agent-project cd my-agent-project jcode initThis command creates a hidden configuration workspace called
.jcode/containing a primary configuration file namedconfig.toml. Let's inspect and modify a standard setup configuration:
---# .jcode/config.toml [workspace] name = "my-agent-project" allowed_commands = ["cargo", "npm", "python", "git", "pytest", "go"] max_iterations = 15 [model] provider = "anthropic" default_model = "claude-3-5-sonnet-20241022" temperature = 0.2 max_tokens = 4096 [sandbox] isolate_network = false timeout_seconds = 45Building an Autonomous Programming Workflow
Now that your workspace is instantiated, let's walk through a real-world software maintenance scenario. We will instruct our jcode agent to write a complete Python utility module, write an associated test suit, run the validations, find bugs from execution outputs, and safely refactor the code automatically.
Step 1: Issue the Agent Task
We trigger the agent execution loop by supplying a clear, high-level engineering prompt using the
jcode runinstruction interface:jcode run "Create a robust Python rate limiter using a sliding window log algorithm. Include unit tests using pytest. Ensure it handles sub-millisecond timestamps gracefully."Step 2: Reviewing the Agent Autonomous Execution Trace
Once triggered, the jcode framework takes absolute control over the planning tree. Here is an approximation of what the terminal sequence tracks as the underlying Rust engine coordinates actions:
[INFO] Initializing agent environment... [INFO] Detected OS: Linux (Ubuntu 24.04), Package Manager: apt
jcode: Building High-Performance Autonomous AI Coding Agents from Scratch
The landscape of AI-driven software development is shifting rapidly. While first-generation AI coding tools operated primarily as conversational completions or simple script generators, the community is moving decisively toward autonomous programming agents. These agents don't just suggest code; they plan, execute tests, refactor, and self-correct within a structured harness.
Emerging at the forefront of this shift in May 2026 is jcode, an open-source, Rust-based programming agent framework developed by creator
1jehuang. Rapidly climbing the GitHub Trending charts and capturing the attention of autonomous systems developers, jcode addresses a critical bottleneck in the agentic ecosystem: execution speed, structural reliability, and resource overhead. Written entirely in Rust, it provides a high-performance harness designed to run AI coding agents at scale without the typical latency and memory bloat associated with Python-heavy orchestration layers.In this comprehensive tutorial-style guide, we will break down what jcode is, analyze its internal architecture, compare it to existing frameworks, and walk through an end-to-end installation and configuration process to build your very first autonomous coding agent.
---Understanding the jcode Architecture
To build effective applications with jcode, it is essential to understand how it organizes the execution loop of an AI agent. Traditional agent frameworks rely on high-level scripting abstractions that introduce significant latency, making deep-tree search algorithms (like Monte Carlo Tree Search or complex reflection loops) painfully slow. jcode solves this by using a compiled Rust backend that exposes a highly structured execution harness.
The framework is divided into three primary layers:
- The Environment Layer (The Sandbox): This component manages the operating system context, available package managers, and shell environments. It isolates agent actions, preventing rogue scripts from damaging the host system while providing full feedback loops (stdout, stderr, exit codes) back to the agent.
- The Core Harness (Rust Engine): Written in Rust for maximum concurrency and memory safety, this engine manages agent state transitions, prompt token streaming pipelines, and workspace file parsing. It abstracts token budgets and tool call translations natively.
- The Agent Interface (Extensible Profiles): This layer allows developers to write custom planning algorithms, definition maps, and system instructions. It defines how the agent approaches a problem, splits tasks, and evaluates success.
Feature Comparison: jcode vs. Traditional Frameworks
Before diving into the implementation details, let's look at how jcode positions itself against traditional Python-based agent architectures and standard LLM orchestration environments.
---Feature / Metric jcode (1jehuang) Python-based Agent Frameworks Standard LLM Chat Hooks Core Language Rust Python Python / TypeScript Execution Speed Ultra-high (Compiled, Native Threading) Moderate (Interpreted, Async Overheads) Low (Network Dependent) Memory Management Strict compile-time safety, minimal footprint High runtime consumption, garbage collected Variable depending on wrapper Sandbox Isolation Native OS environment detection & mapping Requires heavy external Docker wrapper No native execution layer Primary Target Autonomous multi-turn software engineering General purpose task automation agents Single-turn text/code generation Prerequisites and Environment Verification
Before installing jcode, you need to ensure your machine meets the minimum system requirements for native compilation and execution. Because jcode evaluates code in real-time, having a stable environment with standard compilers is essential.
System Requirements:
- Operating System: macOS (Intel/Apple Silicon), Linux (Ubuntu 22.04+, Debian, Fedora), or Windows 11 (with PowerShell or WSL2).
- Toolchains: Rust Stable (1.75+ recommended) if building from source.
- Network: Active internet connection to pull model endpoints and fetch external crate dependencies.
Step-by-Step Installation Guide
jcode features an adaptive installer that detects your current operating system, available package managers, and active shell configurations. Select the installation track below that best matches your local development system.
Option A: macOS via Homebrew
If you are on macOS and use the Homebrew package manager, you can install the official tap maintained by 1jehuang directly via your terminal:
# Tap the jcode formula repository brew tap 1jehuang/jcode # Install the binary package brew install jcodeOption B: Linux or macOS via Shell Script
For standard Linux distributions or macOS environments without Homebrew, use the automated installation script. This pulls the latest compiled binary corresponding to your architecture:
curl -fsSL [https://raw.githubusercontent.com/1jehuang/jcode/main/scripts/install.sh](https://raw.githubusercontent.com/1jehuang/jcode/main/scripts/install.sh) | bashOption C: Windows via PowerShell
If you are running natively on a Windows host within a standard administrative PowerShell prompt, execute the following command to download and map the binaries:
irm [https://raw.githubusercontent.com/1jehuang/jcode/main/scripts/install.ps1](https://raw.githubusercontent.com/1jehuang/jcode/main/scripts/install.ps1) | iexOption D: Building From Source (Recommended for Contributors)
If you want to run the cutting-edge development branch or adapt the core Rust source code to custom enterprise parameters, clone the official GitHub repository and compile it locally:
# Clone the project repository git clone [https://github.com/1jehuang/jcode.git](https://github.com/1jehuang/jcode.git) cd jcode # Compile a highly optimized release binary using Cargo cargo build --release # Execute the local release install configuration script ./scripts/install_release.shVerify that your installation was successful by checking the current version of the harness:
---jcode --versionQuickstart: Configuring and Initializing Your Agent Workspace
With jcode successfully installed, the next stage is configuring your active LLM providers and preparing a localized project workspace where your programming agent can safely read, write, and test applications.
Step 1: Exporting LLM API Credentials
jcode acts as an execution harness that routes logic through state-of-the-art coding LLMs. You must supply your preferred model API keys as environment variables. Add these to your shell profile (e.g.,
.bashrcor.zshrc):export OPENAI_API_KEY="sk-proj-xxxxxxxxxxxxxxxxxxxxxxxxxxxxxxxx" export ANTHROPIC_API_KEY="sk-ant-xxxxxxxxxxxxxxxxxxxxxxxxxxxxxxxx"Step 2: Initialize a New jcode Workspace
Navigate to an empty folder or your target repository and run the workspace initialization command. This tells jcode to parse the local layout and prepare an isolated runtime manifest:
mkdir my-agent-project cd my-agent-project jcode initThis command creates a hidden configuration workspace called
.jcode/containing a primary configuration file namedconfig.toml. Let's inspect and modify a standard setup configuration:
---# .jcode/config.toml [workspace] name = "my-agent-project" allowed_commands = ["cargo", "npm", "python", "git", "pytest", "go"] max_iterations = 15 [model] provider = "anthropic" default_model = "claude-3-5-sonnet-20241022" temperature = 0.2 max_tokens = 4096 [sandbox] isolate_network = false timeout_seconds = 45Building an Autonomous Programming Workflow
Now that your workspace is instantiated, let's walk through a real-world software maintenance scenario. We will instruct our jcode agent to write a complete Python utility module, write an associated test suit, run the validations, find bugs from execution outputs, and safely refactor the code automatically.
Step 1: Issue the Agent Task
We trigger the agent execution loop by supplying a clear, high-level engineering prompt using the
jcode runinstruction interface:jcode run "Create a robust Python rate limiter using a sliding window log algorithm. Include unit tests using pytest. Ensure it handles sub-millisecond timestamps gracefully."Step 2: Reviewing the Agent Autonomous Execution Trace
Once triggered, the jcode framework takes absolute control over the planning tree. Here is an approximation of what the terminal sequence tracks as the underlying Rust engine coordinates actions:
[INFO] Initializing agent environment... [INFO] Detected OS: Linux (Ubuntu 24.04), Package Manager: apt, Shell: bash [STEP 1/15] Planning task allocation tree... [TOOL CALL] Writing file
jcode: Building High-Performance Autonomous AI Coding Agents from Scratch
The landscape of AI-driven software development is shifting rapidly. While first-generation AI coding tools operated primarily as conversational completions or simple script generators, the community is moving decisively toward autonomous programming agents. These agents don't just suggest code; they plan, execute tests, refactor, and self-correct within a structured harness.
Emerging at the forefront of this shift in May 2026 is jcode, an open-source, Rust-based programming agent framework developed by creator
1jehuang. Rapidly climbing the GitHub Trending charts and capturing the attention of autonomous systems developers, jcode addresses a critical bottleneck in the agentic ecosystem: execution speed, structural reliability, and resource overhead. Written entirely in Rust, it provides a high-performance harness designed to run AI coding agents at scale without the typical latency and memory bloat associated with Python-heavy orchestration layers.In this comprehensive tutorial-style guide, we will break down what jcode is, analyze its internal architecture, compare it to existing frameworks, and walk through an end-to-end installation and configuration process to build your very first autonomous coding agent.
---Understanding the jcode Architecture
To build effective applications with jcode, it is essential to understand how it organizes the execution loop of an AI agent. Traditional agent frameworks rely on high-level scripting abstractions that introduce significant latency, making deep-tree search algorithms (like Monte Carlo Tree Search or complex reflection loops) painfully slow. jcode solves this by using a compiled Rust backend that exposes a highly structured execution harness.
The framework is divided into three primary layers:
- The Environment Layer (The Sandbox): This component manages the operating system context, available package managers, and shell environments. It isolates agent actions, preventing rogue scripts from damaging the host system while providing full feedback loops (stdout, stderr, exit codes) back to the agent.
- The Core Harness (Rust Engine): Written in Rust for maximum concurrency and memory safety, this engine manages agent state transitions, prompt token streaming pipelines, and workspace file parsing. It abstracts token budgets and tool call translations natively.
- The Agent Interface (Extensible Profiles): This layer allows developers to write custom planning algorithms, definition maps, and system instructions. It defines how the agent approaches a problem, splits tasks, and evaluates success.
Feature Comparison: jcode vs. Traditional Frameworks
Before diving into the implementation details, let's look at how jcode positions itself against traditional Python-based agent architectures and standard LLM orchestration environments.
---Feature / Metric jcode (1jehuang) Python-based Agent Frameworks Standard LLM Chat Hooks Core Language Rust Python Python / TypeScript Execution Speed Ultra-high (Compiled, Native Threading) Moderate (Interpreted, Async Overheads) Low (Network Dependent) Memory Management Strict compile-time safety, minimal footprint High runtime consumption, garbage collected Variable depending on wrapper Sandbox Isolation Native OS environment detection & mapping Requires heavy external Docker wrapper No native execution layer Primary Target Autonomous multi-turn software engineering General purpose task automation agents Single-turn text/code generation Prerequisites and Environment Verification
Before installing jcode, you need to ensure your machine meets the minimum system requirements for native compilation and execution. Because jcode evaluates code in real-time, having a stable environment with standard compilers is essential.
System Requirements:
- Operating System: macOS (Intel/Apple Silicon), Linux (Ubuntu 22.04+, Debian, Fedora), or Windows 11 (with PowerShell or WSL2).
- Toolchains: Rust Stable (1.75+ recommended) if building from source.
- Network: Active internet connection to pull model endpoints and fetch external crate dependencies.
Step-by-Step Installation Guide
jcode features an adaptive installer that detects your current operating system, available package managers, and active shell configurations. Select the installation track below that best matches your local development system.
Option A: macOS via Homebrew
If you are on macOS and use the Homebrew package manager, you can install the official tap maintained by 1jehuang directly via your terminal:
# Tap the jcode formula repository brew tap 1jehuang/jcode # Install the binary package brew install jcodeOption B: Linux or macOS via Shell Script
For standard Linux distributions or macOS environments without Homebrew, use the automated installation script. This pulls the latest compiled binary corresponding to your architecture:
curl -fsSL [https://raw.githubusercontent.com/1jehuang/jcode/main/scripts/install.sh](https://raw.githubusercontent.com/1jehuang/jcode/main/scripts/install.sh) | bashOption C: Windows via PowerShell
If you are running natively on a Windows host within a standard administrative PowerShell prompt, execute the following command to download and map the binaries:
irm [https://raw.githubusercontent.com/1jehuang/jcode/main/scripts/install.ps1](https://raw.githubusercontent.com/1jehuang/jcode/main/scripts/install.ps1) | iexOption D: Building From Source (Recommended for Contributors)
If you want to run the cutting-edge development branch or adapt the core Rust source code to custom enterprise parameters, clone the official GitHub repository and compile it locally:
# Clone the project repository git clone [https://github.com/1jehuang/jcode.git](https://github.com/1jehuang/jcode.git) cd jcode # Compile a highly optimized release binary using Cargo cargo build --release # Execute the local release install configuration script ./scripts/install_release.shVerify that your installation was successful by checking the current version of the harness:
---jcode --versionQuickstart: Configuring and Initializing Your Agent Workspace
With jcode successfully installed, the next stage is configuring your active LLM providers and preparing a localized project workspace where your programming agent can safely read, write, and test applications.
Step 1: Exporting LLM API Credentials
jcode acts as an execution harness that routes logic through state-of-the-art coding LLMs. You must supply your preferred model API keys as environment variables. Add these to your shell profile (e.g.,
.bashrcor.zshrc):export OPENAI_API_KEY="sk-proj-xxxxxxxxxxxxxxxxxxxxxxxxxxxxxxxx" export ANTHROPIC_API_KEY="sk-ant-xxxxxxxxxxxxxxxxxxxxxxxxxxxxxxxx"Step 2: Initialize a New jcode Workspace
Navigate to an empty folder or your target repository and run the workspace initialization command. This tells jcode to parse the local layout and prepare an isolated runtime manifest:
mkdir my-agent-project cd my-agent-project jcode initThis command creates a hidden configuration workspace called
.jcode/containing a primary configuration file namedconfig.toml. Let's inspect and modify a standard setup configuration:
---# .jcode/config.toml [workspace] name = "my-agent-project" allowed_commands = ["cargo", "npm", "python", "git", "pytest", "go"] max_iterations = 15 [model] provider = "anthropic" default_model = "claude-3-5-sonnet-20241022" temperature = 0.2 max_tokens = 4096 [sandbox] isolate_network = false timeout_seconds = 45Building an Autonomous Programming Workflow
Now that your workspace is instantiated, let's walk through a real-world software maintenance scenario. We will instruct our jcode agent to write a complete Python utility module, write an associated test suit, run the validations, find bugs from execution outputs, and safely refactor the code automatically.
Step 1: Issue the Agent Task
We trigger the agent execution loop by supplying a clear, high-level engineering prompt using the
jcode runinstruction interface:jcode run "Create a robust Python rate limiter using a sliding window log algorithm. Include unit tests using pytest. Ensure it handles sub-millisecond timestamps gracefully."Step 2: Reviewing the Agent Autonomous Execution Trace
Once triggered, the jcode framework takes absolute control over the planning tree. Here is an approximation of what the terminal sequence tracks as the underlying Rust engine coordinates actions:
[INFO] Initializing agent environment... [INFO] Detected OS: Linux (Ubuntu 24.04), Package Manager: apt, Shell: bash [STEP 1/15] Planning task allocation tree... [TOOL CALL] Writing file: rate_limiter.py [TOOL CALL] Writing file: test_rate_limiter.py
jcode: Building High-Performance Autonomous AI Coding Agents from Scratch
The landscape of AI-driven software development is shifting rapidly. While first-generation AI coding tools operated primarily as conversational completions or simple script generators, the community is moving decisively toward autonomous programming agents. These agents don't just suggest code; they plan, execute tests, refactor, and self-correct within a structured harness.
Emerging at the forefront of this shift in May 2026 is jcode, an open-source, Rust-based programming agent framework developed by creator
1jehuang. Rapidly climbing the GitHub Trending charts and capturing the attention of autonomous systems developers, jcode addresses a critical bottleneck in the agentic ecosystem: execution speed, structural reliability, and resource overhead. Written entirely in Rust, it provides a high-performance harness designed to run AI coding agents at scale without the typical latency and memory bloat associated with Python-heavy orchestration layers.In this comprehensive tutorial-style guide, we will break down what jcode is, analyze its internal architecture, compare it to existing frameworks, and walk through an end-to-end installation and configuration process to build your very first autonomous coding agent.
---Understanding the jcode Architecture
To build effective applications with jcode, it is essential to understand how it organizes the execution loop of an AI agent. Traditional agent frameworks rely on high-level scripting abstractions that introduce significant latency, making deep-tree search algorithms (like Monte Carlo Tree Search or complex reflection loops) painfully slow. jcode solves this by using a compiled Rust backend that exposes a highly structured execution harness.
The framework is divided into three primary layers:
- The Environment Layer (The Sandbox): This component manages the operating system context, available package managers, and shell environments. It isolates agent actions, preventing rogue scripts from damaging the host system while providing full feedback loops (stdout, stderr, exit codes) back to the agent.
- The Core Harness (Rust Engine): Written in Rust for maximum concurrency and memory safety, this engine manages agent state transitions, prompt token streaming pipelines, and workspace file parsing. It abstracts token budgets and tool call translations natively.
- The Agent Interface (Extensible Profiles): This layer allows developers to write custom planning algorithms, definition maps, and system instructions. It defines how the agent approaches a problem, splits tasks, and evaluates success.
Feature Comparison: jcode vs. Traditional Frameworks
Before diving into the implementation details, let's look at how jcode positions itself against traditional Python-based agent architectures and standard LLM orchestration environments.
---Feature / Metric jcode (1jehuang) Python-based Agent Frameworks Standard LLM Chat Hooks Core Language Rust Python Python / TypeScript Execution Speed Ultra-high (Compiled, Native Threading) Moderate (Interpreted, Async Overheads) Low (Network Dependent) Memory Management Strict compile-time safety, minimal footprint High runtime consumption, garbage collected Variable depending on wrapper Sandbox Isolation Native OS environment detection & mapping Requires heavy external Docker wrapper No native execution layer Primary Target Autonomous multi-turn software engineering General purpose task automation agents Single-turn text/code generation Prerequisites and Environment Verification
Before installing jcode, you need to ensure your machine meets the minimum system requirements for native compilation and execution. Because jcode evaluates code in real-time, having a stable environment with standard compilers is essential.
System Requirements:
- Operating System: macOS (Intel/Apple Silicon), Linux (Ubuntu 22.04+, Debian, Fedora), or Windows 11 (with PowerShell or WSL2).
- Toolchains: Rust Stable (1.75+ recommended) if building from source.
- Network: Active internet connection to pull model endpoints and fetch external crate dependencies.
Step-by-Step Installation Guide
jcode features an adaptive installer that detects your current operating system, available package managers, and active shell configurations. Select the installation track below that best matches your local development system.
Option A: macOS via Homebrew
If you are on macOS and use the Homebrew package manager, you can install the official tap maintained by 1jehuang directly via your terminal:
# Tap the jcode formula repository brew tap 1jehuang/jcode # Install the binary package brew install jcodeOption B: Linux or macOS via Shell Script
For standard Linux distributions or macOS environments without Homebrew, use the automated installation script. This pulls the latest compiled binary corresponding to your architecture:
curl -fsSL [https://raw.githubusercontent.com/1jehuang/jcode/main/scripts/install.sh](https://raw.githubusercontent.com/1jehuang/jcode/main/scripts/install.sh) | bashOption C: Windows via PowerShell
If you are running natively on a Windows host within a standard administrative PowerShell prompt, execute the following command to download and map the binaries:
irm [https://raw.githubusercontent.com/1jehuang/jcode/main/scripts/install.ps1](https://raw.githubusercontent.com/1jehuang/jcode/main/scripts/install.ps1) | iexOption D: Building From Source (Recommended for Contributors)
If you want to run the cutting-edge development branch or adapt the core Rust source code to custom enterprise parameters, clone the official GitHub repository and compile it locally:
# Clone the project repository git clone [https://github.com/1jehuang/jcode.git](https://github.com/1jehuang/jcode.git) cd jcode # Compile a highly optimized release binary using Cargo cargo build --release # Execute the local release install configuration script ./scripts/install_release.shVerify that your installation was successful by checking the current version of the harness:
---jcode --versionQuickstart: Configuring and Initializing Your Agent Workspace
With jcode successfully installed, the next stage is configuring your active LLM providers and preparing a localized project workspace where your programming agent can safely read, write, and test applications.
Step 1: Exporting LLM API Credentials
jcode acts as an execution harness that routes logic through state-of-the-art coding LLMs. You must supply your preferred model API keys as environment variables. Add these to your shell profile (e.g.,
.bashrcor.zshrc):export OPENAI_API_KEY="sk-proj-xxxxxxxxxxxxxxxxxxxxxxxxxxxxxxxx" export ANTHROPIC_API_KEY="sk-ant-xxxxxxxxxxxxxxxxxxxxxxxxxxxxxxxx"Step 2: Initialize a New jcode Workspace
Navigate to an empty folder or your target repository and run the workspace initialization command. This tells jcode to parse the local layout and prepare an isolated runtime manifest:
mkdir my-agent-project cd my-agent-project jcode initThis command creates a hidden configuration workspace called
.jcode/containing a primary configuration file namedconfig.toml. Let's inspect and modify a standard setup configuration:
---# .jcode/config.toml [workspace] name = "my-agent-project" allowed_commands = ["cargo", "npm", "python", "git", "pytest", "go"] max_iterations = 15 [model] provider = "anthropic" default_model = "claude-3-5-sonnet-20241022" temperature = 0.2 max_tokens = 4096 [sandbox] isolate_network = false timeout_seconds = 45Building an Autonomous Programming Workflow
Now that your workspace is instantiated, let's walk through a real-world software maintenance scenario. We will instruct our jcode agent to write a complete Python utility module, write an associated test suit, run the validations, find bugs from execution outputs, and safely refactor the code automatically.
Step 1: Issue the Agent Task
We trigger the agent execution loop by supplying a clear, high-level engineering prompt using the
jcode runinstruction interface:jcode run "Create a robust Python rate limiter using a sliding window log algorithm. Include unit tests using pytest. Ensure it handles sub-millisecond timestamps gracefully."Step 2: Reviewing the Agent Autonomous Execution Trace
Once triggered, the jcode framework takes absolute control over the planning tree. Here is an approximation of what the terminal sequence tracks as the underlying Rust engine coordinates actions:
[INFO] Initializing agent environment... [INFO] Detected OS: Linux (Ubuntu 24.04), Package Manager: apt, Shell: bash [STEP 1/15] Planning task allocation tree... [TOOL CALL] Writing file: rate_limiter.py [TOOL CALL] Writing file: test_rate_limiter.py [STEP 2/15] Executing automated testing validation suite... [SHELL COMMAND] pytest test_rate_limiter.py
jcode: Building High-Performance Autonomous AI Coding Agents from Scratch
The landscape of AI-driven software development is shifting rapidly. While first-generation AI coding tools operated primarily as conversational completions or simple script generators, the community is moving decisively toward autonomous programming agents. These agents don't just suggest code; they plan, execute tests, refactor, and self-correct within a structured harness.
Emerging at the forefront of this shift in May 2026 is jcode, an open-source, Rust-based programming agent framework developed by creator
1jehuang. Rapidly climbing the GitHub Trending charts and capturing the attention of autonomous systems developers, jcode addresses a critical bottleneck in the agentic ecosystem: execution speed, structural reliability, and resource overhead. Written entirely in Rust, it provides a high-performance harness designed to run AI coding agents at scale without the typical latency and memory bloat associated with Python-heavy orchestration layers.In this comprehensive tutorial-style guide, we will break down what jcode is, analyze its internal architecture, compare it to existing frameworks, and walk through an end-to-end installation and configuration process to build your very first autonomous coding agent.
---Understanding the jcode Architecture
To build effective applications with jcode, it is essential to understand how it organizes the execution loop of an AI agent. Traditional agent frameworks rely on high-level scripting abstractions that introduce significant latency, making deep-tree search algorithms (like Monte Carlo Tree Search or complex reflection loops) painfully slow. jcode solves this by using a compiled Rust backend that exposes a highly structured execution harness.
The framework is divided into three primary layers:
- The Environment Layer (The Sandbox): This component manages the operating system context, available package managers, and shell environments. It isolates agent actions, preventing rogue scripts from damaging the host system while providing full feedback loops (stdout, stderr, exit codes) back to the agent.
- The Core Harness (Rust Engine): Written in Rust for maximum concurrency and memory safety, this engine manages agent state transitions, prompt token streaming pipelines, and workspace file parsing. It abstracts token budgets and tool call translations natively.
- The Agent Interface (Extensible Profiles): This layer allows developers to write custom planning algorithms, definition maps, and system instructions. It defines how the agent approaches a problem, splits tasks, and evaluates success.
Feature Comparison: jcode vs. Traditional Frameworks
Before diving into the implementation details, let's look at how jcode positions itself against traditional Python-based agent architectures and standard LLM orchestration environments.
---Feature / Metric jcode (1jehuang) Python-based Agent Frameworks Standard LLM Chat Hooks Core Language Rust Python Python / TypeScript Execution Speed Ultra-high (Compiled, Native Threading) Moderate (Interpreted, Async Overheads) Low (Network Dependent) Memory Management Strict compile-time safety, minimal footprint High runtime consumption, garbage collected Variable depending on wrapper Sandbox Isolation Native OS environment detection & mapping Requires heavy external Docker wrapper No native execution layer Primary Target Autonomous multi-turn software engineering General purpose task automation agents Single-turn text/code generation Prerequisites and Environment Verification
Before installing jcode, you need to ensure your machine meets the minimum system requirements for native compilation and execution. Because jcode evaluates code in real-time, having a stable environment with standard compilers is essential.
System Requirements:
- Operating System: macOS (Intel/Apple Silicon), Linux (Ubuntu 22.04+, Debian, Fedora), or Windows 11 (with PowerShell or WSL2).
- Toolchains: Rust Stable (1.75+ recommended) if building from source.
- Network: Active internet connection to pull model endpoints and fetch external crate dependencies.
Step-by-Step Installation Guide
jcode features an adaptive installer that detects your current operating system, available package managers, and active shell configurations. Select the installation track below that best matches your local development system.
Option A: macOS via Homebrew
If you are on macOS and use the Homebrew package manager, you can install the official tap maintained by 1jehuang directly via your terminal:
# Tap the jcode formula repository brew tap 1jehuang/jcode # Install the binary package brew install jcodeOption B: Linux or macOS via Shell Script
For standard Linux distributions or macOS environments without Homebrew, use the automated installation script. This pulls the latest compiled binary corresponding to your architecture:
curl -fsSL [https://raw.githubusercontent.com/1jehuang/jcode/main/scripts/install.sh](https://raw.githubusercontent.com/1jehuang/jcode/main/scripts/install.sh) | bashOption C: Windows via PowerShell
If you are running natively on a Windows host within a standard administrative PowerShell prompt, execute the following command to download and map the binaries:
irm [https://raw.githubusercontent.com/1jehuang/jcode/main/scripts/install.ps1](https://raw.githubusercontent.com/1jehuang/jcode/main/scripts/install.ps1) | iexOption D: Building From Source (Recommended for Contributors)
If you want to run the cutting-edge development branch or adapt the core Rust source code to custom enterprise parameters, clone the official GitHub repository and compile it locally:
# Clone the project repository git clone [https://github.com/1jehuang/jcode.git](https://github.com/1jehuang/jcode.git) cd jcode # Compile a highly optimized release binary using Cargo cargo build --release # Execute the local release install configuration script ./scripts/install_release.shVerify that your installation was successful by checking the current version of the harness:
---jcode --versionQuickstart: Configuring and Initializing Your Agent Workspace
With jcode successfully installed, the next stage is configuring your active LLM providers and preparing a localized project workspace where your programming agent can safely read, write, and test applications.
Step 1: Exporting LLM API Credentials
jcode acts as an execution harness that routes logic through state-of-the-art coding LLMs. You must supply your preferred model API keys as environment variables. Add these to your shell profile (e.g.,
.bashrcor.zshrc):export OPENAI_API_KEY="sk-proj-xxxxxxxxxxxxxxxxxxxxxxxxxxxxxxxx" export ANTHROPIC_API_KEY="sk-ant-xxxxxxxxxxxxxxxxxxxxxxxxxxxxxxxx"Step 2: Initialize a New jcode Workspace
Navigate to an empty folder or your target repository and run the workspace initialization command. This tells jcode to parse the local layout and prepare an isolated runtime manifest:
mkdir my-agent-project cd my-agent-project jcode initThis command creates a hidden configuration workspace called
.jcode/containing a primary configuration file namedconfig.toml. Let's inspect and modify a standard setup configuration:
---# .jcode/config.toml [workspace] name = "my-agent-project" allowed_commands = ["cargo", "npm", "python", "git", "pytest", "go"] max_iterations = 15 [model] provider = "anthropic" default_model = "claude-3-5-sonnet-20241022" temperature = 0.2 max_tokens = 4096 [sandbox] isolate_network = false timeout_seconds = 45Building an Autonomous Programming Workflow
Now that your workspace is instantiated, let's walk through a real-world software maintenance scenario. We will instruct our jcode agent to write a complete Python utility module, write an associated test suit, run the validations, find bugs from execution outputs, and safely refactor the code automatically.
Step 1: Issue the Agent Task
We trigger the agent execution loop by supplying a clear, high-level engineering prompt using the
jcode runinstruction interface:jcode run "Create a robust Python rate limiter using a sliding window log algorithm. Include unit tests using pytest. Ensure it handles sub-millisecond timestamps gracefully."Step 2: Reviewing the Agent Autonomous Execution Trace
Once triggered, the jcode framework takes absolute control over the planning tree. Here is an approximation of what the terminal sequence tracks as the underlying Rust engine coordinates actions:
[INFO] Initializing agent environment... [INFO] Detected OS: Linux (Ubuntu 24.04), Package Manager: apt, Shell: bash [STEP 1/15] Planning task allocation tree... [TOOL CALL] Writing file: rate_limiter.py [TOOL CALL] Writing file: test_rate_limiter.py [STEP 2/15] Executing automated testing validation suite... [SHELL COMMAND] pytest test_rate_limiter.py [EXECUTION OUTPUT] ========================= FAILURES ========================= ____ test_sliding_window_log_edge
jcode: Building High-Performance Autonomous AI Coding Agents from Scratch
The landscape of AI-driven software development is shifting rapidly. While first-generation AI coding tools operated primarily as conversational completions or simple script generators, the community is moving decisively toward autonomous programming agents. These agents don't just suggest code; they plan, execute tests, refactor, and self-correct within a structured harness.
Emerging at the forefront of this shift in May 2026 is jcode, an open-source, Rust-based programming agent framework developed by creator
1jehuang. Rapidly climbing the GitHub Trending charts and capturing the attention of autonomous systems developers, jcode addresses a critical bottleneck in the agentic ecosystem: execution speed, structural reliability, and resource overhead. Written entirely in Rust, it provides a high-performance harness designed to run AI coding agents at scale without the typical latency and memory bloat associated with Python-heavy orchestration layers.In this comprehensive tutorial-style guide, we will break down what jcode is, analyze its internal architecture, compare it to existing frameworks, and walk through an end-to-end installation and configuration process to build your very first autonomous coding agent.
---Understanding the jcode Architecture
To build effective applications with jcode, it is essential to understand how it organizes the execution loop of an AI agent. Traditional agent frameworks rely on high-level scripting abstractions that introduce significant latency, making deep-tree search algorithms (like Monte Carlo Tree Search or complex reflection loops) painfully slow. jcode solves this by using a compiled Rust backend that exposes a highly structured execution harness.
The framework is divided into three primary layers:
- The Environment Layer (The Sandbox): This component manages the operating system context, available package managers, and shell environments. It isolates agent actions, preventing rogue scripts from damaging the host system while providing full feedback loops (stdout, stderr, exit codes) back to the agent.
- The Core Harness (Rust Engine): Written in Rust for maximum concurrency and memory safety, this engine manages agent state transitions, prompt token streaming pipelines, and workspace file parsing. It abstracts token budgets and tool call translations natively.
- The Agent Interface (Extensible Profiles): This layer allows developers to write custom planning algorithms, definition maps, and system instructions. It defines how the agent approaches a problem, splits tasks, and evaluates success.
Feature Comparison: jcode vs. Traditional Frameworks
Before diving into the implementation details, let's look at how jcode positions itself against traditional Python-based agent architectures and standard LLM orchestration environments.
---Feature / Metric jcode (1jehuang) Python-based Agent Frameworks Standard LLM Chat Hooks Core Language Rust Python Python / TypeScript Execution Speed Ultra-high (Compiled, Native Threading) Moderate (Interpreted, Async Overheads) Low (Network Dependent) Memory Management Strict compile-time safety, minimal footprint High runtime consumption, garbage collected Variable depending on wrapper Sandbox Isolation Native OS environment detection & mapping Requires heavy external Docker wrapper No native execution layer Primary Target Autonomous multi-turn software engineering General purpose task automation agents Single-turn text/code generation Prerequisites and Environment Verification
Before installing jcode, you need to ensure your machine meets the minimum system requirements for native compilation and execution. Because jcode evaluates code in real-time, having a stable environment with standard compilers is essential.
System Requirements:
- Operating System: macOS (Intel/Apple Silicon), Linux (Ubuntu 22.04+, Debian, Fedora), or Windows 11 (with PowerShell or WSL2).
- Toolchains: Rust Stable (1.75+ recommended) if building from source.
- Network: Active internet connection to pull model endpoints and fetch external crate dependencies.
Step-by-Step Installation Guide
jcode features an adaptive installer that detects your current operating system, available package managers, and active shell configurations. Select the installation track below that best matches your local development system.
Option A: macOS via Homebrew
If you are on macOS and use the Homebrew package manager, you can install the official tap maintained by 1jehuang directly via your terminal:
# Tap the jcode formula repository brew tap 1jehuang/jcode # Install the binary package brew install jcodeOption B: Linux or macOS via Shell Script
For standard Linux distributions or macOS environments without Homebrew, use the automated installation script. This pulls the latest compiled binary corresponding to your architecture:
curl -fsSL [https://raw.githubusercontent.com/1jehuang/jcode/main/scripts/install.sh](https://raw.githubusercontent.com/1jehuang/jcode/main/scripts/install.sh) | bashOption C: Windows via PowerShell
If you are running natively on a Windows host within a standard administrative PowerShell prompt, execute the following command to download and map the binaries:
irm [https://raw.githubusercontent.com/1jehuang/jcode/main/scripts/install.ps1](https://raw.githubusercontent.com/1jehuang/jcode/main/scripts/install.ps1) | iexOption D: Building From Source (Recommended for Contributors)
If you want to run the cutting-edge development branch or adapt the core Rust source code to custom enterprise parameters, clone the official GitHub repository and compile it locally:
# Clone the project repository git clone [https://github.com/1jehuang/jcode.git](https://github.com/1jehuang/jcode.git) cd jcode # Compile a highly optimized release binary using Cargo cargo build --release # Execute the local release install configuration script ./scripts/install_release.shVerify that your installation was successful by checking the current version of the harness:
---jcode --versionQuickstart: Configuring and Initializing Your Agent Workspace
With jcode successfully installed, the next stage is configuring your active LLM providers and preparing a localized project workspace where your programming agent can safely read, write, and test applications.
Step 1: Exporting LLM API Credentials
jcode acts as an execution harness that routes logic through state-of-the-art coding LLMs. You must supply your preferred model API keys as environment variables. Add these to your shell profile (e.g.,
.bashrcor.zshrc):export OPENAI_API_KEY="sk-proj-xxxxxxxxxxxxxxxxxxxxxxxxxxxxxxxx" export ANTHROPIC_API_KEY="sk-ant-xxxxxxxxxxxxxxxxxxxxxxxxxxxxxxxx"Step 2: Initialize a New jcode Workspace
Navigate to an empty folder or your target repository and run the workspace initialization command. This tells jcode to parse the local layout and prepare an isolated runtime manifest:
mkdir my-agent-project cd my-agent-project jcode initThis command creates a hidden configuration workspace called
.jcode/containing a primary configuration file namedconfig.toml. Let's inspect and modify a standard setup configuration:
---# .jcode/config.toml [workspace] name = "my-agent-project" allowed_commands = ["cargo", "npm", "python", "git", "pytest", "go"] max_iterations = 15 [model] provider = "anthropic" default_model = "claude-3-5-sonnet-20241022" temperature = 0.2 max_tokens = 4096 [sandbox] isolate_network = false timeout_seconds = 45Building an Autonomous Programming Workflow
Now that your workspace is instantiated, let's walk through a real-world software maintenance scenario. We will instruct our jcode agent to write a complete Python utility module, write an associated test suit, run the validations, find bugs from execution outputs, and safely refactor the code automatically.
Step 1: Issue the Agent Task
We trigger the agent execution loop by supplying a clear, high-level engineering prompt using the
jcode runinstruction interface:jcode run "Create a robust Python rate limiter using a sliding window log algorithm. Include unit tests using pytest. Ensure it handles sub-millisecond timestamps gracefully."Step 2: Reviewing the Agent Autonomous Execution Trace
Once triggered, the jcode framework takes absolute control over the planning tree. Here is an approximation of what the terminal sequence tracks as the underlying Rust engine coordinates actions:
[INFO] Initializing agent environment... [INFO] Detected OS: Linux (Ubuntu 24.04), Package Manager: apt, Shell: bash [STEP 1/15] Planning task allocation tree... [TOOL CALL] Writing file: rate_limiter.py [TOOL CALL] Writing file: test_rate_limiter.py [STEP 2/15] Executing automated testing validation suite... [SHELL COMMAND] pytest test_rate_limiter.py [EXECUTION OUTPUT] ========================= FAILURES ========================= ____ test_sliding_window_log_edge_case _____________________ > assert limiter.allow_request("user_1") == False E
jcode: Building High-Performance Autonomous AI Coding Agents from Scratch
The landscape of AI-driven software development is shifting rapidly. While first-generation AI coding tools operated primarily as conversational completions or simple script generators, the community is moving decisively toward autonomous programming agents. These agents don't just suggest code; they plan, execute tests, refactor, and self-correct within a structured harness.
Emerging at the forefront of this shift in May 2026 is jcode, an open-source, Rust-based programming agent framework developed by creator
1jehuang. Rapidly climbing the GitHub Trending charts and capturing the attention of autonomous systems developers, jcode addresses a critical bottleneck in the agentic ecosystem: execution speed, structural reliability, and resource overhead. Written entirely in Rust, it provides a high-performance harness designed to run AI coding agents at scale without the typical latency and memory bloat associated with Python-heavy orchestration layers.In this comprehensive tutorial-style guide, we will break down what jcode is, analyze its internal architecture, compare it to existing frameworks, and walk through an end-to-end installation and configuration process to build your very first autonomous coding agent.
---Understanding the jcode Architecture
To build effective applications with jcode, it is essential to understand how it organizes the execution loop of an AI agent. Traditional agent frameworks rely on high-level scripting abstractions that introduce significant latency, making deep-tree search algorithms (like Monte Carlo Tree Search or complex reflection loops) painfully slow. jcode solves this by using a compiled Rust backend that exposes a highly structured execution harness.
The framework is divided into three primary layers:
- The Environment Layer (The Sandbox): This component manages the operating system context, available package managers, and shell environments. It isolates agent actions, preventing rogue scripts from damaging the host system while providing full feedback loops (stdout, stderr, exit codes) back to the agent.
- The Core Harness (Rust Engine): Written in Rust for maximum concurrency and memory safety, this engine manages agent state transitions, prompt token streaming pipelines, and workspace file parsing. It abstracts token budgets and tool call translations natively.
- The Agent Interface (Extensible Profiles): This layer allows developers to write custom planning algorithms, definition maps, and system instructions. It defines how the agent approaches a problem, splits tasks, and evaluates success.
Feature Comparison: jcode vs. Traditional Frameworks
Before diving into the implementation details, let's look at how jcode positions itself against traditional Python-based agent architectures and standard LLM orchestration environments.
---Feature / Metric jcode (1jehuang) Python-based Agent Frameworks Standard LLM Chat Hooks Core Language Rust Python Python / TypeScript Execution Speed Ultra-high (Compiled, Native Threading) Moderate (Interpreted, Async Overheads) Low (Network Dependent) Memory Management Strict compile-time safety, minimal footprint High runtime consumption, garbage collected Variable depending on wrapper Sandbox Isolation Native OS environment detection & mapping Requires heavy external Docker wrapper No native execution layer Primary Target Autonomous multi-turn software engineering General purpose task automation agents Single-turn text/code generation Prerequisites and Environment Verification
Before installing jcode, you need to ensure your machine meets the minimum system requirements for native compilation and execution. Because jcode evaluates code in real-time, having a stable environment with standard compilers is essential.
System Requirements:
- Operating System: macOS (Intel/Apple Silicon), Linux (Ubuntu 22.04+, Debian, Fedora), or Windows 11 (with PowerShell or WSL2).
- Toolchains: Rust Stable (1.75+ recommended) if building from source.
- Network: Active internet connection to pull model endpoints and fetch external crate dependencies.
Step-by-Step Installation Guide
jcode features an adaptive installer that detects your current operating system, available package managers, and active shell configurations. Select the installation track below that best matches your local development system.
Option A: macOS via Homebrew
If you are on macOS and use the Homebrew package manager, you can install the official tap maintained by 1jehuang directly via your terminal:
# Tap the jcode formula repository brew tap 1jehuang/jcode # Install the binary package brew install jcodeOption B: Linux or macOS via Shell Script
For standard Linux distributions or macOS environments without Homebrew, use the automated installation script. This pulls the latest compiled binary corresponding to your architecture:
curl -fsSL [https://raw.githubusercontent.com/1jehuang/jcode/main/scripts/install.sh](https://raw.githubusercontent.com/1jehuang/jcode/main/scripts/install.sh) | bashOption C: Windows via PowerShell
If you are running natively on a Windows host within a standard administrative PowerShell prompt, execute the following command to download and map the binaries:
irm [https://raw.githubusercontent.com/1jehuang/jcode/main/scripts/install.ps1](https://raw.githubusercontent.com/1jehuang/jcode/main/scripts/install.ps1) | iexOption D: Building From Source (Recommended for Contributors)
If you want to run the cutting-edge development branch or adapt the core Rust source code to custom enterprise parameters, clone the official GitHub repository and compile it locally:
# Clone the project repository git clone [https://github.com/1jehuang/jcode.git](https://github.com/1jehuang/jcode.git) cd jcode # Compile a highly optimized release binary using Cargo cargo build --release # Execute the local release install configuration script ./scripts/install_release.shVerify that your installation was successful by checking the current version of the harness:
---jcode --versionQuickstart: Configuring and Initializing Your Agent Workspace
With jcode successfully installed, the next stage is configuring your active LLM providers and preparing a localized project workspace where your programming agent can safely read, write, and test applications.
Step 1: Exporting LLM API Credentials
jcode acts as an execution harness that routes logic through state-of-the-art coding LLMs. You must supply your preferred model API keys as environment variables. Add these to your shell profile (e.g.,
.bashrcor.zshrc):export OPENAI_API_KEY="sk-proj-xxxxxxxxxxxxxxxxxxxxxxxxxxxxxxxx" export ANTHROPIC_API_KEY="sk-ant-xxxxxxxxxxxxxxxxxxxxxxxxxxxxxxxx"Step 2: Initialize a New jcode Workspace
Navigate to an empty folder or your target repository and run the workspace initialization command. This tells jcode to parse the local layout and prepare an isolated runtime manifest:
mkdir my-agent-project cd my-agent-project jcode initThis command creates a hidden configuration workspace called
.jcode/containing a primary configuration file namedconfig.toml. Let's inspect and modify a standard setup configuration:
---# .jcode/config.toml [workspace] name = "my-agent-project" allowed_commands = ["cargo", "npm", "python", "git", "pytest", "go"] max_iterations = 15 [model] provider = "anthropic" default_model = "claude-3-5-sonnet-20241022" temperature = 0.2 max_tokens = 4096 [sandbox] isolate_network = false timeout_seconds = 45Building an Autonomous Programming Workflow
Now that your workspace is instantiated, let's walk through a real-world software maintenance scenario. We will instruct our jcode agent to write a complete Python utility module, write an associated test suit, run the validations, find bugs from execution outputs, and safely refactor the code automatically.
Step 1: Issue the Agent Task
We trigger the agent execution loop by supplying a clear, high-level engineering prompt using the
jcode runinstruction interface:jcode run "Create a robust Python rate limiter using a sliding window log algorithm. Include unit tests using pytest. Ensure it handles sub-millisecond timestamps gracefully."Step 2: Reviewing the Agent Autonomous Execution Trace
Once triggered, the jcode framework takes absolute control over the planning tree. Here is an approximation of what the terminal sequence tracks as the underlying Rust engine coordinates actions:
[INFO] Initializing agent environment... [INFO] Detected OS: Linux (Ubuntu 24.04), Package Manager: apt, Shell: bash [STEP 1/15] Planning task allocation tree... [TOOL CALL] Writing file: rate_limiter.py [TOOL CALL] Writing file: test_rate_limiter.py [STEP 2/15] Executing automated testing validation suite... [SHELL COMMAND] pytest test_rate_limiter.py [EXECUTION OUTPUT] ========================= FAILURES ========================= ____ test_sliding_window_log_edge_case _____________________ > assert limiter.allow_request("user_1") == False E AssertionError: assert True == False [STEP 3/15] Analyzing test failures. Reflection phase initiated...
jcode: Building High-Performance Autonomous AI Coding Agents from Scratch
The landscape of AI-driven software development is shifting rapidly. While first-generation AI coding tools operated primarily as conversational completions or simple script generators, the community is moving decisively toward autonomous programming agents. These agents don't just suggest code; they plan, execute tests, refactor, and self-correct within a structured harness.
Emerging at the forefront of this shift in May 2026 is jcode, an open-source, Rust-based programming agent framework developed by creator
1jehuang. Rapidly climbing the GitHub Trending charts and capturing the attention of autonomous systems developers, jcode addresses a critical bottleneck in the agentic ecosystem: execution speed, structural reliability, and resource overhead. Written entirely in Rust, it provides a high-performance harness designed to run AI coding agents at scale without the typical latency and memory bloat associated with Python-heavy orchestration layers.In this comprehensive tutorial-style guide, we will break down what jcode is, analyze its internal architecture, compare it to existing frameworks, and walk through an end-to-end installation and configuration process to build your very first autonomous coding agent.
---Understanding the jcode Architecture
To build effective applications with jcode, it is essential to understand how it organizes the execution loop of an AI agent. Traditional agent frameworks rely on high-level scripting abstractions that introduce significant latency, making deep-tree search algorithms (like Monte Carlo Tree Search or complex reflection loops) painfully slow. jcode solves this by using a compiled Rust backend that exposes a highly structured execution harness.
The framework is divided into three primary layers:
- The Environment Layer (The Sandbox): This component manages the operating system context, available package managers, and shell environments. It isolates agent actions, preventing rogue scripts from damaging the host system while providing full feedback loops (stdout, stderr, exit codes) back to the agent.
- The Core Harness (Rust Engine): Written in Rust for maximum concurrency and memory safety, this engine manages agent state transitions, prompt token streaming pipelines, and workspace file parsing. It abstracts token budgets and tool call translations natively.
- The Agent Interface (Extensible Profiles): This layer allows developers to write custom planning algorithms, definition maps, and system instructions. It defines how the agent approaches a problem, splits tasks, and evaluates success.
Feature Comparison: jcode vs. Traditional Frameworks
Before diving into the implementation details, let's look at how jcode positions itself against traditional Python-based agent architectures and standard LLM orchestration environments.
---Feature / Metric jcode (1jehuang) Python-based Agent Frameworks Standard LLM Chat Hooks Core Language Rust Python Python / TypeScript Execution Speed Ultra-high (Compiled, Native Threading) Moderate (Interpreted, Async Overheads) Low (Network Dependent) Memory Management Strict compile-time safety, minimal footprint High runtime consumption, garbage collected Variable depending on wrapper Sandbox Isolation Native OS environment detection & mapping Requires heavy external Docker wrapper No native execution layer Primary Target Autonomous multi-turn software engineering General purpose task automation agents Single-turn text/code generation Prerequisites and Environment Verification
Before installing jcode, you need to ensure your machine meets the minimum system requirements for native compilation and execution. Because jcode evaluates code in real-time, having a stable environment with standard compilers is essential.
System Requirements:
- Operating System: macOS (Intel/Apple Silicon), Linux (Ubuntu 22.04+, Debian, Fedora), or Windows 11 (with PowerShell or WSL2).
- Toolchains: Rust Stable (1.75+ recommended) if building from source.
- Network: Active internet connection to pull model endpoints and fetch external crate dependencies.
Step-by-Step Installation Guide
jcode features an adaptive installer that detects your current operating system, available package managers, and active shell configurations. Select the installation track below that best matches your local development system.
Option A: macOS via Homebrew
If you are on macOS and use the Homebrew package manager, you can install the official tap maintained by 1jehuang directly via your terminal:
# Tap the jcode formula repository brew tap 1jehuang/jcode # Install the binary package brew install jcodeOption B: Linux or macOS via Shell Script
For standard Linux distributions or macOS environments without Homebrew, use the automated installation script. This pulls the latest compiled binary corresponding to your architecture:
curl -fsSL [https://raw.githubusercontent.com/1jehuang/jcode/main/scripts/install.sh](https://raw.githubusercontent.com/1jehuang/jcode/main/scripts/install.sh) | bashOption C: Windows via PowerShell
If you are running natively on a Windows host within a standard administrative PowerShell prompt, execute the following command to download and map the binaries:
irm [https://raw.githubusercontent.com/1jehuang/jcode/main/scripts/install.ps1](https://raw.githubusercontent.com/1jehuang/jcode/main/scripts/install.ps1) | iexOption D: Building From Source (Recommended for Contributors)
If you want to run the cutting-edge development branch or adapt the core Rust source code to custom enterprise parameters, clone the official GitHub repository and compile it locally:
# Clone the project repository git clone [https://github.com/1jehuang/jcode.git](https://github.com/1jehuang/jcode.git) cd jcode # Compile a highly optimized release binary using Cargo cargo build --release # Execute the local release install configuration script ./scripts/install_release.shVerify that your installation was successful by checking the current version of the harness:
---jcode --versionQuickstart: Configuring and Initializing Your Agent Workspace
With jcode successfully installed, the next stage is configuring your active LLM providers and preparing a localized project workspace where your programming agent can safely read, write, and test applications.
Step 1: Exporting LLM API Credentials
jcode acts as an execution harness that routes logic through state-of-the-art coding LLMs. You must supply your preferred model API keys as environment variables. Add these to your shell profile (e.g.,
.bashrcor.zshrc):export OPENAI_API_KEY="sk-proj-xxxxxxxxxxxxxxxxxxxxxxxxxxxxxxxx" export ANTHROPIC_API_KEY="sk-ant-xxxxxxxxxxxxxxxxxxxxxxxxxxxxxxxx"Step 2: Initialize a New jcode Workspace
Navigate to an empty folder or your target repository and run the workspace initialization command. This tells jcode to parse the local layout and prepare an isolated runtime manifest:
mkdir my-agent-project cd my-agent-project jcode initThis command creates a hidden configuration workspace called
.jcode/containing a primary configuration file namedconfig.toml. Let's inspect and modify a standard setup configuration:
---# .jcode/config.toml [workspace] name = "my-agent-project" allowed_commands = ["cargo", "npm", "python", "git", "pytest", "go"] max_iterations = 15 [model] provider = "anthropic" default_model = "claude-3-5-sonnet-20241022" temperature = 0.2 max_tokens = 4096 [sandbox] isolate_network = false timeout_seconds = 45Building an Autonomous Programming Workflow
Now that your workspace is instantiated, let's walk through a real-world software maintenance scenario. We will instruct our jcode agent to write a complete Python utility module, write an associated test suit, run the validations, find bugs from execution outputs, and safely refactor the code automatically.
Step 1: Issue the Agent Task
We trigger the agent execution loop by supplying a clear, high-level engineering prompt using the
jcode runinstruction interface:jcode run "Create a robust Python rate limiter using a sliding window log algorithm. Include unit tests using pytest. Ensure it handles sub-millisecond timestamps gracefully."Step 2: Reviewing the Agent Autonomous Execution Trace
Once triggered, the jcode framework takes absolute control over the planning tree. Here is an approximation of what the terminal sequence tracks as the underlying Rust engine coordinates actions:
[INFO] Initializing agent environment... [INFO] Detected OS: Linux (Ubuntu 24.04), Package Manager: apt, Shell: bash [STEP 1/15] Planning task allocation tree... [TOOL CALL] Writing file: rate_limiter.py [TOOL CALL] Writing file: test_rate_limiter.py [STEP 2/15] Executing automated testing validation suite... [SHELL COMMAND] pytest test_rate_limiter.py [EXECUTION OUTPUT] ========================= FAILURES ========================= ____ test_sliding_window_log_edge_case _____________________ > assert limiter.allow_request("user_1") == False E AssertionError: assert True == False [STEP 3/15] Analyzing test failures. Reflection phase initiated... [INFO] Detected boundary edge condition flaw in window timestamps math. [TOOL CALL] Patching file: rate_limiter.py (
jcode: Building High-Performance Autonomous AI Coding Agents from Scratch
The landscape of AI-driven software development is shifting rapidly. While first-generation AI coding tools operated primarily as conversational completions or simple script generators, the community is moving decisively toward autonomous programming agents. These agents don't just suggest code; they plan, execute tests, refactor, and self-correct within a structured harness.
Emerging at the forefront of this shift in May 2026 is jcode, an open-source, Rust-based programming agent framework developed by creator
1jehuang. Rapidly climbing the GitHub Trending charts and capturing the attention of autonomous systems developers, jcode addresses a critical bottleneck in the agentic ecosystem: execution speed, structural reliability, and resource overhead. Written entirely in Rust, it provides a high-performance harness designed to run AI coding agents at scale without the typical latency and memory bloat associated with Python-heavy orchestration layers.In this comprehensive tutorial-style guide, we will break down what jcode is, analyze its internal architecture, compare it to existing frameworks, and walk through an end-to-end installation and configuration process to build your very first autonomous coding agent.
---Understanding the jcode Architecture
To build effective applications with jcode, it is essential to understand how it organizes the execution loop of an AI agent. Traditional agent frameworks rely on high-level scripting abstractions that introduce significant latency, making deep-tree search algorithms (like Monte Carlo Tree Search or complex reflection loops) painfully slow. jcode solves this by using a compiled Rust backend that exposes a highly structured execution harness.
The framework is divided into three primary layers:
- The Environment Layer (The Sandbox): This component manages the operating system context, available package managers, and shell environments. It isolates agent actions, preventing rogue scripts from damaging the host system while providing full feedback loops (stdout, stderr, exit codes) back to the agent.
- The Core Harness (Rust Engine): Written in Rust for maximum concurrency and memory safety, this engine manages agent state transitions, prompt token streaming pipelines, and workspace file parsing. It abstracts token budgets and tool call translations natively.
- The Agent Interface (Extensible Profiles): This layer allows developers to write custom planning algorithms, definition maps, and system instructions. It defines how the agent approaches a problem, splits tasks, and evaluates success.
Feature Comparison: jcode vs. Traditional Frameworks
Before diving into the implementation details, let's look at how jcode positions itself against traditional Python-based agent architectures and standard LLM orchestration environments.
---Feature / Metric jcode (1jehuang) Python-based Agent Frameworks Standard LLM Chat Hooks Core Language Rust Python Python / TypeScript Execution Speed Ultra-high (Compiled, Native Threading) Moderate (Interpreted, Async Overheads) Low (Network Dependent) Memory Management Strict compile-time safety, minimal footprint High runtime consumption, garbage collected Variable depending on wrapper Sandbox Isolation Native OS environment detection & mapping Requires heavy external Docker wrapper No native execution layer Primary Target Autonomous multi-turn software engineering General purpose task automation agents Single-turn text/code generation Prerequisites and Environment Verification
Before installing jcode, you need to ensure your machine meets the minimum system requirements for native compilation and execution. Because jcode evaluates code in real-time, having a stable environment with standard compilers is essential.
System Requirements:
- Operating System: macOS (Intel/Apple Silicon), Linux (Ubuntu 22.04+, Debian, Fedora), or Windows 11 (with PowerShell or WSL2).
- Toolchains: Rust Stable (1.75+ recommended) if building from source.
- Network: Active internet connection to pull model endpoints and fetch external crate dependencies.
Step-by-Step Installation Guide
jcode features an adaptive installer that detects your current operating system, available package managers, and active shell configurations. Select the installation track below that best matches your local development system.
Option A: macOS via Homebrew
If you are on macOS and use the Homebrew package manager, you can install the official tap maintained by 1jehuang directly via your terminal:
# Tap the jcode formula repository brew tap 1jehuang/jcode # Install the binary package brew install jcodeOption B: Linux or macOS via Shell Script
For standard Linux distributions or macOS environments without Homebrew, use the automated installation script. This pulls the latest compiled binary corresponding to your architecture:
curl -fsSL [https://raw.githubusercontent.com/1jehuang/jcode/main/scripts/install.sh](https://raw.githubusercontent.com/1jehuang/jcode/main/scripts/install.sh) | bashOption C: Windows via PowerShell
If you are running natively on a Windows host within a standard administrative PowerShell prompt, execute the following command to download and map the binaries:
irm [https://raw.githubusercontent.com/1jehuang/jcode/main/scripts/install.ps1](https://raw.githubusercontent.com/1jehuang/jcode/main/scripts/install.ps1) | iexOption D: Building From Source (Recommended for Contributors)
If you want to run the cutting-edge development branch or adapt the core Rust source code to custom enterprise parameters, clone the official GitHub repository and compile it locally:
# Clone the project repository git clone [https://github.com/1jehuang/jcode.git](https://github.com/1jehuang/jcode.git) cd jcode # Compile a highly optimized release binary using Cargo cargo build --release # Execute the local release install configuration script ./scripts/install_release.shVerify that your installation was successful by checking the current version of the harness:
---jcode --versionQuickstart: Configuring and Initializing Your Agent Workspace
With jcode successfully installed, the next stage is configuring your active LLM providers and preparing a localized project workspace where your programming agent can safely read, write, and test applications.
Step 1: Exporting LLM API Credentials
jcode acts as an execution harness that routes logic through state-of-the-art coding LLMs. You must supply your preferred model API keys as environment variables. Add these to your shell profile (e.g.,
.bashrcor.zshrc):export OPENAI_API_KEY="sk-proj-xxxxxxxxxxxxxxxxxxxxxxxxxxxxxxxx" export ANTHROPIC_API_KEY="sk-ant-xxxxxxxxxxxxxxxxxxxxxxxxxxxxxxxx"Step 2: Initialize a New jcode Workspace
Navigate to an empty folder or your target repository and run the workspace initialization command. This tells jcode to parse the local layout and prepare an isolated runtime manifest:
mkdir my-agent-project cd my-agent-project jcode initThis command creates a hidden configuration workspace called
.jcode/containing a primary configuration file namedconfig.toml. Let's inspect and modify a standard setup configuration:
---# .jcode/config.toml [workspace] name = "my-agent-project" allowed_commands = ["cargo", "npm", "python", "git", "pytest", "go"] max_iterations = 15 [model] provider = "anthropic" default_model = "claude-3-5-sonnet-20241022" temperature = 0.2 max_tokens = 4096 [sandbox] isolate_network = false timeout_seconds = 45Building an Autonomous Programming Workflow
Now that your workspace is instantiated, let's walk through a real-world software maintenance scenario. We will instruct our jcode agent to write a complete Python utility module, write an associated test suit, run the validations, find bugs from execution outputs, and safely refactor the code automatically.
Step 1: Issue the Agent Task
We trigger the agent execution loop by supplying a clear, high-level engineering prompt using the
jcode runinstruction interface:jcode run "Create a robust Python rate limiter using a sliding window log algorithm. Include unit tests using pytest. Ensure it handles sub-millisecond timestamps gracefully."Step 2: Reviewing the Agent Autonomous Execution Trace
Once triggered, the jcode framework takes absolute control over the planning tree. Here is an approximation of what the terminal sequence tracks as the underlying Rust engine coordinates actions:
[INFO] Initializing agent environment... [INFO] Detected OS: Linux (Ubuntu 24.04), Package Manager: apt, Shell: bash [STEP 1/15] Planning task allocation tree... [TOOL CALL] Writing file: rate_limiter.py [TOOL CALL] Writing file: test_rate_limiter.py [STEP 2/15] Executing automated testing validation suite... [SHELL COMMAND] pytest test_rate_limiter.py [EXECUTION OUTPUT] ========================= FAILURES ========================= ____ test_sliding_window_log_edge_case _____________________ > assert limiter.allow_request("user_1") == False E AssertionError: assert True == False [STEP 3/15] Analyzing test failures. Reflection phase initiated... [INFO] Detected boundary edge condition flaw in window timestamps math. [TOOL CALL] Patching file: rate_limiter.py (Applying inline diff) [STEP 4/15] Re-executing testing suite...
jcode: Building High-Performance Autonomous AI Coding Agents from Scratch
The landscape of AI-driven software development is shifting rapidly. While first-generation AI coding tools operated primarily as conversational completions or simple script generators, the community is moving decisively toward autonomous programming agents. These agents don't just suggest code; they plan, execute tests, refactor, and self-correct within a structured harness.
Emerging at the forefront of this shift in May 2026 is jcode, an open-source, Rust-based programming agent framework developed by creator
1jehuang. Rapidly climbing the GitHub Trending charts and capturing the attention of autonomous systems developers, jcode addresses a critical bottleneck in the agentic ecosystem: execution speed, structural reliability, and resource overhead. Written entirely in Rust, it provides a high-performance harness designed to run AI coding agents at scale without the typical latency and memory bloat associated with Python-heavy orchestration layers.In this comprehensive tutorial-style guide, we will break down what jcode is, analyze its internal architecture, compare it to existing frameworks, and walk through an end-to-end installation and configuration process to build your very first autonomous coding agent.
---Understanding the jcode Architecture
To build effective applications with jcode, it is essential to understand how it organizes the execution loop of an AI agent. Traditional agent frameworks rely on high-level scripting abstractions that introduce significant latency, making deep-tree search algorithms (like Monte Carlo Tree Search or complex reflection loops) painfully slow. jcode solves this by using a compiled Rust backend that exposes a highly structured execution harness.
The framework is divided into three primary layers:
- The Environment Layer (The Sandbox): This component manages the operating system context, available package managers, and shell environments. It isolates agent actions, preventing rogue scripts from damaging the host system while providing full feedback loops (stdout, stderr, exit codes) back to the agent.
- The Core Harness (Rust Engine): Written in Rust for maximum concurrency and memory safety, this engine manages agent state transitions, prompt token streaming pipelines, and workspace file parsing. It abstracts token budgets and tool call translations natively.
- The Agent Interface (Extensible Profiles): This layer allows developers to write custom planning algorithms, definition maps, and system instructions. It defines how the agent approaches a problem, splits tasks, and evaluates success.
Feature Comparison: jcode vs. Traditional Frameworks
Before diving into the implementation details, let's look at how jcode positions itself against traditional Python-based agent architectures and standard LLM orchestration environments.
---Feature / Metric jcode (1jehuang) Python-based Agent Frameworks Standard LLM Chat Hooks Core Language Rust Python Python / TypeScript Execution Speed Ultra-high (Compiled, Native Threading) Moderate (Interpreted, Async Overheads) Low (Network Dependent) Memory Management Strict compile-time safety, minimal footprint High runtime consumption, garbage collected Variable depending on wrapper Sandbox Isolation Native OS environment detection & mapping Requires heavy external Docker wrapper No native execution layer Primary Target Autonomous multi-turn software engineering General purpose task automation agents Single-turn text/code generation Prerequisites and Environment Verification
Before installing jcode, you need to ensure your machine meets the minimum system requirements for native compilation and execution. Because jcode evaluates code in real-time, having a stable environment with standard compilers is essential.
System Requirements:
- Operating System: macOS (Intel/Apple Silicon), Linux (Ubuntu 22.04+, Debian, Fedora), or Windows 11 (with PowerShell or WSL2).
- Toolchains: Rust Stable (1.75+ recommended) if building from source.
- Network: Active internet connection to pull model endpoints and fetch external crate dependencies.
Step-by-Step Installation Guide
jcode features an adaptive installer that detects your current operating system, available package managers, and active shell configurations. Select the installation track below that best matches your local development system.
Option A: macOS via Homebrew
If you are on macOS and use the Homebrew package manager, you can install the official tap maintained by 1jehuang directly via your terminal:
# Tap the jcode formula repository brew tap 1jehuang/jcode # Install the binary package brew install jcodeOption B: Linux or macOS via Shell Script
For standard Linux distributions or macOS environments without Homebrew, use the automated installation script. This pulls the latest compiled binary corresponding to your architecture:
curl -fsSL [https://raw.githubusercontent.com/1jehuang/jcode/main/scripts/install.sh](https://raw.githubusercontent.com/1jehuang/jcode/main/scripts/install.sh) | bashOption C: Windows via PowerShell
If you are running natively on a Windows host within a standard administrative PowerShell prompt, execute the following command to download and map the binaries:
irm [https://raw.githubusercontent.com/1jehuang/jcode/main/scripts/install.ps1](https://raw.githubusercontent.com/1jehuang/jcode/main/scripts/install.ps1) | iexOption D: Building From Source (Recommended for Contributors)
If you want to run the cutting-edge development branch or adapt the core Rust source code to custom enterprise parameters, clone the official GitHub repository and compile it locally:
# Clone the project repository git clone [https://github.com/1jehuang/jcode.git](https://github.com/1jehuang/jcode.git) cd jcode # Compile a highly optimized release binary using Cargo cargo build --release # Execute the local release install configuration script ./scripts/install_release.shVerify that your installation was successful by checking the current version of the harness:
---jcode --versionQuickstart: Configuring and Initializing Your Agent Workspace
With jcode successfully installed, the next stage is configuring your active LLM providers and preparing a localized project workspace where your programming agent can safely read, write, and test applications.
Step 1: Exporting LLM API Credentials
jcode acts as an execution harness that routes logic through state-of-the-art coding LLMs. You must supply your preferred model API keys as environment variables. Add these to your shell profile (e.g.,
.bashrcor.zshrc):export OPENAI_API_KEY="sk-proj-xxxxxxxxxxxxxxxxxxxxxxxxxxxxxxxx" export ANTHROPIC_API_KEY="sk-ant-xxxxxxxxxxxxxxxxxxxxxxxxxxxxxxxx"Step 2: Initialize a New jcode Workspace
Navigate to an empty folder or your target repository and run the workspace initialization command. This tells jcode to parse the local layout and prepare an isolated runtime manifest:
mkdir my-agent-project cd my-agent-project jcode initThis command creates a hidden configuration workspace called
.jcode/containing a primary configuration file namedconfig.toml. Let's inspect and modify a standard setup configuration:
---# .jcode/config.toml [workspace] name = "my-agent-project" allowed_commands = ["cargo", "npm", "python", "git", "pytest", "go"] max_iterations = 15 [model] provider = "anthropic" default_model = "claude-3-5-sonnet-20241022" temperature = 0.2 max_tokens = 4096 [sandbox] isolate_network = false timeout_seconds = 45Building an Autonomous Programming Workflow
Now that your workspace is instantiated, let's walk through a real-world software maintenance scenario. We will instruct our jcode agent to write a complete Python utility module, write an associated test suit, run the validations, find bugs from execution outputs, and safely refactor the code automatically.
Step 1: Issue the Agent Task
We trigger the agent execution loop by supplying a clear, high-level engineering prompt using the
jcode runinstruction interface:jcode run "Create a robust Python rate limiter using a sliding window log algorithm. Include unit tests using pytest. Ensure it handles sub-millisecond timestamps gracefully."Step 2: Reviewing the Agent Autonomous Execution Trace
Once triggered, the jcode framework takes absolute control over the planning tree. Here is an approximation of what the terminal sequence tracks as the underlying Rust engine coordinates actions:
[INFO] Initializing agent environment... [INFO] Detected OS: Linux (Ubuntu 24.04), Package Manager: apt, Shell: bash [STEP 1/15] Planning task allocation tree... [TOOL CALL] Writing file: rate_limiter.py [TOOL CALL] Writing file: test_rate_limiter.py [STEP 2/15] Executing automated testing validation suite... [SHELL COMMAND] pytest test_rate_limiter.py [EXECUTION OUTPUT] ========================= FAILURES ========================= ____ test_sliding_window_log_edge_case _____________________ > assert limiter.allow_request("user_1") == False E AssertionError: assert True == False [STEP 3/15] Analyzing test failures. Reflection phase initiated... [INFO] Detected boundary edge condition flaw in window timestamps math. [TOOL CALL] Patching file: rate_limiter.py (Applying inline diff) [STEP 4/15] Re-executing testing suite... [SHELL COMMAND] pytest test_rate_limiter.py [EXECUTION OUTPUT] ==================== 4 passed in
jcode: Building High-Performance Autonomous AI Coding Agents from Scratch
The landscape of AI-driven software development is shifting rapidly. While first-generation AI coding tools operated primarily as conversational completions or simple script generators, the community is moving decisively toward autonomous programming agents. These agents don't just suggest code; they plan, execute tests, refactor, and self-correct within a structured harness.
Emerging at the forefront of this shift in May 2026 is jcode, an open-source, Rust-based programming agent framework developed by creator
1jehuang. Rapidly climbing the GitHub Trending charts and capturing the attention of autonomous systems developers, jcode addresses a critical bottleneck in the agentic ecosystem: execution speed, structural reliability, and resource overhead. Written entirely in Rust, it provides a high-performance harness designed to run AI coding agents at scale without the typical latency and memory bloat associated with Python-heavy orchestration layers.In this comprehensive tutorial-style guide, we will break down what jcode is, analyze its internal architecture, compare it to existing frameworks, and walk through an end-to-end installation and configuration process to build your very first autonomous coding agent.
---Understanding the jcode Architecture
To build effective applications with jcode, it is essential to understand how it organizes the execution loop of an AI agent. Traditional agent frameworks rely on high-level scripting abstractions that introduce significant latency, making deep-tree search algorithms (like Monte Carlo Tree Search or complex reflection loops) painfully slow. jcode solves this by using a compiled Rust backend that exposes a highly structured execution harness.
The framework is divided into three primary layers:
- The Environment Layer (The Sandbox): This component manages the operating system context, available package managers, and shell environments. It isolates agent actions, preventing rogue scripts from damaging the host system while providing full feedback loops (stdout, stderr, exit codes) back to the agent.
- The Core Harness (Rust Engine): Written in Rust for maximum concurrency and memory safety, this engine manages agent state transitions, prompt token streaming pipelines, and workspace file parsing. It abstracts token budgets and tool call translations natively.
- The Agent Interface (Extensible Profiles): This layer allows developers to write custom planning algorithms, definition maps, and system instructions. It defines how the agent approaches a problem, splits tasks, and evaluates success.
Feature Comparison: jcode vs. Traditional Frameworks
Before diving into the implementation details, let's look at how jcode positions itself against traditional Python-based agent architectures and standard LLM orchestration environments.
---Feature / Metric jcode (1jehuang) Python-based Agent Frameworks Standard LLM Chat Hooks Core Language Rust Python Python / TypeScript Execution Speed Ultra-high (Compiled, Native Threading) Moderate (Interpreted, Async Overheads) Low (Network Dependent) Memory Management Strict compile-time safety, minimal footprint High runtime consumption, garbage collected Variable depending on wrapper Sandbox Isolation Native OS environment detection & mapping Requires heavy external Docker wrapper No native execution layer Primary Target Autonomous multi-turn software engineering General purpose task automation agents Single-turn text/code generation Prerequisites and Environment Verification
Before installing jcode, you need to ensure your machine meets the minimum system requirements for native compilation and execution. Because jcode evaluates code in real-time, having a stable environment with standard compilers is essential.
System Requirements:
- Operating System: macOS (Intel/Apple Silicon), Linux (Ubuntu 22.04+, Debian, Fedora), or Windows 11 (with PowerShell or WSL2).
- Toolchains: Rust Stable (1.75+ recommended) if building from source.
- Network: Active internet connection to pull model endpoints and fetch external crate dependencies.
Step-by-Step Installation Guide
jcode features an adaptive installer that detects your current operating system, available package managers, and active shell configurations. Select the installation track below that best matches your local development system.
Option A: macOS via Homebrew
If you are on macOS and use the Homebrew package manager, you can install the official tap maintained by 1jehuang directly via your terminal:
# Tap the jcode formula repository brew tap 1jehuang/jcode # Install the binary package brew install jcodeOption B: Linux or macOS via Shell Script
For standard Linux distributions or macOS environments without Homebrew, use the automated installation script. This pulls the latest compiled binary corresponding to your architecture:
curl -fsSL [https://raw.githubusercontent.com/1jehuang/jcode/main/scripts/install.sh](https://raw.githubusercontent.com/1jehuang/jcode/main/scripts/install.sh) | bashOption C: Windows via PowerShell
If you are running natively on a Windows host within a standard administrative PowerShell prompt, execute the following command to download and map the binaries:
irm [https://raw.githubusercontent.com/1jehuang/jcode/main/scripts/install.ps1](https://raw.githubusercontent.com/1jehuang/jcode/main/scripts/install.ps1) | iexOption D: Building From Source (Recommended for Contributors)
If you want to run the cutting-edge development branch or adapt the core Rust source code to custom enterprise parameters, clone the official GitHub repository and compile it locally:
# Clone the project repository git clone [https://github.com/1jehuang/jcode.git](https://github.com/1jehuang/jcode.git) cd jcode # Compile a highly optimized release binary using Cargo cargo build --release # Execute the local release install configuration script ./scripts/install_release.shVerify that your installation was successful by checking the current version of the harness:
---jcode --versionQuickstart: Configuring and Initializing Your Agent Workspace
With jcode successfully installed, the next stage is configuring your active LLM providers and preparing a localized project workspace where your programming agent can safely read, write, and test applications.
Step 1: Exporting LLM API Credentials
jcode acts as an execution harness that routes logic through state-of-the-art coding LLMs. You must supply your preferred model API keys as environment variables. Add these to your shell profile (e.g.,
.bashrcor.zshrc):export OPENAI_API_KEY="sk-proj-xxxxxxxxxxxxxxxxxxxxxxxxxxxxxxxx" export ANTHROPIC_API_KEY="sk-ant-xxxxxxxxxxxxxxxxxxxxxxxxxxxxxxxx"Step 2: Initialize a New jcode Workspace
Navigate to an empty folder or your target repository and run the workspace initialization command. This tells jcode to parse the local layout and prepare an isolated runtime manifest:
mkdir my-agent-project cd my-agent-project jcode initThis command creates a hidden configuration workspace called
.jcode/containing a primary configuration file namedconfig.toml. Let's inspect and modify a standard setup configuration:
---# .jcode/config.toml [workspace] name = "my-agent-project" allowed_commands = ["cargo", "npm", "python", "git", "pytest", "go"] max_iterations = 15 [model] provider = "anthropic" default_model = "claude-3-5-sonnet-20241022" temperature = 0.2 max_tokens = 4096 [sandbox] isolate_network = false timeout_seconds = 45Building an Autonomous Programming Workflow
Now that your workspace is instantiated, let's walk through a real-world software maintenance scenario. We will instruct our jcode agent to write a complete Python utility module, write an associated test suit, run the validations, find bugs from execution outputs, and safely refactor the code automatically.
Step 1: Issue the Agent Task
We trigger the agent execution loop by supplying a clear, high-level engineering prompt using the
jcode runinstruction interface:jcode run "Create a robust Python rate limiter using a sliding window log algorithm. Include unit tests using pytest. Ensure it handles sub-millisecond timestamps gracefully."Step 2: Reviewing the Agent Autonomous Execution Trace
Once triggered, the jcode framework takes absolute control over the planning tree. Here is an approximation of what the terminal sequence tracks as the underlying Rust engine coordinates actions:
[INFO] Initializing agent environment... [INFO] Detected OS: Linux (Ubuntu 24.04), Package Manager: apt, Shell: bash [STEP 1/15] Planning task allocation tree... [TOOL CALL] Writing file: rate_limiter.py [TOOL CALL] Writing file: test_rate_limiter.py [STEP 2/15] Executing automated testing validation suite... [SHELL COMMAND] pytest test_rate_limiter.py [EXECUTION OUTPUT] ========================= FAILURES ========================= ____ test_sliding_window_log_edge_case _____________________ > assert limiter.allow_request("user_1") == False E AssertionError: assert True == False [STEP 3/15] Analyzing test failures. Reflection phase initiated... [INFO] Detected boundary edge condition flaw in window timestamps math. [TOOL CALL] Patching file: rate_limiter.py (Applying inline diff) [STEP 4/15] Re-executing testing suite... [SHELL COMMAND] pytest test_rate_limiter.py [EXECUTION OUTPUT] ==================== 4 passed in 0.08s ===================== [SUCCESS] Task fully resolved. Workspace state clean. Halting execution loop.jcode: Building High-Performance Autonomous AI Coding Agents from Scratch
The landscape of AI-driven software development is shifting rapidly. While first-generation AI coding tools operated primarily as conversational completions or simple script generators, the community is moving decisively toward autonomous programming agents. These agents don't just suggest code; they plan, execute tests, refactor, and self-correct within a structured harness.
Emerging at the forefront of this shift in May 2026 is jcode, an open-source, Rust-based programming agent framework developed by creator
1jehuang. Rapidly climbing the GitHub Trending charts and capturing the attention of autonomous systems developers, jcode addresses a critical bottleneck in the agentic ecosystem: execution speed, structural reliability, and resource overhead. Written entirely in Rust, it provides a high-performance harness designed to run AI coding agents at scale without the typical latency and memory bloat associated with Python-heavy orchestration layers.In this comprehensive tutorial-style guide, we will break down what jcode is, analyze its internal architecture, compare it to existing frameworks, and walk through an end-to-end installation and configuration process to build your very first autonomous coding agent.
---Understanding the jcode Architecture
To build effective applications with jcode, it is essential to understand how it organizes the execution loop of an AI agent. Traditional agent frameworks rely on high-level scripting abstractions that introduce significant latency, making deep-tree search algorithms (like Monte Carlo Tree Search or complex reflection loops) painfully slow. jcode solves this by using a compiled Rust backend that exposes a highly structured execution harness.
The framework is divided into three primary layers:
- The Environment Layer (The Sandbox): This component manages the operating system context, available package managers, and shell environments. It isolates agent actions, preventing rogue scripts from damaging the host system while providing full feedback loops (stdout, stderr, exit codes) back to the agent.
- The Core Harness (Rust Engine): Written in Rust for maximum concurrency and memory safety, this engine manages agent state transitions, prompt token streaming pipelines, and workspace file parsing. It abstracts token budgets and tool call translations natively.
- The Agent Interface (Extensible Profiles): This layer allows developers to write custom planning algorithms, definition maps, and system instructions. It defines how the agent approaches a problem, splits tasks, and evaluates success.
Feature Comparison: jcode vs. Traditional Frameworks
Before diving into the implementation details, let's look at how jcode positions itself against traditional Python-based agent architectures and standard LLM orchestration environments.
---Feature / Metric jcode (1jehuang) Python-based Agent Frameworks Standard LLM Chat Hooks Core Language Rust Python Python / TypeScript Execution Speed Ultra-high (Compiled, Native Threading) Moderate (Interpreted, Async Overheads) Low (Network Dependent) Memory Management Strict compile-time safety, minimal footprint High runtime consumption, garbage collected Variable depending on wrapper Sandbox Isolation Native OS environment detection & mapping Requires heavy external Docker wrapper No native execution layer Primary Target Autonomous multi-turn software engineering General purpose task automation agents Single-turn text/code generation Prerequisites and Environment Verification
Before installing jcode, you need to ensure your machine meets the minimum system requirements for native compilation and execution. Because jcode evaluates code in real-time, having a stable environment with standard compilers is essential.
System Requirements:
- Operating System: macOS (Intel/Apple Silicon), Linux (Ubuntu 22.04+, Debian, Fedora), or Windows 11 (with PowerShell or WSL2).
- Toolchains: Rust Stable (1.75+ recommended) if building from source.
- Network: Active internet connection to pull model endpoints and fetch external crate dependencies.
Step-by-Step Installation Guide
jcode features an adaptive installer that detects your current operating system, available package managers, and active shell configurations. Select the installation track below that best matches your local development system.
Option A: macOS via Homebrew
If you are on macOS and use the Homebrew package manager, you can install the official tap maintained by 1jehuang directly via your terminal:
# Tap the jcode formula repository brew tap 1jehuang/jcode # Install the binary package brew install jcodeOption B: Linux or macOS via Shell Script
For standard Linux distributions or macOS environments without Homebrew, use the automated installation script. This pulls the latest compiled binary corresponding to your architecture:
curl -fsSL [https://raw.githubusercontent.com/1jehuang/jcode/main/scripts/install.sh](https://raw.githubusercontent.com/1jehuang/jcode/main/scripts/install.sh) | bashOption C: Windows via PowerShell
If you are running natively on a Windows host within a standard administrative PowerShell prompt, execute the following command to download and map the binaries:
irm [https://raw.githubusercontent.com/1jehuang/jcode/main/scripts/install.ps1](https://raw.githubusercontent.com/1jehuang/jcode/main/scripts/install.ps1) | iexOption D: Building From Source (Recommended for Contributors)
If you want to run the cutting-edge development branch or adapt the core Rust source code to custom enterprise parameters, clone the official GitHub repository and compile it locally:
# Clone the project repository git clone [https://github.com/1jehuang/jcode.git](https://github.com/1jehuang/jcode.git) cd jcode # Compile a highly optimized release binary using Cargo cargo build --release # Execute the local release install configuration script ./scripts/install_release.shVerify that your installation was successful by checking the current version of the harness:
---jcode --versionQuickstart: Configuring and Initializing Your Agent Workspace
With jcode successfully installed, the next stage is configuring your active LLM providers and preparing a localized project workspace where your programming agent can safely read, write, and test applications.
Step 1: Exporting LLM API Credentials
jcode acts as an execution harness that routes logic through state-of-the-art coding LLMs. You must supply your preferred model API keys as environment variables. Add these to your shell profile (e.g.,
.bashrcor.zshrc):export OPENAI_API_KEY="sk-proj-xxxxxxxxxxxxxxxxxxxxxxxxxxxxxxxx" export ANTHROPIC_API_KEY="sk-ant-xxxxxxxxxxxxxxxxxxxxxxxxxxxxxxxx"Step 2: Initialize a New jcode Workspace
Navigate to an empty folder or your target repository and run the workspace initialization command. This tells jcode to parse the local layout and prepare an isolated runtime manifest:
mkdir my-agent-project cd my-agent-project jcode initThis command creates a hidden configuration workspace called
.jcode/containing a primary configuration file namedconfig.toml. Let's inspect and modify a standard setup configuration:
---# .jcode/config.toml [workspace] name = "my-agent-project" allowed_commands = ["cargo", "npm", "python", "git", "pytest", "go"] max_iterations = 15 [model] provider = "anthropic" default_model = "claude-3-5-sonnet-20241022" temperature = 0.2 max_tokens = 4096 [sandbox] isolate_network = false timeout_seconds = 45Building an Autonomous Programming Workflow
Now that your workspace is instantiated, let's walk through a real-world software maintenance scenario. We will instruct our jcode agent to write a complete Python utility module, write an associated test suit, run the validations, find bugs from execution outputs, and safely refactor the code automatically.
Step 1: Issue the Agent Task
We trigger the agent execution loop by supplying a clear, high-level engineering prompt using the
jcode runinstruction interface:jcode run "Create a robust Python rate limiter using a sliding window log algorithm. Include unit tests using pytest. Ensure it handles sub-millisecond timestamps gracefully."Step 2: Reviewing the Agent Autonomous Execution Trace
Once triggered, the jcode framework takes absolute control over the planning tree. Here is an approximation of what the terminal sequence tracks as the underlying Rust engine coordinates actions:
[INFO] Initializing agent environment... [INFO] Detected OS: Linux (Ubuntu 24.04), Package Manager: apt, Shell: bash [STEP 1/15] Planning task allocation tree... [TOOL CALL] Writing file: rate_limiter.py [TOOL CALL] Writing file: test_rate_limiter.py [STEP 2/15] Executing automated testing validation suite... [SHELL COMMAND] pytest test_rate_limiter.py [EXECUTION OUTPUT] ========================= FAILURES ========================= ____ test_sliding_window_log_edge_case _____________________ > assert limiter.allow_request("user_1") == False E AssertionError: assert True == False [STEP 3/15] Analyzing test failures. Reflection phase initiated... [INFO] Detected boundary edge condition flaw in window timestamps math. [TOOL CALL] Patching file: rate_limiter.py (Applying inline diff) [STEP 4/15] Re-executing testing suite... [SHELL COMMAND] pytest test_rate_limiter.py [EXECUTION OUTPUT] ==================== 4 passed in 0.08s ===================== [SUCCESS] Task fully resolved. Workspace state clean. Halting execution loop.Step 3: Examining the Generated Code Artifacts
Let's view the production
jcode: Building High-Performance Autonomous AI Coding Agents from Scratch
The landscape of AI-driven software development is shifting rapidly. While first-generation AI coding tools operated primarily as conversational completions or simple script generators, the community is moving decisively toward autonomous programming agents. These agents don't just suggest code; they plan, execute tests, refactor, and self-correct within a structured harness.
Emerging at the forefront of this shift in May 2026 is jcode, an open-source, Rust-based programming agent framework developed by creator
1jehuang. Rapidly climbing the GitHub Trending charts and capturing the attention of autonomous systems developers, jcode addresses a critical bottleneck in the agentic ecosystem: execution speed, structural reliability, and resource overhead. Written entirely in Rust, it provides a high-performance harness designed to run AI coding agents at scale without the typical latency and memory bloat associated with Python-heavy orchestration layers.In this comprehensive tutorial-style guide, we will break down what jcode is, analyze its internal architecture, compare it to existing frameworks, and walk through an end-to-end installation and configuration process to build your very first autonomous coding agent.
---Understanding the jcode Architecture
To build effective applications with jcode, it is essential to understand how it organizes the execution loop of an AI agent. Traditional agent frameworks rely on high-level scripting abstractions that introduce significant latency, making deep-tree search algorithms (like Monte Carlo Tree Search or complex reflection loops) painfully slow. jcode solves this by using a compiled Rust backend that exposes a highly structured execution harness.
The framework is divided into three primary layers:
- The Environment Layer (The Sandbox): This component manages the operating system context, available package managers, and shell environments. It isolates agent actions, preventing rogue scripts from damaging the host system while providing full feedback loops (stdout, stderr, exit codes) back to the agent.
- The Core Harness (Rust Engine): Written in Rust for maximum concurrency and memory safety, this engine manages agent state transitions, prompt token streaming pipelines, and workspace file parsing. It abstracts token budgets and tool call translations natively.
- The Agent Interface (Extensible Profiles): This layer allows developers to write custom planning algorithms, definition maps, and system instructions. It defines how the agent approaches a problem, splits tasks, and evaluates success.
Feature Comparison: jcode vs. Traditional Frameworks
Before diving into the implementation details, let's look at how jcode positions itself against traditional Python-based agent architectures and standard LLM orchestration environments.
---Feature / Metric jcode (1jehuang) Python-based Agent Frameworks Standard LLM Chat Hooks Core Language Rust Python Python / TypeScript Execution Speed Ultra-high (Compiled, Native Threading) Moderate (Interpreted, Async Overheads) Low (Network Dependent) Memory Management Strict compile-time safety, minimal footprint High runtime consumption, garbage collected Variable depending on wrapper Sandbox Isolation Native OS environment detection & mapping Requires heavy external Docker wrapper No native execution layer Primary Target Autonomous multi-turn software engineering General purpose task automation agents Single-turn text/code generation Prerequisites and Environment Verification
Before installing jcode, you need to ensure your machine meets the minimum system requirements for native compilation and execution. Because jcode evaluates code in real-time, having a stable environment with standard compilers is essential.
System Requirements:
- Operating System: macOS (Intel/Apple Silicon), Linux (Ubuntu 22.04+, Debian, Fedora), or Windows 11 (with PowerShell or WSL2).
- Toolchains: Rust Stable (1.75+ recommended) if building from source.
- Network: Active internet connection to pull model endpoints and fetch external crate dependencies.
Step-by-Step Installation Guide
jcode features an adaptive installer that detects your current operating system, available package managers, and active shell configurations. Select the installation track below that best matches your local development system.
Option A: macOS via Homebrew
If you are on macOS and use the Homebrew package manager, you can install the official tap maintained by 1jehuang directly via your terminal:
# Tap the jcode formula repository brew tap 1jehuang/jcode # Install the binary package brew install jcodeOption B: Linux or macOS via Shell Script
For standard Linux distributions or macOS environments without Homebrew, use the automated installation script. This pulls the latest compiled binary corresponding to your architecture:
curl -fsSL [https://raw.githubusercontent.com/1jehuang/jcode/main/scripts/install.sh](https://raw.githubusercontent.com/1jehuang/jcode/main/scripts/install.sh) | bashOption C: Windows via PowerShell
If you are running natively on a Windows host within a standard administrative PowerShell prompt, execute the following command to download and map the binaries:
irm [https://raw.githubusercontent.com/1jehuang/jcode/main/scripts/install.ps1](https://raw.githubusercontent.com/1jehuang/jcode/main/scripts/install.ps1) | iexOption D: Building From Source (Recommended for Contributors)
If you want to run the cutting-edge development branch or adapt the core Rust source code to custom enterprise parameters, clone the official GitHub repository and compile it locally:
# Clone the project repository git clone [https://github.com/1jehuang/jcode.git](https://github.com/1jehuang/jcode.git) cd jcode # Compile a highly optimized release binary using Cargo cargo build --release # Execute the local release install configuration script ./scripts/install_release.shVerify that your installation was successful by checking the current version of the harness:
---jcode --versionQuickstart: Configuring and Initializing Your Agent Workspace
With jcode successfully installed, the next stage is configuring your active LLM providers and preparing a localized project workspace where your programming agent can safely read, write, and test applications.
Step 1: Exporting LLM API Credentials
jcode acts as an execution harness that routes logic through state-of-the-art coding LLMs. You must supply your preferred model API keys as environment variables. Add these to your shell profile (e.g.,
.bashrcor.zshrc):export OPENAI_API_KEY="sk-proj-xxxxxxxxxxxxxxxxxxxxxxxxxxxxxxxx" export ANTHROPIC_API_KEY="sk-ant-xxxxxxxxxxxxxxxxxxxxxxxxxxxxxxxx"Step 2: Initialize a New jcode Workspace
Navigate to an empty folder or your target repository and run the workspace initialization command. This tells jcode to parse the local layout and prepare an isolated runtime manifest:
mkdir my-agent-project cd my-agent-project jcode initThis command creates a hidden configuration workspace called
.jcode/containing a primary configuration file namedconfig.toml. Let's inspect and modify a standard setup configuration:
---# .jcode/config.toml [workspace] name = "my-agent-project" allowed_commands = ["cargo", "npm", "python", "git", "pytest", "go"] max_iterations = 15 [model] provider = "anthropic" default_model = "claude-3-5-sonnet-20241022" temperature = 0.2 max_tokens = 4096 [sandbox] isolate_network = false timeout_seconds = 45Building an Autonomous Programming Workflow
Now that your workspace is instantiated, let's walk through a real-world software maintenance scenario. We will instruct our jcode agent to write a complete Python utility module, write an associated test suit, run the validations, find bugs from execution outputs, and safely refactor the code automatically.
Step 1: Issue the Agent Task
We trigger the agent execution loop by supplying a clear, high-level engineering prompt using the
jcode runinstruction interface:jcode run "Create a robust Python rate limiter using a sliding window log algorithm. Include unit tests using pytest. Ensure it handles sub-millisecond timestamps gracefully."Step 2: Reviewing the Agent Autonomous Execution Trace
Once triggered, the jcode framework takes absolute control over the planning tree. Here is an approximation of what the terminal sequence tracks as the underlying Rust engine coordinates actions:
[INFO] Initializing agent environment... [INFO] Detected OS: Linux (Ubuntu 24.04), Package Manager: apt, Shell: bash [STEP 1/15] Planning task allocation tree... [TOOL CALL] Writing file: rate_limiter.py [TOOL CALL] Writing file: test_rate_limiter.py [STEP 2/15] Executing automated testing validation suite... [SHELL COMMAND] pytest test_rate_limiter.py [EXECUTION OUTPUT] ========================= FAILURES ========================= ____ test_sliding_window_log_edge_case _____________________ > assert limiter.allow_request("user_1") == False E AssertionError: assert True == False [STEP 3/15] Analyzing test failures. Reflection phase initiated... [INFO] Detected boundary edge condition flaw in window timestamps math. [TOOL CALL] Patching file: rate_limiter.py (Applying inline diff) [STEP 4/15] Re-executing testing suite... [SHELL COMMAND] pytest test_rate_limiter.py [EXECUTION OUTPUT] ==================== 4 passed in 0.08s ===================== [SUCCESS] Task fully resolved. Workspace state clean. Halting execution loop.Step 3: Examining the Generated Code Artifacts
Let's view the production code written completely by the jcode programming agent. Check the output of
rate_limiter.py:jcode: Building High-Performance Autonomous AI Coding Agents from Scratch
The landscape of AI-driven software development is shifting rapidly. While first-generation AI coding tools operated primarily as conversational completions or simple script generators, the community is moving decisively toward autonomous programming agents. These agents don't just suggest code; they plan, execute tests, refactor, and self-correct within a structured harness.
Emerging at the forefront of this shift in May 2026 is jcode, an open-source, Rust-based programming agent framework developed by creator
1jehuang. Rapidly climbing the GitHub Trending charts and capturing the attention of autonomous systems developers, jcode addresses a critical bottleneck in the agentic ecosystem: execution speed, structural reliability, and resource overhead. Written entirely in Rust, it provides a high-performance harness designed to run AI coding agents at scale without the typical latency and memory bloat associated with Python-heavy orchestration layers.In this comprehensive tutorial-style guide, we will break down what jcode is, analyze its internal architecture, compare it to existing frameworks, and walk through an end-to-end installation and configuration process to build your very first autonomous coding agent.
---Understanding the jcode Architecture
To build effective applications with jcode, it is essential to understand how it organizes the execution loop of an AI agent. Traditional agent frameworks rely on high-level scripting abstractions that introduce significant latency, making deep-tree search algorithms (like Monte Carlo Tree Search or complex reflection loops) painfully slow. jcode solves this by using a compiled Rust backend that exposes a highly structured execution harness.
The framework is divided into three primary layers:
- The Environment Layer (The Sandbox): This component manages the operating system context, available package managers, and shell environments. It isolates agent actions, preventing rogue scripts from damaging the host system while providing full feedback loops (stdout, stderr, exit codes) back to the agent.
- The Core Harness (Rust Engine): Written in Rust for maximum concurrency and memory safety, this engine manages agent state transitions, prompt token streaming pipelines, and workspace file parsing. It abstracts token budgets and tool call translations natively.
- The Agent Interface (Extensible Profiles): This layer allows developers to write custom planning algorithms, definition maps, and system instructions. It defines how the agent approaches a problem, splits tasks, and evaluates success.
Feature Comparison: jcode vs. Traditional Frameworks
Before diving into the implementation details, let's look at how jcode positions itself against traditional Python-based agent architectures and standard LLM orchestration environments.
---Feature / Metric jcode (1jehuang) Python-based Agent Frameworks Standard LLM Chat Hooks Core Language Rust Python Python / TypeScript Execution Speed Ultra-high (Compiled, Native Threading) Moderate (Interpreted, Async Overheads) Low (Network Dependent) Memory Management Strict compile-time safety, minimal footprint High runtime consumption, garbage collected Variable depending on wrapper Sandbox Isolation Native OS environment detection & mapping Requires heavy external Docker wrapper No native execution layer Primary Target Autonomous multi-turn software engineering General purpose task automation agents Single-turn text/code generation Prerequisites and Environment Verification
Before installing jcode, you need to ensure your machine meets the minimum system requirements for native compilation and execution. Because jcode evaluates code in real-time, having a stable environment with standard compilers is essential.
System Requirements:
- Operating System: macOS (Intel/Apple Silicon), Linux (Ubuntu 22.04+, Debian, Fedora), or Windows 11 (with PowerShell or WSL2).
- Toolchains: Rust Stable (1.75+ recommended) if building from source.
- Network: Active internet connection to pull model endpoints and fetch external crate dependencies.
Step-by-Step Installation Guide
jcode features an adaptive installer that detects your current operating system, available package managers, and active shell configurations. Select the installation track below that best matches your local development system.
Option A: macOS via Homebrew
If you are on macOS and use the Homebrew package manager, you can install the official tap maintained by 1jehuang directly via your terminal:
# Tap the jcode formula repository brew tap 1jehuang/jcode # Install the binary package brew install jcodeOption B: Linux or macOS via Shell Script
For standard Linux distributions or macOS environments without Homebrew, use the automated installation script. This pulls the latest compiled binary corresponding to your architecture:
curl -fsSL [https://raw.githubusercontent.com/1jehuang/jcode/main/scripts/install.sh](https://raw.githubusercontent.com/1jehuang/jcode/main/scripts/install.sh) | bashOption C: Windows via PowerShell
If you are running natively on a Windows host within a standard administrative PowerShell prompt, execute the following command to download and map the binaries:
irm [https://raw.githubusercontent.com/1jehuang/jcode/main/scripts/install.ps1](https://raw.githubusercontent.com/1jehuang/jcode/main/scripts/install.ps1) | iexOption D: Building From Source (Recommended for Contributors)
If you want to run the cutting-edge development branch or adapt the core Rust source code to custom enterprise parameters, clone the official GitHub repository and compile it locally:
# Clone the project repository git clone [https://github.com/1jehuang/jcode.git](https://github.com/1jehuang/jcode.git) cd jcode # Compile a highly optimized release binary using Cargo cargo build --release # Execute the local release install configuration script ./scripts/install_release.shVerify that your installation was successful by checking the current version of the harness:
---jcode --versionQuickstart: Configuring and Initializing Your Agent Workspace
With jcode successfully installed, the next stage is configuring your active LLM providers and preparing a localized project workspace where your programming agent can safely read, write, and test applications.
Step 1: Exporting LLM API Credentials
jcode acts as an execution harness that routes logic through state-of-the-art coding LLMs. You must supply your preferred model API keys as environment variables. Add these to your shell profile (e.g.,
.bashrcor.zshrc):export OPENAI_API_KEY="sk-proj-xxxxxxxxxxxxxxxxxxxxxxxxxxxxxxxx" export ANTHROPIC_API_KEY="sk-ant-xxxxxxxxxxxxxxxxxxxxxxxxxxxxxxxx"Step 2: Initialize a New jcode Workspace
Navigate to an empty folder or your target repository and run the workspace initialization command. This tells jcode to parse the local layout and prepare an isolated runtime manifest:
mkdir my-agent-project cd my-agent-project jcode initThis command creates a hidden configuration workspace called
.jcode/containing a primary configuration file namedconfig.toml. Let's inspect and modify a standard setup configuration:
---# .jcode/config.toml [workspace] name = "my-agent-project" allowed_commands = ["cargo", "npm", "python", "git", "pytest", "go"] max_iterations = 15 [model] provider = "anthropic" default_model = "claude-3-5-sonnet-20241022" temperature = 0.2 max_tokens = 4096 [sandbox] isolate_network = false timeout_seconds = 45Building an Autonomous Programming Workflow
Now that your workspace is instantiated, let's walk through a real-world software maintenance scenario. We will instruct our jcode agent to write a complete Python utility module, write an associated test suit, run the validations, find bugs from execution outputs, and safely refactor the code automatically.
Step 1: Issue the Agent Task
We trigger the agent execution loop by supplying a clear, high-level engineering prompt using the
jcode runinstruction interface:jcode run "Create a robust Python rate limiter using a sliding window log algorithm. Include unit tests using pytest. Ensure it handles sub-millisecond timestamps gracefully."Step 2: Reviewing the Agent Autonomous Execution Trace
Once triggered, the jcode framework takes absolute control over the planning tree. Here is an approximation of what the terminal sequence tracks as the underlying Rust engine coordinates actions:
[INFO] Initializing agent environment... [INFO] Detected OS: Linux (Ubuntu 24.04), Package Manager: apt, Shell: bash [STEP 1/15] Planning task allocation tree... [TOOL CALL] Writing file: rate_limiter.py [TOOL CALL] Writing file: test_rate_limiter.py [STEP 2/15] Executing automated testing validation suite... [SHELL COMMAND] pytest test_rate_limiter.py [EXECUTION OUTPUT] ========================= FAILURES ========================= ____ test_sliding_window_log_edge_case _____________________ > assert limiter.allow_request("user_1") == False E AssertionError: assert True == False [STEP 3/15] Analyzing test failures. Reflection phase initiated... [INFO] Detected boundary edge condition flaw in window timestamps math. [TOOL CALL] Patching file: rate_limiter.py (Applying inline diff) [STEP 4/15] Re-executing testing suite... [SHELL COMMAND] pytest test_rate_limiter.py [EXECUTION OUTPUT] ==================== 4 passed in 0.08s ===================== [SUCCESS] Task fully resolved. Workspace state clean. Halting execution loop.Step 3: Examining the Generated Code Artifacts
Let's view the production code written completely by the jcode programming agent. Check the output of
rate_limiter.py:import time class SlidingWindowRateLimiter: def __init__(self, max_requests: int, window
jcode: Building High-Performance Autonomous AI Coding Agents from Scratch
The landscape of AI-driven software development is shifting rapidly. While first-generation AI coding tools operated primarily as conversational completions or simple script generators, the community is moving decisively toward autonomous programming agents. These agents don't just suggest code; they plan, execute tests, refactor, and self-correct within a structured harness.
Emerging at the forefront of this shift in May 2026 is jcode, an open-source, Rust-based programming agent framework developed by creator
1jehuang. Rapidly climbing the GitHub Trending charts and capturing the attention of autonomous systems developers, jcode addresses a critical bottleneck in the agentic ecosystem: execution speed, structural reliability, and resource overhead. Written entirely in Rust, it provides a high-performance harness designed to run AI coding agents at scale without the typical latency and memory bloat associated with Python-heavy orchestration layers.In this comprehensive tutorial-style guide, we will break down what jcode is, analyze its internal architecture, compare it to existing frameworks, and walk through an end-to-end installation and configuration process to build your very first autonomous coding agent.
---Understanding the jcode Architecture
To build effective applications with jcode, it is essential to understand how it organizes the execution loop of an AI agent. Traditional agent frameworks rely on high-level scripting abstractions that introduce significant latency, making deep-tree search algorithms (like Monte Carlo Tree Search or complex reflection loops) painfully slow. jcode solves this by using a compiled Rust backend that exposes a highly structured execution harness.
The framework is divided into three primary layers:
- The Environment Layer (The Sandbox): This component manages the operating system context, available package managers, and shell environments. It isolates agent actions, preventing rogue scripts from damaging the host system while providing full feedback loops (stdout, stderr, exit codes) back to the agent.
- The Core Harness (Rust Engine): Written in Rust for maximum concurrency and memory safety, this engine manages agent state transitions, prompt token streaming pipelines, and workspace file parsing. It abstracts token budgets and tool call translations natively.
- The Agent Interface (Extensible Profiles): This layer allows developers to write custom planning algorithms, definition maps, and system instructions. It defines how the agent approaches a problem, splits tasks, and evaluates success.
Feature Comparison: jcode vs. Traditional Frameworks
Before diving into the implementation details, let's look at how jcode positions itself against traditional Python-based agent architectures and standard LLM orchestration environments.
---Feature / Metric jcode (1jehuang) Python-based Agent Frameworks Standard LLM Chat Hooks Core Language Rust Python Python / TypeScript Execution Speed Ultra-high (Compiled, Native Threading) Moderate (Interpreted, Async Overheads) Low (Network Dependent) Memory Management Strict compile-time safety, minimal footprint High runtime consumption, garbage collected Variable depending on wrapper Sandbox Isolation Native OS environment detection & mapping Requires heavy external Docker wrapper No native execution layer Primary Target Autonomous multi-turn software engineering General purpose task automation agents Single-turn text/code generation Prerequisites and Environment Verification
Before installing jcode, you need to ensure your machine meets the minimum system requirements for native compilation and execution. Because jcode evaluates code in real-time, having a stable environment with standard compilers is essential.
System Requirements:
- Operating System: macOS (Intel/Apple Silicon), Linux (Ubuntu 22.04+, Debian, Fedora), or Windows 11 (with PowerShell or WSL2).
- Toolchains: Rust Stable (1.75+ recommended) if building from source.
- Network: Active internet connection to pull model endpoints and fetch external crate dependencies.
Step-by-Step Installation Guide
jcode features an adaptive installer that detects your current operating system, available package managers, and active shell configurations. Select the installation track below that best matches your local development system.
Option A: macOS via Homebrew
If you are on macOS and use the Homebrew package manager, you can install the official tap maintained by 1jehuang directly via your terminal:
# Tap the jcode formula repository brew tap 1jehuang/jcode # Install the binary package brew install jcodeOption B: Linux or macOS via Shell Script
For standard Linux distributions or macOS environments without Homebrew, use the automated installation script. This pulls the latest compiled binary corresponding to your architecture:
curl -fsSL [https://raw.githubusercontent.com/1jehuang/jcode/main/scripts/install.sh](https://raw.githubusercontent.com/1jehuang/jcode/main/scripts/install.sh) | bashOption C: Windows via PowerShell
If you are running natively on a Windows host within a standard administrative PowerShell prompt, execute the following command to download and map the binaries:
irm [https://raw.githubusercontent.com/1jehuang/jcode/main/scripts/install.ps1](https://raw.githubusercontent.com/1jehuang/jcode/main/scripts/install.ps1) | iexOption D: Building From Source (Recommended for Contributors)
If you want to run the cutting-edge development branch or adapt the core Rust source code to custom enterprise parameters, clone the official GitHub repository and compile it locally:
# Clone the project repository git clone [https://github.com/1jehuang/jcode.git](https://github.com/1jehuang/jcode.git) cd jcode # Compile a highly optimized release binary using Cargo cargo build --release # Execute the local release install configuration script ./scripts/install_release.shVerify that your installation was successful by checking the current version of the harness:
---jcode --versionQuickstart: Configuring and Initializing Your Agent Workspace
With jcode successfully installed, the next stage is configuring your active LLM providers and preparing a localized project workspace where your programming agent can safely read, write, and test applications.
Step 1: Exporting LLM API Credentials
jcode acts as an execution harness that routes logic through state-of-the-art coding LLMs. You must supply your preferred model API keys as environment variables. Add these to your shell profile (e.g.,
.bashrcor.zshrc):export OPENAI_API_KEY="sk-proj-xxxxxxxxxxxxxxxxxxxxxxxxxxxxxxxx" export ANTHROPIC_API_KEY="sk-ant-xxxxxxxxxxxxxxxxxxxxxxxxxxxxxxxx"Step 2: Initialize a New jcode Workspace
Navigate to an empty folder or your target repository and run the workspace initialization command. This tells jcode to parse the local layout and prepare an isolated runtime manifest:
mkdir my-agent-project cd my-agent-project jcode initThis command creates a hidden configuration workspace called
.jcode/containing a primary configuration file namedconfig.toml. Let's inspect and modify a standard setup configuration:
---# .jcode/config.toml [workspace] name = "my-agent-project" allowed_commands = ["cargo", "npm", "python", "git", "pytest", "go"] max_iterations = 15 [model] provider = "anthropic" default_model = "claude-3-5-sonnet-20241022" temperature = 0.2 max_tokens = 4096 [sandbox] isolate_network = false timeout_seconds = 45Building an Autonomous Programming Workflow
Now that your workspace is instantiated, let's walk through a real-world software maintenance scenario. We will instruct our jcode agent to write a complete Python utility module, write an associated test suit, run the validations, find bugs from execution outputs, and safely refactor the code automatically.
Step 1: Issue the Agent Task
We trigger the agent execution loop by supplying a clear, high-level engineering prompt using the
jcode runinstruction interface:jcode run "Create a robust Python rate limiter using a sliding window log algorithm. Include unit tests using pytest. Ensure it handles sub-millisecond timestamps gracefully."Step 2: Reviewing the Agent Autonomous Execution Trace
Once triggered, the jcode framework takes absolute control over the planning tree. Here is an approximation of what the terminal sequence tracks as the underlying Rust engine coordinates actions:
[INFO] Initializing agent environment... [INFO] Detected OS: Linux (Ubuntu 24.04), Package Manager: apt, Shell: bash [STEP 1/15] Planning task allocation tree... [TOOL CALL] Writing file: rate_limiter.py [TOOL CALL] Writing file: test_rate_limiter.py [STEP 2/15] Executing automated testing validation suite... [SHELL COMMAND] pytest test_rate_limiter.py [EXECUTION OUTPUT] ========================= FAILURES ========================= ____ test_sliding_window_log_edge_case _____________________ > assert limiter.allow_request("user_1") == False E AssertionError: assert True == False [STEP 3/15] Analyzing test failures. Reflection phase initiated... [INFO] Detected boundary edge condition flaw in window timestamps math. [TOOL CALL] Patching file: rate_limiter.py (Applying inline diff) [STEP 4/15] Re-executing testing suite... [SHELL COMMAND] pytest test_rate_limiter.py [EXECUTION OUTPUT] ==================== 4 passed in 0.08s ===================== [SUCCESS] Task fully resolved. Workspace state clean. Halting execution loop.Step 3: Examining the Generated Code Artifacts
Let's view the production code written completely by the jcode programming agent. Check the output of
rate_limiter.py:import time class SlidingWindowRateLimiter: def __init__(self, max_requests: int, window_size_seconds: float): self.max_requests = max_requests self.window_size_
jcode: Building High-Performance Autonomous AI Coding Agents from Scratch
The landscape of AI-driven software development is shifting rapidly. While first-generation AI coding tools operated primarily as conversational completions or simple script generators, the community is moving decisively toward autonomous programming agents. These agents don't just suggest code; they plan, execute tests, refactor, and self-correct within a structured harness.
Emerging at the forefront of this shift in May 2026 is jcode, an open-source, Rust-based programming agent framework developed by creator
1jehuang. Rapidly climbing the GitHub Trending charts and capturing the attention of autonomous systems developers, jcode addresses a critical bottleneck in the agentic ecosystem: execution speed, structural reliability, and resource overhead. Written entirely in Rust, it provides a high-performance harness designed to run AI coding agents at scale without the typical latency and memory bloat associated with Python-heavy orchestration layers.In this comprehensive tutorial-style guide, we will break down what jcode is, analyze its internal architecture, compare it to existing frameworks, and walk through an end-to-end installation and configuration process to build your very first autonomous coding agent.
---Understanding the jcode Architecture
To build effective applications with jcode, it is essential to understand how it organizes the execution loop of an AI agent. Traditional agent frameworks rely on high-level scripting abstractions that introduce significant latency, making deep-tree search algorithms (like Monte Carlo Tree Search or complex reflection loops) painfully slow. jcode solves this by using a compiled Rust backend that exposes a highly structured execution harness.
The framework is divided into three primary layers:
- The Environment Layer (The Sandbox): This component manages the operating system context, available package managers, and shell environments. It isolates agent actions, preventing rogue scripts from damaging the host system while providing full feedback loops (stdout, stderr, exit codes) back to the agent.
- The Core Harness (Rust Engine): Written in Rust for maximum concurrency and memory safety, this engine manages agent state transitions, prompt token streaming pipelines, and workspace file parsing. It abstracts token budgets and tool call translations natively.
- The Agent Interface (Extensible Profiles): This layer allows developers to write custom planning algorithms, definition maps, and system instructions. It defines how the agent approaches a problem, splits tasks, and evaluates success.
Feature Comparison: jcode vs. Traditional Frameworks
Before diving into the implementation details, let's look at how jcode positions itself against traditional Python-based agent architectures and standard LLM orchestration environments.
---Feature / Metric jcode (1jehuang) Python-based Agent Frameworks Standard LLM Chat Hooks Core Language Rust Python Python / TypeScript Execution Speed Ultra-high (Compiled, Native Threading) Moderate (Interpreted, Async Overheads) Low (Network Dependent) Memory Management Strict compile-time safety, minimal footprint High runtime consumption, garbage collected Variable depending on wrapper Sandbox Isolation Native OS environment detection & mapping Requires heavy external Docker wrapper No native execution layer Primary Target Autonomous multi-turn software engineering General purpose task automation agents Single-turn text/code generation Prerequisites and Environment Verification
Before installing jcode, you need to ensure your machine meets the minimum system requirements for native compilation and execution. Because jcode evaluates code in real-time, having a stable environment with standard compilers is essential.
System Requirements:
- Operating System: macOS (Intel/Apple Silicon), Linux (Ubuntu 22.04+, Debian, Fedora), or Windows 11 (with PowerShell or WSL2).
- Toolchains: Rust Stable (1.75+ recommended) if building from source.
- Network: Active internet connection to pull model endpoints and fetch external crate dependencies.
Step-by-Step Installation Guide
jcode features an adaptive installer that detects your current operating system, available package managers, and active shell configurations. Select the installation track below that best matches your local development system.
Option A: macOS via Homebrew
If you are on macOS and use the Homebrew package manager, you can install the official tap maintained by 1jehuang directly via your terminal:
# Tap the jcode formula repository brew tap 1jehuang/jcode # Install the binary package brew install jcodeOption B: Linux or macOS via Shell Script
For standard Linux distributions or macOS environments without Homebrew, use the automated installation script. This pulls the latest compiled binary corresponding to your architecture:
curl -fsSL [https://raw.githubusercontent.com/1jehuang/jcode/main/scripts/install.sh](https://raw.githubusercontent.com/1jehuang/jcode/main/scripts/install.sh) | bashOption C: Windows via PowerShell
If you are running natively on a Windows host within a standard administrative PowerShell prompt, execute the following command to download and map the binaries:
irm [https://raw.githubusercontent.com/1jehuang/jcode/main/scripts/install.ps1](https://raw.githubusercontent.com/1jehuang/jcode/main/scripts/install.ps1) | iexOption D: Building From Source (Recommended for Contributors)
If you want to run the cutting-edge development branch or adapt the core Rust source code to custom enterprise parameters, clone the official GitHub repository and compile it locally:
# Clone the project repository git clone [https://github.com/1jehuang/jcode.git](https://github.com/1jehuang/jcode.git) cd jcode # Compile a highly optimized release binary using Cargo cargo build --release # Execute the local release install configuration script ./scripts/install_release.shVerify that your installation was successful by checking the current version of the harness:
---jcode --versionQuickstart: Configuring and Initializing Your Agent Workspace
With jcode successfully installed, the next stage is configuring your active LLM providers and preparing a localized project workspace where your programming agent can safely read, write, and test applications.
Step 1: Exporting LLM API Credentials
jcode acts as an execution harness that routes logic through state-of-the-art coding LLMs. You must supply your preferred model API keys as environment variables. Add these to your shell profile (e.g.,
.bashrcor.zshrc):export OPENAI_API_KEY="sk-proj-xxxxxxxxxxxxxxxxxxxxxxxxxxxxxxxx" export ANTHROPIC_API_KEY="sk-ant-xxxxxxxxxxxxxxxxxxxxxxxxxxxxxxxx"Step 2: Initialize a New jcode Workspace
Navigate to an empty folder or your target repository and run the workspace initialization command. This tells jcode to parse the local layout and prepare an isolated runtime manifest:
mkdir my-agent-project cd my-agent-project jcode initThis command creates a hidden configuration workspace called
.jcode/containing a primary configuration file namedconfig.toml. Let's inspect and modify a standard setup configuration:
---# .jcode/config.toml [workspace] name = "my-agent-project" allowed_commands = ["cargo", "npm", "python", "git", "pytest", "go"] max_iterations = 15 [model] provider = "anthropic" default_model = "claude-3-5-sonnet-20241022" temperature = 0.2 max_tokens = 4096 [sandbox] isolate_network = false timeout_seconds = 45Building an Autonomous Programming Workflow
Now that your workspace is instantiated, let's walk through a real-world software maintenance scenario. We will instruct our jcode agent to write a complete Python utility module, write an associated test suit, run the validations, find bugs from execution outputs, and safely refactor the code automatically.
Step 1: Issue the Agent Task
We trigger the agent execution loop by supplying a clear, high-level engineering prompt using the
jcode runinstruction interface:jcode run "Create a robust Python rate limiter using a sliding window log algorithm. Include unit tests using pytest. Ensure it handles sub-millisecond timestamps gracefully."Step 2: Reviewing the Agent Autonomous Execution Trace
Once triggered, the jcode framework takes absolute control over the planning tree. Here is an approximation of what the terminal sequence tracks as the underlying Rust engine coordinates actions:
[INFO] Initializing agent environment... [INFO] Detected OS: Linux (Ubuntu 24.04), Package Manager: apt, Shell: bash [STEP 1/15] Planning task allocation tree... [TOOL CALL] Writing file: rate_limiter.py [TOOL CALL] Writing file: test_rate_limiter.py [STEP 2/15] Executing automated testing validation suite... [SHELL COMMAND] pytest test_rate_limiter.py [EXECUTION OUTPUT] ========================= FAILURES ========================= ____ test_sliding_window_log_edge_case _____________________ > assert limiter.allow_request("user_1") == False E AssertionError: assert True == False [STEP 3/15] Analyzing test failures. Reflection phase initiated... [INFO] Detected boundary edge condition flaw in window timestamps math. [TOOL CALL] Patching file: rate_limiter.py (Applying inline diff) [STEP 4/15] Re-executing testing suite... [SHELL COMMAND] pytest test_rate_limiter.py [EXECUTION OUTPUT] ==================== 4 passed in 0.08s ===================== [SUCCESS] Task fully resolved. Workspace state clean. Halting execution loop.Step 3: Examining the Generated Code Artifacts
Let's view the production code written completely by the jcode programming agent. Check the output of
rate_limiter.py:import time class SlidingWindowRateLimiter: def __init__(self, max_requests: int, window_size_seconds: float): self.max_requests = max_requests self.window_size_seconds = window_size_seconds self.user_logs = {} def allow_request(self
jcode: Building High-Performance Autonomous AI Coding Agents from Scratch
The landscape of AI-driven software development is shifting rapidly. While first-generation AI coding tools operated primarily as conversational completions or simple script generators, the community is moving decisively toward autonomous programming agents. These agents don't just suggest code; they plan, execute tests, refactor, and self-correct within a structured harness.
Emerging at the forefront of this shift in May 2026 is jcode, an open-source, Rust-based programming agent framework developed by creator
1jehuang. Rapidly climbing the GitHub Trending charts and capturing the attention of autonomous systems developers, jcode addresses a critical bottleneck in the agentic ecosystem: execution speed, structural reliability, and resource overhead. Written entirely in Rust, it provides a high-performance harness designed to run AI coding agents at scale without the typical latency and memory bloat associated with Python-heavy orchestration layers.In this comprehensive tutorial-style guide, we will break down what jcode is, analyze its internal architecture, compare it to existing frameworks, and walk through an end-to-end installation and configuration process to build your very first autonomous coding agent.
---Understanding the jcode Architecture
To build effective applications with jcode, it is essential to understand how it organizes the execution loop of an AI agent. Traditional agent frameworks rely on high-level scripting abstractions that introduce significant latency, making deep-tree search algorithms (like Monte Carlo Tree Search or complex reflection loops) painfully slow. jcode solves this by using a compiled Rust backend that exposes a highly structured execution harness.
The framework is divided into three primary layers:
- The Environment Layer (The Sandbox): This component manages the operating system context, available package managers, and shell environments. It isolates agent actions, preventing rogue scripts from damaging the host system while providing full feedback loops (stdout, stderr, exit codes) back to the agent.
- The Core Harness (Rust Engine): Written in Rust for maximum concurrency and memory safety, this engine manages agent state transitions, prompt token streaming pipelines, and workspace file parsing. It abstracts token budgets and tool call translations natively.
- The Agent Interface (Extensible Profiles): This layer allows developers to write custom planning algorithms, definition maps, and system instructions. It defines how the agent approaches a problem, splits tasks, and evaluates success.
Feature Comparison: jcode vs. Traditional Frameworks
Before diving into the implementation details, let's look at how jcode positions itself against traditional Python-based agent architectures and standard LLM orchestration environments.
---Feature / Metric jcode (1jehuang) Python-based Agent Frameworks Standard LLM Chat Hooks Core Language Rust Python Python / TypeScript Execution Speed Ultra-high (Compiled, Native Threading) Moderate (Interpreted, Async Overheads) Low (Network Dependent) Memory Management Strict compile-time safety, minimal footprint High runtime consumption, garbage collected Variable depending on wrapper Sandbox Isolation Native OS environment detection & mapping Requires heavy external Docker wrapper No native execution layer Primary Target Autonomous multi-turn software engineering General purpose task automation agents Single-turn text/code generation Prerequisites and Environment Verification
Before installing jcode, you need to ensure your machine meets the minimum system requirements for native compilation and execution. Because jcode evaluates code in real-time, having a stable environment with standard compilers is essential.
System Requirements:
- Operating System: macOS (Intel/Apple Silicon), Linux (Ubuntu 22.04+, Debian, Fedora), or Windows 11 (with PowerShell or WSL2).
- Toolchains: Rust Stable (1.75+ recommended) if building from source.
- Network: Active internet connection to pull model endpoints and fetch external crate dependencies.
Step-by-Step Installation Guide
jcode features an adaptive installer that detects your current operating system, available package managers, and active shell configurations. Select the installation track below that best matches your local development system.
Option A: macOS via Homebrew
If you are on macOS and use the Homebrew package manager, you can install the official tap maintained by 1jehuang directly via your terminal:
# Tap the jcode formula repository brew tap 1jehuang/jcode # Install the binary package brew install jcodeOption B: Linux or macOS via Shell Script
For standard Linux distributions or macOS environments without Homebrew, use the automated installation script. This pulls the latest compiled binary corresponding to your architecture:
curl -fsSL [https://raw.githubusercontent.com/1jehuang/jcode/main/scripts/install.sh](https://raw.githubusercontent.com/1jehuang/jcode/main/scripts/install.sh) | bashOption C: Windows via PowerShell
If you are running natively on a Windows host within a standard administrative PowerShell prompt, execute the following command to download and map the binaries:
irm [https://raw.githubusercontent.com/1jehuang/jcode/main/scripts/install.ps1](https://raw.githubusercontent.com/1jehuang/jcode/main/scripts/install.ps1) | iexOption D: Building From Source (Recommended for Contributors)
If you want to run the cutting-edge development branch or adapt the core Rust source code to custom enterprise parameters, clone the official GitHub repository and compile it locally:
# Clone the project repository git clone [https://github.com/1jehuang/jcode.git](https://github.com/1jehuang/jcode.git) cd jcode # Compile a highly optimized release binary using Cargo cargo build --release # Execute the local release install configuration script ./scripts/install_release.shVerify that your installation was successful by checking the current version of the harness:
---jcode --versionQuickstart: Configuring and Initializing Your Agent Workspace
With jcode successfully installed, the next stage is configuring your active LLM providers and preparing a localized project workspace where your programming agent can safely read, write, and test applications.
Step 1: Exporting LLM API Credentials
jcode acts as an execution harness that routes logic through state-of-the-art coding LLMs. You must supply your preferred model API keys as environment variables. Add these to your shell profile (e.g.,
.bashrcor.zshrc):export OPENAI_API_KEY="sk-proj-xxxxxxxxxxxxxxxxxxxxxxxxxxxxxxxx" export ANTHROPIC_API_KEY="sk-ant-xxxxxxxxxxxxxxxxxxxxxxxxxxxxxxxx"Step 2: Initialize a New jcode Workspace
Navigate to an empty folder or your target repository and run the workspace initialization command. This tells jcode to parse the local layout and prepare an isolated runtime manifest:
mkdir my-agent-project cd my-agent-project jcode initThis command creates a hidden configuration workspace called
.jcode/containing a primary configuration file namedconfig.toml. Let's inspect and modify a standard setup configuration:
---# .jcode/config.toml [workspace] name = "my-agent-project" allowed_commands = ["cargo", "npm", "python", "git", "pytest", "go"] max_iterations = 15 [model] provider = "anthropic" default_model = "claude-3-5-sonnet-20241022" temperature = 0.2 max_tokens = 4096 [sandbox] isolate_network = false timeout_seconds = 45Building an Autonomous Programming Workflow
Now that your workspace is instantiated, let's walk through a real-world software maintenance scenario. We will instruct our jcode agent to write a complete Python utility module, write an associated test suit, run the validations, find bugs from execution outputs, and safely refactor the code automatically.
Step 1: Issue the Agent Task
We trigger the agent execution loop by supplying a clear, high-level engineering prompt using the
jcode runinstruction interface:jcode run "Create a robust Python rate limiter using a sliding window log algorithm. Include unit tests using pytest. Ensure it handles sub-millisecond timestamps gracefully."Step 2: Reviewing the Agent Autonomous Execution Trace
Once triggered, the jcode framework takes absolute control over the planning tree. Here is an approximation of what the terminal sequence tracks as the underlying Rust engine coordinates actions:
[INFO] Initializing agent environment... [INFO] Detected OS: Linux (Ubuntu 24.04), Package Manager: apt, Shell: bash [STEP 1/15] Planning task allocation tree... [TOOL CALL] Writing file: rate_limiter.py [TOOL CALL] Writing file: test_rate_limiter.py [STEP 2/15] Executing automated testing validation suite... [SHELL COMMAND] pytest test_rate_limiter.py [EXECUTION OUTPUT] ========================= FAILURES ========================= ____ test_sliding_window_log_edge_case _____________________ > assert limiter.allow_request("user_1") == False E AssertionError: assert True == False [STEP 3/15] Analyzing test failures. Reflection phase initiated... [INFO] Detected boundary edge condition flaw in window timestamps math. [TOOL CALL] Patching file: rate_limiter.py (Applying inline diff) [STEP 4/15] Re-executing testing suite... [SHELL COMMAND] pytest test_rate_limiter.py [EXECUTION OUTPUT] ==================== 4 passed in 0.08s ===================== [SUCCESS] Task fully resolved. Workspace state clean. Halting execution loop.Step 3: Examining the Generated Code Artifacts
Let's view the production code written completely by the jcode programming agent. Check the output of
rate_limiter.py:import time class SlidingWindowRateLimiter: def __init__(self, max_requests: int, window_size_seconds: float): self.max_requests = max_requests self.window_size_seconds = window_size_seconds self.user_logs = {} def allow_request(self, user_id: str) -> bool: current_time = time.time() if user_id not in self
jcode: Building High-Performance Autonomous AI Coding Agents from Scratch
The landscape of AI-driven software development is shifting rapidly. While first-generation AI coding tools operated primarily as conversational completions or simple script generators, the community is moving decisively toward autonomous programming agents. These agents don't just suggest code; they plan, execute tests, refactor, and self-correct within a structured harness.
Emerging at the forefront of this shift in May 2026 is jcode, an open-source, Rust-based programming agent framework developed by creator
1jehuang. Rapidly climbing the GitHub Trending charts and capturing the attention of autonomous systems developers, jcode addresses a critical bottleneck in the agentic ecosystem: execution speed, structural reliability, and resource overhead. Written entirely in Rust, it provides a high-performance harness designed to run AI coding agents at scale without the typical latency and memory bloat associated with Python-heavy orchestration layers.In this comprehensive tutorial-style guide, we will break down what jcode is, analyze its internal architecture, compare it to existing frameworks, and walk through an end-to-end installation and configuration process to build your very first autonomous coding agent.
---Understanding the jcode Architecture
To build effective applications with jcode, it is essential to understand how it organizes the execution loop of an AI agent. Traditional agent frameworks rely on high-level scripting abstractions that introduce significant latency, making deep-tree search algorithms (like Monte Carlo Tree Search or complex reflection loops) painfully slow. jcode solves this by using a compiled Rust backend that exposes a highly structured execution harness.
The framework is divided into three primary layers:
- The Environment Layer (The Sandbox): This component manages the operating system context, available package managers, and shell environments. It isolates agent actions, preventing rogue scripts from damaging the host system while providing full feedback loops (stdout, stderr, exit codes) back to the agent.
- The Core Harness (Rust Engine): Written in Rust for maximum concurrency and memory safety, this engine manages agent state transitions, prompt token streaming pipelines, and workspace file parsing. It abstracts token budgets and tool call translations natively.
- The Agent Interface (Extensible Profiles): This layer allows developers to write custom planning algorithms, definition maps, and system instructions. It defines how the agent approaches a problem, splits tasks, and evaluates success.
Feature Comparison: jcode vs. Traditional Frameworks
Before diving into the implementation details, let's look at how jcode positions itself against traditional Python-based agent architectures and standard LLM orchestration environments.
---Feature / Metric jcode (1jehuang) Python-based Agent Frameworks Standard LLM Chat Hooks Core Language Rust Python Python / TypeScript Execution Speed Ultra-high (Compiled, Native Threading) Moderate (Interpreted, Async Overheads) Low (Network Dependent) Memory Management Strict compile-time safety, minimal footprint High runtime consumption, garbage collected Variable depending on wrapper Sandbox Isolation Native OS environment detection & mapping Requires heavy external Docker wrapper No native execution layer Primary Target Autonomous multi-turn software engineering General purpose task automation agents Single-turn text/code generation Prerequisites and Environment Verification
Before installing jcode, you need to ensure your machine meets the minimum system requirements for native compilation and execution. Because jcode evaluates code in real-time, having a stable environment with standard compilers is essential.
System Requirements:
- Operating System: macOS (Intel/Apple Silicon), Linux (Ubuntu 22.04+, Debian, Fedora), or Windows 11 (with PowerShell or WSL2).
- Toolchains: Rust Stable (1.75+ recommended) if building from source.
- Network: Active internet connection to pull model endpoints and fetch external crate dependencies.
Step-by-Step Installation Guide
jcode features an adaptive installer that detects your current operating system, available package managers, and active shell configurations. Select the installation track below that best matches your local development system.
Option A: macOS via Homebrew
If you are on macOS and use the Homebrew package manager, you can install the official tap maintained by 1jehuang directly via your terminal:
# Tap the jcode formula repository brew tap 1jehuang/jcode # Install the binary package brew install jcodeOption B: Linux or macOS via Shell Script
For standard Linux distributions or macOS environments without Homebrew, use the automated installation script. This pulls the latest compiled binary corresponding to your architecture:
curl -fsSL [https://raw.githubusercontent.com/1jehuang/jcode/main/scripts/install.sh](https://raw.githubusercontent.com/1jehuang/jcode/main/scripts/install.sh) | bashOption C: Windows via PowerShell
If you are running natively on a Windows host within a standard administrative PowerShell prompt, execute the following command to download and map the binaries:
irm [https://raw.githubusercontent.com/1jehuang/jcode/main/scripts/install.ps1](https://raw.githubusercontent.com/1jehuang/jcode/main/scripts/install.ps1) | iexOption D: Building From Source (Recommended for Contributors)
If you want to run the cutting-edge development branch or adapt the core Rust source code to custom enterprise parameters, clone the official GitHub repository and compile it locally:
# Clone the project repository git clone [https://github.com/1jehuang/jcode.git](https://github.com/1jehuang/jcode.git) cd jcode # Compile a highly optimized release binary using Cargo cargo build --release # Execute the local release install configuration script ./scripts/install_release.shVerify that your installation was successful by checking the current version of the harness:
---jcode --versionQuickstart: Configuring and Initializing Your Agent Workspace
With jcode successfully installed, the next stage is configuring your active LLM providers and preparing a localized project workspace where your programming agent can safely read, write, and test applications.
Step 1: Exporting LLM API Credentials
jcode acts as an execution harness that routes logic through state-of-the-art coding LLMs. You must supply your preferred model API keys as environment variables. Add these to your shell profile (e.g.,
.bashrcor.zshrc):export OPENAI_API_KEY="sk-proj-xxxxxxxxxxxxxxxxxxxxxxxxxxxxxxxx" export ANTHROPIC_API_KEY="sk-ant-xxxxxxxxxxxxxxxxxxxxxxxxxxxxxxxx"Step 2: Initialize a New jcode Workspace
Navigate to an empty folder or your target repository and run the workspace initialization command. This tells jcode to parse the local layout and prepare an isolated runtime manifest:
mkdir my-agent-project cd my-agent-project jcode initThis command creates a hidden configuration workspace called
.jcode/containing a primary configuration file namedconfig.toml. Let's inspect and modify a standard setup configuration:
---# .jcode/config.toml [workspace] name = "my-agent-project" allowed_commands = ["cargo", "npm", "python", "git", "pytest", "go"] max_iterations = 15 [model] provider = "anthropic" default_model = "claude-3-5-sonnet-20241022" temperature = 0.2 max_tokens = 4096 [sandbox] isolate_network = false timeout_seconds = 45Building an Autonomous Programming Workflow
Now that your workspace is instantiated, let's walk through a real-world software maintenance scenario. We will instruct our jcode agent to write a complete Python utility module, write an associated test suit, run the validations, find bugs from execution outputs, and safely refactor the code automatically.
Step 1: Issue the Agent Task
We trigger the agent execution loop by supplying a clear, high-level engineering prompt using the
jcode runinstruction interface:jcode run "Create a robust Python rate limiter using a sliding window log algorithm. Include unit tests using pytest. Ensure it handles sub-millisecond timestamps gracefully."Step 2: Reviewing the Agent Autonomous Execution Trace
Once triggered, the jcode framework takes absolute control over the planning tree. Here is an approximation of what the terminal sequence tracks as the underlying Rust engine coordinates actions:
[INFO] Initializing agent environment... [INFO] Detected OS: Linux (Ubuntu 24.04), Package Manager: apt, Shell: bash [STEP 1/15] Planning task allocation tree... [TOOL CALL] Writing file: rate_limiter.py [TOOL CALL] Writing file: test_rate_limiter.py [STEP 2/15] Executing automated testing validation suite... [SHELL COMMAND] pytest test_rate_limiter.py [EXECUTION OUTPUT] ========================= FAILURES ========================= ____ test_sliding_window_log_edge_case _____________________ > assert limiter.allow_request("user_1") == False E AssertionError: assert True == False [STEP 3/15] Analyzing test failures. Reflection phase initiated... [INFO] Detected boundary edge condition flaw in window timestamps math. [TOOL CALL] Patching file: rate_limiter.py (Applying inline diff) [STEP 4/15] Re-executing testing suite... [SHELL COMMAND] pytest test_rate_limiter.py [EXECUTION OUTPUT] ==================== 4 passed in 0.08s ===================== [SUCCESS] Task fully resolved. Workspace state clean. Halting execution loop.Step 3: Examining the Generated Code Artifacts
Let's view the production code written completely by the jcode programming agent. Check the output of
rate_limiter.py:import time class SlidingWindowRateLimiter: def __init__(self, max_requests: int, window_size_seconds: float): self.max_requests = max_requests self.window_size_seconds = window_size_seconds self.user_logs = {} def allow_request(self, user_id: str) -> bool: current_time = time.time() if user_id not in self.user_logs: self.user_logs[user_id] = [] # Filter
jcode: Building High-Performance Autonomous AI Coding Agents from Scratch
The landscape of AI-driven software development is shifting rapidly. While first-generation AI coding tools operated primarily as conversational completions or simple script generators, the community is moving decisively toward autonomous programming agents. These agents don't just suggest code; they plan, execute tests, refactor, and self-correct within a structured harness.
Emerging at the forefront of this shift in May 2026 is jcode, an open-source, Rust-based programming agent framework developed by creator
1jehuang. Rapidly climbing the GitHub Trending charts and capturing the attention of autonomous systems developers, jcode addresses a critical bottleneck in the agentic ecosystem: execution speed, structural reliability, and resource overhead. Written entirely in Rust, it provides a high-performance harness designed to run AI coding agents at scale without the typical latency and memory bloat associated with Python-heavy orchestration layers.In this comprehensive tutorial-style guide, we will break down what jcode is, analyze its internal architecture, compare it to existing frameworks, and walk through an end-to-end installation and configuration process to build your very first autonomous coding agent.
---Understanding the jcode Architecture
To build effective applications with jcode, it is essential to understand how it organizes the execution loop of an AI agent. Traditional agent frameworks rely on high-level scripting abstractions that introduce significant latency, making deep-tree search algorithms (like Monte Carlo Tree Search or complex reflection loops) painfully slow. jcode solves this by using a compiled Rust backend that exposes a highly structured execution harness.
The framework is divided into three primary layers:
- The Environment Layer (The Sandbox): This component manages the operating system context, available package managers, and shell environments. It isolates agent actions, preventing rogue scripts from damaging the host system while providing full feedback loops (stdout, stderr, exit codes) back to the agent.
- The Core Harness (Rust Engine): Written in Rust for maximum concurrency and memory safety, this engine manages agent state transitions, prompt token streaming pipelines, and workspace file parsing. It abstracts token budgets and tool call translations natively.
- The Agent Interface (Extensible Profiles): This layer allows developers to write custom planning algorithms, definition maps, and system instructions. It defines how the agent approaches a problem, splits tasks, and evaluates success.
Feature Comparison: jcode vs. Traditional Frameworks
Before diving into the implementation details, let's look at how jcode positions itself against traditional Python-based agent architectures and standard LLM orchestration environments.
---Feature / Metric jcode (1jehuang) Python-based Agent Frameworks Standard LLM Chat Hooks Core Language Rust Python Python / TypeScript Execution Speed Ultra-high (Compiled, Native Threading) Moderate (Interpreted, Async Overheads) Low (Network Dependent) Memory Management Strict compile-time safety, minimal footprint High runtime consumption, garbage collected Variable depending on wrapper Sandbox Isolation Native OS environment detection & mapping Requires heavy external Docker wrapper No native execution layer Primary Target Autonomous multi-turn software engineering General purpose task automation agents Single-turn text/code generation Prerequisites and Environment Verification
Before installing jcode, you need to ensure your machine meets the minimum system requirements for native compilation and execution. Because jcode evaluates code in real-time, having a stable environment with standard compilers is essential.
System Requirements:
- Operating System: macOS (Intel/Apple Silicon), Linux (Ubuntu 22.04+, Debian, Fedora), or Windows 11 (with PowerShell or WSL2).
- Toolchains: Rust Stable (1.75+ recommended) if building from source.
- Network: Active internet connection to pull model endpoints and fetch external crate dependencies.
Step-by-Step Installation Guide
jcode features an adaptive installer that detects your current operating system, available package managers, and active shell configurations. Select the installation track below that best matches your local development system.
Option A: macOS via Homebrew
If you are on macOS and use the Homebrew package manager, you can install the official tap maintained by 1jehuang directly via your terminal:
# Tap the jcode formula repository brew tap 1jehuang/jcode # Install the binary package brew install jcodeOption B: Linux or macOS via Shell Script
For standard Linux distributions or macOS environments without Homebrew, use the automated installation script. This pulls the latest compiled binary corresponding to your architecture:
curl -fsSL [https://raw.githubusercontent.com/1jehuang/jcode/main/scripts/install.sh](https://raw.githubusercontent.com/1jehuang/jcode/main/scripts/install.sh) | bashOption C: Windows via PowerShell
If you are running natively on a Windows host within a standard administrative PowerShell prompt, execute the following command to download and map the binaries:
irm [https://raw.githubusercontent.com/1jehuang/jcode/main/scripts/install.ps1](https://raw.githubusercontent.com/1jehuang/jcode/main/scripts/install.ps1) | iexOption D: Building From Source (Recommended for Contributors)
If you want to run the cutting-edge development branch or adapt the core Rust source code to custom enterprise parameters, clone the official GitHub repository and compile it locally:
# Clone the project repository git clone [https://github.com/1jehuang/jcode.git](https://github.com/1jehuang/jcode.git) cd jcode # Compile a highly optimized release binary using Cargo cargo build --release # Execute the local release install configuration script ./scripts/install_release.shVerify that your installation was successful by checking the current version of the harness:
---jcode --versionQuickstart: Configuring and Initializing Your Agent Workspace
With jcode successfully installed, the next stage is configuring your active LLM providers and preparing a localized project workspace where your programming agent can safely read, write, and test applications.
Step 1: Exporting LLM API Credentials
jcode acts as an execution harness that routes logic through state-of-the-art coding LLMs. You must supply your preferred model API keys as environment variables. Add these to your shell profile (e.g.,
.bashrcor.zshrc):export OPENAI_API_KEY="sk-proj-xxxxxxxxxxxxxxxxxxxxxxxxxxxxxxxx" export ANTHROPIC_API_KEY="sk-ant-xxxxxxxxxxxxxxxxxxxxxxxxxxxxxxxx"Step 2: Initialize a New jcode Workspace
Navigate to an empty folder or your target repository and run the workspace initialization command. This tells jcode to parse the local layout and prepare an isolated runtime manifest:
mkdir my-agent-project cd my-agent-project jcode initThis command creates a hidden configuration workspace called
.jcode/containing a primary configuration file namedconfig.toml. Let's inspect and modify a standard setup configuration:
---# .jcode/config.toml [workspace] name = "my-agent-project" allowed_commands = ["cargo", "npm", "python", "git", "pytest", "go"] max_iterations = 15 [model] provider = "anthropic" default_model = "claude-3-5-sonnet-20241022" temperature = 0.2 max_tokens = 4096 [sandbox] isolate_network = false timeout_seconds = 45Building an Autonomous Programming Workflow
Now that your workspace is instantiated, let's walk through a real-world software maintenance scenario. We will instruct our jcode agent to write a complete Python utility module, write an associated test suit, run the validations, find bugs from execution outputs, and safely refactor the code automatically.
Step 1: Issue the Agent Task
We trigger the agent execution loop by supplying a clear, high-level engineering prompt using the
jcode runinstruction interface:jcode run "Create a robust Python rate limiter using a sliding window log algorithm. Include unit tests using pytest. Ensure it handles sub-millisecond timestamps gracefully."Step 2: Reviewing the Agent Autonomous Execution Trace
Once triggered, the jcode framework takes absolute control over the planning tree. Here is an approximation of what the terminal sequence tracks as the underlying Rust engine coordinates actions:
[INFO] Initializing agent environment... [INFO] Detected OS: Linux (Ubuntu 24.04), Package Manager: apt, Shell: bash [STEP 1/15] Planning task allocation tree... [TOOL CALL] Writing file: rate_limiter.py [TOOL CALL] Writing file: test_rate_limiter.py [STEP 2/15] Executing automated testing validation suite... [SHELL COMMAND] pytest test_rate_limiter.py [EXECUTION OUTPUT] ========================= FAILURES ========================= ____ test_sliding_window_log_edge_case _____________________ > assert limiter.allow_request("user_1") == False E AssertionError: assert True == False [STEP 3/15] Analyzing test failures. Reflection phase initiated... [INFO] Detected boundary edge condition flaw in window timestamps math. [TOOL CALL] Patching file: rate_limiter.py (Applying inline diff) [STEP 4/15] Re-executing testing suite... [SHELL COMMAND] pytest test_rate_limiter.py [EXECUTION OUTPUT] ==================== 4 passed in 0.08s ===================== [SUCCESS] Task fully resolved. Workspace state clean. Halting execution loop.Step 3: Examining the Generated Code Artifacts
Let's view the production code written completely by the jcode programming agent. Check the output of
rate_limiter.py:import time class SlidingWindowRateLimiter: def __init__(self, max_requests: int, window_size_seconds: float): self.max_requests = max_requests self.window_size_seconds = window_size_seconds self.user_logs = {} def allow_request(self, user_id: str) -> bool: current_time = time.time() if user_id not in self.user_logs: self.user_logs[user_id] = [] # Filter timestamps outside the active historical sliding window window_start = current_time - self.window_size_seconds self.user
jcode: Building High-Performance Autonomous AI Coding Agents from Scratch
The landscape of AI-driven software development is shifting rapidly. While first-generation AI coding tools operated primarily as conversational completions or simple script generators, the community is moving decisively toward autonomous programming agents. These agents don't just suggest code; they plan, execute tests, refactor, and self-correct within a structured harness.
Emerging at the forefront of this shift in May 2026 is jcode, an open-source, Rust-based programming agent framework developed by creator
1jehuang. Rapidly climbing the GitHub Trending charts and capturing the attention of autonomous systems developers, jcode addresses a critical bottleneck in the agentic ecosystem: execution speed, structural reliability, and resource overhead. Written entirely in Rust, it provides a high-performance harness designed to run AI coding agents at scale without the typical latency and memory bloat associated with Python-heavy orchestration layers.In this comprehensive tutorial-style guide, we will break down what jcode is, analyze its internal architecture, compare it to existing frameworks, and walk through an end-to-end installation and configuration process to build your very first autonomous coding agent.
---Understanding the jcode Architecture
To build effective applications with jcode, it is essential to understand how it organizes the execution loop of an AI agent. Traditional agent frameworks rely on high-level scripting abstractions that introduce significant latency, making deep-tree search algorithms (like Monte Carlo Tree Search or complex reflection loops) painfully slow. jcode solves this by using a compiled Rust backend that exposes a highly structured execution harness.
The framework is divided into three primary layers:
- The Environment Layer (The Sandbox): This component manages the operating system context, available package managers, and shell environments. It isolates agent actions, preventing rogue scripts from damaging the host system while providing full feedback loops (stdout, stderr, exit codes) back to the agent.
- The Core Harness (Rust Engine): Written in Rust for maximum concurrency and memory safety, this engine manages agent state transitions, prompt token streaming pipelines, and workspace file parsing. It abstracts token budgets and tool call translations natively.
- The Agent Interface (Extensible Profiles): This layer allows developers to write custom planning algorithms, definition maps, and system instructions. It defines how the agent approaches a problem, splits tasks, and evaluates success.
Feature Comparison: jcode vs. Traditional Frameworks
Before diving into the implementation details, let's look at how jcode positions itself against traditional Python-based agent architectures and standard LLM orchestration environments.
---Feature / Metric jcode (1jehuang) Python-based Agent Frameworks Standard LLM Chat Hooks Core Language Rust Python Python / TypeScript Execution Speed Ultra-high (Compiled, Native Threading) Moderate (Interpreted, Async Overheads) Low (Network Dependent) Memory Management Strict compile-time safety, minimal footprint High runtime consumption, garbage collected Variable depending on wrapper Sandbox Isolation Native OS environment detection & mapping Requires heavy external Docker wrapper No native execution layer Primary Target Autonomous multi-turn software engineering General purpose task automation agents Single-turn text/code generation Prerequisites and Environment Verification
Before installing jcode, you need to ensure your machine meets the minimum system requirements for native compilation and execution. Because jcode evaluates code in real-time, having a stable environment with standard compilers is essential.
System Requirements:
- Operating System: macOS (Intel/Apple Silicon), Linux (Ubuntu 22.04+, Debian, Fedora), or Windows 11 (with PowerShell or WSL2).
- Toolchains: Rust Stable (1.75+ recommended) if building from source.
- Network: Active internet connection to pull model endpoints and fetch external crate dependencies.
Step-by-Step Installation Guide
jcode features an adaptive installer that detects your current operating system, available package managers, and active shell configurations. Select the installation track below that best matches your local development system.
Option A: macOS via Homebrew
If you are on macOS and use the Homebrew package manager, you can install the official tap maintained by 1jehuang directly via your terminal:
# Tap the jcode formula repository brew tap 1jehuang/jcode # Install the binary package brew install jcodeOption B: Linux or macOS via Shell Script
For standard Linux distributions or macOS environments without Homebrew, use the automated installation script. This pulls the latest compiled binary corresponding to your architecture:
curl -fsSL [https://raw.githubusercontent.com/1jehuang/jcode/main/scripts/install.sh](https://raw.githubusercontent.com/1jehuang/jcode/main/scripts/install.sh) | bashOption C: Windows via PowerShell
If you are running natively on a Windows host within a standard administrative PowerShell prompt, execute the following command to download and map the binaries:
irm [https://raw.githubusercontent.com/1jehuang/jcode/main/scripts/install.ps1](https://raw.githubusercontent.com/1jehuang/jcode/main/scripts/install.ps1) | iexOption D: Building From Source (Recommended for Contributors)
If you want to run the cutting-edge development branch or adapt the core Rust source code to custom enterprise parameters, clone the official GitHub repository and compile it locally:
# Clone the project repository git clone [https://github.com/1jehuang/jcode.git](https://github.com/1jehuang/jcode.git) cd jcode # Compile a highly optimized release binary using Cargo cargo build --release # Execute the local release install configuration script ./scripts/install_release.shVerify that your installation was successful by checking the current version of the harness:
---jcode --versionQuickstart: Configuring and Initializing Your Agent Workspace
With jcode successfully installed, the next stage is configuring your active LLM providers and preparing a localized project workspace where your programming agent can safely read, write, and test applications.
Step 1: Exporting LLM API Credentials
jcode acts as an execution harness that routes logic through state-of-the-art coding LLMs. You must supply your preferred model API keys as environment variables. Add these to your shell profile (e.g.,
.bashrcor.zshrc):export OPENAI_API_KEY="sk-proj-xxxxxxxxxxxxxxxxxxxxxxxxxxxxxxxx" export ANTHROPIC_API_KEY="sk-ant-xxxxxxxxxxxxxxxxxxxxxxxxxxxxxxxx"Step 2: Initialize a New jcode Workspace
Navigate to an empty folder or your target repository and run the workspace initialization command. This tells jcode to parse the local layout and prepare an isolated runtime manifest:
mkdir my-agent-project cd my-agent-project jcode initThis command creates a hidden configuration workspace called
.jcode/containing a primary configuration file namedconfig.toml. Let's inspect and modify a standard setup configuration:
---# .jcode/config.toml [workspace] name = "my-agent-project" allowed_commands = ["cargo", "npm", "python", "git", "pytest", "go"] max_iterations = 15 [model] provider = "anthropic" default_model = "claude-3-5-sonnet-20241022" temperature = 0.2 max_tokens = 4096 [sandbox] isolate_network = false timeout_seconds = 45Building an Autonomous Programming Workflow
Now that your workspace is instantiated, let's walk through a real-world software maintenance scenario. We will instruct our jcode agent to write a complete Python utility module, write an associated test suit, run the validations, find bugs from execution outputs, and safely refactor the code automatically.
Step 1: Issue the Agent Task
We trigger the agent execution loop by supplying a clear, high-level engineering prompt using the
jcode runinstruction interface:jcode run "Create a robust Python rate limiter using a sliding window log algorithm. Include unit tests using pytest. Ensure it handles sub-millisecond timestamps gracefully."Step 2: Reviewing the Agent Autonomous Execution Trace
Once triggered, the jcode framework takes absolute control over the planning tree. Here is an approximation of what the terminal sequence tracks as the underlying Rust engine coordinates actions:
[INFO] Initializing agent environment... [INFO] Detected OS: Linux (Ubuntu 24.04), Package Manager: apt, Shell: bash [STEP 1/15] Planning task allocation tree... [TOOL CALL] Writing file: rate_limiter.py [TOOL CALL] Writing file: test_rate_limiter.py [STEP 2/15] Executing automated testing validation suite... [SHELL COMMAND] pytest test_rate_limiter.py [EXECUTION OUTPUT] ========================= FAILURES ========================= ____ test_sliding_window_log_edge_case _____________________ > assert limiter.allow_request("user_1") == False E AssertionError: assert True == False [STEP 3/15] Analyzing test failures. Reflection phase initiated... [INFO] Detected boundary edge condition flaw in window timestamps math. [TOOL CALL] Patching file: rate_limiter.py (Applying inline diff) [STEP 4/15] Re-executing testing suite... [SHELL COMMAND] pytest test_rate_limiter.py [EXECUTION OUTPUT] ==================== 4 passed in 0.08s ===================== [SUCCESS] Task fully resolved. Workspace state clean. Halting execution loop.Step 3: Examining the Generated Code Artifacts
Let's view the production code written completely by the jcode programming agent. Check the output of
rate_limiter.py:import time class SlidingWindowRateLimiter: def __init__(self, max_requests: int, window_size_seconds: float): self.max_requests = max_requests self.window_size_seconds = window_size_seconds self.user_logs = {} def allow_request(self, user_id: str) -> bool: current_time = time.time() if user_id not in self.user_logs: self.user_logs[user_id] = [] # Filter timestamps outside the active historical sliding window window_start = current_time - self.window_size_seconds self.user_logs[user_id] = [t for t in self.user_logs[user_id] if t > window_
jcode: Building High-Performance Autonomous AI Coding Agents from Scratch
The landscape of AI-driven software development is shifting rapidly. While first-generation AI coding tools operated primarily as conversational completions or simple script generators, the community is moving decisively toward autonomous programming agents. These agents don't just suggest code; they plan, execute tests, refactor, and self-correct within a structured harness.
Emerging at the forefront of this shift in May 2026 is jcode, an open-source, Rust-based programming agent framework developed by creator
1jehuang. Rapidly climbing the GitHub Trending charts and capturing the attention of autonomous systems developers, jcode addresses a critical bottleneck in the agentic ecosystem: execution speed, structural reliability, and resource overhead. Written entirely in Rust, it provides a high-performance harness designed to run AI coding agents at scale without the typical latency and memory bloat associated with Python-heavy orchestration layers.In this comprehensive tutorial-style guide, we will break down what jcode is, analyze its internal architecture, compare it to existing frameworks, and walk through an end-to-end installation and configuration process to build your very first autonomous coding agent.
---Understanding the jcode Architecture
To build effective applications with jcode, it is essential to understand how it organizes the execution loop of an AI agent. Traditional agent frameworks rely on high-level scripting abstractions that introduce significant latency, making deep-tree search algorithms (like Monte Carlo Tree Search or complex reflection loops) painfully slow. jcode solves this by using a compiled Rust backend that exposes a highly structured execution harness.
The framework is divided into three primary layers:
- The Environment Layer (The Sandbox): This component manages the operating system context, available package managers, and shell environments. It isolates agent actions, preventing rogue scripts from damaging the host system while providing full feedback loops (stdout, stderr, exit codes) back to the agent.
- The Core Harness (Rust Engine): Written in Rust for maximum concurrency and memory safety, this engine manages agent state transitions, prompt token streaming pipelines, and workspace file parsing. It abstracts token budgets and tool call translations natively.
- The Agent Interface (Extensible Profiles): This layer allows developers to write custom planning algorithms, definition maps, and system instructions. It defines how the agent approaches a problem, splits tasks, and evaluates success.
Feature Comparison: jcode vs. Traditional Frameworks
Before diving into the implementation details, let's look at how jcode positions itself against traditional Python-based agent architectures and standard LLM orchestration environments.
---Feature / Metric jcode (1jehuang) Python-based Agent Frameworks Standard LLM Chat Hooks Core Language Rust Python Python / TypeScript Execution Speed Ultra-high (Compiled, Native Threading) Moderate (Interpreted, Async Overheads) Low (Network Dependent) Memory Management Strict compile-time safety, minimal footprint High runtime consumption, garbage collected Variable depending on wrapper Sandbox Isolation Native OS environment detection & mapping Requires heavy external Docker wrapper No native execution layer Primary Target Autonomous multi-turn software engineering General purpose task automation agents Single-turn text/code generation Prerequisites and Environment Verification
Before installing jcode, you need to ensure your machine meets the minimum system requirements for native compilation and execution. Because jcode evaluates code in real-time, having a stable environment with standard compilers is essential.
System Requirements:
- Operating System: macOS (Intel/Apple Silicon), Linux (Ubuntu 22.04+, Debian, Fedora), or Windows 11 (with PowerShell or WSL2).
- Toolchains: Rust Stable (1.75+ recommended) if building from source.
- Network: Active internet connection to pull model endpoints and fetch external crate dependencies.
Step-by-Step Installation Guide
jcode features an adaptive installer that detects your current operating system, available package managers, and active shell configurations. Select the installation track below that best matches your local development system.
Option A: macOS via Homebrew
If you are on macOS and use the Homebrew package manager, you can install the official tap maintained by 1jehuang directly via your terminal:
# Tap the jcode formula repository brew tap 1jehuang/jcode # Install the binary package brew install jcodeOption B: Linux or macOS via Shell Script
For standard Linux distributions or macOS environments without Homebrew, use the automated installation script. This pulls the latest compiled binary corresponding to your architecture:
curl -fsSL [https://raw.githubusercontent.com/1jehuang/jcode/main/scripts/install.sh](https://raw.githubusercontent.com/1jehuang/jcode/main/scripts/install.sh) | bashOption C: Windows via PowerShell
If you are running natively on a Windows host within a standard administrative PowerShell prompt, execute the following command to download and map the binaries:
irm [https://raw.githubusercontent.com/1jehuang/jcode/main/scripts/install.ps1](https://raw.githubusercontent.com/1jehuang/jcode/main/scripts/install.ps1) | iexOption D: Building From Source (Recommended for Contributors)
If you want to run the cutting-edge development branch or adapt the core Rust source code to custom enterprise parameters, clone the official GitHub repository and compile it locally:
# Clone the project repository git clone [https://github.com/1jehuang/jcode.git](https://github.com/1jehuang/jcode.git) cd jcode # Compile a highly optimized release binary using Cargo cargo build --release # Execute the local release install configuration script ./scripts/install_release.shVerify that your installation was successful by checking the current version of the harness:
---jcode --versionQuickstart: Configuring and Initializing Your Agent Workspace
With jcode successfully installed, the next stage is configuring your active LLM providers and preparing a localized project workspace where your programming agent can safely read, write, and test applications.
Step 1: Exporting LLM API Credentials
jcode acts as an execution harness that routes logic through state-of-the-art coding LLMs. You must supply your preferred model API keys as environment variables. Add these to your shell profile (e.g.,
.bashrcor.zshrc):export OPENAI_API_KEY="sk-proj-xxxxxxxxxxxxxxxxxxxxxxxxxxxxxxxx" export ANTHROPIC_API_KEY="sk-ant-xxxxxxxxxxxxxxxxxxxxxxxxxxxxxxxx"Step 2: Initialize a New jcode Workspace
Navigate to an empty folder or your target repository and run the workspace initialization command. This tells jcode to parse the local layout and prepare an isolated runtime manifest:
mkdir my-agent-project cd my-agent-project jcode initThis command creates a hidden configuration workspace called
.jcode/containing a primary configuration file namedconfig.toml. Let's inspect and modify a standard setup configuration:
---# .jcode/config.toml [workspace] name = "my-agent-project" allowed_commands = ["cargo", "npm", "python", "git", "pytest", "go"] max_iterations = 15 [model] provider = "anthropic" default_model = "claude-3-5-sonnet-20241022" temperature = 0.2 max_tokens = 4096 [sandbox] isolate_network = false timeout_seconds = 45Building an Autonomous Programming Workflow
Now that your workspace is instantiated, let's walk through a real-world software maintenance scenario. We will instruct our jcode agent to write a complete Python utility module, write an associated test suit, run the validations, find bugs from execution outputs, and safely refactor the code automatically.
Step 1: Issue the Agent Task
We trigger the agent execution loop by supplying a clear, high-level engineering prompt using the
jcode runinstruction interface:jcode run "Create a robust Python rate limiter using a sliding window log algorithm. Include unit tests using pytest. Ensure it handles sub-millisecond timestamps gracefully."Step 2: Reviewing the Agent Autonomous Execution Trace
Once triggered, the jcode framework takes absolute control over the planning tree. Here is an approximation of what the terminal sequence tracks as the underlying Rust engine coordinates actions:
[INFO] Initializing agent environment... [INFO] Detected OS: Linux (Ubuntu 24.04), Package Manager: apt, Shell: bash [STEP 1/15] Planning task allocation tree... [TOOL CALL] Writing file: rate_limiter.py [TOOL CALL] Writing file: test_rate_limiter.py [STEP 2/15] Executing automated testing validation suite... [SHELL COMMAND] pytest test_rate_limiter.py [EXECUTION OUTPUT] ========================= FAILURES ========================= ____ test_sliding_window_log_edge_case _____________________ > assert limiter.allow_request("user_1") == False E AssertionError: assert True == False [STEP 3/15] Analyzing test failures. Reflection phase initiated... [INFO] Detected boundary edge condition flaw in window timestamps math. [TOOL CALL] Patching file: rate_limiter.py (Applying inline diff) [STEP 4/15] Re-executing testing suite... [SHELL COMMAND] pytest test_rate_limiter.py [EXECUTION OUTPUT] ==================== 4 passed in 0.08s ===================== [SUCCESS] Task fully resolved. Workspace state clean. Halting execution loop.Step 3: Examining the Generated Code Artifacts
Let's view the production code written completely by the jcode programming agent. Check the output of
rate_limiter.py:import time class SlidingWindowRateLimiter: def __init__(self, max_requests: int, window_size_seconds: float): self.max_requests = max_requests self.window_size_seconds = window_size_seconds self.user_logs = {} def allow_request(self, user_id: str) -> bool: current_time = time.time() if user_id not in self.user_logs: self.user_logs[user_id] = [] # Filter timestamps outside the active historical sliding window window_start = current_time - self.window_size_seconds self.user_logs[user_id] = [t for t in self.user_logs[user_id] if t > window_start] if len(self.user_logs[user_id]) < self.max_
jcode: Building High-Performance Autonomous AI Coding Agents from Scratch
The landscape of AI-driven software development is shifting rapidly. While first-generation AI coding tools operated primarily as conversational completions or simple script generators, the community is moving decisively toward autonomous programming agents. These agents don't just suggest code; they plan, execute tests, refactor, and self-correct within a structured harness.
Emerging at the forefront of this shift in May 2026 is jcode, an open-source, Rust-based programming agent framework developed by creator
1jehuang. Rapidly climbing the GitHub Trending charts and capturing the attention of autonomous systems developers, jcode addresses a critical bottleneck in the agentic ecosystem: execution speed, structural reliability, and resource overhead. Written entirely in Rust, it provides a high-performance harness designed to run AI coding agents at scale without the typical latency and memory bloat associated with Python-heavy orchestration layers.In this comprehensive tutorial-style guide, we will break down what jcode is, analyze its internal architecture, compare it to existing frameworks, and walk through an end-to-end installation and configuration process to build your very first autonomous coding agent.
---Understanding the jcode Architecture
To build effective applications with jcode, it is essential to understand how it organizes the execution loop of an AI agent. Traditional agent frameworks rely on high-level scripting abstractions that introduce significant latency, making deep-tree search algorithms (like Monte Carlo Tree Search or complex reflection loops) painfully slow. jcode solves this by using a compiled Rust backend that exposes a highly structured execution harness.
The framework is divided into three primary layers:
- The Environment Layer (The Sandbox): This component manages the operating system context, available package managers, and shell environments. It isolates agent actions, preventing rogue scripts from damaging the host system while providing full feedback loops (stdout, stderr, exit codes) back to the agent.
- The Core Harness (Rust Engine): Written in Rust for maximum concurrency and memory safety, this engine manages agent state transitions, prompt token streaming pipelines, and workspace file parsing. It abstracts token budgets and tool call translations natively.
- The Agent Interface (Extensible Profiles): This layer allows developers to write custom planning algorithms, definition maps, and system instructions. It defines how the agent approaches a problem, splits tasks, and evaluates success.
Feature Comparison: jcode vs. Traditional Frameworks
Before diving into the implementation details, let's look at how jcode positions itself against traditional Python-based agent architectures and standard LLM orchestration environments.
---Feature / Metric jcode (1jehuang) Python-based Agent Frameworks Standard LLM Chat Hooks Core Language Rust Python Python / TypeScript Execution Speed Ultra-high (Compiled, Native Threading) Moderate (Interpreted, Async Overheads) Low (Network Dependent) Memory Management Strict compile-time safety, minimal footprint High runtime consumption, garbage collected Variable depending on wrapper Sandbox Isolation Native OS environment detection & mapping Requires heavy external Docker wrapper No native execution layer Primary Target Autonomous multi-turn software engineering General purpose task automation agents Single-turn text/code generation Prerequisites and Environment Verification
Before installing jcode, you need to ensure your machine meets the minimum system requirements for native compilation and execution. Because jcode evaluates code in real-time, having a stable environment with standard compilers is essential.
System Requirements:
- Operating System: macOS (Intel/Apple Silicon), Linux (Ubuntu 22.04+, Debian, Fedora), or Windows 11 (with PowerShell or WSL2).
- Toolchains: Rust Stable (1.75+ recommended) if building from source.
- Network: Active internet connection to pull model endpoints and fetch external crate dependencies.
Step-by-Step Installation Guide
jcode features an adaptive installer that detects your current operating system, available package managers, and active shell configurations. Select the installation track below that best matches your local development system.
Option A: macOS via Homebrew
If you are on macOS and use the Homebrew package manager, you can install the official tap maintained by 1jehuang directly via your terminal:
# Tap the jcode formula repository brew tap 1jehuang/jcode # Install the binary package brew install jcodeOption B: Linux or macOS via Shell Script
For standard Linux distributions or macOS environments without Homebrew, use the automated installation script. This pulls the latest compiled binary corresponding to your architecture:
curl -fsSL [https://raw.githubusercontent.com/1jehuang/jcode/main/scripts/install.sh](https://raw.githubusercontent.com/1jehuang/jcode/main/scripts/install.sh) | bashOption C: Windows via PowerShell
If you are running natively on a Windows host within a standard administrative PowerShell prompt, execute the following command to download and map the binaries:
irm [https://raw.githubusercontent.com/1jehuang/jcode/main/scripts/install.ps1](https://raw.githubusercontent.com/1jehuang/jcode/main/scripts/install.ps1) | iexOption D: Building From Source (Recommended for Contributors)
If you want to run the cutting-edge development branch or adapt the core Rust source code to custom enterprise parameters, clone the official GitHub repository and compile it locally:
# Clone the project repository git clone [https://github.com/1jehuang/jcode.git](https://github.com/1jehuang/jcode.git) cd jcode # Compile a highly optimized release binary using Cargo cargo build --release # Execute the local release install configuration script ./scripts/install_release.shVerify that your installation was successful by checking the current version of the harness:
---jcode --versionQuickstart: Configuring and Initializing Your Agent Workspace
With jcode successfully installed, the next stage is configuring your active LLM providers and preparing a localized project workspace where your programming agent can safely read, write, and test applications.
Step 1: Exporting LLM API Credentials
jcode acts as an execution harness that routes logic through state-of-the-art coding LLMs. You must supply your preferred model API keys as environment variables. Add these to your shell profile (e.g.,
.bashrcor.zshrc):export OPENAI_API_KEY="sk-proj-xxxxxxxxxxxxxxxxxxxxxxxxxxxxxxxx" export ANTHROPIC_API_KEY="sk-ant-xxxxxxxxxxxxxxxxxxxxxxxxxxxxxxxx"Step 2: Initialize a New jcode Workspace
Navigate to an empty folder or your target repository and run the workspace initialization command. This tells jcode to parse the local layout and prepare an isolated runtime manifest:
mkdir my-agent-project cd my-agent-project jcode initThis command creates a hidden configuration workspace called
.jcode/containing a primary configuration file namedconfig.toml. Let's inspect and modify a standard setup configuration:
---# .jcode/config.toml [workspace] name = "my-agent-project" allowed_commands = ["cargo", "npm", "python", "git", "pytest", "go"] max_iterations = 15 [model] provider = "anthropic" default_model = "claude-3-5-sonnet-20241022" temperature = 0.2 max_tokens = 4096 [sandbox] isolate_network = false timeout_seconds = 45Building an Autonomous Programming Workflow
Now that your workspace is instantiated, let's walk through a real-world software maintenance scenario. We will instruct our jcode agent to write a complete Python utility module, write an associated test suit, run the validations, find bugs from execution outputs, and safely refactor the code automatically.
Step 1: Issue the Agent Task
We trigger the agent execution loop by supplying a clear, high-level engineering prompt using the
jcode runinstruction interface:jcode run "Create a robust Python rate limiter using a sliding window log algorithm. Include unit tests using pytest. Ensure it handles sub-millisecond timestamps gracefully."Step 2: Reviewing the Agent Autonomous Execution Trace
Once triggered, the jcode framework takes absolute control over the planning tree. Here is an approximation of what the terminal sequence tracks as the underlying Rust engine coordinates actions:
[INFO] Initializing agent environment... [INFO] Detected OS: Linux (Ubuntu 24.04), Package Manager: apt, Shell: bash [STEP 1/15] Planning task allocation tree... [TOOL CALL] Writing file: rate_limiter.py [TOOL CALL] Writing file: test_rate_limiter.py [STEP 2/15] Executing automated testing validation suite... [SHELL COMMAND] pytest test_rate_limiter.py [EXECUTION OUTPUT] ========================= FAILURES ========================= ____ test_sliding_window_log_edge_case _____________________ > assert limiter.allow_request("user_1") == False E AssertionError: assert True == False [STEP 3/15] Analyzing test failures. Reflection phase initiated... [INFO] Detected boundary edge condition flaw in window timestamps math. [TOOL CALL] Patching file: rate_limiter.py (Applying inline diff) [STEP 4/15] Re-executing testing suite... [SHELL COMMAND] pytest test_rate_limiter.py [EXECUTION OUTPUT] ==================== 4 passed in 0.08s ===================== [SUCCESS] Task fully resolved. Workspace state clean. Halting execution loop.Step 3: Examining the Generated Code Artifacts
Let's view the production code written completely by the jcode programming agent. Check the output of
rate_limiter.py:import time class SlidingWindowRateLimiter: def __init__(self, max_requests: int, window_size_seconds: float): self.max_requests = max_requests self.window_size_seconds = window_size_seconds self.user_logs = {} def allow_request(self, user_id: str) -> bool: current_time = time.time() if user_id not in self.user_logs: self.user_logs[user_id] = [] # Filter timestamps outside the active historical sliding window window_start = current_time - self.window_size_seconds self.user_logs[user_id] = [t for t in self.user_logs[user_id] if t > window_start] if len(self.user_logs[user_id]) < self.max_requests: self.user_logs[user_id].append(current_time) return True
jcode: Building High-Performance Autonomous AI Coding Agents from Scratch
The landscape of AI-driven software development is shifting rapidly. While first-generation AI coding tools operated primarily as conversational completions or simple script generators, the community is moving decisively toward autonomous programming agents. These agents don't just suggest code; they plan, execute tests, refactor, and self-correct within a structured harness.
Emerging at the forefront of this shift in May 2026 is jcode, an open-source, Rust-based programming agent framework developed by creator
1jehuang. Rapidly climbing the GitHub Trending charts and capturing the attention of autonomous systems developers, jcode addresses a critical bottleneck in the agentic ecosystem: execution speed, structural reliability, and resource overhead. Written entirely in Rust, it provides a high-performance harness designed to run AI coding agents at scale without the typical latency and memory bloat associated with Python-heavy orchestration layers.In this comprehensive tutorial-style guide, we will break down what jcode is, analyze its internal architecture, compare it to existing frameworks, and walk through an end-to-end installation and configuration process to build your very first autonomous coding agent.
---Understanding the jcode Architecture
To build effective applications with jcode, it is essential to understand how it organizes the execution loop of an AI agent. Traditional agent frameworks rely on high-level scripting abstractions that introduce significant latency, making deep-tree search algorithms (like Monte Carlo Tree Search or complex reflection loops) painfully slow. jcode solves this by using a compiled Rust backend that exposes a highly structured execution harness.
The framework is divided into three primary layers:
- The Environment Layer (The Sandbox): This component manages the operating system context, available package managers, and shell environments. It isolates agent actions, preventing rogue scripts from damaging the host system while providing full feedback loops (stdout, stderr, exit codes) back to the agent.
- The Core Harness (Rust Engine): Written in Rust for maximum concurrency and memory safety, this engine manages agent state transitions, prompt token streaming pipelines, and workspace file parsing. It abstracts token budgets and tool call translations natively.
- The Agent Interface (Extensible Profiles): This layer allows developers to write custom planning algorithms, definition maps, and system instructions. It defines how the agent approaches a problem, splits tasks, and evaluates success.
Feature Comparison: jcode vs. Traditional Frameworks
Before diving into the implementation details, let's look at how jcode positions itself against traditional Python-based agent architectures and standard LLM orchestration environments.
---Feature / Metric jcode (1jehuang) Python-based Agent Frameworks Standard LLM Chat Hooks Core Language Rust Python Python / TypeScript Execution Speed Ultra-high (Compiled, Native Threading) Moderate (Interpreted, Async Overheads) Low (Network Dependent) Memory Management Strict compile-time safety, minimal footprint High runtime consumption, garbage collected Variable depending on wrapper Sandbox Isolation Native OS environment detection & mapping Requires heavy external Docker wrapper No native execution layer Primary Target Autonomous multi-turn software engineering General purpose task automation agents Single-turn text/code generation Prerequisites and Environment Verification
Before installing jcode, you need to ensure your machine meets the minimum system requirements for native compilation and execution. Because jcode evaluates code in real-time, having a stable environment with standard compilers is essential.
System Requirements:
- Operating System: macOS (Intel/Apple Silicon), Linux (Ubuntu 22.04+, Debian, Fedora), or Windows 11 (with PowerShell or WSL2).
- Toolchains: Rust Stable (1.75+ recommended) if building from source.
- Network: Active internet connection to pull model endpoints and fetch external crate dependencies.
Step-by-Step Installation Guide
jcode features an adaptive installer that detects your current operating system, available package managers, and active shell configurations. Select the installation track below that best matches your local development system.
Option A: macOS via Homebrew
If you are on macOS and use the Homebrew package manager, you can install the official tap maintained by 1jehuang directly via your terminal:
# Tap the jcode formula repository brew tap 1jehuang/jcode # Install the binary package brew install jcodeOption B: Linux or macOS via Shell Script
For standard Linux distributions or macOS environments without Homebrew, use the automated installation script. This pulls the latest compiled binary corresponding to your architecture:
curl -fsSL [https://raw.githubusercontent.com/1jehuang/jcode/main/scripts/install.sh](https://raw.githubusercontent.com/1jehuang/jcode/main/scripts/install.sh) | bashOption C: Windows via PowerShell
If you are running natively on a Windows host within a standard administrative PowerShell prompt, execute the following command to download and map the binaries:
irm [https://raw.githubusercontent.com/1jehuang/jcode/main/scripts/install.ps1](https://raw.githubusercontent.com/1jehuang/jcode/main/scripts/install.ps1) | iexOption D: Building From Source (Recommended for Contributors)
If you want to run the cutting-edge development branch or adapt the core Rust source code to custom enterprise parameters, clone the official GitHub repository and compile it locally:
# Clone the project repository git clone [https://github.com/1jehuang/jcode.git](https://github.com/1jehuang/jcode.git) cd jcode # Compile a highly optimized release binary using Cargo cargo build --release # Execute the local release install configuration script ./scripts/install_release.shVerify that your installation was successful by checking the current version of the harness:
---jcode --versionQuickstart: Configuring and Initializing Your Agent Workspace
With jcode successfully installed, the next stage is configuring your active LLM providers and preparing a localized project workspace where your programming agent can safely read, write, and test applications.
Step 1: Exporting LLM API Credentials
jcode acts as an execution harness that routes logic through state-of-the-art coding LLMs. You must supply your preferred model API keys as environment variables. Add these to your shell profile (e.g.,
.bashrcor.zshrc):export OPENAI_API_KEY="sk-proj-xxxxxxxxxxxxxxxxxxxxxxxxxxxxxxxx" export ANTHROPIC_API_KEY="sk-ant-xxxxxxxxxxxxxxxxxxxxxxxxxxxxxxxx"Step 2: Initialize a New jcode Workspace
Navigate to an empty folder or your target repository and run the workspace initialization command. This tells jcode to parse the local layout and prepare an isolated runtime manifest:
mkdir my-agent-project cd my-agent-project jcode initThis command creates a hidden configuration workspace called
.jcode/containing a primary configuration file namedconfig.toml. Let's inspect and modify a standard setup configuration:
---# .jcode/config.toml [workspace] name = "my-agent-project" allowed_commands = ["cargo", "npm", "python", "git", "pytest", "go"] max_iterations = 15 [model] provider = "anthropic" default_model = "claude-3-5-sonnet-20241022" temperature = 0.2 max_tokens = 4096 [sandbox] isolate_network = false timeout_seconds = 45Building an Autonomous Programming Workflow
Now that your workspace is instantiated, let's walk through a real-world software maintenance scenario. We will instruct our jcode agent to write a complete Python utility module, write an associated test suit, run the validations, find bugs from execution outputs, and safely refactor the code automatically.
Step 1: Issue the Agent Task
We trigger the agent execution loop by supplying a clear, high-level engineering prompt using the
jcode runinstruction interface:jcode run "Create a robust Python rate limiter using a sliding window log algorithm. Include unit tests using pytest. Ensure it handles sub-millisecond timestamps gracefully."Step 2: Reviewing the Agent Autonomous Execution Trace
Once triggered, the jcode framework takes absolute control over the planning tree. Here is an approximation of what the terminal sequence tracks as the underlying Rust engine coordinates actions:
[INFO] Initializing agent environment... [INFO] Detected OS: Linux (Ubuntu 24.04), Package Manager: apt, Shell: bash [STEP 1/15] Planning task allocation tree... [TOOL CALL] Writing file: rate_limiter.py [TOOL CALL] Writing file: test_rate_limiter.py [STEP 2/15] Executing automated testing validation suite... [SHELL COMMAND] pytest test_rate_limiter.py [EXECUTION OUTPUT] ========================= FAILURES ========================= ____ test_sliding_window_log_edge_case _____________________ > assert limiter.allow_request("user_1") == False E AssertionError: assert True == False [STEP 3/15] Analyzing test failures. Reflection phase initiated... [INFO] Detected boundary edge condition flaw in window timestamps math. [TOOL CALL] Patching file: rate_limiter.py (Applying inline diff) [STEP 4/15] Re-executing testing suite... [SHELL COMMAND] pytest test_rate_limiter.py [EXECUTION OUTPUT] ==================== 4 passed in 0.08s ===================== [SUCCESS] Task fully resolved. Workspace state clean. Halting execution loop.Step 3: Examining the Generated Code Artifacts
Let's view the production code written completely by the jcode programming agent. Check the output of
rate_limiter.py:import time class SlidingWindowRateLimiter: def __init__(self, max_requests: int, window_size_seconds: float): self.max_requests = max_requests self.window_size_seconds = window_size_seconds self.user_logs = {} def allow_request(self, user_id: str) -> bool: current_time = time.time() if user_id not in self.user_logs: self.user_logs[user_id] = [] # Filter timestamps outside the active historical sliding window window_start = current_time - self.window_size_seconds self.user_logs[user_id] = [t for t in self.user_logs[user_id] if t > window_start] if len(self.user_logs[user_id]) < self.max_requests: self.user_logs[user_id].append(current_time) return True return FalseNext, inspect the corresponding automated validation suites written in
test
jcode: Building High-Performance Autonomous AI Coding Agents from Scratch
The landscape of AI-driven software development is shifting rapidly. While first-generation AI coding tools operated primarily as conversational completions or simple script generators, the community is moving decisively toward autonomous programming agents. These agents don't just suggest code; they plan, execute tests, refactor, and self-correct within a structured harness.
Emerging at the forefront of this shift in May 2026 is jcode, an open-source, Rust-based programming agent framework developed by creator
1jehuang. Rapidly climbing the GitHub Trending charts and capturing the attention of autonomous systems developers, jcode addresses a critical bottleneck in the agentic ecosystem: execution speed, structural reliability, and resource overhead. Written entirely in Rust, it provides a high-performance harness designed to run AI coding agents at scale without the typical latency and memory bloat associated with Python-heavy orchestration layers.In this comprehensive tutorial-style guide, we will break down what jcode is, analyze its internal architecture, compare it to existing frameworks, and walk through an end-to-end installation and configuration process to build your very first autonomous coding agent.
---Understanding the jcode Architecture
To build effective applications with jcode, it is essential to understand how it organizes the execution loop of an AI agent. Traditional agent frameworks rely on high-level scripting abstractions that introduce significant latency, making deep-tree search algorithms (like Monte Carlo Tree Search or complex reflection loops) painfully slow. jcode solves this by using a compiled Rust backend that exposes a highly structured execution harness.
The framework is divided into three primary layers:
- The Environment Layer (The Sandbox): This component manages the operating system context, available package managers, and shell environments. It isolates agent actions, preventing rogue scripts from damaging the host system while providing full feedback loops (stdout, stderr, exit codes) back to the agent.
- The Core Harness (Rust Engine): Written in Rust for maximum concurrency and memory safety, this engine manages agent state transitions, prompt token streaming pipelines, and workspace file parsing. It abstracts token budgets and tool call translations natively.
- The Agent Interface (Extensible Profiles): This layer allows developers to write custom planning algorithms, definition maps, and system instructions. It defines how the agent approaches a problem, splits tasks, and evaluates success.
Feature Comparison: jcode vs. Traditional Frameworks
Before diving into the implementation details, let's look at how jcode positions itself against traditional Python-based agent architectures and standard LLM orchestration environments.
---Feature / Metric jcode (1jehuang) Python-based Agent Frameworks Standard LLM Chat Hooks Core Language Rust Python Python / TypeScript Execution Speed Ultra-high (Compiled, Native Threading) Moderate (Interpreted, Async Overheads) Low (Network Dependent) Memory Management Strict compile-time safety, minimal footprint High runtime consumption, garbage collected Variable depending on wrapper Sandbox Isolation Native OS environment detection & mapping Requires heavy external Docker wrapper No native execution layer Primary Target Autonomous multi-turn software engineering General purpose task automation agents Single-turn text/code generation Prerequisites and Environment Verification
Before installing jcode, you need to ensure your machine meets the minimum system requirements for native compilation and execution. Because jcode evaluates code in real-time, having a stable environment with standard compilers is essential.
System Requirements:
- Operating System: macOS (Intel/Apple Silicon), Linux (Ubuntu 22.04+, Debian, Fedora), or Windows 11 (with PowerShell or WSL2).
- Toolchains: Rust Stable (1.75+ recommended) if building from source.
- Network: Active internet connection to pull model endpoints and fetch external crate dependencies.
Step-by-Step Installation Guide
jcode features an adaptive installer that detects your current operating system, available package managers, and active shell configurations. Select the installation track below that best matches your local development system.
Option A: macOS via Homebrew
If you are on macOS and use the Homebrew package manager, you can install the official tap maintained by 1jehuang directly via your terminal:
# Tap the jcode formula repository brew tap 1jehuang/jcode # Install the binary package brew install jcodeOption B: Linux or macOS via Shell Script
For standard Linux distributions or macOS environments without Homebrew, use the automated installation script. This pulls the latest compiled binary corresponding to your architecture:
curl -fsSL [https://raw.githubusercontent.com/1jehuang/jcode/main/scripts/install.sh](https://raw.githubusercontent.com/1jehuang/jcode/main/scripts/install.sh) | bashOption C: Windows via PowerShell
If you are running natively on a Windows host within a standard administrative PowerShell prompt, execute the following command to download and map the binaries:
irm [https://raw.githubusercontent.com/1jehuang/jcode/main/scripts/install.ps1](https://raw.githubusercontent.com/1jehuang/jcode/main/scripts/install.ps1) | iexOption D: Building From Source (Recommended for Contributors)
If you want to run the cutting-edge development branch or adapt the core Rust source code to custom enterprise parameters, clone the official GitHub repository and compile it locally:
# Clone the project repository git clone [https://github.com/1jehuang/jcode.git](https://github.com/1jehuang/jcode.git) cd jcode # Compile a highly optimized release binary using Cargo cargo build --release # Execute the local release install configuration script ./scripts/install_release.shVerify that your installation was successful by checking the current version of the harness:
---jcode --versionQuickstart: Configuring and Initializing Your Agent Workspace
With jcode successfully installed, the next stage is configuring your active LLM providers and preparing a localized project workspace where your programming agent can safely read, write, and test applications.
Step 1: Exporting LLM API Credentials
jcode acts as an execution harness that routes logic through state-of-the-art coding LLMs. You must supply your preferred model API keys as environment variables. Add these to your shell profile (e.g.,
.bashrcor.zshrc):export OPENAI_API_KEY="sk-proj-xxxxxxxxxxxxxxxxxxxxxxxxxxxxxxxx" export ANTHROPIC_API_KEY="sk-ant-xxxxxxxxxxxxxxxxxxxxxxxxxxxxxxxx"Step 2: Initialize a New jcode Workspace
Navigate to an empty folder or your target repository and run the workspace initialization command. This tells jcode to parse the local layout and prepare an isolated runtime manifest:
mkdir my-agent-project cd my-agent-project jcode initThis command creates a hidden configuration workspace called
.jcode/containing a primary configuration file namedconfig.toml. Let's inspect and modify a standard setup configuration:
---# .jcode/config.toml [workspace] name = "my-agent-project" allowed_commands = ["cargo", "npm", "python", "git", "pytest", "go"] max_iterations = 15 [model] provider = "anthropic" default_model = "claude-3-5-sonnet-20241022" temperature = 0.2 max_tokens = 4096 [sandbox] isolate_network = false timeout_seconds = 45Building an Autonomous Programming Workflow
Now that your workspace is instantiated, let's walk through a real-world software maintenance scenario. We will instruct our jcode agent to write a complete Python utility module, write an associated test suit, run the validations, find bugs from execution outputs, and safely refactor the code automatically.
Step 1: Issue the Agent Task
We trigger the agent execution loop by supplying a clear, high-level engineering prompt using the
jcode runinstruction interface:jcode run "Create a robust Python rate limiter using a sliding window log algorithm. Include unit tests using pytest. Ensure it handles sub-millisecond timestamps gracefully."Step 2: Reviewing the Agent Autonomous Execution Trace
Once triggered, the jcode framework takes absolute control over the planning tree. Here is an approximation of what the terminal sequence tracks as the underlying Rust engine coordinates actions:
[INFO] Initializing agent environment... [INFO] Detected OS: Linux (Ubuntu 24.04), Package Manager: apt, Shell: bash [STEP 1/15] Planning task allocation tree... [TOOL CALL] Writing file: rate_limiter.py [TOOL CALL] Writing file: test_rate_limiter.py [STEP 2/15] Executing automated testing validation suite... [SHELL COMMAND] pytest test_rate_limiter.py [EXECUTION OUTPUT] ========================= FAILURES ========================= ____ test_sliding_window_log_edge_case _____________________ > assert limiter.allow_request("user_1") == False E AssertionError: assert True == False [STEP 3/15] Analyzing test failures. Reflection phase initiated... [INFO] Detected boundary edge condition flaw in window timestamps math. [TOOL CALL] Patching file: rate_limiter.py (Applying inline diff) [STEP 4/15] Re-executing testing suite... [SHELL COMMAND] pytest test_rate_limiter.py [EXECUTION OUTPUT] ==================== 4 passed in 0.08s ===================== [SUCCESS] Task fully resolved. Workspace state clean. Halting execution loop.Step 3: Examining the Generated Code Artifacts
Let's view the production code written completely by the jcode programming agent. Check the output of
rate_limiter.py:import time class SlidingWindowRateLimiter: def __init__(self, max_requests: int, window_size_seconds: float): self.max_requests = max_requests self.window_size_seconds = window_size_seconds self.user_logs = {} def allow_request(self, user_id: str) -> bool: current_time = time.time() if user_id not in self.user_logs: self.user_logs[user_id] = [] # Filter timestamps outside the active historical sliding window window_start = current_time - self.window_size_seconds self.user_logs[user_id] = [t for t in self.user_logs[user_id] if t > window_start] if len(self.user_logs[user_id]) < self.max_requests: self.user_logs[user_id].append(current_time) return True return FalseNext, inspect the corresponding automated validation suites written in
test_rate_limiter.py:import time import pytest from rate_limiter import Sliding
jcode: Building High-Performance Autonomous AI Coding Agents from Scratch
The landscape of AI-driven software development is shifting rapidly. While first-generation AI coding tools operated primarily as conversational completions or simple script generators, the community is moving decisively toward autonomous programming agents. These agents don't just suggest code; they plan, execute tests, refactor, and self-correct within a structured harness.
Emerging at the forefront of this shift in May 2026 is jcode, an open-source, Rust-based programming agent framework developed by creator
1jehuang. Rapidly climbing the GitHub Trending charts and capturing the attention of autonomous systems developers, jcode addresses a critical bottleneck in the agentic ecosystem: execution speed, structural reliability, and resource overhead. Written entirely in Rust, it provides a high-performance harness designed to run AI coding agents at scale without the typical latency and memory bloat associated with Python-heavy orchestration layers.In this comprehensive tutorial-style guide, we will break down what jcode is, analyze its internal architecture, compare it to existing frameworks, and walk through an end-to-end installation and configuration process to build your very first autonomous coding agent.
---Understanding the jcode Architecture
To build effective applications with jcode, it is essential to understand how it organizes the execution loop of an AI agent. Traditional agent frameworks rely on high-level scripting abstractions that introduce significant latency, making deep-tree search algorithms (like Monte Carlo Tree Search or complex reflection loops) painfully slow. jcode solves this by using a compiled Rust backend that exposes a highly structured execution harness.
The framework is divided into three primary layers:
- The Environment Layer (The Sandbox): This component manages the operating system context, available package managers, and shell environments. It isolates agent actions, preventing rogue scripts from damaging the host system while providing full feedback loops (stdout, stderr, exit codes) back to the agent.
- The Core Harness (Rust Engine): Written in Rust for maximum concurrency and memory safety, this engine manages agent state transitions, prompt token streaming pipelines, and workspace file parsing. It abstracts token budgets and tool call translations natively.
- The Agent Interface (Extensible Profiles): This layer allows developers to write custom planning algorithms, definition maps, and system instructions. It defines how the agent approaches a problem, splits tasks, and evaluates success.
Feature Comparison: jcode vs. Traditional Frameworks
Before diving into the implementation details, let's look at how jcode positions itself against traditional Python-based agent architectures and standard LLM orchestration environments.
---Feature / Metric jcode (1jehuang) Python-based Agent Frameworks Standard LLM Chat Hooks Core Language Rust Python Python / TypeScript Execution Speed Ultra-high (Compiled, Native Threading) Moderate (Interpreted, Async Overheads) Low (Network Dependent) Memory Management Strict compile-time safety, minimal footprint High runtime consumption, garbage collected Variable depending on wrapper Sandbox Isolation Native OS environment detection & mapping Requires heavy external Docker wrapper No native execution layer Primary Target Autonomous multi-turn software engineering General purpose task automation agents Single-turn text/code generation Prerequisites and Environment Verification
Before installing jcode, you need to ensure your machine meets the minimum system requirements for native compilation and execution. Because jcode evaluates code in real-time, having a stable environment with standard compilers is essential.
System Requirements:
- Operating System: macOS (Intel/Apple Silicon), Linux (Ubuntu 22.04+, Debian, Fedora), or Windows 11 (with PowerShell or WSL2).
- Toolchains: Rust Stable (1.75+ recommended) if building from source.
- Network: Active internet connection to pull model endpoints and fetch external crate dependencies.
Step-by-Step Installation Guide
jcode features an adaptive installer that detects your current operating system, available package managers, and active shell configurations. Select the installation track below that best matches your local development system.
Option A: macOS via Homebrew
If you are on macOS and use the Homebrew package manager, you can install the official tap maintained by 1jehuang directly via your terminal:
# Tap the jcode formula repository brew tap 1jehuang/jcode # Install the binary package brew install jcodeOption B: Linux or macOS via Shell Script
For standard Linux distributions or macOS environments without Homebrew, use the automated installation script. This pulls the latest compiled binary corresponding to your architecture:
curl -fsSL [https://raw.githubusercontent.com/1jehuang/jcode/main/scripts/install.sh](https://raw.githubusercontent.com/1jehuang/jcode/main/scripts/install.sh) | bashOption C: Windows via PowerShell
If you are running natively on a Windows host within a standard administrative PowerShell prompt, execute the following command to download and map the binaries:
irm [https://raw.githubusercontent.com/1jehuang/jcode/main/scripts/install.ps1](https://raw.githubusercontent.com/1jehuang/jcode/main/scripts/install.ps1) | iexOption D: Building From Source (Recommended for Contributors)
If you want to run the cutting-edge development branch or adapt the core Rust source code to custom enterprise parameters, clone the official GitHub repository and compile it locally:
# Clone the project repository git clone [https://github.com/1jehuang/jcode.git](https://github.com/1jehuang/jcode.git) cd jcode # Compile a highly optimized release binary using Cargo cargo build --release # Execute the local release install configuration script ./scripts/install_release.shVerify that your installation was successful by checking the current version of the harness:
---jcode --versionQuickstart: Configuring and Initializing Your Agent Workspace
With jcode successfully installed, the next stage is configuring your active LLM providers and preparing a localized project workspace where your programming agent can safely read, write, and test applications.
Step 1: Exporting LLM API Credentials
jcode acts as an execution harness that routes logic through state-of-the-art coding LLMs. You must supply your preferred model API keys as environment variables. Add these to your shell profile (e.g.,
.bashrcor.zshrc):export OPENAI_API_KEY="sk-proj-xxxxxxxxxxxxxxxxxxxxxxxxxxxxxxxx" export ANTHROPIC_API_KEY="sk-ant-xxxxxxxxxxxxxxxxxxxxxxxxxxxxxxxx"Step 2: Initialize a New jcode Workspace
Navigate to an empty folder or your target repository and run the workspace initialization command. This tells jcode to parse the local layout and prepare an isolated runtime manifest:
mkdir my-agent-project cd my-agent-project jcode initThis command creates a hidden configuration workspace called
.jcode/containing a primary configuration file namedconfig.toml. Let's inspect and modify a standard setup configuration:
---# .jcode/config.toml [workspace] name = "my-agent-project" allowed_commands = ["cargo", "npm", "python", "git", "pytest", "go"] max_iterations = 15 [model] provider = "anthropic" default_model = "claude-3-5-sonnet-20241022" temperature = 0.2 max_tokens = 4096 [sandbox] isolate_network = false timeout_seconds = 45Building an Autonomous Programming Workflow
Now that your workspace is instantiated, let's walk through a real-world software maintenance scenario. We will instruct our jcode agent to write a complete Python utility module, write an associated test suit, run the validations, find bugs from execution outputs, and safely refactor the code automatically.
Step 1: Issue the Agent Task
We trigger the agent execution loop by supplying a clear, high-level engineering prompt using the
jcode runinstruction interface:jcode run "Create a robust Python rate limiter using a sliding window log algorithm. Include unit tests using pytest. Ensure it handles sub-millisecond timestamps gracefully."Step 2: Reviewing the Agent Autonomous Execution Trace
Once triggered, the jcode framework takes absolute control over the planning tree. Here is an approximation of what the terminal sequence tracks as the underlying Rust engine coordinates actions:
[INFO] Initializing agent environment... [INFO] Detected OS: Linux (Ubuntu 24.04), Package Manager: apt, Shell: bash [STEP 1/15] Planning task allocation tree... [TOOL CALL] Writing file: rate_limiter.py [TOOL CALL] Writing file: test_rate_limiter.py [STEP 2/15] Executing automated testing validation suite... [SHELL COMMAND] pytest test_rate_limiter.py [EXECUTION OUTPUT] ========================= FAILURES ========================= ____ test_sliding_window_log_edge_case _____________________ > assert limiter.allow_request("user_1") == False E AssertionError: assert True == False [STEP 3/15] Analyzing test failures. Reflection phase initiated... [INFO] Detected boundary edge condition flaw in window timestamps math. [TOOL CALL] Patching file: rate_limiter.py (Applying inline diff) [STEP 4/15] Re-executing testing suite... [SHELL COMMAND] pytest test_rate_limiter.py [EXECUTION OUTPUT] ==================== 4 passed in 0.08s ===================== [SUCCESS] Task fully resolved. Workspace state clean. Halting execution loop.Step 3: Examining the Generated Code Artifacts
Let's view the production code written completely by the jcode programming agent. Check the output of
rate_limiter.py:import time class SlidingWindowRateLimiter: def __init__(self, max_requests: int, window_size_seconds: float): self.max_requests = max_requests self.window_size_seconds = window_size_seconds self.user_logs = {} def allow_request(self, user_id: str) -> bool: current_time = time.time() if user_id not in self.user_logs: self.user_logs[user_id] = [] # Filter timestamps outside the active historical sliding window window_start = current_time - self.window_size_seconds self.user_logs[user_id] = [t for t in self.user_logs[user_id] if t > window_start] if len(self.user_logs[user_id]) < self.max_requests: self.user_logs[user_id].append(current_time) return True return FalseNext, inspect the corresponding automated validation suites written in
test_rate_limiter.py:import time import pytest from rate_limiter import SlidingWindowRateLimiter def test_rate_limiter_concurrency_allowance(): limiter = SlidingWindowRateLimiter
jcode: Building High-Performance Autonomous AI Coding Agents from Scratch
The landscape of AI-driven software development is shifting rapidly. While first-generation AI coding tools operated primarily as conversational completions or simple script generators, the community is moving decisively toward autonomous programming agents. These agents don't just suggest code; they plan, execute tests, refactor, and self-correct within a structured harness.
Emerging at the forefront of this shift in May 2026 is jcode, an open-source, Rust-based programming agent framework developed by creator
1jehuang. Rapidly climbing the GitHub Trending charts and capturing the attention of autonomous systems developers, jcode addresses a critical bottleneck in the agentic ecosystem: execution speed, structural reliability, and resource overhead. Written entirely in Rust, it provides a high-performance harness designed to run AI coding agents at scale without the typical latency and memory bloat associated with Python-heavy orchestration layers.In this comprehensive tutorial-style guide, we will break down what jcode is, analyze its internal architecture, compare it to existing frameworks, and walk through an end-to-end installation and configuration process to build your very first autonomous coding agent.
---Understanding the jcode Architecture
To build effective applications with jcode, it is essential to understand how it organizes the execution loop of an AI agent. Traditional agent frameworks rely on high-level scripting abstractions that introduce significant latency, making deep-tree search algorithms (like Monte Carlo Tree Search or complex reflection loops) painfully slow. jcode solves this by using a compiled Rust backend that exposes a highly structured execution harness.
The framework is divided into three primary layers:
- The Environment Layer (The Sandbox): This component manages the operating system context, available package managers, and shell environments. It isolates agent actions, preventing rogue scripts from damaging the host system while providing full feedback loops (stdout, stderr, exit codes) back to the agent.
- The Core Harness (Rust Engine): Written in Rust for maximum concurrency and memory safety, this engine manages agent state transitions, prompt token streaming pipelines, and workspace file parsing. It abstracts token budgets and tool call translations natively.
- The Agent Interface (Extensible Profiles): This layer allows developers to write custom planning algorithms, definition maps, and system instructions. It defines how the agent approaches a problem, splits tasks, and evaluates success.
Feature Comparison: jcode vs. Traditional Frameworks
Before diving into the implementation details, let's look at how jcode positions itself against traditional Python-based agent architectures and standard LLM orchestration environments.
---Feature / Metric jcode (1jehuang) Python-based Agent Frameworks Standard LLM Chat Hooks Core Language Rust Python Python / TypeScript Execution Speed Ultra-high (Compiled, Native Threading) Moderate (Interpreted, Async Overheads) Low (Network Dependent) Memory Management Strict compile-time safety, minimal footprint High runtime consumption, garbage collected Variable depending on wrapper Sandbox Isolation Native OS environment detection & mapping Requires heavy external Docker wrapper No native execution layer Primary Target Autonomous multi-turn software engineering General purpose task automation agents Single-turn text/code generation Prerequisites and Environment Verification
Before installing jcode, you need to ensure your machine meets the minimum system requirements for native compilation and execution. Because jcode evaluates code in real-time, having a stable environment with standard compilers is essential.
System Requirements:
- Operating System: macOS (Intel/Apple Silicon), Linux (Ubuntu 22.04+, Debian, Fedora), or Windows 11 (with PowerShell or WSL2).
- Toolchains: Rust Stable (1.75+ recommended) if building from source.
- Network: Active internet connection to pull model endpoints and fetch external crate dependencies.
Step-by-Step Installation Guide
jcode features an adaptive installer that detects your current operating system, available package managers, and active shell configurations. Select the installation track below that best matches your local development system.
Option A: macOS via Homebrew
If you are on macOS and use the Homebrew package manager, you can install the official tap maintained by 1jehuang directly via your terminal:
# Tap the jcode formula repository brew tap 1jehuang/jcode # Install the binary package brew install jcodeOption B: Linux or macOS via Shell Script
For standard Linux distributions or macOS environments without Homebrew, use the automated installation script. This pulls the latest compiled binary corresponding to your architecture:
curl -fsSL [https://raw.githubusercontent.com/1jehuang/jcode/main/scripts/install.sh](https://raw.githubusercontent.com/1jehuang/jcode/main/scripts/install.sh) | bashOption C: Windows via PowerShell
If you are running natively on a Windows host within a standard administrative PowerShell prompt, execute the following command to download and map the binaries:
irm [https://raw.githubusercontent.com/1jehuang/jcode/main/scripts/install.ps1](https://raw.githubusercontent.com/1jehuang/jcode/main/scripts/install.ps1) | iexOption D: Building From Source (Recommended for Contributors)
If you want to run the cutting-edge development branch or adapt the core Rust source code to custom enterprise parameters, clone the official GitHub repository and compile it locally:
# Clone the project repository git clone [https://github.com/1jehuang/jcode.git](https://github.com/1jehuang/jcode.git) cd jcode # Compile a highly optimized release binary using Cargo cargo build --release # Execute the local release install configuration script ./scripts/install_release.shVerify that your installation was successful by checking the current version of the harness:
---jcode --versionQuickstart: Configuring and Initializing Your Agent Workspace
With jcode successfully installed, the next stage is configuring your active LLM providers and preparing a localized project workspace where your programming agent can safely read, write, and test applications.
Step 1: Exporting LLM API Credentials
jcode acts as an execution harness that routes logic through state-of-the-art coding LLMs. You must supply your preferred model API keys as environment variables. Add these to your shell profile (e.g.,
.bashrcor.zshrc):export OPENAI_API_KEY="sk-proj-xxxxxxxxxxxxxxxxxxxxxxxxxxxxxxxx" export ANTHROPIC_API_KEY="sk-ant-xxxxxxxxxxxxxxxxxxxxxxxxxxxxxxxx"Step 2: Initialize a New jcode Workspace
Navigate to an empty folder or your target repository and run the workspace initialization command. This tells jcode to parse the local layout and prepare an isolated runtime manifest:
mkdir my-agent-project cd my-agent-project jcode initThis command creates a hidden configuration workspace called
.jcode/containing a primary configuration file namedconfig.toml. Let's inspect and modify a standard setup configuration:
---# .jcode/config.toml [workspace] name = "my-agent-project" allowed_commands = ["cargo", "npm", "python", "git", "pytest", "go"] max_iterations = 15 [model] provider = "anthropic" default_model = "claude-3-5-sonnet-20241022" temperature = 0.2 max_tokens = 4096 [sandbox] isolate_network = false timeout_seconds = 45Building an Autonomous Programming Workflow
Now that your workspace is instantiated, let's walk through a real-world software maintenance scenario. We will instruct our jcode agent to write a complete Python utility module, write an associated test suit, run the validations, find bugs from execution outputs, and safely refactor the code automatically.
Step 1: Issue the Agent Task
We trigger the agent execution loop by supplying a clear, high-level engineering prompt using the
jcode runinstruction interface:jcode run "Create a robust Python rate limiter using a sliding window log algorithm. Include unit tests using pytest. Ensure it handles sub-millisecond timestamps gracefully."Step 2: Reviewing the Agent Autonomous Execution Trace
Once triggered, the jcode framework takes absolute control over the planning tree. Here is an approximation of what the terminal sequence tracks as the underlying Rust engine coordinates actions:
[INFO] Initializing agent environment... [INFO] Detected OS: Linux (Ubuntu 24.04), Package Manager: apt, Shell: bash [STEP 1/15] Planning task allocation tree... [TOOL CALL] Writing file: rate_limiter.py [TOOL CALL] Writing file: test_rate_limiter.py [STEP 2/15] Executing automated testing validation suite... [SHELL COMMAND] pytest test_rate_limiter.py [EXECUTION OUTPUT] ========================= FAILURES ========================= ____ test_sliding_window_log_edge_case _____________________ > assert limiter.allow_request("user_1") == False E AssertionError: assert True == False [STEP 3/15] Analyzing test failures. Reflection phase initiated... [INFO] Detected boundary edge condition flaw in window timestamps math. [TOOL CALL] Patching file: rate_limiter.py (Applying inline diff) [STEP 4/15] Re-executing testing suite... [SHELL COMMAND] pytest test_rate_limiter.py [EXECUTION OUTPUT] ==================== 4 passed in 0.08s ===================== [SUCCESS] Task fully resolved. Workspace state clean. Halting execution loop.Step 3: Examining the Generated Code Artifacts
Let's view the production code written completely by the jcode programming agent. Check the output of
rate_limiter.py:import time class SlidingWindowRateLimiter: def __init__(self, max_requests: int, window_size_seconds: float): self.max_requests = max_requests self.window_size_seconds = window_size_seconds self.user_logs = {} def allow_request(self, user_id: str) -> bool: current_time = time.time() if user_id not in self.user_logs: self.user_logs[user_id] = [] # Filter timestamps outside the active historical sliding window window_start = current_time - self.window_size_seconds self.user_logs[user_id] = [t for t in self.user_logs[user_id] if t > window_start] if len(self.user_logs[user_id]) < self.max_requests: self.user_logs[user_id].append(current_time) return True return FalseNext, inspect the corresponding automated validation suites written in
test_rate_limiter.py:import time import pytest from rate_limiter import SlidingWindowRateLimiter def test_rate_limiter_concurrency_allowance(): limiter = SlidingWindowRateLimiter(max_requests=3, window_size_seconds=1.0) assert limiter.allow_
jcode: Building High-Performance Autonomous AI Coding Agents from Scratch
The landscape of AI-driven software development is shifting rapidly. While first-generation AI coding tools operated primarily as conversational completions or simple script generators, the community is moving decisively toward autonomous programming agents. These agents don't just suggest code; they plan, execute tests, refactor, and self-correct within a structured harness.
Emerging at the forefront of this shift in May 2026 is jcode, an open-source, Rust-based programming agent framework developed by creator
1jehuang. Rapidly climbing the GitHub Trending charts and capturing the attention of autonomous systems developers, jcode addresses a critical bottleneck in the agentic ecosystem: execution speed, structural reliability, and resource overhead. Written entirely in Rust, it provides a high-performance harness designed to run AI coding agents at scale without the typical latency and memory bloat associated with Python-heavy orchestration layers.In this comprehensive tutorial-style guide, we will break down what jcode is, analyze its internal architecture, compare it to existing frameworks, and walk through an end-to-end installation and configuration process to build your very first autonomous coding agent.
---Understanding the jcode Architecture
To build effective applications with jcode, it is essential to understand how it organizes the execution loop of an AI agent. Traditional agent frameworks rely on high-level scripting abstractions that introduce significant latency, making deep-tree search algorithms (like Monte Carlo Tree Search or complex reflection loops) painfully slow. jcode solves this by using a compiled Rust backend that exposes a highly structured execution harness.
The framework is divided into three primary layers:
- The Environment Layer (The Sandbox): This component manages the operating system context, available package managers, and shell environments. It isolates agent actions, preventing rogue scripts from damaging the host system while providing full feedback loops (stdout, stderr, exit codes) back to the agent.
- The Core Harness (Rust Engine): Written in Rust for maximum concurrency and memory safety, this engine manages agent state transitions, prompt token streaming pipelines, and workspace file parsing. It abstracts token budgets and tool call translations natively.
- The Agent Interface (Extensible Profiles): This layer allows developers to write custom planning algorithms, definition maps, and system instructions. It defines how the agent approaches a problem, splits tasks, and evaluates success.
Feature Comparison: jcode vs. Traditional Frameworks
Before diving into the implementation details, let's look at how jcode positions itself against traditional Python-based agent architectures and standard LLM orchestration environments.
---Feature / Metric jcode (1jehuang) Python-based Agent Frameworks Standard LLM Chat Hooks Core Language Rust Python Python / TypeScript Execution Speed Ultra-high (Compiled, Native Threading) Moderate (Interpreted, Async Overheads) Low (Network Dependent) Memory Management Strict compile-time safety, minimal footprint High runtime consumption, garbage collected Variable depending on wrapper Sandbox Isolation Native OS environment detection & mapping Requires heavy external Docker wrapper No native execution layer Primary Target Autonomous multi-turn software engineering General purpose task automation agents Single-turn text/code generation Prerequisites and Environment Verification
Before installing jcode, you need to ensure your machine meets the minimum system requirements for native compilation and execution. Because jcode evaluates code in real-time, having a stable environment with standard compilers is essential.
System Requirements:
- Operating System: macOS (Intel/Apple Silicon), Linux (Ubuntu 22.04+, Debian, Fedora), or Windows 11 (with PowerShell or WSL2).
- Toolchains: Rust Stable (1.75+ recommended) if building from source.
- Network: Active internet connection to pull model endpoints and fetch external crate dependencies.
Step-by-Step Installation Guide
jcode features an adaptive installer that detects your current operating system, available package managers, and active shell configurations. Select the installation track below that best matches your local development system.
Option A: macOS via Homebrew
If you are on macOS and use the Homebrew package manager, you can install the official tap maintained by 1jehuang directly via your terminal:
# Tap the jcode formula repository brew tap 1jehuang/jcode # Install the binary package brew install jcodeOption B: Linux or macOS via Shell Script
For standard Linux distributions or macOS environments without Homebrew, use the automated installation script. This pulls the latest compiled binary corresponding to your architecture:
curl -fsSL [https://raw.githubusercontent.com/1jehuang/jcode/main/scripts/install.sh](https://raw.githubusercontent.com/1jehuang/jcode/main/scripts/install.sh) | bashOption C: Windows via PowerShell
If you are running natively on a Windows host within a standard administrative PowerShell prompt, execute the following command to download and map the binaries:
irm [https://raw.githubusercontent.com/1jehuang/jcode/main/scripts/install.ps1](https://raw.githubusercontent.com/1jehuang/jcode/main/scripts/install.ps1) | iexOption D: Building From Source (Recommended for Contributors)
If you want to run the cutting-edge development branch or adapt the core Rust source code to custom enterprise parameters, clone the official GitHub repository and compile it locally:
# Clone the project repository git clone [https://github.com/1jehuang/jcode.git](https://github.com/1jehuang/jcode.git) cd jcode # Compile a highly optimized release binary using Cargo cargo build --release # Execute the local release install configuration script ./scripts/install_release.shVerify that your installation was successful by checking the current version of the harness:
---jcode --versionQuickstart: Configuring and Initializing Your Agent Workspace
With jcode successfully installed, the next stage is configuring your active LLM providers and preparing a localized project workspace where your programming agent can safely read, write, and test applications.
Step 1: Exporting LLM API Credentials
jcode acts as an execution harness that routes logic through state-of-the-art coding LLMs. You must supply your preferred model API keys as environment variables. Add these to your shell profile (e.g.,
.bashrcor.zshrc):export OPENAI_API_KEY="sk-proj-xxxxxxxxxxxxxxxxxxxxxxxxxxxxxxxx" export ANTHROPIC_API_KEY="sk-ant-xxxxxxxxxxxxxxxxxxxxxxxxxxxxxxxx"Step 2: Initialize a New jcode Workspace
Navigate to an empty folder or your target repository and run the workspace initialization command. This tells jcode to parse the local layout and prepare an isolated runtime manifest:
mkdir my-agent-project cd my-agent-project jcode initThis command creates a hidden configuration workspace called
.jcode/containing a primary configuration file namedconfig.toml. Let's inspect and modify a standard setup configuration:
---# .jcode/config.toml [workspace] name = "my-agent-project" allowed_commands = ["cargo", "npm", "python", "git", "pytest", "go"] max_iterations = 15 [model] provider = "anthropic" default_model = "claude-3-5-sonnet-20241022" temperature = 0.2 max_tokens = 4096 [sandbox] isolate_network = false timeout_seconds = 45Building an Autonomous Programming Workflow
Now that your workspace is instantiated, let's walk through a real-world software maintenance scenario. We will instruct our jcode agent to write a complete Python utility module, write an associated test suit, run the validations, find bugs from execution outputs, and safely refactor the code automatically.
Step 1: Issue the Agent Task
We trigger the agent execution loop by supplying a clear, high-level engineering prompt using the
jcode runinstruction interface:jcode run "Create a robust Python rate limiter using a sliding window log algorithm. Include unit tests using pytest. Ensure it handles sub-millisecond timestamps gracefully."Step 2: Reviewing the Agent Autonomous Execution Trace
Once triggered, the jcode framework takes absolute control over the planning tree. Here is an approximation of what the terminal sequence tracks as the underlying Rust engine coordinates actions:
[INFO] Initializing agent environment... [INFO] Detected OS: Linux (Ubuntu 24.04), Package Manager: apt, Shell: bash [STEP 1/15] Planning task allocation tree... [TOOL CALL] Writing file: rate_limiter.py [TOOL CALL] Writing file: test_rate_limiter.py [STEP 2/15] Executing automated testing validation suite... [SHELL COMMAND] pytest test_rate_limiter.py [EXECUTION OUTPUT] ========================= FAILURES ========================= ____ test_sliding_window_log_edge_case _____________________ > assert limiter.allow_request("user_1") == False E AssertionError: assert True == False [STEP 3/15] Analyzing test failures. Reflection phase initiated... [INFO] Detected boundary edge condition flaw in window timestamps math. [TOOL CALL] Patching file: rate_limiter.py (Applying inline diff) [STEP 4/15] Re-executing testing suite... [SHELL COMMAND] pytest test_rate_limiter.py [EXECUTION OUTPUT] ==================== 4 passed in 0.08s ===================== [SUCCESS] Task fully resolved. Workspace state clean. Halting execution loop.Step 3: Examining the Generated Code Artifacts
Let's view the production code written completely by the jcode programming agent. Check the output of
rate_limiter.py:import time class SlidingWindowRateLimiter: def __init__(self, max_requests: int, window_size_seconds: float): self.max_requests = max_requests self.window_size_seconds = window_size_seconds self.user_logs = {} def allow_request(self, user_id: str) -> bool: current_time = time.time() if user_id not in self.user_logs: self.user_logs[user_id] = [] # Filter timestamps outside the active historical sliding window window_start = current_time - self.window_size_seconds self.user_logs[user_id] = [t for t in self.user_logs[user_id] if t > window_start] if len(self.user_logs[user_id]) < self.max_requests: self.user_logs[user_id].append(current_time) return True return FalseNext, inspect the corresponding automated validation suites written in
test_rate_limiter.py:import time import pytest from rate_limiter import SlidingWindowRateLimiter def test_rate_limiter_concurrency_allowance(): limiter = SlidingWindowRateLimiter(max_requests=3, window_size_seconds=1.0) assert limiter.allow_request("dev_user") is True assert limiter.allow_request("dev_user") is True
jcode: Building High-Performance Autonomous AI Coding Agents from Scratch
The landscape of AI-driven software development is shifting rapidly. While first-generation AI coding tools operated primarily as conversational completions or simple script generators, the community is moving decisively toward autonomous programming agents. These agents don't just suggest code; they plan, execute tests, refactor, and self-correct within a structured harness.
Emerging at the forefront of this shift in May 2026 is jcode, an open-source, Rust-based programming agent framework developed by creator
1jehuang. Rapidly climbing the GitHub Trending charts and capturing the attention of autonomous systems developers, jcode addresses a critical bottleneck in the agentic ecosystem: execution speed, structural reliability, and resource overhead. Written entirely in Rust, it provides a high-performance harness designed to run AI coding agents at scale without the typical latency and memory bloat associated with Python-heavy orchestration layers.In this comprehensive tutorial-style guide, we will break down what jcode is, analyze its internal architecture, compare it to existing frameworks, and walk through an end-to-end installation and configuration process to build your very first autonomous coding agent.
---Understanding the jcode Architecture
To build effective applications with jcode, it is essential to understand how it organizes the execution loop of an AI agent. Traditional agent frameworks rely on high-level scripting abstractions that introduce significant latency, making deep-tree search algorithms (like Monte Carlo Tree Search or complex reflection loops) painfully slow. jcode solves this by using a compiled Rust backend that exposes a highly structured execution harness.
The framework is divided into three primary layers:
- The Environment Layer (The Sandbox): This component manages the operating system context, available package managers, and shell environments. It isolates agent actions, preventing rogue scripts from damaging the host system while providing full feedback loops (stdout, stderr, exit codes) back to the agent.
- The Core Harness (Rust Engine): Written in Rust for maximum concurrency and memory safety, this engine manages agent state transitions, prompt token streaming pipelines, and workspace file parsing. It abstracts token budgets and tool call translations natively.
- The Agent Interface (Extensible Profiles): This layer allows developers to write custom planning algorithms, definition maps, and system instructions. It defines how the agent approaches a problem, splits tasks, and evaluates success.
Feature Comparison: jcode vs. Traditional Frameworks
Before diving into the implementation details, let's look at how jcode positions itself against traditional Python-based agent architectures and standard LLM orchestration environments.
---Feature / Metric jcode (1jehuang) Python-based Agent Frameworks Standard LLM Chat Hooks Core Language Rust Python Python / TypeScript Execution Speed Ultra-high (Compiled, Native Threading) Moderate (Interpreted, Async Overheads) Low (Network Dependent) Memory Management Strict compile-time safety, minimal footprint High runtime consumption, garbage collected Variable depending on wrapper Sandbox Isolation Native OS environment detection & mapping Requires heavy external Docker wrapper No native execution layer Primary Target Autonomous multi-turn software engineering General purpose task automation agents Single-turn text/code generation Prerequisites and Environment Verification
Before installing jcode, you need to ensure your machine meets the minimum system requirements for native compilation and execution. Because jcode evaluates code in real-time, having a stable environment with standard compilers is essential.
System Requirements:
- Operating System: macOS (Intel/Apple Silicon), Linux (Ubuntu 22.04+, Debian, Fedora), or Windows 11 (with PowerShell or WSL2).
- Toolchains: Rust Stable (1.75+ recommended) if building from source.
- Network: Active internet connection to pull model endpoints and fetch external crate dependencies.
Step-by-Step Installation Guide
jcode features an adaptive installer that detects your current operating system, available package managers, and active shell configurations. Select the installation track below that best matches your local development system.
Option A: macOS via Homebrew
If you are on macOS and use the Homebrew package manager, you can install the official tap maintained by 1jehuang directly via your terminal:
# Tap the jcode formula repository brew tap 1jehuang/jcode # Install the binary package brew install jcodeOption B: Linux or macOS via Shell Script
For standard Linux distributions or macOS environments without Homebrew, use the automated installation script. This pulls the latest compiled binary corresponding to your architecture:
curl -fsSL [https://raw.githubusercontent.com/1jehuang/jcode/main/scripts/install.sh](https://raw.githubusercontent.com/1jehuang/jcode/main/scripts/install.sh) | bashOption C: Windows via PowerShell
If you are running natively on a Windows host within a standard administrative PowerShell prompt, execute the following command to download and map the binaries:
irm [https://raw.githubusercontent.com/1jehuang/jcode/main/scripts/install.ps1](https://raw.githubusercontent.com/1jehuang/jcode/main/scripts/install.ps1) | iexOption D: Building From Source (Recommended for Contributors)
If you want to run the cutting-edge development branch or adapt the core Rust source code to custom enterprise parameters, clone the official GitHub repository and compile it locally:
# Clone the project repository git clone [https://github.com/1jehuang/jcode.git](https://github.com/1jehuang/jcode.git) cd jcode # Compile a highly optimized release binary using Cargo cargo build --release # Execute the local release install configuration script ./scripts/install_release.shVerify that your installation was successful by checking the current version of the harness:
---jcode --versionQuickstart: Configuring and Initializing Your Agent Workspace
With jcode successfully installed, the next stage is configuring your active LLM providers and preparing a localized project workspace where your programming agent can safely read, write, and test applications.
Step 1: Exporting LLM API Credentials
jcode acts as an execution harness that routes logic through state-of-the-art coding LLMs. You must supply your preferred model API keys as environment variables. Add these to your shell profile (e.g.,
.bashrcor.zshrc):export OPENAI_API_KEY="sk-proj-xxxxxxxxxxxxxxxxxxxxxxxxxxxxxxxx" export ANTHROPIC_API_KEY="sk-ant-xxxxxxxxxxxxxxxxxxxxxxxxxxxxxxxx"Step 2: Initialize a New jcode Workspace
Navigate to an empty folder or your target repository and run the workspace initialization command. This tells jcode to parse the local layout and prepare an isolated runtime manifest:
mkdir my-agent-project cd my-agent-project jcode initThis command creates a hidden configuration workspace called
.jcode/containing a primary configuration file namedconfig.toml. Let's inspect and modify a standard setup configuration:
---# .jcode/config.toml [workspace] name = "my-agent-project" allowed_commands = ["cargo", "npm", "python", "git", "pytest", "go"] max_iterations = 15 [model] provider = "anthropic" default_model = "claude-3-5-sonnet-20241022" temperature = 0.2 max_tokens = 4096 [sandbox] isolate_network = false timeout_seconds = 45Building an Autonomous Programming Workflow
Now that your workspace is instantiated, let's walk through a real-world software maintenance scenario. We will instruct our jcode agent to write a complete Python utility module, write an associated test suit, run the validations, find bugs from execution outputs, and safely refactor the code automatically.
Step 1: Issue the Agent Task
We trigger the agent execution loop by supplying a clear, high-level engineering prompt using the
jcode runinstruction interface:jcode run "Create a robust Python rate limiter using a sliding window log algorithm. Include unit tests using pytest. Ensure it handles sub-millisecond timestamps gracefully."Step 2: Reviewing the Agent Autonomous Execution Trace
Once triggered, the jcode framework takes absolute control over the planning tree. Here is an approximation of what the terminal sequence tracks as the underlying Rust engine coordinates actions:
[INFO] Initializing agent environment... [INFO] Detected OS: Linux (Ubuntu 24.04), Package Manager: apt, Shell: bash [STEP 1/15] Planning task allocation tree... [TOOL CALL] Writing file: rate_limiter.py [TOOL CALL] Writing file: test_rate_limiter.py [STEP 2/15] Executing automated testing validation suite... [SHELL COMMAND] pytest test_rate_limiter.py [EXECUTION OUTPUT] ========================= FAILURES ========================= ____ test_sliding_window_log_edge_case _____________________ > assert limiter.allow_request("user_1") == False E AssertionError: assert True == False [STEP 3/15] Analyzing test failures. Reflection phase initiated... [INFO] Detected boundary edge condition flaw in window timestamps math. [TOOL CALL] Patching file: rate_limiter.py (Applying inline diff) [STEP 4/15] Re-executing testing suite... [SHELL COMMAND] pytest test_rate_limiter.py [EXECUTION OUTPUT] ==================== 4 passed in 0.08s ===================== [SUCCESS] Task fully resolved. Workspace state clean. Halting execution loop.Step 3: Examining the Generated Code Artifacts
Let's view the production code written completely by the jcode programming agent. Check the output of
rate_limiter.py:import time class SlidingWindowRateLimiter: def __init__(self, max_requests: int, window_size_seconds: float): self.max_requests = max_requests self.window_size_seconds = window_size_seconds self.user_logs = {} def allow_request(self, user_id: str) -> bool: current_time = time.time() if user_id not in self.user_logs: self.user_logs[user_id] = [] # Filter timestamps outside the active historical sliding window window_start = current_time - self.window_size_seconds self.user_logs[user_id] = [t for t in self.user_logs[user_id] if t > window_start] if len(self.user_logs[user_id]) < self.max_requests: self.user_logs[user_id].append(current_time) return True return FalseNext, inspect the corresponding automated validation suites written in
test_rate_limiter.py:import time import pytest from rate_limiter import SlidingWindowRateLimiter def test_rate_limiter_concurrency_allowance(): limiter = SlidingWindowRateLimiter(max_requests=3, window_size_seconds=1.0) assert limiter.allow_request("dev_user") is True assert limiter.allow_request("dev_user") is True assert limiter.allow_request("dev_user") is True assert limiter.allow_request("dev_user") is False
jcode: Building High-Performance Autonomous AI Coding Agents from Scratch
The landscape of AI-driven software development is shifting rapidly. While first-generation AI coding tools operated primarily as conversational completions or simple script generators, the community is moving decisively toward autonomous programming agents. These agents don't just suggest code; they plan, execute tests, refactor, and self-correct within a structured harness.
Emerging at the forefront of this shift in May 2026 is jcode, an open-source, Rust-based programming agent framework developed by creator
1jehuang. Rapidly climbing the GitHub Trending charts and capturing the attention of autonomous systems developers, jcode addresses a critical bottleneck in the agentic ecosystem: execution speed, structural reliability, and resource overhead. Written entirely in Rust, it provides a high-performance harness designed to run AI coding agents at scale without the typical latency and memory bloat associated with Python-heavy orchestration layers.In this comprehensive tutorial-style guide, we will break down what jcode is, analyze its internal architecture, compare it to existing frameworks, and walk through an end-to-end installation and configuration process to build your very first autonomous coding agent.
---Understanding the jcode Architecture
To build effective applications with jcode, it is essential to understand how it organizes the execution loop of an AI agent. Traditional agent frameworks rely on high-level scripting abstractions that introduce significant latency, making deep-tree search algorithms (like Monte Carlo Tree Search or complex reflection loops) painfully slow. jcode solves this by using a compiled Rust backend that exposes a highly structured execution harness.
The framework is divided into three primary layers:
- The Environment Layer (The Sandbox): This component manages the operating system context, available package managers, and shell environments. It isolates agent actions, preventing rogue scripts from damaging the host system while providing full feedback loops (stdout, stderr, exit codes) back to the agent.
- The Core Harness (Rust Engine): Written in Rust for maximum concurrency and memory safety, this engine manages agent state transitions, prompt token streaming pipelines, and workspace file parsing. It abstracts token budgets and tool call translations natively.
- The Agent Interface (Extensible Profiles): This layer allows developers to write custom planning algorithms, definition maps, and system instructions. It defines how the agent approaches a problem, splits tasks, and evaluates success.
Feature Comparison: jcode vs. Traditional Frameworks
Before diving into the implementation details, let's look at how jcode positions itself against traditional Python-based agent architectures and standard LLM orchestration environments.
---Feature / Metric jcode (1jehuang) Python-based Agent Frameworks Standard LLM Chat Hooks Core Language Rust Python Python / TypeScript Execution Speed Ultra-high (Compiled, Native Threading) Moderate (Interpreted, Async Overheads) Low (Network Dependent) Memory Management Strict compile-time safety, minimal footprint High runtime consumption, garbage collected Variable depending on wrapper Sandbox Isolation Native OS environment detection & mapping Requires heavy external Docker wrapper No native execution layer Primary Target Autonomous multi-turn software engineering General purpose task automation agents Single-turn text/code generation Prerequisites and Environment Verification
Before installing jcode, you need to ensure your machine meets the minimum system requirements for native compilation and execution. Because jcode evaluates code in real-time, having a stable environment with standard compilers is essential.
System Requirements:
- Operating System: macOS (Intel/Apple Silicon), Linux (Ubuntu 22.04+, Debian, Fedora), or Windows 11 (with PowerShell or WSL2).
- Toolchains: Rust Stable (1.75+ recommended) if building from source.
- Network: Active internet connection to pull model endpoints and fetch external crate dependencies.
Step-by-Step Installation Guide
jcode features an adaptive installer that detects your current operating system, available package managers, and active shell configurations. Select the installation track below that best matches your local development system.
Option A: macOS via Homebrew
If you are on macOS and use the Homebrew package manager, you can install the official tap maintained by 1jehuang directly via your terminal:
# Tap the jcode formula repository brew tap 1jehuang/jcode # Install the binary package brew install jcodeOption B: Linux or macOS via Shell Script
For standard Linux distributions or macOS environments without Homebrew, use the automated installation script. This pulls the latest compiled binary corresponding to your architecture:
curl -fsSL [https://raw.githubusercontent.com/1jehuang/jcode/main/scripts/install.sh](https://raw.githubusercontent.com/1jehuang/jcode/main/scripts/install.sh) | bashOption C: Windows via PowerShell
If you are running natively on a Windows host within a standard administrative PowerShell prompt, execute the following command to download and map the binaries:
irm [https://raw.githubusercontent.com/1jehuang/jcode/main/scripts/install.ps1](https://raw.githubusercontent.com/1jehuang/jcode/main/scripts/install.ps1) | iexOption D: Building From Source (Recommended for Contributors)
If you want to run the cutting-edge development branch or adapt the core Rust source code to custom enterprise parameters, clone the official GitHub repository and compile it locally:
# Clone the project repository git clone [https://github.com/1jehuang/jcode.git](https://github.com/1jehuang/jcode.git) cd jcode # Compile a highly optimized release binary using Cargo cargo build --release # Execute the local release install configuration script ./scripts/install_release.shVerify that your installation was successful by checking the current version of the harness:
---jcode --versionQuickstart: Configuring and Initializing Your Agent Workspace
With jcode successfully installed, the next stage is configuring your active LLM providers and preparing a localized project workspace where your programming agent can safely read, write, and test applications.
Step 1: Exporting LLM API Credentials
jcode acts as an execution harness that routes logic through state-of-the-art coding LLMs. You must supply your preferred model API keys as environment variables. Add these to your shell profile (e.g.,
.bashrcor.zshrc):export OPENAI_API_KEY="sk-proj-xxxxxxxxxxxxxxxxxxxxxxxxxxxxxxxx" export ANTHROPIC_API_KEY="sk-ant-xxxxxxxxxxxxxxxxxxxxxxxxxxxxxxxx"Step 2: Initialize a New jcode Workspace
Navigate to an empty folder or your target repository and run the workspace initialization command. This tells jcode to parse the local layout and prepare an isolated runtime manifest:
mkdir my-agent-project cd my-agent-project jcode initThis command creates a hidden configuration workspace called
.jcode/containing a primary configuration file namedconfig.toml. Let's inspect and modify a standard setup configuration:
---# .jcode/config.toml [workspace] name = "my-agent-project" allowed_commands = ["cargo", "npm", "python", "git", "pytest", "go"] max_iterations = 15 [model] provider = "anthropic" default_model = "claude-3-5-sonnet-20241022" temperature = 0.2 max_tokens = 4096 [sandbox] isolate_network = false timeout_seconds = 45Building an Autonomous Programming Workflow
Now that your workspace is instantiated, let's walk through a real-world software maintenance scenario. We will instruct our jcode agent to write a complete Python utility module, write an associated test suit, run the validations, find bugs from execution outputs, and safely refactor the code automatically.
Step 1: Issue the Agent Task
We trigger the agent execution loop by supplying a clear, high-level engineering prompt using the
jcode runinstruction interface:jcode run "Create a robust Python rate limiter using a sliding window log algorithm. Include unit tests using pytest. Ensure it handles sub-millisecond timestamps gracefully."Step 2: Reviewing the Agent Autonomous Execution Trace
Once triggered, the jcode framework takes absolute control over the planning tree. Here is an approximation of what the terminal sequence tracks as the underlying Rust engine coordinates actions:
[INFO] Initializing agent environment... [INFO] Detected OS: Linux (Ubuntu 24.04), Package Manager: apt, Shell: bash [STEP 1/15] Planning task allocation tree... [TOOL CALL] Writing file: rate_limiter.py [TOOL CALL] Writing file: test_rate_limiter.py [STEP 2/15] Executing automated testing validation suite... [SHELL COMMAND] pytest test_rate_limiter.py [EXECUTION OUTPUT] ========================= FAILURES ========================= ____ test_sliding_window_log_edge_case _____________________ > assert limiter.allow_request("user_1") == False E AssertionError: assert True == False [STEP 3/15] Analyzing test failures. Reflection phase initiated... [INFO] Detected boundary edge condition flaw in window timestamps math. [TOOL CALL] Patching file: rate_limiter.py (Applying inline diff) [STEP 4/15] Re-executing testing suite... [SHELL COMMAND] pytest test_rate_limiter.py [EXECUTION OUTPUT] ==================== 4 passed in 0.08s ===================== [SUCCESS] Task fully resolved. Workspace state clean. Halting execution loop.Step 3: Examining the Generated Code Artifacts
Let's view the production code written completely by the jcode programming agent. Check the output of
rate_limiter.py:import time class SlidingWindowRateLimiter: def __init__(self, max_requests: int, window_size_seconds: float): self.max_requests = max_requests self.window_size_seconds = window_size_seconds self.user_logs = {} def allow_request(self, user_id: str) -> bool: current_time = time.time() if user_id not in self.user_logs: self.user_logs[user_id] = [] # Filter timestamps outside the active historical sliding window window_start = current_time - self.window_size_seconds self.user_logs[user_id] = [t for t in self.user_logs[user_id] if t > window_start] if len(self.user_logs[user_id]) < self.max_requests: self.user_logs[user_id].append(current_time) return True return FalseNext, inspect the corresponding automated validation suites written in
test_rate_limiter.py:import time import pytest from rate_limiter import SlidingWindowRateLimiter def test_rate_limiter_concurrency_allowance(): limiter = SlidingWindowRateLimiter(max_requests=3, window_size_seconds=1.0) assert limiter.allow_request("dev_user") is True assert limiter.allow_request("dev_user") is True assert limiter.allow_request("dev_user") is True assert limiter.allow_request("dev_user") is False # Throttled def test_rate_limiter_window_expiry(): limiter = Sliding
jcode: Building High-Performance Autonomous AI Coding Agents from Scratch
The landscape of AI-driven software development is shifting rapidly. While first-generation AI coding tools operated primarily as conversational completions or simple script generators, the community is moving decisively toward autonomous programming agents. These agents don't just suggest code; they plan, execute tests, refactor, and self-correct within a structured harness.
Emerging at the forefront of this shift in May 2026 is jcode, an open-source, Rust-based programming agent framework developed by creator
1jehuang. Rapidly climbing the GitHub Trending charts and capturing the attention of autonomous systems developers, jcode addresses a critical bottleneck in the agentic ecosystem: execution speed, structural reliability, and resource overhead. Written entirely in Rust, it provides a high-performance harness designed to run AI coding agents at scale without the typical latency and memory bloat associated with Python-heavy orchestration layers.In this comprehensive tutorial-style guide, we will break down what jcode is, analyze its internal architecture, compare it to existing frameworks, and walk through an end-to-end installation and configuration process to build your very first autonomous coding agent.
---Understanding the jcode Architecture
To build effective applications with jcode, it is essential to understand how it organizes the execution loop of an AI agent. Traditional agent frameworks rely on high-level scripting abstractions that introduce significant latency, making deep-tree search algorithms (like Monte Carlo Tree Search or complex reflection loops) painfully slow. jcode solves this by using a compiled Rust backend that exposes a highly structured execution harness.
The framework is divided into three primary layers:
- The Environment Layer (The Sandbox): This component manages the operating system context, available package managers, and shell environments. It isolates agent actions, preventing rogue scripts from damaging the host system while providing full feedback loops (stdout, stderr, exit codes) back to the agent.
- The Core Harness (Rust Engine): Written in Rust for maximum concurrency and memory safety, this engine manages agent state transitions, prompt token streaming pipelines, and workspace file parsing. It abstracts token budgets and tool call translations natively.
- The Agent Interface (Extensible Profiles): This layer allows developers to write custom planning algorithms, definition maps, and system instructions. It defines how the agent approaches a problem, splits tasks, and evaluates success.
Feature Comparison: jcode vs. Traditional Frameworks
Before diving into the implementation details, let's look at how jcode positions itself against traditional Python-based agent architectures and standard LLM orchestration environments.
---Feature / Metric jcode (1jehuang) Python-based Agent Frameworks Standard LLM Chat Hooks Core Language Rust Python Python / TypeScript Execution Speed Ultra-high (Compiled, Native Threading) Moderate (Interpreted, Async Overheads) Low (Network Dependent) Memory Management Strict compile-time safety, minimal footprint High runtime consumption, garbage collected Variable depending on wrapper Sandbox Isolation Native OS environment detection & mapping Requires heavy external Docker wrapper No native execution layer Primary Target Autonomous multi-turn software engineering General purpose task automation agents Single-turn text/code generation Prerequisites and Environment Verification
Before installing jcode, you need to ensure your machine meets the minimum system requirements for native compilation and execution. Because jcode evaluates code in real-time, having a stable environment with standard compilers is essential.
System Requirements:
- Operating System: macOS (Intel/Apple Silicon), Linux (Ubuntu 22.04+, Debian, Fedora), or Windows 11 (with PowerShell or WSL2).
- Toolchains: Rust Stable (1.75+ recommended) if building from source.
- Network: Active internet connection to pull model endpoints and fetch external crate dependencies.
Step-by-Step Installation Guide
jcode features an adaptive installer that detects your current operating system, available package managers, and active shell configurations. Select the installation track below that best matches your local development system.
Option A: macOS via Homebrew
If you are on macOS and use the Homebrew package manager, you can install the official tap maintained by 1jehuang directly via your terminal:
# Tap the jcode formula repository brew tap 1jehuang/jcode # Install the binary package brew install jcodeOption B: Linux or macOS via Shell Script
For standard Linux distributions or macOS environments without Homebrew, use the automated installation script. This pulls the latest compiled binary corresponding to your architecture:
curl -fsSL [https://raw.githubusercontent.com/1jehuang/jcode/main/scripts/install.sh](https://raw.githubusercontent.com/1jehuang/jcode/main/scripts/install.sh) | bashOption C: Windows via PowerShell
If you are running natively on a Windows host within a standard administrative PowerShell prompt, execute the following command to download and map the binaries:
irm [https://raw.githubusercontent.com/1jehuang/jcode/main/scripts/install.ps1](https://raw.githubusercontent.com/1jehuang/jcode/main/scripts/install.ps1) | iexOption D: Building From Source (Recommended for Contributors)
If you want to run the cutting-edge development branch or adapt the core Rust source code to custom enterprise parameters, clone the official GitHub repository and compile it locally:
# Clone the project repository git clone [https://github.com/1jehuang/jcode.git](https://github.com/1jehuang/jcode.git) cd jcode # Compile a highly optimized release binary using Cargo cargo build --release # Execute the local release install configuration script ./scripts/install_release.shVerify that your installation was successful by checking the current version of the harness:
---jcode --versionQuickstart: Configuring and Initializing Your Agent Workspace
With jcode successfully installed, the next stage is configuring your active LLM providers and preparing a localized project workspace where your programming agent can safely read, write, and test applications.
Step 1: Exporting LLM API Credentials
jcode acts as an execution harness that routes logic through state-of-the-art coding LLMs. You must supply your preferred model API keys as environment variables. Add these to your shell profile (e.g.,
.bashrcor.zshrc):export OPENAI_API_KEY="sk-proj-xxxxxxxxxxxxxxxxxxxxxxxxxxxxxxxx" export ANTHROPIC_API_KEY="sk-ant-xxxxxxxxxxxxxxxxxxxxxxxxxxxxxxxx"Step 2: Initialize a New jcode Workspace
Navigate to an empty folder or your target repository and run the workspace initialization command. This tells jcode to parse the local layout and prepare an isolated runtime manifest:
mkdir my-agent-project cd my-agent-project jcode initThis command creates a hidden configuration workspace called
.jcode/containing a primary configuration file namedconfig.toml. Let's inspect and modify a standard setup configuration:
---# .jcode/config.toml [workspace] name = "my-agent-project" allowed_commands = ["cargo", "npm", "python", "git", "pytest", "go"] max_iterations = 15 [model] provider = "anthropic" default_model = "claude-3-5-sonnet-20241022" temperature = 0.2 max_tokens = 4096 [sandbox] isolate_network = false timeout_seconds = 45Building an Autonomous Programming Workflow
Now that your workspace is instantiated, let's walk through a real-world software maintenance scenario. We will instruct our jcode agent to write a complete Python utility module, write an associated test suit, run the validations, find bugs from execution outputs, and safely refactor the code automatically.
Step 1: Issue the Agent Task
We trigger the agent execution loop by supplying a clear, high-level engineering prompt using the
jcode runinstruction interface:jcode run "Create a robust Python rate limiter using a sliding window log algorithm. Include unit tests using pytest. Ensure it handles sub-millisecond timestamps gracefully."Step 2: Reviewing the Agent Autonomous Execution Trace
Once triggered, the jcode framework takes absolute control over the planning tree. Here is an approximation of what the terminal sequence tracks as the underlying Rust engine coordinates actions:
[INFO] Initializing agent environment... [INFO] Detected OS: Linux (Ubuntu 24.04), Package Manager: apt, Shell: bash [STEP 1/15] Planning task allocation tree... [TOOL CALL] Writing file: rate_limiter.py [TOOL CALL] Writing file: test_rate_limiter.py [STEP 2/15] Executing automated testing validation suite... [SHELL COMMAND] pytest test_rate_limiter.py [EXECUTION OUTPUT] ========================= FAILURES ========================= ____ test_sliding_window_log_edge_case _____________________ > assert limiter.allow_request("user_1") == False E AssertionError: assert True == False [STEP 3/15] Analyzing test failures. Reflection phase initiated... [INFO] Detected boundary edge condition flaw in window timestamps math. [TOOL CALL] Patching file: rate_limiter.py (Applying inline diff) [STEP 4/15] Re-executing testing suite... [SHELL COMMAND] pytest test_rate_limiter.py [EXECUTION OUTPUT] ==================== 4 passed in 0.08s ===================== [SUCCESS] Task fully resolved. Workspace state clean. Halting execution loop.Step 3: Examining the Generated Code Artifacts
Let's view the production code written completely by the jcode programming agent. Check the output of
rate_limiter.py:import time class SlidingWindowRateLimiter: def __init__(self, max_requests: int, window_size_seconds: float): self.max_requests = max_requests self.window_size_seconds = window_size_seconds self.user_logs = {} def allow_request(self, user_id: str) -> bool: current_time = time.time() if user_id not in self.user_logs: self.user_logs[user_id] = [] # Filter timestamps outside the active historical sliding window window_start = current_time - self.window_size_seconds self.user_logs[user_id] = [t for t in self.user_logs[user_id] if t > window_start] if len(self.user_logs[user_id]) < self.max_requests: self.user_logs[user_id].append(current_time) return True return FalseNext, inspect the corresponding automated validation suites written in
test_rate_limiter.py:import time import pytest from rate_limiter import SlidingWindowRateLimiter def test_rate_limiter_concurrency_allowance(): limiter = SlidingWindowRateLimiter(max_requests=3, window_size_seconds=1.0) assert limiter.allow_request("dev_user") is True assert limiter.allow_request("dev_user") is True assert limiter.allow_request("dev_user") is True assert limiter.allow_request("dev_user") is False # Throttled def test_rate_limiter_window_expiry(): limiter = SlidingWindowRateLimiter(max_requests=1, window_size_seconds=0.5) assert limiter.allow_
jcode: Building High-Performance Autonomous AI Coding Agents from Scratch
The landscape of AI-driven software development is shifting rapidly. While first-generation AI coding tools operated primarily as conversational completions or simple script generators, the community is moving decisively toward autonomous programming agents. These agents don't just suggest code; they plan, execute tests, refactor, and self-correct within a structured harness.
Emerging at the forefront of this shift in May 2026 is jcode, an open-source, Rust-based programming agent framework developed by creator
1jehuang. Rapidly climbing the GitHub Trending charts and capturing the attention of autonomous systems developers, jcode addresses a critical bottleneck in the agentic ecosystem: execution speed, structural reliability, and resource overhead. Written entirely in Rust, it provides a high-performance harness designed to run AI coding agents at scale without the typical latency and memory bloat associated with Python-heavy orchestration layers.In this comprehensive tutorial-style guide, we will break down what jcode is, analyze its internal architecture, compare it to existing frameworks, and walk through an end-to-end installation and configuration process to build your very first autonomous coding agent.
---Understanding the jcode Architecture
To build effective applications with jcode, it is essential to understand how it organizes the execution loop of an AI agent. Traditional agent frameworks rely on high-level scripting abstractions that introduce significant latency, making deep-tree search algorithms (like Monte Carlo Tree Search or complex reflection loops) painfully slow. jcode solves this by using a compiled Rust backend that exposes a highly structured execution harness.
The framework is divided into three primary layers:
- The Environment Layer (The Sandbox): This component manages the operating system context, available package managers, and shell environments. It isolates agent actions, preventing rogue scripts from damaging the host system while providing full feedback loops (stdout, stderr, exit codes) back to the agent.
- The Core Harness (Rust Engine): Written in Rust for maximum concurrency and memory safety, this engine manages agent state transitions, prompt token streaming pipelines, and workspace file parsing. It abstracts token budgets and tool call translations natively.
- The Agent Interface (Extensible Profiles): This layer allows developers to write custom planning algorithms, definition maps, and system instructions. It defines how the agent approaches a problem, splits tasks, and evaluates success.
Feature Comparison: jcode vs. Traditional Frameworks
Before diving into the implementation details, let's look at how jcode positions itself against traditional Python-based agent architectures and standard LLM orchestration environments.
---Feature / Metric jcode (1jehuang) Python-based Agent Frameworks Standard LLM Chat Hooks Core Language Rust Python Python / TypeScript Execution Speed Ultra-high (Compiled, Native Threading) Moderate (Interpreted, Async Overheads) Low (Network Dependent) Memory Management Strict compile-time safety, minimal footprint High runtime consumption, garbage collected Variable depending on wrapper Sandbox Isolation Native OS environment detection & mapping Requires heavy external Docker wrapper No native execution layer Primary Target Autonomous multi-turn software engineering General purpose task automation agents Single-turn text/code generation Prerequisites and Environment Verification
Before installing jcode, you need to ensure your machine meets the minimum system requirements for native compilation and execution. Because jcode evaluates code in real-time, having a stable environment with standard compilers is essential.
System Requirements:
- Operating System: macOS (Intel/Apple Silicon), Linux (Ubuntu 22.04+, Debian, Fedora), or Windows 11 (with PowerShell or WSL2).
- Toolchains: Rust Stable (1.75+ recommended) if building from source.
- Network: Active internet connection to pull model endpoints and fetch external crate dependencies.
Step-by-Step Installation Guide
jcode features an adaptive installer that detects your current operating system, available package managers, and active shell configurations. Select the installation track below that best matches your local development system.
Option A: macOS via Homebrew
If you are on macOS and use the Homebrew package manager, you can install the official tap maintained by 1jehuang directly via your terminal:
# Tap the jcode formula repository brew tap 1jehuang/jcode # Install the binary package brew install jcodeOption B: Linux or macOS via Shell Script
For standard Linux distributions or macOS environments without Homebrew, use the automated installation script. This pulls the latest compiled binary corresponding to your architecture:
curl -fsSL [https://raw.githubusercontent.com/1jehuang/jcode/main/scripts/install.sh](https://raw.githubusercontent.com/1jehuang/jcode/main/scripts/install.sh) | bashOption C: Windows via PowerShell
If you are running natively on a Windows host within a standard administrative PowerShell prompt, execute the following command to download and map the binaries:
irm [https://raw.githubusercontent.com/1jehuang/jcode/main/scripts/install.ps1](https://raw.githubusercontent.com/1jehuang/jcode/main/scripts/install.ps1) | iexOption D: Building From Source (Recommended for Contributors)
If you want to run the cutting-edge development branch or adapt the core Rust source code to custom enterprise parameters, clone the official GitHub repository and compile it locally:
# Clone the project repository git clone [https://github.com/1jehuang/jcode.git](https://github.com/1jehuang/jcode.git) cd jcode # Compile a highly optimized release binary using Cargo cargo build --release # Execute the local release install configuration script ./scripts/install_release.shVerify that your installation was successful by checking the current version of the harness:
---jcode --versionQuickstart: Configuring and Initializing Your Agent Workspace
With jcode successfully installed, the next stage is configuring your active LLM providers and preparing a localized project workspace where your programming agent can safely read, write, and test applications.
Step 1: Exporting LLM API Credentials
jcode acts as an execution harness that routes logic through state-of-the-art coding LLMs. You must supply your preferred model API keys as environment variables. Add these to your shell profile (e.g.,
.bashrcor.zshrc):export OPENAI_API_KEY="sk-proj-xxxxxxxxxxxxxxxxxxxxxxxxxxxxxxxx" export ANTHROPIC_API_KEY="sk-ant-xxxxxxxxxxxxxxxxxxxxxxxxxxxxxxxx"Step 2: Initialize a New jcode Workspace
Navigate to an empty folder or your target repository and run the workspace initialization command. This tells jcode to parse the local layout and prepare an isolated runtime manifest:
mkdir my-agent-project cd my-agent-project jcode initThis command creates a hidden configuration workspace called
.jcode/containing a primary configuration file namedconfig.toml. Let's inspect and modify a standard setup configuration:
---# .jcode/config.toml [workspace] name = "my-agent-project" allowed_commands = ["cargo", "npm", "python", "git", "pytest", "go"] max_iterations = 15 [model] provider = "anthropic" default_model = "claude-3-5-sonnet-20241022" temperature = 0.2 max_tokens = 4096 [sandbox] isolate_network = false timeout_seconds = 45Building an Autonomous Programming Workflow
Now that your workspace is instantiated, let's walk through a real-world software maintenance scenario. We will instruct our jcode agent to write a complete Python utility module, write an associated test suit, run the validations, find bugs from execution outputs, and safely refactor the code automatically.
Step 1: Issue the Agent Task
We trigger the agent execution loop by supplying a clear, high-level engineering prompt using the
jcode runinstruction interface:jcode run "Create a robust Python rate limiter using a sliding window log algorithm. Include unit tests using pytest. Ensure it handles sub-millisecond timestamps gracefully."Step 2: Reviewing the Agent Autonomous Execution Trace
Once triggered, the jcode framework takes absolute control over the planning tree. Here is an approximation of what the terminal sequence tracks as the underlying Rust engine coordinates actions:
[INFO] Initializing agent environment... [INFO] Detected OS: Linux (Ubuntu 24.04), Package Manager: apt, Shell: bash [STEP 1/15] Planning task allocation tree... [TOOL CALL] Writing file: rate_limiter.py [TOOL CALL] Writing file: test_rate_limiter.py [STEP 2/15] Executing automated testing validation suite... [SHELL COMMAND] pytest test_rate_limiter.py [EXECUTION OUTPUT] ========================= FAILURES ========================= ____ test_sliding_window_log_edge_case _____________________ > assert limiter.allow_request("user_1") == False E AssertionError: assert True == False [STEP 3/15] Analyzing test failures. Reflection phase initiated... [INFO] Detected boundary edge condition flaw in window timestamps math. [TOOL CALL] Patching file: rate_limiter.py (Applying inline diff) [STEP 4/15] Re-executing testing suite... [SHELL COMMAND] pytest test_rate_limiter.py [EXECUTION OUTPUT] ==================== 4 passed in 0.08s ===================== [SUCCESS] Task fully resolved. Workspace state clean. Halting execution loop.Step 3: Examining the Generated Code Artifacts
Let's view the production code written completely by the jcode programming agent. Check the output of
rate_limiter.py:import time class SlidingWindowRateLimiter: def __init__(self, max_requests: int, window_size_seconds: float): self.max_requests = max_requests self.window_size_seconds = window_size_seconds self.user_logs = {} def allow_request(self, user_id: str) -> bool: current_time = time.time() if user_id not in self.user_logs: self.user_logs[user_id] = [] # Filter timestamps outside the active historical sliding window window_start = current_time - self.window_size_seconds self.user_logs[user_id] = [t for t in self.user_logs[user_id] if t > window_start] if len(self.user_logs[user_id]) < self.max_requests: self.user_logs[user_id].append(current_time) return True return FalseNext, inspect the corresponding automated validation suites written in
test_rate_limiter.py:import time import pytest from rate_limiter import SlidingWindowRateLimiter def test_rate_limiter_concurrency_allowance(): limiter = SlidingWindowRateLimiter(max_requests=3, window_size_seconds=1.0) assert limiter.allow_request("dev_user") is True assert limiter.allow_request("dev_user") is True assert limiter.allow_request("dev_user") is True assert limiter.allow_request("dev_user") is False # Throttled def test_rate_limiter_window_expiry(): limiter = SlidingWindowRateLimiter(max_requests=1, window_size_seconds=0.5) assert limiter.allow_request("admin_user") is True time.sleep(0.6) assert limiter.allow_
jcode: Building High-Performance Autonomous AI Coding Agents from Scratch
The landscape of AI-driven software development is shifting rapidly. While first-generation AI coding tools operated primarily as conversational completions or simple script generators, the community is moving decisively toward autonomous programming agents. These agents don't just suggest code; they plan, execute tests, refactor, and self-correct within a structured harness.
Emerging at the forefront of this shift in May 2026 is jcode, an open-source, Rust-based programming agent framework developed by creator
1jehuang. Rapidly climbing the GitHub Trending charts and capturing the attention of autonomous systems developers, jcode addresses a critical bottleneck in the agentic ecosystem: execution speed, structural reliability, and resource overhead. Written entirely in Rust, it provides a high-performance harness designed to run AI coding agents at scale without the typical latency and memory bloat associated with Python-heavy orchestration layers.In this comprehensive tutorial-style guide, we will break down what jcode is, analyze its internal architecture, compare it to existing frameworks, and walk through an end-to-end installation and configuration process to build your very first autonomous coding agent.
---Understanding the jcode Architecture
To build effective applications with jcode, it is essential to understand how it organizes the execution loop of an AI agent. Traditional agent frameworks rely on high-level scripting abstractions that introduce significant latency, making deep-tree search algorithms (like Monte Carlo Tree Search or complex reflection loops) painfully slow. jcode solves this by using a compiled Rust backend that exposes a highly structured execution harness.
The framework is divided into three primary layers:
- The Environment Layer (The Sandbox): This component manages the operating system context, available package managers, and shell environments. It isolates agent actions, preventing rogue scripts from damaging the host system while providing full feedback loops (stdout, stderr, exit codes) back to the agent.
- The Core Harness (Rust Engine): Written in Rust for maximum concurrency and memory safety, this engine manages agent state transitions, prompt token streaming pipelines, and workspace file parsing. It abstracts token budgets and tool call translations natively.
- The Agent Interface (Extensible Profiles): This layer allows developers to write custom planning algorithms, definition maps, and system instructions. It defines how the agent approaches a problem, splits tasks, and evaluates success.
Feature Comparison: jcode vs. Traditional Frameworks
Before diving into the implementation details, let's look at how jcode positions itself against traditional Python-based agent architectures and standard LLM orchestration environments.
---Feature / Metric jcode (1jehuang) Python-based Agent Frameworks Standard LLM Chat Hooks Core Language Rust Python Python / TypeScript Execution Speed Ultra-high (Compiled, Native Threading) Moderate (Interpreted, Async Overheads) Low (Network Dependent) Memory Management Strict compile-time safety, minimal footprint High runtime consumption, garbage collected Variable depending on wrapper Sandbox Isolation Native OS environment detection & mapping Requires heavy external Docker wrapper No native execution layer Primary Target Autonomous multi-turn software engineering General purpose task automation agents Single-turn text/code generation Prerequisites and Environment Verification
Before installing jcode, you need to ensure your machine meets the minimum system requirements for native compilation and execution. Because jcode evaluates code in real-time, having a stable environment with standard compilers is essential.
System Requirements:
- Operating System: macOS (Intel/Apple Silicon), Linux (Ubuntu 22.04+, Debian, Fedora), or Windows 11 (with PowerShell or WSL2).
- Toolchains: Rust Stable (1.75+ recommended) if building from source.
- Network: Active internet connection to pull model endpoints and fetch external crate dependencies.
Step-by-Step Installation Guide
jcode features an adaptive installer that detects your current operating system, available package managers, and active shell configurations. Select the installation track below that best matches your local development system.
Option A: macOS via Homebrew
If you are on macOS and use the Homebrew package manager, you can install the official tap maintained by 1jehuang directly via your terminal:
# Tap the jcode formula repository brew tap 1jehuang/jcode # Install the binary package brew install jcodeOption B: Linux or macOS via Shell Script
For standard Linux distributions or macOS environments without Homebrew, use the automated installation script. This pulls the latest compiled binary corresponding to your architecture:
curl -fsSL [https://raw.githubusercontent.com/1jehuang/jcode/main/scripts/install.sh](https://raw.githubusercontent.com/1jehuang/jcode/main/scripts/install.sh) | bashOption C: Windows via PowerShell
If you are running natively on a Windows host within a standard administrative PowerShell prompt, execute the following command to download and map the binaries:
irm [https://raw.githubusercontent.com/1jehuang/jcode/main/scripts/install.ps1](https://raw.githubusercontent.com/1jehuang/jcode/main/scripts/install.ps1) | iexOption D: Building From Source (Recommended for Contributors)
If you want to run the cutting-edge development branch or adapt the core Rust source code to custom enterprise parameters, clone the official GitHub repository and compile it locally:
# Clone the project repository git clone [https://github.com/1jehuang/jcode.git](https://github.com/1jehuang/jcode.git) cd jcode # Compile a highly optimized release binary using Cargo cargo build --release # Execute the local release install configuration script ./scripts/install_release.shVerify that your installation was successful by checking the current version of the harness:
---jcode --versionQuickstart: Configuring and Initializing Your Agent Workspace
With jcode successfully installed, the next stage is configuring your active LLM providers and preparing a localized project workspace where your programming agent can safely read, write, and test applications.
Step 1: Exporting LLM API Credentials
jcode acts as an execution harness that routes logic through state-of-the-art coding LLMs. You must supply your preferred model API keys as environment variables. Add these to your shell profile (e.g.,
.bashrcor.zshrc):export OPENAI_API_KEY="sk-proj-xxxxxxxxxxxxxxxxxxxxxxxxxxxxxxxx" export ANTHROPIC_API_KEY="sk-ant-xxxxxxxxxxxxxxxxxxxxxxxxxxxxxxxx"Step 2: Initialize a New jcode Workspace
Navigate to an empty folder or your target repository and run the workspace initialization command. This tells jcode to parse the local layout and prepare an isolated runtime manifest:
mkdir my-agent-project cd my-agent-project jcode initThis command creates a hidden configuration workspace called
.jcode/containing a primary configuration file namedconfig.toml. Let's inspect and modify a standard setup configuration:
---# .jcode/config.toml [workspace] name = "my-agent-project" allowed_commands = ["cargo", "npm", "python", "git", "pytest", "go"] max_iterations = 15 [model] provider = "anthropic" default_model = "claude-3-5-sonnet-20241022" temperature = 0.2 max_tokens = 4096 [sandbox] isolate_network = false timeout_seconds = 45Building an Autonomous Programming Workflow
Now that your workspace is instantiated, let's walk through a real-world software maintenance scenario. We will instruct our jcode agent to write a complete Python utility module, write an associated test suit, run the validations, find bugs from execution outputs, and safely refactor the code automatically.
Step 1: Issue the Agent Task
We trigger the agent execution loop by supplying a clear, high-level engineering prompt using the
jcode runinstruction interface:jcode run "Create a robust Python rate limiter using a sliding window log algorithm. Include unit tests using pytest. Ensure it handles sub-millisecond timestamps gracefully."Step 2: Reviewing the Agent Autonomous Execution Trace
Once triggered, the jcode framework takes absolute control over the planning tree. Here is an approximation of what the terminal sequence tracks as the underlying Rust engine coordinates actions:
[INFO] Initializing agent environment... [INFO] Detected OS: Linux (Ubuntu 24.04), Package Manager: apt, Shell: bash [STEP 1/15] Planning task allocation tree... [TOOL CALL] Writing file: rate_limiter.py [TOOL CALL] Writing file: test_rate_limiter.py [STEP 2/15] Executing automated testing validation suite... [SHELL COMMAND] pytest test_rate_limiter.py [EXECUTION OUTPUT] ========================= FAILURES ========================= ____ test_sliding_window_log_edge_case _____________________ > assert limiter.allow_request("user_1") == False E AssertionError: assert True == False [STEP 3/15] Analyzing test failures. Reflection phase initiated... [INFO] Detected boundary edge condition flaw in window timestamps math. [TOOL CALL] Patching file: rate_limiter.py (Applying inline diff) [STEP 4/15] Re-executing testing suite... [SHELL COMMAND] pytest test_rate_limiter.py [EXECUTION OUTPUT] ==================== 4 passed in 0.08s ===================== [SUCCESS] Task fully resolved. Workspace state clean. Halting execution loop.Step 3: Examining the Generated Code Artifacts
Let's view the production code written completely by the jcode programming agent. Check the output of
rate_limiter.py:import time class SlidingWindowRateLimiter: def __init__(self, max_requests: int, window_size_seconds: float): self.max_requests = max_requests self.window_size_seconds = window_size_seconds self.user_logs = {} def allow_request(self, user_id: str) -> bool: current_time = time.time() if user_id not in self.user_logs: self.user_logs[user_id] = [] # Filter timestamps outside the active historical sliding window window_start = current_time - self.window_size_seconds self.user_logs[user_id] = [t for t in self.user_logs[user_id] if t > window_start] if len(self.user_logs[user_id]) < self.max_requests: self.user_logs[user_id].append(current_time) return True return FalseNext, inspect the corresponding automated validation suites written in
test_rate_limiter.py:
---import time import pytest from rate_limiter import SlidingWindowRateLimiter def test_rate_limiter_concurrency_allowance(): limiter = SlidingWindowRateLimiter(max_requests=3, window_size_seconds=1.0) assert limiter.allow_request("dev_user") is True assert limiter.allow_request("dev_user") is True assert limiter.allow_request("dev_user") is True assert limiter.allow_request("dev_user") is False # Throttled def test_rate_limiter_window_expiry(): limiter = SlidingWindowRateLimiter(max_requests=1, window_size_seconds=0.5) assert limiter.allow_request("admin_user") is True time.sleep(0.6) assert limiter.allow_request("admin_user") is True # RefreshedAdvanced Configuration:
jcode: Building High-Performance Autonomous AI Coding Agents from Scratch
The landscape of AI-driven software development is shifting rapidly. While first-generation AI coding tools operated primarily as conversational completions or simple script generators, the community is moving decisively toward autonomous programming agents. These agents don't just suggest code; they plan, execute tests, refactor, and self-correct within a structured harness.
Emerging at the forefront of this shift in May 2026 is jcode, an open-source, Rust-based programming agent framework developed by creator
1jehuang. Rapidly climbing the GitHub Trending charts and capturing the attention of autonomous systems developers, jcode addresses a critical bottleneck in the agentic ecosystem: execution speed, structural reliability, and resource overhead. Written entirely in Rust, it provides a high-performance harness designed to run AI coding agents at scale without the typical latency and memory bloat associated with Python-heavy orchestration layers.In this comprehensive tutorial-style guide, we will break down what jcode is, analyze its internal architecture, compare it to existing frameworks, and walk through an end-to-end installation and configuration process to build your very first autonomous coding agent.
---Understanding the jcode Architecture
To build effective applications with jcode, it is essential to understand how it organizes the execution loop of an AI agent. Traditional agent frameworks rely on high-level scripting abstractions that introduce significant latency, making deep-tree search algorithms (like Monte Carlo Tree Search or complex reflection loops) painfully slow. jcode solves this by using a compiled Rust backend that exposes a highly structured execution harness.
The framework is divided into three primary layers:
- The Environment Layer (The Sandbox): This component manages the operating system context, available package managers, and shell environments. It isolates agent actions, preventing rogue scripts from damaging the host system while providing full feedback loops (stdout, stderr, exit codes) back to the agent.
- The Core Harness (Rust Engine): Written in Rust for maximum concurrency and memory safety, this engine manages agent state transitions, prompt token streaming pipelines, and workspace file parsing. It abstracts token budgets and tool call translations natively.
- The Agent Interface (Extensible Profiles): This layer allows developers to write custom planning algorithms, definition maps, and system instructions. It defines how the agent approaches a problem, splits tasks, and evaluates success.
Feature Comparison: jcode vs. Traditional Frameworks
Before diving into the implementation details, let's look at how jcode positions itself against traditional Python-based agent architectures and standard LLM orchestration environments.
---Feature / Metric jcode (1jehuang) Python-based Agent Frameworks Standard LLM Chat Hooks Core Language Rust Python Python / TypeScript Execution Speed Ultra-high (Compiled, Native Threading) Moderate (Interpreted, Async Overheads) Low (Network Dependent) Memory Management Strict compile-time safety, minimal footprint High runtime consumption, garbage collected Variable depending on wrapper Sandbox Isolation Native OS environment detection & mapping Requires heavy external Docker wrapper No native execution layer Primary Target Autonomous multi-turn software engineering General purpose task automation agents Single-turn text/code generation Prerequisites and Environment Verification
Before installing jcode, you need to ensure your machine meets the minimum system requirements for native compilation and execution. Because jcode evaluates code in real-time, having a stable environment with standard compilers is essential.
System Requirements:
- Operating System: macOS (Intel/Apple Silicon), Linux (Ubuntu 22.04+, Debian, Fedora), or Windows 11 (with PowerShell or WSL2).
- Toolchains: Rust Stable (1.75+ recommended) if building from source.
- Network: Active internet connection to pull model endpoints and fetch external crate dependencies.
Step-by-Step Installation Guide
jcode features an adaptive installer that detects your current operating system, available package managers, and active shell configurations. Select the installation track below that best matches your local development system.
Option A: macOS via Homebrew
If you are on macOS and use the Homebrew package manager, you can install the official tap maintained by 1jehuang directly via your terminal:
# Tap the jcode formula repository brew tap 1jehuang/jcode # Install the binary package brew install jcodeOption B: Linux or macOS via Shell Script
For standard Linux distributions or macOS environments without Homebrew, use the automated installation script. This pulls the latest compiled binary corresponding to your architecture:
curl -fsSL [https://raw.githubusercontent.com/1jehuang/jcode/main/scripts/install.sh](https://raw.githubusercontent.com/1jehuang/jcode/main/scripts/install.sh) | bashOption C: Windows via PowerShell
If you are running natively on a Windows host within a standard administrative PowerShell prompt, execute the following command to download and map the binaries:
irm [https://raw.githubusercontent.com/1jehuang/jcode/main/scripts/install.ps1](https://raw.githubusercontent.com/1jehuang/jcode/main/scripts/install.ps1) | iexOption D: Building From Source (Recommended for Contributors)
If you want to run the cutting-edge development branch or adapt the core Rust source code to custom enterprise parameters, clone the official GitHub repository and compile it locally:
# Clone the project repository git clone [https://github.com/1jehuang/jcode.git](https://github.com/1jehuang/jcode.git) cd jcode # Compile a highly optimized release binary using Cargo cargo build --release # Execute the local release install configuration script ./scripts/install_release.shVerify that your installation was successful by checking the current version of the harness:
---jcode --versionQuickstart: Configuring and Initializing Your Agent Workspace
With jcode successfully installed, the next stage is configuring your active LLM providers and preparing a localized project workspace where your programming agent can safely read, write, and test applications.
Step 1: Exporting LLM API Credentials
jcode acts as an execution harness that routes logic through state-of-the-art coding LLMs. You must supply your preferred model API keys as environment variables. Add these to your shell profile (e.g.,
.bashrcor.zshrc):export OPENAI_API_KEY="sk-proj-xxxxxxxxxxxxxxxxxxxxxxxxxxxxxxxx" export ANTHROPIC_API_KEY="sk-ant-xxxxxxxxxxxxxxxxxxxxxxxxxxxxxxxx"Step 2: Initialize a New jcode Workspace
Navigate to an empty folder or your target repository and run the workspace initialization command. This tells jcode to parse the local layout and prepare an isolated runtime manifest:
mkdir my-agent-project cd my-agent-project jcode initThis command creates a hidden configuration workspace called
.jcode/containing a primary configuration file namedconfig.toml. Let's inspect and modify a standard setup configuration:
---# .jcode/config.toml [workspace] name = "my-agent-project" allowed_commands = ["cargo", "npm", "python", "git", "pytest", "go"] max_iterations = 15 [model] provider = "anthropic" default_model = "claude-3-5-sonnet-20241022" temperature = 0.2 max_tokens = 4096 [sandbox] isolate_network = false timeout_seconds = 45Building an Autonomous Programming Workflow
Now that your workspace is instantiated, let's walk through a real-world software maintenance scenario. We will instruct our jcode agent to write a complete Python utility module, write an associated test suit, run the validations, find bugs from execution outputs, and safely refactor the code automatically.
Step 1: Issue the Agent Task
We trigger the agent execution loop by supplying a clear, high-level engineering prompt using the
jcode runinstruction interface:jcode run "Create a robust Python rate limiter using a sliding window log algorithm. Include unit tests using pytest. Ensure it handles sub-millisecond timestamps gracefully."Step 2: Reviewing the Agent Autonomous Execution Trace
Once triggered, the jcode framework takes absolute control over the planning tree. Here is an approximation of what the terminal sequence tracks as the underlying Rust engine coordinates actions:
[INFO] Initializing agent environment... [INFO] Detected OS: Linux (Ubuntu 24.04), Package Manager: apt, Shell: bash [STEP 1/15] Planning task allocation tree... [TOOL CALL] Writing file: rate_limiter.py [TOOL CALL] Writing file: test_rate_limiter.py [STEP 2/15] Executing automated testing validation suite... [SHELL COMMAND] pytest test_rate_limiter.py [EXECUTION OUTPUT] ========================= FAILURES ========================= ____ test_sliding_window_log_edge_case _____________________ > assert limiter.allow_request("user_1") == False E AssertionError: assert True == False [STEP 3/15] Analyzing test failures. Reflection phase initiated... [INFO] Detected boundary edge condition flaw in window timestamps math. [TOOL CALL] Patching file: rate_limiter.py (Applying inline diff) [STEP 4/15] Re-executing testing suite... [SHELL COMMAND] pytest test_rate_limiter.py [EXECUTION OUTPUT] ==================== 4 passed in 0.08s ===================== [SUCCESS] Task fully resolved. Workspace state clean. Halting execution loop.Step 3: Examining the Generated Code Artifacts
Let's view the production code written completely by the jcode programming agent. Check the output of
rate_limiter.py:import time class SlidingWindowRateLimiter: def __init__(self, max_requests: int, window_size_seconds: float): self.max_requests = max_requests self.window_size_seconds = window_size_seconds self.user_logs = {} def allow_request(self, user_id: str) -> bool: current_time = time.time() if user_id not in self.user_logs: self.user_logs[user_id] = [] # Filter timestamps outside the active historical sliding window window_start = current_time - self.window_size_seconds self.user_logs[user_id] = [t for t in self.user_logs[user_id] if t > window_start] if len(self.user_logs[user_id]) < self.max_requests: self.user_logs[user_id].append(current_time) return True return FalseNext, inspect the corresponding automated validation suites written in
test_rate_limiter.py:
---import time import pytest from rate_limiter import SlidingWindowRateLimiter def test_rate_limiter_concurrency_allowance(): limiter = SlidingWindowRateLimiter(max_requests=3, window_size_seconds=1.0) assert limiter.allow_request("dev_user") is True assert limiter.allow_request("dev_user") is True assert limiter.allow_request("dev_user") is True assert limiter.allow_request("dev_user") is False # Throttled def test_rate_limiter_window_expiry(): limiter = SlidingWindowRateLimiter(max_requests=1, window_size_seconds=0.5) assert limiter.allow_request("admin_user") is True time.sleep(0.6) assert limiter.allow_request("admin_user") is True # RefreshedAdvanced Configuration: Creating Custom Agentic Rulesets
For large engineering groups or complex codebases, you may want to enforce strict coding
jcode: Building High-Performance Autonomous AI Coding Agents from Scratch
The landscape of AI-driven software development is shifting rapidly. While first-generation AI coding tools operated primarily as conversational completions or simple script generators, the community is moving decisively toward autonomous programming agents. These agents don't just suggest code; they plan, execute tests, refactor, and self-correct within a structured harness.
Emerging at the forefront of this shift in May 2026 is jcode, an open-source, Rust-based programming agent framework developed by creator
1jehuang. Rapidly climbing the GitHub Trending charts and capturing the attention of autonomous systems developers, jcode addresses a critical bottleneck in the agentic ecosystem: execution speed, structural reliability, and resource overhead. Written entirely in Rust, it provides a high-performance harness designed to run AI coding agents at scale without the typical latency and memory bloat associated with Python-heavy orchestration layers.In this comprehensive tutorial-style guide, we will break down what jcode is, analyze its internal architecture, compare it to existing frameworks, and walk through an end-to-end installation and configuration process to build your very first autonomous coding agent.
---Understanding the jcode Architecture
To build effective applications with jcode, it is essential to understand how it organizes the execution loop of an AI agent. Traditional agent frameworks rely on high-level scripting abstractions that introduce significant latency, making deep-tree search algorithms (like Monte Carlo Tree Search or complex reflection loops) painfully slow. jcode solves this by using a compiled Rust backend that exposes a highly structured execution harness.
The framework is divided into three primary layers:
- The Environment Layer (The Sandbox): This component manages the operating system context, available package managers, and shell environments. It isolates agent actions, preventing rogue scripts from damaging the host system while providing full feedback loops (stdout, stderr, exit codes) back to the agent.
- The Core Harness (Rust Engine): Written in Rust for maximum concurrency and memory safety, this engine manages agent state transitions, prompt token streaming pipelines, and workspace file parsing. It abstracts token budgets and tool call translations natively.
- The Agent Interface (Extensible Profiles): This layer allows developers to write custom planning algorithms, definition maps, and system instructions. It defines how the agent approaches a problem, splits tasks, and evaluates success.
Feature Comparison: jcode vs. Traditional Frameworks
Before diving into the implementation details, let's look at how jcode positions itself against traditional Python-based agent architectures and standard LLM orchestration environments.
---Feature / Metric jcode (1jehuang) Python-based Agent Frameworks Standard LLM Chat Hooks Core Language Rust Python Python / TypeScript Execution Speed Ultra-high (Compiled, Native Threading) Moderate (Interpreted, Async Overheads) Low (Network Dependent) Memory Management Strict compile-time safety, minimal footprint High runtime consumption, garbage collected Variable depending on wrapper Sandbox Isolation Native OS environment detection & mapping Requires heavy external Docker wrapper No native execution layer Primary Target Autonomous multi-turn software engineering General purpose task automation agents Single-turn text/code generation Prerequisites and Environment Verification
Before installing jcode, you need to ensure your machine meets the minimum system requirements for native compilation and execution. Because jcode evaluates code in real-time, having a stable environment with standard compilers is essential.
System Requirements:
- Operating System: macOS (Intel/Apple Silicon), Linux (Ubuntu 22.04+, Debian, Fedora), or Windows 11 (with PowerShell or WSL2).
- Toolchains: Rust Stable (1.75+ recommended) if building from source.
- Network: Active internet connection to pull model endpoints and fetch external crate dependencies.
Step-by-Step Installation Guide
jcode features an adaptive installer that detects your current operating system, available package managers, and active shell configurations. Select the installation track below that best matches your local development system.
Option A: macOS via Homebrew
If you are on macOS and use the Homebrew package manager, you can install the official tap maintained by 1jehuang directly via your terminal:
# Tap the jcode formula repository brew tap 1jehuang/jcode # Install the binary package brew install jcodeOption B: Linux or macOS via Shell Script
For standard Linux distributions or macOS environments without Homebrew, use the automated installation script. This pulls the latest compiled binary corresponding to your architecture:
curl -fsSL [https://raw.githubusercontent.com/1jehuang/jcode/main/scripts/install.sh](https://raw.githubusercontent.com/1jehuang/jcode/main/scripts/install.sh) | bashOption C: Windows via PowerShell
If you are running natively on a Windows host within a standard administrative PowerShell prompt, execute the following command to download and map the binaries:
irm [https://raw.githubusercontent.com/1jehuang/jcode/main/scripts/install.ps1](https://raw.githubusercontent.com/1jehuang/jcode/main/scripts/install.ps1) | iexOption D: Building From Source (Recommended for Contributors)
If you want to run the cutting-edge development branch or adapt the core Rust source code to custom enterprise parameters, clone the official GitHub repository and compile it locally:
# Clone the project repository git clone [https://github.com/1jehuang/jcode.git](https://github.com/1jehuang/jcode.git) cd jcode # Compile a highly optimized release binary using Cargo cargo build --release # Execute the local release install configuration script ./scripts/install_release.shVerify that your installation was successful by checking the current version of the harness:
---jcode --versionQuickstart: Configuring and Initializing Your Agent Workspace
With jcode successfully installed, the next stage is configuring your active LLM providers and preparing a localized project workspace where your programming agent can safely read, write, and test applications.
Step 1: Exporting LLM API Credentials
jcode acts as an execution harness that routes logic through state-of-the-art coding LLMs. You must supply your preferred model API keys as environment variables. Add these to your shell profile (e.g.,
.bashrcor.zshrc):export OPENAI_API_KEY="sk-proj-xxxxxxxxxxxxxxxxxxxxxxxxxxxxxxxx" export ANTHROPIC_API_KEY="sk-ant-xxxxxxxxxxxxxxxxxxxxxxxxxxxxxxxx"Step 2: Initialize a New jcode Workspace
Navigate to an empty folder or your target repository and run the workspace initialization command. This tells jcode to parse the local layout and prepare an isolated runtime manifest:
mkdir my-agent-project cd my-agent-project jcode initThis command creates a hidden configuration workspace called
.jcode/containing a primary configuration file namedconfig.toml. Let's inspect and modify a standard setup configuration:
---# .jcode/config.toml [workspace] name = "my-agent-project" allowed_commands = ["cargo", "npm", "python", "git", "pytest", "go"] max_iterations = 15 [model] provider = "anthropic" default_model = "claude-3-5-sonnet-20241022" temperature = 0.2 max_tokens = 4096 [sandbox] isolate_network = false timeout_seconds = 45Building an Autonomous Programming Workflow
Now that your workspace is instantiated, let's walk through a real-world software maintenance scenario. We will instruct our jcode agent to write a complete Python utility module, write an associated test suit, run the validations, find bugs from execution outputs, and safely refactor the code automatically.
Step 1: Issue the Agent Task
We trigger the agent execution loop by supplying a clear, high-level engineering prompt using the
jcode runinstruction interface:jcode run "Create a robust Python rate limiter using a sliding window log algorithm. Include unit tests using pytest. Ensure it handles sub-millisecond timestamps gracefully."Step 2: Reviewing the Agent Autonomous Execution Trace
Once triggered, the jcode framework takes absolute control over the planning tree. Here is an approximation of what the terminal sequence tracks as the underlying Rust engine coordinates actions:
[INFO] Initializing agent environment... [INFO] Detected OS: Linux (Ubuntu 24.04), Package Manager: apt, Shell: bash [STEP 1/15] Planning task allocation tree... [TOOL CALL] Writing file: rate_limiter.py [TOOL CALL] Writing file: test_rate_limiter.py [STEP 2/15] Executing automated testing validation suite... [SHELL COMMAND] pytest test_rate_limiter.py [EXECUTION OUTPUT] ========================= FAILURES ========================= ____ test_sliding_window_log_edge_case _____________________ > assert limiter.allow_request("user_1") == False E AssertionError: assert True == False [STEP 3/15] Analyzing test failures. Reflection phase initiated... [INFO] Detected boundary edge condition flaw in window timestamps math. [TOOL CALL] Patching file: rate_limiter.py (Applying inline diff) [STEP 4/15] Re-executing testing suite... [SHELL COMMAND] pytest test_rate_limiter.py [EXECUTION OUTPUT] ==================== 4 passed in 0.08s ===================== [SUCCESS] Task fully resolved. Workspace state clean. Halting execution loop.Step 3: Examining the Generated Code Artifacts
Let's view the production code written completely by the jcode programming agent. Check the output of
rate_limiter.py:import time class SlidingWindowRateLimiter: def __init__(self, max_requests: int, window_size_seconds: float): self.max_requests = max_requests self.window_size_seconds = window_size_seconds self.user_logs = {} def allow_request(self, user_id: str) -> bool: current_time = time.time() if user_id not in self.user_logs: self.user_logs[user_id] = [] # Filter timestamps outside the active historical sliding window window_start = current_time - self.window_size_seconds self.user_logs[user_id] = [t for t in self.user_logs[user_id] if t > window_start] if len(self.user_logs[user_id]) < self.max_requests: self.user_logs[user_id].append(current_time) return True return FalseNext, inspect the corresponding automated validation suites written in
test_rate_limiter.py:
---import time import pytest from rate_limiter import SlidingWindowRateLimiter def test_rate_limiter_concurrency_allowance(): limiter = SlidingWindowRateLimiter(max_requests=3, window_size_seconds=1.0) assert limiter.allow_request("dev_user") is True assert limiter.allow_request("dev_user") is True assert limiter.allow_request("dev_user") is True assert limiter.allow_request("dev_user") is False # Throttled def test_rate_limiter_window_expiry(): limiter = SlidingWindowRateLimiter(max_requests=1, window_size_seconds=0.5) assert limiter.allow_request("admin_user") is True time.sleep(0.6) assert limiter.allow_request("admin_user") is True # RefreshedAdvanced Configuration: Creating Custom Agentic Rulesets
For large engineering groups or complex codebases, you may want to enforce strict coding policies, guardrails, or dependency behaviors. jcode supports local rule binding through systemic definition markdown assets. Create a file called
.
jcode: Building High-Performance Autonomous AI Coding Agents from Scratch
The landscape of AI-driven software development is shifting rapidly. While first-generation AI coding tools operated primarily as conversational completions or simple script generators, the community is moving decisively toward autonomous programming agents. These agents don't just suggest code; they plan, execute tests, refactor, and self-correct within a structured harness.
Emerging at the forefront of this shift in May 2026 is jcode, an open-source, Rust-based programming agent framework developed by creator
1jehuang. Rapidly climbing the GitHub Trending charts and capturing the attention of autonomous systems developers, jcode addresses a critical bottleneck in the agentic ecosystem: execution speed, structural reliability, and resource overhead. Written entirely in Rust, it provides a high-performance harness designed to run AI coding agents at scale without the typical latency and memory bloat associated with Python-heavy orchestration layers.In this comprehensive tutorial-style guide, we will break down what jcode is, analyze its internal architecture, compare it to existing frameworks, and walk through an end-to-end installation and configuration process to build your very first autonomous coding agent.
---Understanding the jcode Architecture
To build effective applications with jcode, it is essential to understand how it organizes the execution loop of an AI agent. Traditional agent frameworks rely on high-level scripting abstractions that introduce significant latency, making deep-tree search algorithms (like Monte Carlo Tree Search or complex reflection loops) painfully slow. jcode solves this by using a compiled Rust backend that exposes a highly structured execution harness.
The framework is divided into three primary layers:
- The Environment Layer (The Sandbox): This component manages the operating system context, available package managers, and shell environments. It isolates agent actions, preventing rogue scripts from damaging the host system while providing full feedback loops (stdout, stderr, exit codes) back to the agent.
- The Core Harness (Rust Engine): Written in Rust for maximum concurrency and memory safety, this engine manages agent state transitions, prompt token streaming pipelines, and workspace file parsing. It abstracts token budgets and tool call translations natively.
- The Agent Interface (Extensible Profiles): This layer allows developers to write custom planning algorithms, definition maps, and system instructions. It defines how the agent approaches a problem, splits tasks, and evaluates success.
Feature Comparison: jcode vs. Traditional Frameworks
Before diving into the implementation details, let's look at how jcode positions itself against traditional Python-based agent architectures and standard LLM orchestration environments.
---Feature / Metric jcode (1jehuang) Python-based Agent Frameworks Standard LLM Chat Hooks Core Language Rust Python Python / TypeScript Execution Speed Ultra-high (Compiled, Native Threading) Moderate (Interpreted, Async Overheads) Low (Network Dependent) Memory Management Strict compile-time safety, minimal footprint High runtime consumption, garbage collected Variable depending on wrapper Sandbox Isolation Native OS environment detection & mapping Requires heavy external Docker wrapper No native execution layer Primary Target Autonomous multi-turn software engineering General purpose task automation agents Single-turn text/code generation Prerequisites and Environment Verification
Before installing jcode, you need to ensure your machine meets the minimum system requirements for native compilation and execution. Because jcode evaluates code in real-time, having a stable environment with standard compilers is essential.
System Requirements:
- Operating System: macOS (Intel/Apple Silicon), Linux (Ubuntu 22.04+, Debian, Fedora), or Windows 11 (with PowerShell or WSL2).
- Toolchains: Rust Stable (1.75+ recommended) if building from source.
- Network: Active internet connection to pull model endpoints and fetch external crate dependencies.
Step-by-Step Installation Guide
jcode features an adaptive installer that detects your current operating system, available package managers, and active shell configurations. Select the installation track below that best matches your local development system.
Option A: macOS via Homebrew
If you are on macOS and use the Homebrew package manager, you can install the official tap maintained by 1jehuang directly via your terminal:
# Tap the jcode formula repository brew tap 1jehuang/jcode # Install the binary package brew install jcodeOption B: Linux or macOS via Shell Script
For standard Linux distributions or macOS environments without Homebrew, use the automated installation script. This pulls the latest compiled binary corresponding to your architecture:
curl -fsSL [https://raw.githubusercontent.com/1jehuang/jcode/main/scripts/install.sh](https://raw.githubusercontent.com/1jehuang/jcode/main/scripts/install.sh) | bashOption C: Windows via PowerShell
If you are running natively on a Windows host within a standard administrative PowerShell prompt, execute the following command to download and map the binaries:
irm [https://raw.githubusercontent.com/1jehuang/jcode/main/scripts/install.ps1](https://raw.githubusercontent.com/1jehuang/jcode/main/scripts/install.ps1) | iexOption D: Building From Source (Recommended for Contributors)
If you want to run the cutting-edge development branch or adapt the core Rust source code to custom enterprise parameters, clone the official GitHub repository and compile it locally:
# Clone the project repository git clone [https://github.com/1jehuang/jcode.git](https://github.com/1jehuang/jcode.git) cd jcode # Compile a highly optimized release binary using Cargo cargo build --release # Execute the local release install configuration script ./scripts/install_release.shVerify that your installation was successful by checking the current version of the harness:
---jcode --versionQuickstart: Configuring and Initializing Your Agent Workspace
With jcode successfully installed, the next stage is configuring your active LLM providers and preparing a localized project workspace where your programming agent can safely read, write, and test applications.
Step 1: Exporting LLM API Credentials
jcode acts as an execution harness that routes logic through state-of-the-art coding LLMs. You must supply your preferred model API keys as environment variables. Add these to your shell profile (e.g.,
.bashrcor.zshrc):export OPENAI_API_KEY="sk-proj-xxxxxxxxxxxxxxxxxxxxxxxxxxxxxxxx" export ANTHROPIC_API_KEY="sk-ant-xxxxxxxxxxxxxxxxxxxxxxxxxxxxxxxx"Step 2: Initialize a New jcode Workspace
Navigate to an empty folder or your target repository and run the workspace initialization command. This tells jcode to parse the local layout and prepare an isolated runtime manifest:
mkdir my-agent-project cd my-agent-project jcode initThis command creates a hidden configuration workspace called
.jcode/containing a primary configuration file namedconfig.toml. Let's inspect and modify a standard setup configuration:
---# .jcode/config.toml [workspace] name = "my-agent-project" allowed_commands = ["cargo", "npm", "python", "git", "pytest", "go"] max_iterations = 15 [model] provider = "anthropic" default_model = "claude-3-5-sonnet-20241022" temperature = 0.2 max_tokens = 4096 [sandbox] isolate_network = false timeout_seconds = 45Building an Autonomous Programming Workflow
Now that your workspace is instantiated, let's walk through a real-world software maintenance scenario. We will instruct our jcode agent to write a complete Python utility module, write an associated test suit, run the validations, find bugs from execution outputs, and safely refactor the code automatically.
Step 1: Issue the Agent Task
We trigger the agent execution loop by supplying a clear, high-level engineering prompt using the
jcode runinstruction interface:jcode run "Create a robust Python rate limiter using a sliding window log algorithm. Include unit tests using pytest. Ensure it handles sub-millisecond timestamps gracefully."Step 2: Reviewing the Agent Autonomous Execution Trace
Once triggered, the jcode framework takes absolute control over the planning tree. Here is an approximation of what the terminal sequence tracks as the underlying Rust engine coordinates actions:
[INFO] Initializing agent environment... [INFO] Detected OS: Linux (Ubuntu 24.04), Package Manager: apt, Shell: bash [STEP 1/15] Planning task allocation tree... [TOOL CALL] Writing file: rate_limiter.py [TOOL CALL] Writing file: test_rate_limiter.py [STEP 2/15] Executing automated testing validation suite... [SHELL COMMAND] pytest test_rate_limiter.py [EXECUTION OUTPUT] ========================= FAILURES ========================= ____ test_sliding_window_log_edge_case _____________________ > assert limiter.allow_request("user_1") == False E AssertionError: assert True == False [STEP 3/15] Analyzing test failures. Reflection phase initiated... [INFO] Detected boundary edge condition flaw in window timestamps math. [TOOL CALL] Patching file: rate_limiter.py (Applying inline diff) [STEP 4/15] Re-executing testing suite... [SHELL COMMAND] pytest test_rate_limiter.py [EXECUTION OUTPUT] ==================== 4 passed in 0.08s ===================== [SUCCESS] Task fully resolved. Workspace state clean. Halting execution loop.Step 3: Examining the Generated Code Artifacts
Let's view the production code written completely by the jcode programming agent. Check the output of
rate_limiter.py:import time class SlidingWindowRateLimiter: def __init__(self, max_requests: int, window_size_seconds: float): self.max_requests = max_requests self.window_size_seconds = window_size_seconds self.user_logs = {} def allow_request(self, user_id: str) -> bool: current_time = time.time() if user_id not in self.user_logs: self.user_logs[user_id] = [] # Filter timestamps outside the active historical sliding window window_start = current_time - self.window_size_seconds self.user_logs[user_id] = [t for t in self.user_logs[user_id] if t > window_start] if len(self.user_logs[user_id]) < self.max_requests: self.user_logs[user_id].append(current_time) return True return FalseNext, inspect the corresponding automated validation suites written in
test_rate_limiter.py:
---import time import pytest from rate_limiter import SlidingWindowRateLimiter def test_rate_limiter_concurrency_allowance(): limiter = SlidingWindowRateLimiter(max_requests=3, window_size_seconds=1.0) assert limiter.allow_request("dev_user") is True assert limiter.allow_request("dev_user") is True assert limiter.allow_request("dev_user") is True assert limiter.allow_request("dev_user") is False # Throttled def test_rate_limiter_window_expiry(): limiter = SlidingWindowRateLimiter(max_requests=1, window_size_seconds=0.5) assert limiter.allow_request("admin_user") is True time.sleep(0.6) assert limiter.allow_request("admin_user") is True # RefreshedAdvanced Configuration: Creating Custom Agentic Rulesets
For large engineering groups or complex codebases, you may want to enforce strict coding policies, guardrails, or dependency behaviors. jcode supports local rule binding through systemic definition markdown assets. Create a file called
.jcode/rules.mdto define these behavioral rules:# Project Coding Standards &
jcode: Building High-Performance Autonomous AI Coding Agents from Scratch
The landscape of AI-driven software development is shifting rapidly. While first-generation AI coding tools operated primarily as conversational completions or simple script generators, the community is moving decisively toward autonomous programming agents. These agents don't just suggest code; they plan, execute tests, refactor, and self-correct within a structured harness.
Emerging at the forefront of this shift in May 2026 is jcode, an open-source, Rust-based programming agent framework developed by creator
1jehuang. Rapidly climbing the GitHub Trending charts and capturing the attention of autonomous systems developers, jcode addresses a critical bottleneck in the agentic ecosystem: execution speed, structural reliability, and resource overhead. Written entirely in Rust, it provides a high-performance harness designed to run AI coding agents at scale without the typical latency and memory bloat associated with Python-heavy orchestration layers.In this comprehensive tutorial-style guide, we will break down what jcode is, analyze its internal architecture, compare it to existing frameworks, and walk through an end-to-end installation and configuration process to build your very first autonomous coding agent.
---Understanding the jcode Architecture
To build effective applications with jcode, it is essential to understand how it organizes the execution loop of an AI agent. Traditional agent frameworks rely on high-level scripting abstractions that introduce significant latency, making deep-tree search algorithms (like Monte Carlo Tree Search or complex reflection loops) painfully slow. jcode solves this by using a compiled Rust backend that exposes a highly structured execution harness.
The framework is divided into three primary layers:
- The Environment Layer (The Sandbox): This component manages the operating system context, available package managers, and shell environments. It isolates agent actions, preventing rogue scripts from damaging the host system while providing full feedback loops (stdout, stderr, exit codes) back to the agent.
- The Core Harness (Rust Engine): Written in Rust for maximum concurrency and memory safety, this engine manages agent state transitions, prompt token streaming pipelines, and workspace file parsing. It abstracts token budgets and tool call translations natively.
- The Agent Interface (Extensible Profiles): This layer allows developers to write custom planning algorithms, definition maps, and system instructions. It defines how the agent approaches a problem, splits tasks, and evaluates success.
Feature Comparison: jcode vs. Traditional Frameworks
Before diving into the implementation details, let's look at how jcode positions itself against traditional Python-based agent architectures and standard LLM orchestration environments.
---Feature / Metric jcode (1jehuang) Python-based Agent Frameworks Standard LLM Chat Hooks Core Language Rust Python Python / TypeScript Execution Speed Ultra-high (Compiled, Native Threading) Moderate (Interpreted, Async Overheads) Low (Network Dependent) Memory Management Strict compile-time safety, minimal footprint High runtime consumption, garbage collected Variable depending on wrapper Sandbox Isolation Native OS environment detection & mapping Requires heavy external Docker wrapper No native execution layer Primary Target Autonomous multi-turn software engineering General purpose task automation agents Single-turn text/code generation Prerequisites and Environment Verification
Before installing jcode, you need to ensure your machine meets the minimum system requirements for native compilation and execution. Because jcode evaluates code in real-time, having a stable environment with standard compilers is essential.
System Requirements:
- Operating System: macOS (Intel/Apple Silicon), Linux (Ubuntu 22.04+, Debian, Fedora), or Windows 11 (with PowerShell or WSL2).
- Toolchains: Rust Stable (1.75+ recommended) if building from source.
- Network: Active internet connection to pull model endpoints and fetch external crate dependencies.
Step-by-Step Installation Guide
jcode features an adaptive installer that detects your current operating system, available package managers, and active shell configurations. Select the installation track below that best matches your local development system.
Option A: macOS via Homebrew
If you are on macOS and use the Homebrew package manager, you can install the official tap maintained by 1jehuang directly via your terminal:
# Tap the jcode formula repository brew tap 1jehuang/jcode # Install the binary package brew install jcodeOption B: Linux or macOS via Shell Script
For standard Linux distributions or macOS environments without Homebrew, use the automated installation script. This pulls the latest compiled binary corresponding to your architecture:
curl -fsSL [https://raw.githubusercontent.com/1jehuang/jcode/main/scripts/install.sh](https://raw.githubusercontent.com/1jehuang/jcode/main/scripts/install.sh) | bashOption C: Windows via PowerShell
If you are running natively on a Windows host within a standard administrative PowerShell prompt, execute the following command to download and map the binaries:
irm [https://raw.githubusercontent.com/1jehuang/jcode/main/scripts/install.ps1](https://raw.githubusercontent.com/1jehuang/jcode/main/scripts/install.ps1) | iexOption D: Building From Source (Recommended for Contributors)
If you want to run the cutting-edge development branch or adapt the core Rust source code to custom enterprise parameters, clone the official GitHub repository and compile it locally:
# Clone the project repository git clone [https://github.com/1jehuang/jcode.git](https://github.com/1jehuang/jcode.git) cd jcode # Compile a highly optimized release binary using Cargo cargo build --release # Execute the local release install configuration script ./scripts/install_release.shVerify that your installation was successful by checking the current version of the harness:
---jcode --versionQuickstart: Configuring and Initializing Your Agent Workspace
With jcode successfully installed, the next stage is configuring your active LLM providers and preparing a localized project workspace where your programming agent can safely read, write, and test applications.
Step 1: Exporting LLM API Credentials
jcode acts as an execution harness that routes logic through state-of-the-art coding LLMs. You must supply your preferred model API keys as environment variables. Add these to your shell profile (e.g.,
.bashrcor.zshrc):export OPENAI_API_KEY="sk-proj-xxxxxxxxxxxxxxxxxxxxxxxxxxxxxxxx" export ANTHROPIC_API_KEY="sk-ant-xxxxxxxxxxxxxxxxxxxxxxxxxxxxxxxx"Step 2: Initialize a New jcode Workspace
Navigate to an empty folder or your target repository and run the workspace initialization command. This tells jcode to parse the local layout and prepare an isolated runtime manifest:
mkdir my-agent-project cd my-agent-project jcode initThis command creates a hidden configuration workspace called
.jcode/containing a primary configuration file namedconfig.toml. Let's inspect and modify a standard setup configuration:
---# .jcode/config.toml [workspace] name = "my-agent-project" allowed_commands = ["cargo", "npm", "python", "git", "pytest", "go"] max_iterations = 15 [model] provider = "anthropic" default_model = "claude-3-5-sonnet-20241022" temperature = 0.2 max_tokens = 4096 [sandbox] isolate_network = false timeout_seconds = 45Building an Autonomous Programming Workflow
Now that your workspace is instantiated, let's walk through a real-world software maintenance scenario. We will instruct our jcode agent to write a complete Python utility module, write an associated test suit, run the validations, find bugs from execution outputs, and safely refactor the code automatically.
Step 1: Issue the Agent Task
We trigger the agent execution loop by supplying a clear, high-level engineering prompt using the
jcode runinstruction interface:jcode run "Create a robust Python rate limiter using a sliding window log algorithm. Include unit tests using pytest. Ensure it handles sub-millisecond timestamps gracefully."Step 2: Reviewing the Agent Autonomous Execution Trace
Once triggered, the jcode framework takes absolute control over the planning tree. Here is an approximation of what the terminal sequence tracks as the underlying Rust engine coordinates actions:
[INFO] Initializing agent environment... [INFO] Detected OS: Linux (Ubuntu 24.04), Package Manager: apt, Shell: bash [STEP 1/15] Planning task allocation tree... [TOOL CALL] Writing file: rate_limiter.py [TOOL CALL] Writing file: test_rate_limiter.py [STEP 2/15] Executing automated testing validation suite... [SHELL COMMAND] pytest test_rate_limiter.py [EXECUTION OUTPUT] ========================= FAILURES ========================= ____ test_sliding_window_log_edge_case _____________________ > assert limiter.allow_request("user_1") == False E AssertionError: assert True == False [STEP 3/15] Analyzing test failures. Reflection phase initiated... [INFO] Detected boundary edge condition flaw in window timestamps math. [TOOL CALL] Patching file: rate_limiter.py (Applying inline diff) [STEP 4/15] Re-executing testing suite... [SHELL COMMAND] pytest test_rate_limiter.py [EXECUTION OUTPUT] ==================== 4 passed in 0.08s ===================== [SUCCESS] Task fully resolved. Workspace state clean. Halting execution loop.Step 3: Examining the Generated Code Artifacts
Let's view the production code written completely by the jcode programming agent. Check the output of
rate_limiter.py:import time class SlidingWindowRateLimiter: def __init__(self, max_requests: int, window_size_seconds: float): self.max_requests = max_requests self.window_size_seconds = window_size_seconds self.user_logs = {} def allow_request(self, user_id: str) -> bool: current_time = time.time() if user_id not in self.user_logs: self.user_logs[user_id] = [] # Filter timestamps outside the active historical sliding window window_start = current_time - self.window_size_seconds self.user_logs[user_id] = [t for t in self.user_logs[user_id] if t > window_start] if len(self.user_logs[user_id]) < self.max_requests: self.user_logs[user_id].append(current_time) return True return FalseNext, inspect the corresponding automated validation suites written in
test_rate_limiter.py:
---import time import pytest from rate_limiter import SlidingWindowRateLimiter def test_rate_limiter_concurrency_allowance(): limiter = SlidingWindowRateLimiter(max_requests=3, window_size_seconds=1.0) assert limiter.allow_request("dev_user") is True assert limiter.allow_request("dev_user") is True assert limiter.allow_request("dev_user") is True assert limiter.allow_request("dev_user") is False # Throttled def test_rate_limiter_window_expiry(): limiter = SlidingWindowRateLimiter(max_requests=1, window_size_seconds=0.5) assert limiter.allow_request("admin_user") is True time.sleep(0.6) assert limiter.allow_request("admin_user") is True # RefreshedAdvanced Configuration: Creating Custom Agentic Rulesets
For large engineering groups or complex codebases, you may want to enforce strict coding policies, guardrails, or dependency behaviors. jcode supports local rule binding through systemic definition markdown assets. Create a file called
.jcode/rules.mdto define these behavioral rules:# Project Coding Standards & Policies ## Python Style Rules - All newly generated Python files must include explicit type hinting for argument parameters and return conditions.
jcode: Building High-Performance Autonomous AI Coding Agents from Scratch
The landscape of AI-driven software development is shifting rapidly. While first-generation AI coding tools operated primarily as conversational completions or simple script generators, the community is moving decisively toward autonomous programming agents. These agents don't just suggest code; they plan, execute tests, refactor, and self-correct within a structured harness.
Emerging at the forefront of this shift in May 2026 is jcode, an open-source, Rust-based programming agent framework developed by creator
1jehuang. Rapidly climbing the GitHub Trending charts and capturing the attention of autonomous systems developers, jcode addresses a critical bottleneck in the agentic ecosystem: execution speed, structural reliability, and resource overhead. Written entirely in Rust, it provides a high-performance harness designed to run AI coding agents at scale without the typical latency and memory bloat associated with Python-heavy orchestration layers.In this comprehensive tutorial-style guide, we will break down what jcode is, analyze its internal architecture, compare it to existing frameworks, and walk through an end-to-end installation and configuration process to build your very first autonomous coding agent.
---Understanding the jcode Architecture
To build effective applications with jcode, it is essential to understand how it organizes the execution loop of an AI agent. Traditional agent frameworks rely on high-level scripting abstractions that introduce significant latency, making deep-tree search algorithms (like Monte Carlo Tree Search or complex reflection loops) painfully slow. jcode solves this by using a compiled Rust backend that exposes a highly structured execution harness.
The framework is divided into three primary layers:
- The Environment Layer (The Sandbox): This component manages the operating system context, available package managers, and shell environments. It isolates agent actions, preventing rogue scripts from damaging the host system while providing full feedback loops (stdout, stderr, exit codes) back to the agent.
- The Core Harness (Rust Engine): Written in Rust for maximum concurrency and memory safety, this engine manages agent state transitions, prompt token streaming pipelines, and workspace file parsing. It abstracts token budgets and tool call translations natively.
- The Agent Interface (Extensible Profiles): This layer allows developers to write custom planning algorithms, definition maps, and system instructions. It defines how the agent approaches a problem, splits tasks, and evaluates success.
Feature Comparison: jcode vs. Traditional Frameworks
Before diving into the implementation details, let's look at how jcode positions itself against traditional Python-based agent architectures and standard LLM orchestration environments.
---Feature / Metric jcode (1jehuang) Python-based Agent Frameworks Standard LLM Chat Hooks Core Language Rust Python Python / TypeScript Execution Speed Ultra-high (Compiled, Native Threading) Moderate (Interpreted, Async Overheads) Low (Network Dependent) Memory Management Strict compile-time safety, minimal footprint High runtime consumption, garbage collected Variable depending on wrapper Sandbox Isolation Native OS environment detection & mapping Requires heavy external Docker wrapper No native execution layer Primary Target Autonomous multi-turn software engineering General purpose task automation agents Single-turn text/code generation Prerequisites and Environment Verification
Before installing jcode, you need to ensure your machine meets the minimum system requirements for native compilation and execution. Because jcode evaluates code in real-time, having a stable environment with standard compilers is essential.
System Requirements:
- Operating System: macOS (Intel/Apple Silicon), Linux (Ubuntu 22.04+, Debian, Fedora), or Windows 11 (with PowerShell or WSL2).
- Toolchains: Rust Stable (1.75+ recommended) if building from source.
- Network: Active internet connection to pull model endpoints and fetch external crate dependencies.
Step-by-Step Installation Guide
jcode features an adaptive installer that detects your current operating system, available package managers, and active shell configurations. Select the installation track below that best matches your local development system.
Option A: macOS via Homebrew
If you are on macOS and use the Homebrew package manager, you can install the official tap maintained by 1jehuang directly via your terminal:
# Tap the jcode formula repository brew tap 1jehuang/jcode # Install the binary package brew install jcodeOption B: Linux or macOS via Shell Script
For standard Linux distributions or macOS environments without Homebrew, use the automated installation script. This pulls the latest compiled binary corresponding to your architecture:
curl -fsSL [https://raw.githubusercontent.com/1jehuang/jcode/main/scripts/install.sh](https://raw.githubusercontent.com/1jehuang/jcode/main/scripts/install.sh) | bashOption C: Windows via PowerShell
If you are running natively on a Windows host within a standard administrative PowerShell prompt, execute the following command to download and map the binaries:
irm [https://raw.githubusercontent.com/1jehuang/jcode/main/scripts/install.ps1](https://raw.githubusercontent.com/1jehuang/jcode/main/scripts/install.ps1) | iexOption D: Building From Source (Recommended for Contributors)
If you want to run the cutting-edge development branch or adapt the core Rust source code to custom enterprise parameters, clone the official GitHub repository and compile it locally:
# Clone the project repository git clone [https://github.com/1jehuang/jcode.git](https://github.com/1jehuang/jcode.git) cd jcode # Compile a highly optimized release binary using Cargo cargo build --release # Execute the local release install configuration script ./scripts/install_release.shVerify that your installation was successful by checking the current version of the harness:
---jcode --versionQuickstart: Configuring and Initializing Your Agent Workspace
With jcode successfully installed, the next stage is configuring your active LLM providers and preparing a localized project workspace where your programming agent can safely read, write, and test applications.
Step 1: Exporting LLM API Credentials
jcode acts as an execution harness that routes logic through state-of-the-art coding LLMs. You must supply your preferred model API keys as environment variables. Add these to your shell profile (e.g.,
.bashrcor.zshrc):export OPENAI_API_KEY="sk-proj-xxxxxxxxxxxxxxxxxxxxxxxxxxxxxxxx" export ANTHROPIC_API_KEY="sk-ant-xxxxxxxxxxxxxxxxxxxxxxxxxxxxxxxx"Step 2: Initialize a New jcode Workspace
Navigate to an empty folder or your target repository and run the workspace initialization command. This tells jcode to parse the local layout and prepare an isolated runtime manifest:
mkdir my-agent-project cd my-agent-project jcode initThis command creates a hidden configuration workspace called
.jcode/containing a primary configuration file namedconfig.toml. Let's inspect and modify a standard setup configuration:
---# .jcode/config.toml [workspace] name = "my-agent-project" allowed_commands = ["cargo", "npm", "python", "git", "pytest", "go"] max_iterations = 15 [model] provider = "anthropic" default_model = "claude-3-5-sonnet-20241022" temperature = 0.2 max_tokens = 4096 [sandbox] isolate_network = false timeout_seconds = 45Building an Autonomous Programming Workflow
Now that your workspace is instantiated, let's walk through a real-world software maintenance scenario. We will instruct our jcode agent to write a complete Python utility module, write an associated test suit, run the validations, find bugs from execution outputs, and safely refactor the code automatically.
Step 1: Issue the Agent Task
We trigger the agent execution loop by supplying a clear, high-level engineering prompt using the
jcode runinstruction interface:jcode run "Create a robust Python rate limiter using a sliding window log algorithm. Include unit tests using pytest. Ensure it handles sub-millisecond timestamps gracefully."Step 2: Reviewing the Agent Autonomous Execution Trace
Once triggered, the jcode framework takes absolute control over the planning tree. Here is an approximation of what the terminal sequence tracks as the underlying Rust engine coordinates actions:
[INFO] Initializing agent environment... [INFO] Detected OS: Linux (Ubuntu 24.04), Package Manager: apt, Shell: bash [STEP 1/15] Planning task allocation tree... [TOOL CALL] Writing file: rate_limiter.py [TOOL CALL] Writing file: test_rate_limiter.py [STEP 2/15] Executing automated testing validation suite... [SHELL COMMAND] pytest test_rate_limiter.py [EXECUTION OUTPUT] ========================= FAILURES ========================= ____ test_sliding_window_log_edge_case _____________________ > assert limiter.allow_request("user_1") == False E AssertionError: assert True == False [STEP 3/15] Analyzing test failures. Reflection phase initiated... [INFO] Detected boundary edge condition flaw in window timestamps math. [TOOL CALL] Patching file: rate_limiter.py (Applying inline diff) [STEP 4/15] Re-executing testing suite... [SHELL COMMAND] pytest test_rate_limiter.py [EXECUTION OUTPUT] ==================== 4 passed in 0.08s ===================== [SUCCESS] Task fully resolved. Workspace state clean. Halting execution loop.Step 3: Examining the Generated Code Artifacts
Let's view the production code written completely by the jcode programming agent. Check the output of
rate_limiter.py:import time class SlidingWindowRateLimiter: def __init__(self, max_requests: int, window_size_seconds: float): self.max_requests = max_requests self.window_size_seconds = window_size_seconds self.user_logs = {} def allow_request(self, user_id: str) -> bool: current_time = time.time() if user_id not in self.user_logs: self.user_logs[user_id] = [] # Filter timestamps outside the active historical sliding window window_start = current_time - self.window_size_seconds self.user_logs[user_id] = [t for t in self.user_logs[user_id] if t > window_start] if len(self.user_logs[user_id]) < self.max_requests: self.user_logs[user_id].append(current_time) return True return FalseNext, inspect the corresponding automated validation suites written in
test_rate_limiter.py:
---import time import pytest from rate_limiter import SlidingWindowRateLimiter def test_rate_limiter_concurrency_allowance(): limiter = SlidingWindowRateLimiter(max_requests=3, window_size_seconds=1.0) assert limiter.allow_request("dev_user") is True assert limiter.allow_request("dev_user") is True assert limiter.allow_request("dev_user") is True assert limiter.allow_request("dev_user") is False # Throttled def test_rate_limiter_window_expiry(): limiter = SlidingWindowRateLimiter(max_requests=1, window_size_seconds=0.5) assert limiter.allow_request("admin_user") is True time.sleep(0.6) assert limiter.allow_request("admin_user") is True # RefreshedAdvanced Configuration: Creating Custom Agentic Rulesets
For large engineering groups or complex codebases, you may want to enforce strict coding policies, guardrails, or dependency behaviors. jcode supports local rule binding through systemic definition markdown assets. Create a file called
.jcode/rules.mdto define these behavioral rules:# Project Coding Standards & Policies ## Python Style Rules - All newly generated Python files must include explicit type hinting for argument parameters and return conditions. - Document all core classes with complete PEP-257 compliant docstrings. - Never invoke raw raw input formatting
jcode: Building High-Performance Autonomous AI Coding Agents from Scratch
The landscape of AI-driven software development is shifting rapidly. While first-generation AI coding tools operated primarily as conversational completions or simple script generators, the community is moving decisively toward autonomous programming agents. These agents don't just suggest code; they plan, execute tests, refactor, and self-correct within a structured harness.
Emerging at the forefront of this shift in May 2026 is jcode, an open-source, Rust-based programming agent framework developed by creator
1jehuang. Rapidly climbing the GitHub Trending charts and capturing the attention of autonomous systems developers, jcode addresses a critical bottleneck in the agentic ecosystem: execution speed, structural reliability, and resource overhead. Written entirely in Rust, it provides a high-performance harness designed to run AI coding agents at scale without the typical latency and memory bloat associated with Python-heavy orchestration layers.In this comprehensive tutorial-style guide, we will break down what jcode is, analyze its internal architecture, compare it to existing frameworks, and walk through an end-to-end installation and configuration process to build your very first autonomous coding agent.
---Understanding the jcode Architecture
To build effective applications with jcode, it is essential to understand how it organizes the execution loop of an AI agent. Traditional agent frameworks rely on high-level scripting abstractions that introduce significant latency, making deep-tree search algorithms (like Monte Carlo Tree Search or complex reflection loops) painfully slow. jcode solves this by using a compiled Rust backend that exposes a highly structured execution harness.
The framework is divided into three primary layers:
- The Environment Layer (The Sandbox): This component manages the operating system context, available package managers, and shell environments. It isolates agent actions, preventing rogue scripts from damaging the host system while providing full feedback loops (stdout, stderr, exit codes) back to the agent.
- The Core Harness (Rust Engine): Written in Rust for maximum concurrency and memory safety, this engine manages agent state transitions, prompt token streaming pipelines, and workspace file parsing. It abstracts token budgets and tool call translations natively.
- The Agent Interface (Extensible Profiles): This layer allows developers to write custom planning algorithms, definition maps, and system instructions. It defines how the agent approaches a problem, splits tasks, and evaluates success.
Feature Comparison: jcode vs. Traditional Frameworks
Before diving into the implementation details, let's look at how jcode positions itself against traditional Python-based agent architectures and standard LLM orchestration environments.
---Feature / Metric jcode (1jehuang) Python-based Agent Frameworks Standard LLM Chat Hooks Core Language Rust Python Python / TypeScript Execution Speed Ultra-high (Compiled, Native Threading) Moderate (Interpreted, Async Overheads) Low (Network Dependent) Memory Management Strict compile-time safety, minimal footprint High runtime consumption, garbage collected Variable depending on wrapper Sandbox Isolation Native OS environment detection & mapping Requires heavy external Docker wrapper No native execution layer Primary Target Autonomous multi-turn software engineering General purpose task automation agents Single-turn text/code generation Prerequisites and Environment Verification
Before installing jcode, you need to ensure your machine meets the minimum system requirements for native compilation and execution. Because jcode evaluates code in real-time, having a stable environment with standard compilers is essential.
System Requirements:
- Operating System: macOS (Intel/Apple Silicon), Linux (Ubuntu 22.04+, Debian, Fedora), or Windows 11 (with PowerShell or WSL2).
- Toolchains: Rust Stable (1.75+ recommended) if building from source.
- Network: Active internet connection to pull model endpoints and fetch external crate dependencies.
Step-by-Step Installation Guide
jcode features an adaptive installer that detects your current operating system, available package managers, and active shell configurations. Select the installation track below that best matches your local development system.
Option A: macOS via Homebrew
If you are on macOS and use the Homebrew package manager, you can install the official tap maintained by 1jehuang directly via your terminal:
# Tap the jcode formula repository brew tap 1jehuang/jcode # Install the binary package brew install jcodeOption B: Linux or macOS via Shell Script
For standard Linux distributions or macOS environments without Homebrew, use the automated installation script. This pulls the latest compiled binary corresponding to your architecture:
curl -fsSL [https://raw.githubusercontent.com/1jehuang/jcode/main/scripts/install.sh](https://raw.githubusercontent.com/1jehuang/jcode/main/scripts/install.sh) | bashOption C: Windows via PowerShell
If you are running natively on a Windows host within a standard administrative PowerShell prompt, execute the following command to download and map the binaries:
irm [https://raw.githubusercontent.com/1jehuang/jcode/main/scripts/install.ps1](https://raw.githubusercontent.com/1jehuang/jcode/main/scripts/install.ps1) | iexOption D: Building From Source (Recommended for Contributors)
If you want to run the cutting-edge development branch or adapt the core Rust source code to custom enterprise parameters, clone the official GitHub repository and compile it locally:
# Clone the project repository git clone [https://github.com/1jehuang/jcode.git](https://github.com/1jehuang/jcode.git) cd jcode # Compile a highly optimized release binary using Cargo cargo build --release # Execute the local release install configuration script ./scripts/install_release.shVerify that your installation was successful by checking the current version of the harness:
---jcode --versionQuickstart: Configuring and Initializing Your Agent Workspace
With jcode successfully installed, the next stage is configuring your active LLM providers and preparing a localized project workspace where your programming agent can safely read, write, and test applications.
Step 1: Exporting LLM API Credentials
jcode acts as an execution harness that routes logic through state-of-the-art coding LLMs. You must supply your preferred model API keys as environment variables. Add these to your shell profile (e.g.,
.bashrcor.zshrc):export OPENAI_API_KEY="sk-proj-xxxxxxxxxxxxxxxxxxxxxxxxxxxxxxxx" export ANTHROPIC_API_KEY="sk-ant-xxxxxxxxxxxxxxxxxxxxxxxxxxxxxxxx"Step 2: Initialize a New jcode Workspace
Navigate to an empty folder or your target repository and run the workspace initialization command. This tells jcode to parse the local layout and prepare an isolated runtime manifest:
mkdir my-agent-project cd my-agent-project jcode initThis command creates a hidden configuration workspace called
.jcode/containing a primary configuration file namedconfig.toml. Let's inspect and modify a standard setup configuration:
---# .jcode/config.toml [workspace] name = "my-agent-project" allowed_commands = ["cargo", "npm", "python", "git", "pytest", "go"] max_iterations = 15 [model] provider = "anthropic" default_model = "claude-3-5-sonnet-20241022" temperature = 0.2 max_tokens = 4096 [sandbox] isolate_network = false timeout_seconds = 45Building an Autonomous Programming Workflow
Now that your workspace is instantiated, let's walk through a real-world software maintenance scenario. We will instruct our jcode agent to write a complete Python utility module, write an associated test suit, run the validations, find bugs from execution outputs, and safely refactor the code automatically.
Step 1: Issue the Agent Task
We trigger the agent execution loop by supplying a clear, high-level engineering prompt using the
jcode runinstruction interface:jcode run "Create a robust Python rate limiter using a sliding window log algorithm. Include unit tests using pytest. Ensure it handles sub-millisecond timestamps gracefully."Step 2: Reviewing the Agent Autonomous Execution Trace
Once triggered, the jcode framework takes absolute control over the planning tree. Here is an approximation of what the terminal sequence tracks as the underlying Rust engine coordinates actions:
[INFO] Initializing agent environment... [INFO] Detected OS: Linux (Ubuntu 24.04), Package Manager: apt, Shell: bash [STEP 1/15] Planning task allocation tree... [TOOL CALL] Writing file: rate_limiter.py [TOOL CALL] Writing file: test_rate_limiter.py [STEP 2/15] Executing automated testing validation suite... [SHELL COMMAND] pytest test_rate_limiter.py [EXECUTION OUTPUT] ========================= FAILURES ========================= ____ test_sliding_window_log_edge_case _____________________ > assert limiter.allow_request("user_1") == False E AssertionError: assert True == False [STEP 3/15] Analyzing test failures. Reflection phase initiated... [INFO] Detected boundary edge condition flaw in window timestamps math. [TOOL CALL] Patching file: rate_limiter.py (Applying inline diff) [STEP 4/15] Re-executing testing suite... [SHELL COMMAND] pytest test_rate_limiter.py [EXECUTION OUTPUT] ==================== 4 passed in 0.08s ===================== [SUCCESS] Task fully resolved. Workspace state clean. Halting execution loop.Step 3: Examining the Generated Code Artifacts
Let's view the production code written completely by the jcode programming agent. Check the output of
rate_limiter.py:import time class SlidingWindowRateLimiter: def __init__(self, max_requests: int, window_size_seconds: float): self.max_requests = max_requests self.window_size_seconds = window_size_seconds self.user_logs = {} def allow_request(self, user_id: str) -> bool: current_time = time.time() if user_id not in self.user_logs: self.user_logs[user_id] = [] # Filter timestamps outside the active historical sliding window window_start = current_time - self.window_size_seconds self.user_logs[user_id] = [t for t in self.user_logs[user_id] if t > window_start] if len(self.user_logs[user_id]) < self.max_requests: self.user_logs[user_id].append(current_time) return True return FalseNext, inspect the corresponding automated validation suites written in
test_rate_limiter.py:
---import time import pytest from rate_limiter import SlidingWindowRateLimiter def test_rate_limiter_concurrency_allowance(): limiter = SlidingWindowRateLimiter(max_requests=3, window_size_seconds=1.0) assert limiter.allow_request("dev_user") is True assert limiter.allow_request("dev_user") is True assert limiter.allow_request("dev_user") is True assert limiter.allow_request("dev_user") is False # Throttled def test_rate_limiter_window_expiry(): limiter = SlidingWindowRateLimiter(max_requests=1, window_size_seconds=0.5) assert limiter.allow_request("admin_user") is True time.sleep(0.6) assert limiter.allow_request("admin_user") is True # RefreshedAdvanced Configuration: Creating Custom Agentic Rulesets
For large engineering groups or complex codebases, you may want to enforce strict coding policies, guardrails, or dependency behaviors. jcode supports local rule binding through systemic definition markdown assets. Create a file called
.jcode/rules.mdto define these behavioral rules:# Project Coding Standards & Policies ## Python Style Rules - All newly generated Python files must include explicit type hinting for argument parameters and return conditions. - Document all core classes with complete PEP-257 compliant docstrings. - Never invoke raw raw input formatting pipelines or unvetted third-party system subshells without utilizing structural subprocess escaping methods. ## Testing Rules - Every module must maintain
jcode: Building High-Performance Autonomous AI Coding Agents from Scratch
The landscape of AI-driven software development is shifting rapidly. While first-generation AI coding tools operated primarily as conversational completions or simple script generators, the community is moving decisively toward autonomous programming agents. These agents don't just suggest code; they plan, execute tests, refactor, and self-correct within a structured harness.
Emerging at the forefront of this shift in May 2026 is jcode, an open-source, Rust-based programming agent framework developed by creator
1jehuang. Rapidly climbing the GitHub Trending charts and capturing the attention of autonomous systems developers, jcode addresses a critical bottleneck in the agentic ecosystem: execution speed, structural reliability, and resource overhead. Written entirely in Rust, it provides a high-performance harness designed to run AI coding agents at scale without the typical latency and memory bloat associated with Python-heavy orchestration layers.In this comprehensive tutorial-style guide, we will break down what jcode is, analyze its internal architecture, compare it to existing frameworks, and walk through an end-to-end installation and configuration process to build your very first autonomous coding agent.
---Understanding the jcode Architecture
To build effective applications with jcode, it is essential to understand how it organizes the execution loop of an AI agent. Traditional agent frameworks rely on high-level scripting abstractions that introduce significant latency, making deep-tree search algorithms (like Monte Carlo Tree Search or complex reflection loops) painfully slow. jcode solves this by using a compiled Rust backend that exposes a highly structured execution harness.
The framework is divided into three primary layers:
- The Environment Layer (The Sandbox): This component manages the operating system context, available package managers, and shell environments. It isolates agent actions, preventing rogue scripts from damaging the host system while providing full feedback loops (stdout, stderr, exit codes) back to the agent.
- The Core Harness (Rust Engine): Written in Rust for maximum concurrency and memory safety, this engine manages agent state transitions, prompt token streaming pipelines, and workspace file parsing. It abstracts token budgets and tool call translations natively.
- The Agent Interface (Extensible Profiles): This layer allows developers to write custom planning algorithms, definition maps, and system instructions. It defines how the agent approaches a problem, splits tasks, and evaluates success.
Feature Comparison: jcode vs. Traditional Frameworks
Before diving into the implementation details, let's look at how jcode positions itself against traditional Python-based agent architectures and standard LLM orchestration environments.
---Feature / Metric jcode (1jehuang) Python-based Agent Frameworks Standard LLM Chat Hooks Core Language Rust Python Python / TypeScript Execution Speed Ultra-high (Compiled, Native Threading) Moderate (Interpreted, Async Overheads) Low (Network Dependent) Memory Management Strict compile-time safety, minimal footprint High runtime consumption, garbage collected Variable depending on wrapper Sandbox Isolation Native OS environment detection & mapping Requires heavy external Docker wrapper No native execution layer Primary Target Autonomous multi-turn software engineering General purpose task automation agents Single-turn text/code generation Prerequisites and Environment Verification
Before installing jcode, you need to ensure your machine meets the minimum system requirements for native compilation and execution. Because jcode evaluates code in real-time, having a stable environment with standard compilers is essential.
System Requirements:
- Operating System: macOS (Intel/Apple Silicon), Linux (Ubuntu 22.04+, Debian, Fedora), or Windows 11 (with PowerShell or WSL2).
- Toolchains: Rust Stable (1.75+ recommended) if building from source.
- Network: Active internet connection to pull model endpoints and fetch external crate dependencies.
Step-by-Step Installation Guide
jcode features an adaptive installer that detects your current operating system, available package managers, and active shell configurations. Select the installation track below that best matches your local development system.
Option A: macOS via Homebrew
If you are on macOS and use the Homebrew package manager, you can install the official tap maintained by 1jehuang directly via your terminal:
# Tap the jcode formula repository brew tap 1jehuang/jcode # Install the binary package brew install jcodeOption B: Linux or macOS via Shell Script
For standard Linux distributions or macOS environments without Homebrew, use the automated installation script. This pulls the latest compiled binary corresponding to your architecture:
curl -fsSL [https://raw.githubusercontent.com/1jehuang/jcode/main/scripts/install.sh](https://raw.githubusercontent.com/1jehuang/jcode/main/scripts/install.sh) | bashOption C: Windows via PowerShell
If you are running natively on a Windows host within a standard administrative PowerShell prompt, execute the following command to download and map the binaries:
irm [https://raw.githubusercontent.com/1jehuang/jcode/main/scripts/install.ps1](https://raw.githubusercontent.com/1jehuang/jcode/main/scripts/install.ps1) | iexOption D: Building From Source (Recommended for Contributors)
If you want to run the cutting-edge development branch or adapt the core Rust source code to custom enterprise parameters, clone the official GitHub repository and compile it locally:
# Clone the project repository git clone [https://github.com/1jehuang/jcode.git](https://github.com/1jehuang/jcode.git) cd jcode # Compile a highly optimized release binary using Cargo cargo build --release # Execute the local release install configuration script ./scripts/install_release.shVerify that your installation was successful by checking the current version of the harness:
---jcode --versionQuickstart: Configuring and Initializing Your Agent Workspace
With jcode successfully installed, the next stage is configuring your active LLM providers and preparing a localized project workspace where your programming agent can safely read, write, and test applications.
Step 1: Exporting LLM API Credentials
jcode acts as an execution harness that routes logic through state-of-the-art coding LLMs. You must supply your preferred model API keys as environment variables. Add these to your shell profile (e.g.,
.bashrcor.zshrc):export OPENAI_API_KEY="sk-proj-xxxxxxxxxxxxxxxxxxxxxxxxxxxxxxxx" export ANTHROPIC_API_KEY="sk-ant-xxxxxxxxxxxxxxxxxxxxxxxxxxxxxxxx"Step 2: Initialize a New jcode Workspace
Navigate to an empty folder or your target repository and run the workspace initialization command. This tells jcode to parse the local layout and prepare an isolated runtime manifest:
mkdir my-agent-project cd my-agent-project jcode initThis command creates a hidden configuration workspace called
.jcode/containing a primary configuration file namedconfig.toml. Let's inspect and modify a standard setup configuration:
---# .jcode/config.toml [workspace] name = "my-agent-project" allowed_commands = ["cargo", "npm", "python", "git", "pytest", "go"] max_iterations = 15 [model] provider = "anthropic" default_model = "claude-3-5-sonnet-20241022" temperature = 0.2 max_tokens = 4096 [sandbox] isolate_network = false timeout_seconds = 45Building an Autonomous Programming Workflow
Now that your workspace is instantiated, let's walk through a real-world software maintenance scenario. We will instruct our jcode agent to write a complete Python utility module, write an associated test suit, run the validations, find bugs from execution outputs, and safely refactor the code automatically.
Step 1: Issue the Agent Task
We trigger the agent execution loop by supplying a clear, high-level engineering prompt using the
jcode runinstruction interface:jcode run "Create a robust Python rate limiter using a sliding window log algorithm. Include unit tests using pytest. Ensure it handles sub-millisecond timestamps gracefully."Step 2: Reviewing the Agent Autonomous Execution Trace
Once triggered, the jcode framework takes absolute control over the planning tree. Here is an approximation of what the terminal sequence tracks as the underlying Rust engine coordinates actions:
[INFO] Initializing agent environment... [INFO] Detected OS: Linux (Ubuntu 24.04), Package Manager: apt, Shell: bash [STEP 1/15] Planning task allocation tree... [TOOL CALL] Writing file: rate_limiter.py [TOOL CALL] Writing file: test_rate_limiter.py [STEP 2/15] Executing automated testing validation suite... [SHELL COMMAND] pytest test_rate_limiter.py [EXECUTION OUTPUT] ========================= FAILURES ========================= ____ test_sliding_window_log_edge_case _____________________ > assert limiter.allow_request("user_1") == False E AssertionError: assert True == False [STEP 3/15] Analyzing test failures. Reflection phase initiated... [INFO] Detected boundary edge condition flaw in window timestamps math. [TOOL CALL] Patching file: rate_limiter.py (Applying inline diff) [STEP 4/15] Re-executing testing suite... [SHELL COMMAND] pytest test_rate_limiter.py [EXECUTION OUTPUT] ==================== 4 passed in 0.08s ===================== [SUCCESS] Task fully resolved. Workspace state clean. Halting execution loop.Step 3: Examining the Generated Code Artifacts
Let's view the production code written completely by the jcode programming agent. Check the output of
rate_limiter.py:import time class SlidingWindowRateLimiter: def __init__(self, max_requests: int, window_size_seconds: float): self.max_requests = max_requests self.window_size_seconds = window_size_seconds self.user_logs = {} def allow_request(self, user_id: str) -> bool: current_time = time.time() if user_id not in self.user_logs: self.user_logs[user_id] = [] # Filter timestamps outside the active historical sliding window window_start = current_time - self.window_size_seconds self.user_logs[user_id] = [t for t in self.user_logs[user_id] if t > window_start] if len(self.user_logs[user_id]) < self.max_requests: self.user_logs[user_id].append(current_time) return True return FalseNext, inspect the corresponding automated validation suites written in
test_rate_limiter.py:
---import time import pytest from rate_limiter import SlidingWindowRateLimiter def test_rate_limiter_concurrency_allowance(): limiter = SlidingWindowRateLimiter(max_requests=3, window_size_seconds=1.0) assert limiter.allow_request("dev_user") is True assert limiter.allow_request("dev_user") is True assert limiter.allow_request("dev_user") is True assert limiter.allow_request("dev_user") is False # Throttled def test_rate_limiter_window_expiry(): limiter = SlidingWindowRateLimiter(max_requests=1, window_size_seconds=0.5) assert limiter.allow_request("admin_user") is True time.sleep(0.6) assert limiter.allow_request("admin_user") is True # RefreshedAdvanced Configuration: Creating Custom Agentic Rulesets
For large engineering groups or complex codebases, you may want to enforce strict coding policies, guardrails, or dependency behaviors. jcode supports local rule binding through systemic definition markdown assets. Create a file called
.jcode/rules.mdto define these behavioral rules:# Project Coding Standards & Policies ## Python Style Rules - All newly generated Python files must include explicit type hinting for argument parameters and return conditions. - Document all core classes with complete PEP-257 compliant docstrings. - Never invoke raw raw input formatting pipelines or unvetted third-party system subshells without utilizing structural subprocess escaping methods. ## Testing Rules - Every module must maintain at least an 85% assertion verification target block footprint. - Always use localized mocking modules when testing external system communication gateways or raw databases
jcode: Building High-Performance Autonomous AI Coding Agents from Scratch
The landscape of AI-driven software development is shifting rapidly. While first-generation AI coding tools operated primarily as conversational completions or simple script generators, the community is moving decisively toward autonomous programming agents. These agents don't just suggest code; they plan, execute tests, refactor, and self-correct within a structured harness.
Emerging at the forefront of this shift in May 2026 is jcode, an open-source, Rust-based programming agent framework developed by creator
1jehuang. Rapidly climbing the GitHub Trending charts and capturing the attention of autonomous systems developers, jcode addresses a critical bottleneck in the agentic ecosystem: execution speed, structural reliability, and resource overhead. Written entirely in Rust, it provides a high-performance harness designed to run AI coding agents at scale without the typical latency and memory bloat associated with Python-heavy orchestration layers.In this comprehensive tutorial-style guide, we will break down what jcode is, analyze its internal architecture, compare it to existing frameworks, and walk through an end-to-end installation and configuration process to build your very first autonomous coding agent.
---Understanding the jcode Architecture
To build effective applications with jcode, it is essential to understand how it organizes the execution loop of an AI agent. Traditional agent frameworks rely on high-level scripting abstractions that introduce significant latency, making deep-tree search algorithms (like Monte Carlo Tree Search or complex reflection loops) painfully slow. jcode solves this by using a compiled Rust backend that exposes a highly structured execution harness.
The framework is divided into three primary layers:
- The Environment Layer (The Sandbox): This component manages the operating system context, available package managers, and shell environments. It isolates agent actions, preventing rogue scripts from damaging the host system while providing full feedback loops (stdout, stderr, exit codes) back to the agent.
- The Core Harness (Rust Engine): Written in Rust for maximum concurrency and memory safety, this engine manages agent state transitions, prompt token streaming pipelines, and workspace file parsing. It abstracts token budgets and tool call translations natively.
- The Agent Interface (Extensible Profiles): This layer allows developers to write custom planning algorithms, definition maps, and system instructions. It defines how the agent approaches a problem, splits tasks, and evaluates success.
Feature Comparison: jcode vs. Traditional Frameworks
Before diving into the implementation details, let's look at how jcode positions itself against traditional Python-based agent architectures and standard LLM orchestration environments.
---Feature / Metric jcode (1jehuang) Python-based Agent Frameworks Standard LLM Chat Hooks Core Language Rust Python Python / TypeScript Execution Speed Ultra-high (Compiled, Native Threading) Moderate (Interpreted, Async Overheads) Low (Network Dependent) Memory Management Strict compile-time safety, minimal footprint High runtime consumption, garbage collected Variable depending on wrapper Sandbox Isolation Native OS environment detection & mapping Requires heavy external Docker wrapper No native execution layer Primary Target Autonomous multi-turn software engineering General purpose task automation agents Single-turn text/code generation Prerequisites and Environment Verification
Before installing jcode, you need to ensure your machine meets the minimum system requirements for native compilation and execution. Because jcode evaluates code in real-time, having a stable environment with standard compilers is essential.
System Requirements:
- Operating System: macOS (Intel/Apple Silicon), Linux (Ubuntu 22.04+, Debian, Fedora), or Windows 11 (with PowerShell or WSL2).
- Toolchains: Rust Stable (1.75+ recommended) if building from source.
- Network: Active internet connection to pull model endpoints and fetch external crate dependencies.
Step-by-Step Installation Guide
jcode features an adaptive installer that detects your current operating system, available package managers, and active shell configurations. Select the installation track below that best matches your local development system.
Option A: macOS via Homebrew
If you are on macOS and use the Homebrew package manager, you can install the official tap maintained by 1jehuang directly via your terminal:
# Tap the jcode formula repository brew tap 1jehuang/jcode # Install the binary package brew install jcodeOption B: Linux or macOS via Shell Script
For standard Linux distributions or macOS environments without Homebrew, use the automated installation script. This pulls the latest compiled binary corresponding to your architecture:
curl -fsSL [https://raw.githubusercontent.com/1jehuang/jcode/main/scripts/install.sh](https://raw.githubusercontent.com/1jehuang/jcode/main/scripts/install.sh) | bashOption C: Windows via PowerShell
If you are running natively on a Windows host within a standard administrative PowerShell prompt, execute the following command to download and map the binaries:
irm [https://raw.githubusercontent.com/1jehuang/jcode/main/scripts/install.ps1](https://raw.githubusercontent.com/1jehuang/jcode/main/scripts/install.ps1) | iexOption D: Building From Source (Recommended for Contributors)
If you want to run the cutting-edge development branch or adapt the core Rust source code to custom enterprise parameters, clone the official GitHub repository and compile it locally:
# Clone the project repository git clone [https://github.com/1jehuang/jcode.git](https://github.com/1jehuang/jcode.git) cd jcode # Compile a highly optimized release binary using Cargo cargo build --release # Execute the local release install configuration script ./scripts/install_release.shVerify that your installation was successful by checking the current version of the harness:
---jcode --versionQuickstart: Configuring and Initializing Your Agent Workspace
With jcode successfully installed, the next stage is configuring your active LLM providers and preparing a localized project workspace where your programming agent can safely read, write, and test applications.
Step 1: Exporting LLM API Credentials
jcode acts as an execution harness that routes logic through state-of-the-art coding LLMs. You must supply your preferred model API keys as environment variables. Add these to your shell profile (e.g.,
.bashrcor.zshrc):export OPENAI_API_KEY="sk-proj-xxxxxxxxxxxxxxxxxxxxxxxxxxxxxxxx" export ANTHROPIC_API_KEY="sk-ant-xxxxxxxxxxxxxxxxxxxxxxxxxxxxxxxx"Step 2: Initialize a New jcode Workspace
Navigate to an empty folder or your target repository and run the workspace initialization command. This tells jcode to parse the local layout and prepare an isolated runtime manifest:
mkdir my-agent-project cd my-agent-project jcode initThis command creates a hidden configuration workspace called
.jcode/containing a primary configuration file namedconfig.toml. Let's inspect and modify a standard setup configuration:
---# .jcode/config.toml [workspace] name = "my-agent-project" allowed_commands = ["cargo", "npm", "python", "git", "pytest", "go"] max_iterations = 15 [model] provider = "anthropic" default_model = "claude-3-5-sonnet-20241022" temperature = 0.2 max_tokens = 4096 [sandbox] isolate_network = false timeout_seconds = 45Building an Autonomous Programming Workflow
Now that your workspace is instantiated, let's walk through a real-world software maintenance scenario. We will instruct our jcode agent to write a complete Python utility module, write an associated test suit, run the validations, find bugs from execution outputs, and safely refactor the code automatically.
Step 1: Issue the Agent Task
We trigger the agent execution loop by supplying a clear, high-level engineering prompt using the
jcode runinstruction interface:jcode run "Create a robust Python rate limiter using a sliding window log algorithm. Include unit tests using pytest. Ensure it handles sub-millisecond timestamps gracefully."Step 2: Reviewing the Agent Autonomous Execution Trace
Once triggered, the jcode framework takes absolute control over the planning tree. Here is an approximation of what the terminal sequence tracks as the underlying Rust engine coordinates actions:
[INFO] Initializing agent environment... [INFO] Detected OS: Linux (Ubuntu 24.04), Package Manager: apt, Shell: bash [STEP 1/15] Planning task allocation tree... [TOOL CALL] Writing file: rate_limiter.py [TOOL CALL] Writing file: test_rate_limiter.py [STEP 2/15] Executing automated testing validation suite... [SHELL COMMAND] pytest test_rate_limiter.py [EXECUTION OUTPUT] ========================= FAILURES ========================= ____ test_sliding_window_log_edge_case _____________________ > assert limiter.allow_request("user_1") == False E AssertionError: assert True == False [STEP 3/15] Analyzing test failures. Reflection phase initiated... [INFO] Detected boundary edge condition flaw in window timestamps math. [TOOL CALL] Patching file: rate_limiter.py (Applying inline diff) [STEP 4/15] Re-executing testing suite... [SHELL COMMAND] pytest test_rate_limiter.py [EXECUTION OUTPUT] ==================== 4 passed in 0.08s ===================== [SUCCESS] Task fully resolved. Workspace state clean. Halting execution loop.Step 3: Examining the Generated Code Artifacts
Let's view the production code written completely by the jcode programming agent. Check the output of
rate_limiter.py:import time class SlidingWindowRateLimiter: def __init__(self, max_requests: int, window_size_seconds: float): self.max_requests = max_requests self.window_size_seconds = window_size_seconds self.user_logs = {} def allow_request(self, user_id: str) -> bool: current_time = time.time() if user_id not in self.user_logs: self.user_logs[user_id] = [] # Filter timestamps outside the active historical sliding window window_start = current_time - self.window_size_seconds self.user_logs[user_id] = [t for t in self.user_logs[user_id] if t > window_start] if len(self.user_logs[user_id]) < self.max_requests: self.user_logs[user_id].append(current_time) return True return FalseNext, inspect the corresponding automated validation suites written in
test_rate_limiter.py:
---import time import pytest from rate_limiter import SlidingWindowRateLimiter def test_rate_limiter_concurrency_allowance(): limiter = SlidingWindowRateLimiter(max_requests=3, window_size_seconds=1.0) assert limiter.allow_request("dev_user") is True assert limiter.allow_request("dev_user") is True assert limiter.allow_request("dev_user") is True assert limiter.allow_request("dev_user") is False # Throttled def test_rate_limiter_window_expiry(): limiter = SlidingWindowRateLimiter(max_requests=1, window_size_seconds=0.5) assert limiter.allow_request("admin_user") is True time.sleep(0.6) assert limiter.allow_request("admin_user") is True # RefreshedAdvanced Configuration: Creating Custom Agentic Rulesets
For large engineering groups or complex codebases, you may want to enforce strict coding policies, guardrails, or dependency behaviors. jcode supports local rule binding through systemic definition markdown assets. Create a file called
.jcode/rules.mdto define these behavioral rules:# Project Coding Standards & Policies ## Python Style Rules - All newly generated Python files must include explicit type hinting for argument parameters and return conditions. - Document all core classes with complete PEP-257 compliant docstrings. - Never invoke raw raw input formatting pipelines or unvetted third-party system subshells without utilizing structural subprocess escaping methods. ## Testing Rules - Every module must maintain at least an 85% assertion verification target block footprint. - Always use localized mocking modules when testing external system communication gateways or raw databases.When executing future
jcode runoperational assignments, the Rust engine automatically
jcode: Building High-Performance Autonomous AI Coding Agents from Scratch
The landscape of AI-driven software development is shifting rapidly. While first-generation AI coding tools operated primarily as conversational completions or simple script generators, the community is moving decisively toward autonomous programming agents. These agents don't just suggest code; they plan, execute tests, refactor, and self-correct within a structured harness.
Emerging at the forefront of this shift in May 2026 is jcode, an open-source, Rust-based programming agent framework developed by creator
1jehuang. Rapidly climbing the GitHub Trending charts and capturing the attention of autonomous systems developers, jcode addresses a critical bottleneck in the agentic ecosystem: execution speed, structural reliability, and resource overhead. Written entirely in Rust, it provides a high-performance harness designed to run AI coding agents at scale without the typical latency and memory bloat associated with Python-heavy orchestration layers.In this comprehensive tutorial-style guide, we will break down what jcode is, analyze its internal architecture, compare it to existing frameworks, and walk through an end-to-end installation and configuration process to build your very first autonomous coding agent.
---Understanding the jcode Architecture
To build effective applications with jcode, it is essential to understand how it organizes the execution loop of an AI agent. Traditional agent frameworks rely on high-level scripting abstractions that introduce significant latency, making deep-tree search algorithms (like Monte Carlo Tree Search or complex reflection loops) painfully slow. jcode solves this by using a compiled Rust backend that exposes a highly structured execution harness.
The framework is divided into three primary layers:
- The Environment Layer (The Sandbox): This component manages the operating system context, available package managers, and shell environments. It isolates agent actions, preventing rogue scripts from damaging the host system while providing full feedback loops (stdout, stderr, exit codes) back to the agent.
- The Core Harness (Rust Engine): Written in Rust for maximum concurrency and memory safety, this engine manages agent state transitions, prompt token streaming pipelines, and workspace file parsing. It abstracts token budgets and tool call translations natively.
- The Agent Interface (Extensible Profiles): This layer allows developers to write custom planning algorithms, definition maps, and system instructions. It defines how the agent approaches a problem, splits tasks, and evaluates success.
Feature Comparison: jcode vs. Traditional Frameworks
Before diving into the implementation details, let's look at how jcode positions itself against traditional Python-based agent architectures and standard LLM orchestration environments.
---Feature / Metric jcode (1jehuang) Python-based Agent Frameworks Standard LLM Chat Hooks Core Language Rust Python Python / TypeScript Execution Speed Ultra-high (Compiled, Native Threading) Moderate (Interpreted, Async Overheads) Low (Network Dependent) Memory Management Strict compile-time safety, minimal footprint High runtime consumption, garbage collected Variable depending on wrapper Sandbox Isolation Native OS environment detection & mapping Requires heavy external Docker wrapper No native execution layer Primary Target Autonomous multi-turn software engineering General purpose task automation agents Single-turn text/code generation Prerequisites and Environment Verification
Before installing jcode, you need to ensure your machine meets the minimum system requirements for native compilation and execution. Because jcode evaluates code in real-time, having a stable environment with standard compilers is essential.
System Requirements:
- Operating System: macOS (Intel/Apple Silicon), Linux (Ubuntu 22.04+, Debian, Fedora), or Windows 11 (with PowerShell or WSL2).
- Toolchains: Rust Stable (1.75+ recommended) if building from source.
- Network: Active internet connection to pull model endpoints and fetch external crate dependencies.
Step-by-Step Installation Guide
jcode features an adaptive installer that detects your current operating system, available package managers, and active shell configurations. Select the installation track below that best matches your local development system.
Option A: macOS via Homebrew
If you are on macOS and use the Homebrew package manager, you can install the official tap maintained by 1jehuang directly via your terminal:
# Tap the jcode formula repository brew tap 1jehuang/jcode # Install the binary package brew install jcodeOption B: Linux or macOS via Shell Script
For standard Linux distributions or macOS environments without Homebrew, use the automated installation script. This pulls the latest compiled binary corresponding to your architecture:
curl -fsSL [https://raw.githubusercontent.com/1jehuang/jcode/main/scripts/install.sh](https://raw.githubusercontent.com/1jehuang/jcode/main/scripts/install.sh) | bashOption C: Windows via PowerShell
If you are running natively on a Windows host within a standard administrative PowerShell prompt, execute the following command to download and map the binaries:
irm [https://raw.githubusercontent.com/1jehuang/jcode/main/scripts/install.ps1](https://raw.githubusercontent.com/1jehuang/jcode/main/scripts/install.ps1) | iexOption D: Building From Source (Recommended for Contributors)
If you want to run the cutting-edge development branch or adapt the core Rust source code to custom enterprise parameters, clone the official GitHub repository and compile it locally:
# Clone the project repository git clone [https://github.com/1jehuang/jcode.git](https://github.com/1jehuang/jcode.git) cd jcode # Compile a highly optimized release binary using Cargo cargo build --release # Execute the local release install configuration script ./scripts/install_release.shVerify that your installation was successful by checking the current version of the harness:
---jcode --versionQuickstart: Configuring and Initializing Your Agent Workspace
With jcode successfully installed, the next stage is configuring your active LLM providers and preparing a localized project workspace where your programming agent can safely read, write, and test applications.
Step 1: Exporting LLM API Credentials
jcode acts as an execution harness that routes logic through state-of-the-art coding LLMs. You must supply your preferred model API keys as environment variables. Add these to your shell profile (e.g.,
.bashrcor.zshrc):export OPENAI_API_KEY="sk-proj-xxxxxxxxxxxxxxxxxxxxxxxxxxxxxxxx" export ANTHROPIC_API_KEY="sk-ant-xxxxxxxxxxxxxxxxxxxxxxxxxxxxxxxx"Step 2: Initialize a New jcode Workspace
Navigate to an empty folder or your target repository and run the workspace initialization command. This tells jcode to parse the local layout and prepare an isolated runtime manifest:
mkdir my-agent-project cd my-agent-project jcode initThis command creates a hidden configuration workspace called
.jcode/containing a primary configuration file namedconfig.toml. Let's inspect and modify a standard setup configuration:
---# .jcode/config.toml [workspace] name = "my-agent-project" allowed_commands = ["cargo", "npm", "python", "git", "pytest", "go"] max_iterations = 15 [model] provider = "anthropic" default_model = "claude-3-5-sonnet-20241022" temperature = 0.2 max_tokens = 4096 [sandbox] isolate_network = false timeout_seconds = 45Building an Autonomous Programming Workflow
Now that your workspace is instantiated, let's walk through a real-world software maintenance scenario. We will instruct our jcode agent to write a complete Python utility module, write an associated test suit, run the validations, find bugs from execution outputs, and safely refactor the code automatically.
Step 1: Issue the Agent Task
We trigger the agent execution loop by supplying a clear, high-level engineering prompt using the
jcode runinstruction interface:jcode run "Create a robust Python rate limiter using a sliding window log algorithm. Include unit tests using pytest. Ensure it handles sub-millisecond timestamps gracefully."Step 2: Reviewing the Agent Autonomous Execution Trace
Once triggered, the jcode framework takes absolute control over the planning tree. Here is an approximation of what the terminal sequence tracks as the underlying Rust engine coordinates actions:
[INFO] Initializing agent environment... [INFO] Detected OS: Linux (Ubuntu 24.04), Package Manager: apt, Shell: bash [STEP 1/15] Planning task allocation tree... [TOOL CALL] Writing file: rate_limiter.py [TOOL CALL] Writing file: test_rate_limiter.py [STEP 2/15] Executing automated testing validation suite... [SHELL COMMAND] pytest test_rate_limiter.py [EXECUTION OUTPUT] ========================= FAILURES ========================= ____ test_sliding_window_log_edge_case _____________________ > assert limiter.allow_request("user_1") == False E AssertionError: assert True == False [STEP 3/15] Analyzing test failures. Reflection phase initiated... [INFO] Detected boundary edge condition flaw in window timestamps math. [TOOL CALL] Patching file: rate_limiter.py (Applying inline diff) [STEP 4/15] Re-executing testing suite... [SHELL COMMAND] pytest test_rate_limiter.py [EXECUTION OUTPUT] ==================== 4 passed in 0.08s ===================== [SUCCESS] Task fully resolved. Workspace state clean. Halting execution loop.Step 3: Examining the Generated Code Artifacts
Let's view the production code written completely by the jcode programming agent. Check the output of
rate_limiter.py:import time class SlidingWindowRateLimiter: def __init__(self, max_requests: int, window_size_seconds: float): self.max_requests = max_requests self.window_size_seconds = window_size_seconds self.user_logs = {} def allow_request(self, user_id: str) -> bool: current_time = time.time() if user_id not in self.user_logs: self.user_logs[user_id] = [] # Filter timestamps outside the active historical sliding window window_start = current_time - self.window_size_seconds self.user_logs[user_id] = [t for t in self.user_logs[user_id] if t > window_start] if len(self.user_logs[user_id]) < self.max_requests: self.user_logs[user_id].append(current_time) return True return FalseNext, inspect the corresponding automated validation suites written in
test_rate_limiter.py:
---import time import pytest from rate_limiter import SlidingWindowRateLimiter def test_rate_limiter_concurrency_allowance(): limiter = SlidingWindowRateLimiter(max_requests=3, window_size_seconds=1.0) assert limiter.allow_request("dev_user") is True assert limiter.allow_request("dev_user") is True assert limiter.allow_request("dev_user") is True assert limiter.allow_request("dev_user") is False # Throttled def test_rate_limiter_window_expiry(): limiter = SlidingWindowRateLimiter(max_requests=1, window_size_seconds=0.5) assert limiter.allow_request("admin_user") is True time.sleep(0.6) assert limiter.allow_request("admin_user") is True # RefreshedAdvanced Configuration: Creating Custom Agentic Rulesets
For large engineering groups or complex codebases, you may want to enforce strict coding policies, guardrails, or dependency behaviors. jcode supports local rule binding through systemic definition markdown assets. Create a file called
.jcode/rules.mdto define these behavioral rules:# Project Coding Standards & Policies ## Python Style Rules - All newly generated Python files must include explicit type hinting for argument parameters and return conditions. - Document all core classes with complete PEP-257 compliant docstrings. - Never invoke raw raw input formatting pipelines or unvetted third-party system subshells without utilizing structural subprocess escaping methods. ## Testing Rules - Every module must maintain at least an 85% assertion verification target block footprint. - Always use localized mocking modules when testing external system communication gateways or raw databases.When executing future
---jcode runoperational assignments, the Rust engine automatically parses and incorporates these structural directives directly into the agent planning and verification pipeline constraints.Conclusion and Community
jcode: Building High-Performance Autonomous AI Coding Agents from Scratch
The landscape of AI-driven software development is shifting rapidly. While first-generation AI coding tools operated primarily as conversational completions or simple script generators, the community is moving decisively toward autonomous programming agents. These agents don't just suggest code; they plan, execute tests, refactor, and self-correct within a structured harness.
Emerging at the forefront of this shift in May 2026 is jcode, an open-source, Rust-based programming agent framework developed by creator
1jehuang. Rapidly climbing the GitHub Trending charts and capturing the attention of autonomous systems developers, jcode addresses a critical bottleneck in the agentic ecosystem: execution speed, structural reliability, and resource overhead. Written entirely in Rust, it provides a high-performance harness designed to run AI coding agents at scale without the typical latency and memory bloat associated with Python-heavy orchestration layers.In this comprehensive tutorial-style guide, we will break down what jcode is, analyze its internal architecture, compare it to existing frameworks, and walk through an end-to-end installation and configuration process to build your very first autonomous coding agent.
---Understanding the jcode Architecture
To build effective applications with jcode, it is essential to understand how it organizes the execution loop of an AI agent. Traditional agent frameworks rely on high-level scripting abstractions that introduce significant latency, making deep-tree search algorithms (like Monte Carlo Tree Search or complex reflection loops) painfully slow. jcode solves this by using a compiled Rust backend that exposes a highly structured execution harness.
The framework is divided into three primary layers:
- The Environment Layer (The Sandbox): This component manages the operating system context, available package managers, and shell environments. It isolates agent actions, preventing rogue scripts from damaging the host system while providing full feedback loops (stdout, stderr, exit codes) back to the agent.
- The Core Harness (Rust Engine): Written in Rust for maximum concurrency and memory safety, this engine manages agent state transitions, prompt token streaming pipelines, and workspace file parsing. It abstracts token budgets and tool call translations natively.
- The Agent Interface (Extensible Profiles): This layer allows developers to write custom planning algorithms, definition maps, and system instructions. It defines how the agent approaches a problem, splits tasks, and evaluates success.
Feature Comparison: jcode vs. Traditional Frameworks
Before diving into the implementation details, let's look at how jcode positions itself against traditional Python-based agent architectures and standard LLM orchestration environments.
---Feature / Metric jcode (1jehuang) Python-based Agent Frameworks Standard LLM Chat Hooks Core Language Rust Python Python / TypeScript Execution Speed Ultra-high (Compiled, Native Threading) Moderate (Interpreted, Async Overheads) Low (Network Dependent) Memory Management Strict compile-time safety, minimal footprint High runtime consumption, garbage collected Variable depending on wrapper Sandbox Isolation Native OS environment detection & mapping Requires heavy external Docker wrapper No native execution layer Primary Target Autonomous multi-turn software engineering General purpose task automation agents Single-turn text/code generation Prerequisites and Environment Verification
Before installing jcode, you need to ensure your machine meets the minimum system requirements for native compilation and execution. Because jcode evaluates code in real-time, having a stable environment with standard compilers is essential.
System Requirements:
- Operating System: macOS (Intel/Apple Silicon), Linux (Ubuntu 22.04+, Debian, Fedora), or Windows 11 (with PowerShell or WSL2).
- Toolchains: Rust Stable (1.75+ recommended) if building from source.
- Network: Active internet connection to pull model endpoints and fetch external crate dependencies.
Step-by-Step Installation Guide
jcode features an adaptive installer that detects your current operating system, available package managers, and active shell configurations. Select the installation track below that best matches your local development system.
Option A: macOS via Homebrew
If you are on macOS and use the Homebrew package manager, you can install the official tap maintained by 1jehuang directly via your terminal:
# Tap the jcode formula repository brew tap 1jehuang/jcode # Install the binary package brew install jcodeOption B: Linux or macOS via Shell Script
For standard Linux distributions or macOS environments without Homebrew, use the automated installation script. This pulls the latest compiled binary corresponding to your architecture:
curl -fsSL [https://raw.githubusercontent.com/1jehuang/jcode/main/scripts/install.sh](https://raw.githubusercontent.com/1jehuang/jcode/main/scripts/install.sh) | bashOption C: Windows via PowerShell
If you are running natively on a Windows host within a standard administrative PowerShell prompt, execute the following command to download and map the binaries:
irm [https://raw.githubusercontent.com/1jehuang/jcode/main/scripts/install.ps1](https://raw.githubusercontent.com/1jehuang/jcode/main/scripts/install.ps1) | iexOption D: Building From Source (Recommended for Contributors)
If you want to run the cutting-edge development branch or adapt the core Rust source code to custom enterprise parameters, clone the official GitHub repository and compile it locally:
# Clone the project repository git clone [https://github.com/1jehuang/jcode.git](https://github.com/1jehuang/jcode.git) cd jcode # Compile a highly optimized release binary using Cargo cargo build --release # Execute the local release install configuration script ./scripts/install_release.shVerify that your installation was successful by checking the current version of the harness:
---jcode --versionQuickstart: Configuring and Initializing Your Agent Workspace
With jcode successfully installed, the next stage is configuring your active LLM providers and preparing a localized project workspace where your programming agent can safely read, write, and test applications.
Step 1: Exporting LLM API Credentials
jcode acts as an execution harness that routes logic through state-of-the-art coding LLMs. You must supply your preferred model API keys as environment variables. Add these to your shell profile (e.g.,
.bashrcor.zshrc):export OPENAI_API_KEY="sk-proj-xxxxxxxxxxxxxxxxxxxxxxxxxxxxxxxx" export ANTHROPIC_API_KEY="sk-ant-xxxxxxxxxxxxxxxxxxxxxxxxxxxxxxxx"Step 2: Initialize a New jcode Workspace
Navigate to an empty folder or your target repository and run the workspace initialization command. This tells jcode to parse the local layout and prepare an isolated runtime manifest:
mkdir my-agent-project cd my-agent-project jcode initThis command creates a hidden configuration workspace called
.jcode/containing a primary configuration file namedconfig.toml. Let's inspect and modify a standard setup configuration:
---# .jcode/config.toml [workspace] name = "my-agent-project" allowed_commands = ["cargo", "npm", "python", "git", "pytest", "go"] max_iterations = 15 [model] provider = "anthropic" default_model = "claude-3-5-sonnet-20241022" temperature = 0.2 max_tokens = 4096 [sandbox] isolate_network = false timeout_seconds = 45Building an Autonomous Programming Workflow
Now that your workspace is instantiated, let's walk through a real-world software maintenance scenario. We will instruct our jcode agent to write a complete Python utility module, write an associated test suit, run the validations, find bugs from execution outputs, and safely refactor the code automatically.
Step 1: Issue the Agent Task
We trigger the agent execution loop by supplying a clear, high-level engineering prompt using the
jcode runinstruction interface:jcode run "Create a robust Python rate limiter using a sliding window log algorithm. Include unit tests using pytest. Ensure it handles sub-millisecond timestamps gracefully."Step 2: Reviewing the Agent Autonomous Execution Trace
Once triggered, the jcode framework takes absolute control over the planning tree. Here is an approximation of what the terminal sequence tracks as the underlying Rust engine coordinates actions:
[INFO] Initializing agent environment... [INFO] Detected OS: Linux (Ubuntu 24.04), Package Manager: apt, Shell: bash [STEP 1/15] Planning task allocation tree... [TOOL CALL] Writing file: rate_limiter.py [TOOL CALL] Writing file: test_rate_limiter.py [STEP 2/15] Executing automated testing validation suite... [SHELL COMMAND] pytest test_rate_limiter.py [EXECUTION OUTPUT] ========================= FAILURES ========================= ____ test_sliding_window_log_edge_case _____________________ > assert limiter.allow_request("user_1") == False E AssertionError: assert True == False [STEP 3/15] Analyzing test failures. Reflection phase initiated... [INFO] Detected boundary edge condition flaw in window timestamps math. [TOOL CALL] Patching file: rate_limiter.py (Applying inline diff) [STEP 4/15] Re-executing testing suite... [SHELL COMMAND] pytest test_rate_limiter.py [EXECUTION OUTPUT] ==================== 4 passed in 0.08s ===================== [SUCCESS] Task fully resolved. Workspace state clean. Halting execution loop.Step 3: Examining the Generated Code Artifacts
Let's view the production code written completely by the jcode programming agent. Check the output of
rate_limiter.py:import time class SlidingWindowRateLimiter: def __init__(self, max_requests: int, window_size_seconds: float): self.max_requests = max_requests self.window_size_seconds = window_size_seconds self.user_logs = {} def allow_request(self, user_id: str) -> bool: current_time = time.time() if user_id not in self.user_logs: self.user_logs[user_id] = [] # Filter timestamps outside the active historical sliding window window_start = current_time - self.window_size_seconds self.user_logs[user_id] = [t for t in self.user_logs[user_id] if t > window_start] if len(self.user_logs[user_id]) < self.max_requests: self.user_logs[user_id].append(current_time) return True return FalseNext, inspect the corresponding automated validation suites written in
test_rate_limiter.py:
---import time import pytest from rate_limiter import SlidingWindowRateLimiter def test_rate_limiter_concurrency_allowance(): limiter = SlidingWindowRateLimiter(max_requests=3, window_size_seconds=1.0) assert limiter.allow_request("dev_user") is True assert limiter.allow_request("dev_user") is True assert limiter.allow_request("dev_user") is True assert limiter.allow_request("dev_user") is False # Throttled def test_rate_limiter_window_expiry(): limiter = SlidingWindowRateLimiter(max_requests=1, window_size_seconds=0.5) assert limiter.allow_request("admin_user") is True time.sleep(0.6) assert limiter.allow_request("admin_user") is True # RefreshedAdvanced Configuration: Creating Custom Agentic Rulesets
For large engineering groups or complex codebases, you may want to enforce strict coding policies, guardrails, or dependency behaviors. jcode supports local rule binding through systemic definition markdown assets. Create a file called
.jcode/rules.mdto define these behavioral rules:# Project Coding Standards & Policies ## Python Style Rules - All newly generated Python files must include explicit type hinting for argument parameters and return conditions. - Document all core classes with complete PEP-257 compliant docstrings. - Never invoke raw raw input formatting pipelines or unvetted third-party system subshells without utilizing structural subprocess escaping methods. ## Testing Rules - Every module must maintain at least an 85% assertion verification target block footprint. - Always use localized mocking modules when testing external system communication gateways or raw databases.When executing future
---jcode runoperational assignments, the Rust engine automatically parses and incorporates these structural directives directly into the agent planning and verification pipeline constraints.Conclusion and Community Call to Action
The jcode framework represents a fundamental evolution in autonomous software engineering tooling. By embedding
jcode: Building High-Performance Autonomous AI Coding Agents from Scratch
The landscape of AI-driven software development is shifting rapidly. While first-generation AI coding tools operated primarily as conversational completions or simple script generators, the community is moving decisively toward autonomous programming agents. These agents don't just suggest code; they plan, execute tests, refactor, and self-correct within a structured harness.
Emerging at the forefront of this shift in May 2026 is jcode, an open-source, Rust-based programming agent framework developed by creator
1jehuang. Rapidly climbing the GitHub Trending charts and capturing the attention of autonomous systems developers, jcode addresses a critical bottleneck in the agentic ecosystem: execution speed, structural reliability, and resource overhead. Written entirely in Rust, it provides a high-performance harness designed to run AI coding agents at scale without the typical latency and memory bloat associated with Python-heavy orchestration layers.In this comprehensive tutorial-style guide, we will break down what jcode is, analyze its internal architecture, compare it to existing frameworks, and walk through an end-to-end installation and configuration process to build your very first autonomous coding agent.
---Understanding the jcode Architecture
To build effective applications with jcode, it is essential to understand how it organizes the execution loop of an AI agent. Traditional agent frameworks rely on high-level scripting abstractions that introduce significant latency, making deep-tree search algorithms (like Monte Carlo Tree Search or complex reflection loops) painfully slow. jcode solves this by using a compiled Rust backend that exposes a highly structured execution harness.
The framework is divided into three primary layers:
- The Environment Layer (The Sandbox): This component manages the operating system context, available package managers, and shell environments. It isolates agent actions, preventing rogue scripts from damaging the host system while providing full feedback loops (stdout, stderr, exit codes) back to the agent.
- The Core Harness (Rust Engine): Written in Rust for maximum concurrency and memory safety, this engine manages agent state transitions, prompt token streaming pipelines, and workspace file parsing. It abstracts token budgets and tool call translations natively.
- The Agent Interface (Extensible Profiles): This layer allows developers to write custom planning algorithms, definition maps, and system instructions. It defines how the agent approaches a problem, splits tasks, and evaluates success.
Feature Comparison: jcode vs. Traditional Frameworks
Before diving into the implementation details, let's look at how jcode positions itself against traditional Python-based agent architectures and standard LLM orchestration environments.
---Feature / Metric jcode (1jehuang) Python-based Agent Frameworks Standard LLM Chat Hooks Core Language Rust Python Python / TypeScript Execution Speed Ultra-high (Compiled, Native Threading) Moderate (Interpreted, Async Overheads) Low (Network Dependent) Memory Management Strict compile-time safety, minimal footprint High runtime consumption, garbage collected Variable depending on wrapper Sandbox Isolation Native OS environment detection & mapping Requires heavy external Docker wrapper No native execution layer Primary Target Autonomous multi-turn software engineering General purpose task automation agents Single-turn text/code generation Prerequisites and Environment Verification
Before installing jcode, you need to ensure your machine meets the minimum system requirements for native compilation and execution. Because jcode evaluates code in real-time, having a stable environment with standard compilers is essential.
System Requirements:
- Operating System: macOS (Intel/Apple Silicon), Linux (Ubuntu 22.04+, Debian, Fedora), or Windows 11 (with PowerShell or WSL2).
- Toolchains: Rust Stable (1.75+ recommended) if building from source.
- Network: Active internet connection to pull model endpoints and fetch external crate dependencies.
Step-by-Step Installation Guide
jcode features an adaptive installer that detects your current operating system, available package managers, and active shell configurations. Select the installation track below that best matches your local development system.
Option A: macOS via Homebrew
If you are on macOS and use the Homebrew package manager, you can install the official tap maintained by 1jehuang directly via your terminal:
# Tap the jcode formula repository brew tap 1jehuang/jcode # Install the binary package brew install jcodeOption B: Linux or macOS via Shell Script
For standard Linux distributions or macOS environments without Homebrew, use the automated installation script. This pulls the latest compiled binary corresponding to your architecture:
curl -fsSL [https://raw.githubusercontent.com/1jehuang/jcode/main/scripts/install.sh](https://raw.githubusercontent.com/1jehuang/jcode/main/scripts/install.sh) | bashOption C: Windows via PowerShell
If you are running natively on a Windows host within a standard administrative PowerShell prompt, execute the following command to download and map the binaries:
irm [https://raw.githubusercontent.com/1jehuang/jcode/main/scripts/install.ps1](https://raw.githubusercontent.com/1jehuang/jcode/main/scripts/install.ps1) | iexOption D: Building From Source (Recommended for Contributors)
If you want to run the cutting-edge development branch or adapt the core Rust source code to custom enterprise parameters, clone the official GitHub repository and compile it locally:
# Clone the project repository git clone [https://github.com/1jehuang/jcode.git](https://github.com/1jehuang/jcode.git) cd jcode # Compile a highly optimized release binary using Cargo cargo build --release # Execute the local release install configuration script ./scripts/install_release.shVerify that your installation was successful by checking the current version of the harness:
---jcode --versionQuickstart: Configuring and Initializing Your Agent Workspace
With jcode successfully installed, the next stage is configuring your active LLM providers and preparing a localized project workspace where your programming agent can safely read, write, and test applications.
Step 1: Exporting LLM API Credentials
jcode acts as an execution harness that routes logic through state-of-the-art coding LLMs. You must supply your preferred model API keys as environment variables. Add these to your shell profile (e.g.,
.bashrcor.zshrc):export OPENAI_API_KEY="sk-proj-xxxxxxxxxxxxxxxxxxxxxxxxxxxxxxxx" export ANTHROPIC_API_KEY="sk-ant-xxxxxxxxxxxxxxxxxxxxxxxxxxxxxxxx"Step 2: Initialize a New jcode Workspace
Navigate to an empty folder or your target repository and run the workspace initialization command. This tells jcode to parse the local layout and prepare an isolated runtime manifest:
mkdir my-agent-project cd my-agent-project jcode initThis command creates a hidden configuration workspace called
.jcode/containing a primary configuration file namedconfig.toml. Let's inspect and modify a standard setup configuration:
---# .jcode/config.toml [workspace] name = "my-agent-project" allowed_commands = ["cargo", "npm", "python", "git", "pytest", "go"] max_iterations = 15 [model] provider = "anthropic" default_model = "claude-3-5-sonnet-20241022" temperature = 0.2 max_tokens = 4096 [sandbox] isolate_network = false timeout_seconds = 45Building an Autonomous Programming Workflow
Now that your workspace is instantiated, let's walk through a real-world software maintenance scenario. We will instruct our jcode agent to write a complete Python utility module, write an associated test suit, run the validations, find bugs from execution outputs, and safely refactor the code automatically.
Step 1: Issue the Agent Task
We trigger the agent execution loop by supplying a clear, high-level engineering prompt using the
jcode runinstruction interface:jcode run "Create a robust Python rate limiter using a sliding window log algorithm. Include unit tests using pytest. Ensure it handles sub-millisecond timestamps gracefully."Step 2: Reviewing the Agent Autonomous Execution Trace
Once triggered, the jcode framework takes absolute control over the planning tree. Here is an approximation of what the terminal sequence tracks as the underlying Rust engine coordinates actions:
[INFO] Initializing agent environment... [INFO] Detected OS: Linux (Ubuntu 24.04), Package Manager: apt, Shell: bash [STEP 1/15] Planning task allocation tree... [TOOL CALL] Writing file: rate_limiter.py [TOOL CALL] Writing file: test_rate_limiter.py [STEP 2/15] Executing automated testing validation suite... [SHELL COMMAND] pytest test_rate_limiter.py [EXECUTION OUTPUT] ========================= FAILURES ========================= ____ test_sliding_window_log_edge_case _____________________ > assert limiter.allow_request("user_1") == False E AssertionError: assert True == False [STEP 3/15] Analyzing test failures. Reflection phase initiated... [INFO] Detected boundary edge condition flaw in window timestamps math. [TOOL CALL] Patching file: rate_limiter.py (Applying inline diff) [STEP 4/15] Re-executing testing suite... [SHELL COMMAND] pytest test_rate_limiter.py [EXECUTION OUTPUT] ==================== 4 passed in 0.08s ===================== [SUCCESS] Task fully resolved. Workspace state clean. Halting execution loop.Step 3: Examining the Generated Code Artifacts
Let's view the production code written completely by the jcode programming agent. Check the output of
rate_limiter.py:import time class SlidingWindowRateLimiter: def __init__(self, max_requests: int, window_size_seconds: float): self.max_requests = max_requests self.window_size_seconds = window_size_seconds self.user_logs = {} def allow_request(self, user_id: str) -> bool: current_time = time.time() if user_id not in self.user_logs: self.user_logs[user_id] = [] # Filter timestamps outside the active historical sliding window window_start = current_time - self.window_size_seconds self.user_logs[user_id] = [t for t in self.user_logs[user_id] if t > window_start] if len(self.user_logs[user_id]) < self.max_requests: self.user_logs[user_id].append(current_time) return True return FalseNext, inspect the corresponding automated validation suites written in
test_rate_limiter.py:
---import time import pytest from rate_limiter import SlidingWindowRateLimiter def test_rate_limiter_concurrency_allowance(): limiter = SlidingWindowRateLimiter(max_requests=3, window_size_seconds=1.0) assert limiter.allow_request("dev_user") is True assert limiter.allow_request("dev_user") is True assert limiter.allow_request("dev_user") is True assert limiter.allow_request("dev_user") is False # Throttled def test_rate_limiter_window_expiry(): limiter = SlidingWindowRateLimiter(max_requests=1, window_size_seconds=0.5) assert limiter.allow_request("admin_user") is True time.sleep(0.6) assert limiter.allow_request("admin_user") is True # RefreshedAdvanced Configuration: Creating Custom Agentic Rulesets
For large engineering groups or complex codebases, you may want to enforce strict coding policies, guardrails, or dependency behaviors. jcode supports local rule binding through systemic definition markdown assets. Create a file called
.jcode/rules.mdto define these behavioral rules:# Project Coding Standards & Policies ## Python Style Rules - All newly generated Python files must include explicit type hinting for argument parameters and return conditions. - Document all core classes with complete PEP-257 compliant docstrings. - Never invoke raw raw input formatting pipelines or unvetted third-party system subshells without utilizing structural subprocess escaping methods. ## Testing Rules - Every module must maintain at least an 85% assertion verification target block footprint. - Always use localized mocking modules when testing external system communication gateways or raw databases.When executing future
---jcode runoperational assignments, the Rust engine automatically parses and incorporates these structural directives directly into the agent planning and verification pipeline constraints.Conclusion and Community Call to Action
The jcode framework represents a fundamental evolution in autonomous software engineering tooling. By embedding agentic execution steps directly inside a native, high-performance Rust framework, 1jehuang's project eliminates structural
jcode: Building High-Performance Autonomous AI Coding Agents from Scratch
The landscape of AI-driven software development is shifting rapidly. While first-generation AI coding tools operated primarily as conversational completions or simple script generators, the community is moving decisively toward autonomous programming agents. These agents don't just suggest code; they plan, execute tests, refactor, and self-correct within a structured harness.
Emerging at the forefront of this shift in May 2026 is jcode, an open-source, Rust-based programming agent framework developed by creator
1jehuang. Rapidly climbing the GitHub Trending charts and capturing the attention of autonomous systems developers, jcode addresses a critical bottleneck in the agentic ecosystem: execution speed, structural reliability, and resource overhead. Written entirely in Rust, it provides a high-performance harness designed to run AI coding agents at scale without the typical latency and memory bloat associated with Python-heavy orchestration layers.In this comprehensive tutorial-style guide, we will break down what jcode is, analyze its internal architecture, compare it to existing frameworks, and walk through an end-to-end installation and configuration process to build your very first autonomous coding agent.
---Understanding the jcode Architecture
To build effective applications with jcode, it is essential to understand how it organizes the execution loop of an AI agent. Traditional agent frameworks rely on high-level scripting abstractions that introduce significant latency, making deep-tree search algorithms (like Monte Carlo Tree Search or complex reflection loops) painfully slow. jcode solves this by using a compiled Rust backend that exposes a highly structured execution harness.
The framework is divided into three primary layers:
- The Environment Layer (The Sandbox): This component manages the operating system context, available package managers, and shell environments. It isolates agent actions, preventing rogue scripts from damaging the host system while providing full feedback loops (stdout, stderr, exit codes) back to the agent.
- The Core Harness (Rust Engine): Written in Rust for maximum concurrency and memory safety, this engine manages agent state transitions, prompt token streaming pipelines, and workspace file parsing. It abstracts token budgets and tool call translations natively.
- The Agent Interface (Extensible Profiles): This layer allows developers to write custom planning algorithms, definition maps, and system instructions. It defines how the agent approaches a problem, splits tasks, and evaluates success.
Feature Comparison: jcode vs. Traditional Frameworks
Before diving into the implementation details, let's look at how jcode positions itself against traditional Python-based agent architectures and standard LLM orchestration environments.
---Feature / Metric jcode (1jehuang) Python-based Agent Frameworks Standard LLM Chat Hooks Core Language Rust Python Python / TypeScript Execution Speed Ultra-high (Compiled, Native Threading) Moderate (Interpreted, Async Overheads) Low (Network Dependent) Memory Management Strict compile-time safety, minimal footprint High runtime consumption, garbage collected Variable depending on wrapper Sandbox Isolation Native OS environment detection & mapping Requires heavy external Docker wrapper No native execution layer Primary Target Autonomous multi-turn software engineering General purpose task automation agents Single-turn text/code generation Prerequisites and Environment Verification
Before installing jcode, you need to ensure your machine meets the minimum system requirements for native compilation and execution. Because jcode evaluates code in real-time, having a stable environment with standard compilers is essential.
System Requirements:
- Operating System: macOS (Intel/Apple Silicon), Linux (Ubuntu 22.04+, Debian, Fedora), or Windows 11 (with PowerShell or WSL2).
- Toolchains: Rust Stable (1.75+ recommended) if building from source.
- Network: Active internet connection to pull model endpoints and fetch external crate dependencies.
Step-by-Step Installation Guide
jcode features an adaptive installer that detects your current operating system, available package managers, and active shell configurations. Select the installation track below that best matches your local development system.
Option A: macOS via Homebrew
If you are on macOS and use the Homebrew package manager, you can install the official tap maintained by 1jehuang directly via your terminal:
# Tap the jcode formula repository brew tap 1jehuang/jcode # Install the binary package brew install jcodeOption B: Linux or macOS via Shell Script
For standard Linux distributions or macOS environments without Homebrew, use the automated installation script. This pulls the latest compiled binary corresponding to your architecture:
curl -fsSL [https://raw.githubusercontent.com/1jehuang/jcode/main/scripts/install.sh](https://raw.githubusercontent.com/1jehuang/jcode/main/scripts/install.sh) | bashOption C: Windows via PowerShell
If you are running natively on a Windows host within a standard administrative PowerShell prompt, execute the following command to download and map the binaries:
irm [https://raw.githubusercontent.com/1jehuang/jcode/main/scripts/install.ps1](https://raw.githubusercontent.com/1jehuang/jcode/main/scripts/install.ps1) | iexOption D: Building From Source (Recommended for Contributors)
If you want to run the cutting-edge development branch or adapt the core Rust source code to custom enterprise parameters, clone the official GitHub repository and compile it locally:
# Clone the project repository git clone [https://github.com/1jehuang/jcode.git](https://github.com/1jehuang/jcode.git) cd jcode # Compile a highly optimized release binary using Cargo cargo build --release # Execute the local release install configuration script ./scripts/install_release.shVerify that your installation was successful by checking the current version of the harness:
---jcode --versionQuickstart: Configuring and Initializing Your Agent Workspace
With jcode successfully installed, the next stage is configuring your active LLM providers and preparing a localized project workspace where your programming agent can safely read, write, and test applications.
Step 1: Exporting LLM API Credentials
jcode acts as an execution harness that routes logic through state-of-the-art coding LLMs. You must supply your preferred model API keys as environment variables. Add these to your shell profile (e.g.,
.bashrcor.zshrc):export OPENAI_API_KEY="sk-proj-xxxxxxxxxxxxxxxxxxxxxxxxxxxxxxxx" export ANTHROPIC_API_KEY="sk-ant-xxxxxxxxxxxxxxxxxxxxxxxxxxxxxxxx"Step 2: Initialize a New jcode Workspace
Navigate to an empty folder or your target repository and run the workspace initialization command. This tells jcode to parse the local layout and prepare an isolated runtime manifest:
mkdir my-agent-project cd my-agent-project jcode initThis command creates a hidden configuration workspace called
.jcode/containing a primary configuration file namedconfig.toml. Let's inspect and modify a standard setup configuration:
---# .jcode/config.toml [workspace] name = "my-agent-project" allowed_commands = ["cargo", "npm", "python", "git", "pytest", "go"] max_iterations = 15 [model] provider = "anthropic" default_model = "claude-3-5-sonnet-20241022" temperature = 0.2 max_tokens = 4096 [sandbox] isolate_network = false timeout_seconds = 45Building an Autonomous Programming Workflow
Now that your workspace is instantiated, let's walk through a real-world software maintenance scenario. We will instruct our jcode agent to write a complete Python utility module, write an associated test suit, run the validations, find bugs from execution outputs, and safely refactor the code automatically.
Step 1: Issue the Agent Task
We trigger the agent execution loop by supplying a clear, high-level engineering prompt using the
jcode runinstruction interface:jcode run "Create a robust Python rate limiter using a sliding window log algorithm. Include unit tests using pytest. Ensure it handles sub-millisecond timestamps gracefully."Step 2: Reviewing the Agent Autonomous Execution Trace
Once triggered, the jcode framework takes absolute control over the planning tree. Here is an approximation of what the terminal sequence tracks as the underlying Rust engine coordinates actions:
[INFO] Initializing agent environment... [INFO] Detected OS: Linux (Ubuntu 24.04), Package Manager: apt, Shell: bash [STEP 1/15] Planning task allocation tree... [TOOL CALL] Writing file: rate_limiter.py [TOOL CALL] Writing file: test_rate_limiter.py [STEP 2/15] Executing automated testing validation suite... [SHELL COMMAND] pytest test_rate_limiter.py [EXECUTION OUTPUT] ========================= FAILURES ========================= ____ test_sliding_window_log_edge_case _____________________ > assert limiter.allow_request("user_1") == False E AssertionError: assert True == False [STEP 3/15] Analyzing test failures. Reflection phase initiated... [INFO] Detected boundary edge condition flaw in window timestamps math. [TOOL CALL] Patching file: rate_limiter.py (Applying inline diff) [STEP 4/15] Re-executing testing suite... [SHELL COMMAND] pytest test_rate_limiter.py [EXECUTION OUTPUT] ==================== 4 passed in 0.08s ===================== [SUCCESS] Task fully resolved. Workspace state clean. Halting execution loop.Step 3: Examining the Generated Code Artifacts
Let's view the production code written completely by the jcode programming agent. Check the output of
rate_limiter.py:import time class SlidingWindowRateLimiter: def __init__(self, max_requests: int, window_size_seconds: float): self.max_requests = max_requests self.window_size_seconds = window_size_seconds self.user_logs = {} def allow_request(self, user_id: str) -> bool: current_time = time.time() if user_id not in self.user_logs: self.user_logs[user_id] = [] # Filter timestamps outside the active historical sliding window window_start = current_time - self.window_size_seconds self.user_logs[user_id] = [t for t in self.user_logs[user_id] if t > window_start] if len(self.user_logs[user_id]) < self.max_requests: self.user_logs[user_id].append(current_time) return True return FalseNext, inspect the corresponding automated validation suites written in
test_rate_limiter.py:
---import time import pytest from rate_limiter import SlidingWindowRateLimiter def test_rate_limiter_concurrency_allowance(): limiter = SlidingWindowRateLimiter(max_requests=3, window_size_seconds=1.0) assert limiter.allow_request("dev_user") is True assert limiter.allow_request("dev_user") is True assert limiter.allow_request("dev_user") is True assert limiter.allow_request("dev_user") is False # Throttled def test_rate_limiter_window_expiry(): limiter = SlidingWindowRateLimiter(max_requests=1, window_size_seconds=0.5) assert limiter.allow_request("admin_user") is True time.sleep(0.6) assert limiter.allow_request("admin_user") is True # RefreshedAdvanced Configuration: Creating Custom Agentic Rulesets
For large engineering groups or complex codebases, you may want to enforce strict coding policies, guardrails, or dependency behaviors. jcode supports local rule binding through systemic definition markdown assets. Create a file called
.jcode/rules.mdto define these behavioral rules:# Project Coding Standards & Policies ## Python Style Rules - All newly generated Python files must include explicit type hinting for argument parameters and return conditions. - Document all core classes with complete PEP-257 compliant docstrings. - Never invoke raw raw input formatting pipelines or unvetted third-party system subshells without utilizing structural subprocess escaping methods. ## Testing Rules - Every module must maintain at least an 85% assertion verification target block footprint. - Always use localized mocking modules when testing external system communication gateways or raw databases.When executing future
---jcode runoperational assignments, the Rust engine automatically parses and incorporates these structural directives directly into the agent planning and verification pipeline constraints.Conclusion and Community Call to Action
The jcode framework represents a fundamental evolution in autonomous software engineering tooling. By embedding agentic execution steps directly inside a native, high-performance Rust framework, 1jehuang's project eliminates structural runtime bottlenecks, leaving more room for complex reasoning pipelines. Even in its early release lifecycle, it provides software engineering teams with an
jcode: Building High-Performance Autonomous AI Coding Agents from Scratch
The landscape of AI-driven software development is shifting rapidly. While first-generation AI coding tools operated primarily as conversational completions or simple script generators, the community is moving decisively toward autonomous programming agents. These agents don't just suggest code; they plan, execute tests, refactor, and self-correct within a structured harness.
Emerging at the forefront of this shift in May 2026 is jcode, an open-source, Rust-based programming agent framework developed by creator
1jehuang. Rapidly climbing the GitHub Trending charts and capturing the attention of autonomous systems developers, jcode addresses a critical bottleneck in the agentic ecosystem: execution speed, structural reliability, and resource overhead. Written entirely in Rust, it provides a high-performance harness designed to run AI coding agents at scale without the typical latency and memory bloat associated with Python-heavy orchestration layers.In this comprehensive tutorial-style guide, we will break down what jcode is, analyze its internal architecture, compare it to existing frameworks, and walk through an end-to-end installation and configuration process to build your very first autonomous coding agent.
---Understanding the jcode Architecture
To build effective applications with jcode, it is essential to understand how it organizes the execution loop of an AI agent. Traditional agent frameworks rely on high-level scripting abstractions that introduce significant latency, making deep-tree search algorithms (like Monte Carlo Tree Search or complex reflection loops) painfully slow. jcode solves this by using a compiled Rust backend that exposes a highly structured execution harness.
The framework is divided into three primary layers:
- The Environment Layer (The Sandbox): This component manages the operating system context, available package managers, and shell environments. It isolates agent actions, preventing rogue scripts from damaging the host system while providing full feedback loops (stdout, stderr, exit codes) back to the agent.
- The Core Harness (Rust Engine): Written in Rust for maximum concurrency and memory safety, this engine manages agent state transitions, prompt token streaming pipelines, and workspace file parsing. It abstracts token budgets and tool call translations natively.
- The Agent Interface (Extensible Profiles): This layer allows developers to write custom planning algorithms, definition maps, and system instructions. It defines how the agent approaches a problem, splits tasks, and evaluates success.
Feature Comparison: jcode vs. Traditional Frameworks
Before diving into the implementation details, let's look at how jcode positions itself against traditional Python-based agent architectures and standard LLM orchestration environments.
---Feature / Metric jcode (1jehuang) Python-based Agent Frameworks Standard LLM Chat Hooks Core Language Rust Python Python / TypeScript Execution Speed Ultra-high (Compiled, Native Threading) Moderate (Interpreted, Async Overheads) Low (Network Dependent) Memory Management Strict compile-time safety, minimal footprint High runtime consumption, garbage collected Variable depending on wrapper Sandbox Isolation Native OS environment detection & mapping Requires heavy external Docker wrapper No native execution layer Primary Target Autonomous multi-turn software engineering General purpose task automation agents Single-turn text/code generation Prerequisites and Environment Verification
Before installing jcode, you need to ensure your machine meets the minimum system requirements for native compilation and execution. Because jcode evaluates code in real-time, having a stable environment with standard compilers is essential.
System Requirements:
- Operating System: macOS (Intel/Apple Silicon), Linux (Ubuntu 22.04+, Debian, Fedora), or Windows 11 (with PowerShell or WSL2).
- Toolchains: Rust Stable (1.75+ recommended) if building from source.
- Network: Active internet connection to pull model endpoints and fetch external crate dependencies.
Step-by-Step Installation Guide
jcode features an adaptive installer that detects your current operating system, available package managers, and active shell configurations. Select the installation track below that best matches your local development system.
Option A: macOS via Homebrew
If you are on macOS and use the Homebrew package manager, you can install the official tap maintained by 1jehuang directly via your terminal:
# Tap the jcode formula repository brew tap 1jehuang/jcode # Install the binary package brew install jcodeOption B: Linux or macOS via Shell Script
For standard Linux distributions or macOS environments without Homebrew, use the automated installation script. This pulls the latest compiled binary corresponding to your architecture:
curl -fsSL [https://raw.githubusercontent.com/1jehuang/jcode/main/scripts/install.sh](https://raw.githubusercontent.com/1jehuang/jcode/main/scripts/install.sh) | bashOption C: Windows via PowerShell
If you are running natively on a Windows host within a standard administrative PowerShell prompt, execute the following command to download and map the binaries:
irm [https://raw.githubusercontent.com/1jehuang/jcode/main/scripts/install.ps1](https://raw.githubusercontent.com/1jehuang/jcode/main/scripts/install.ps1) | iexOption D: Building From Source (Recommended for Contributors)
If you want to run the cutting-edge development branch or adapt the core Rust source code to custom enterprise parameters, clone the official GitHub repository and compile it locally:
# Clone the project repository git clone [https://github.com/1jehuang/jcode.git](https://github.com/1jehuang/jcode.git) cd jcode # Compile a highly optimized release binary using Cargo cargo build --release # Execute the local release install configuration script ./scripts/install_release.shVerify that your installation was successful by checking the current version of the harness:
---jcode --versionQuickstart: Configuring and Initializing Your Agent Workspace
With jcode successfully installed, the next stage is configuring your active LLM providers and preparing a localized project workspace where your programming agent can safely read, write, and test applications.
Step 1: Exporting LLM API Credentials
jcode acts as an execution harness that routes logic through state-of-the-art coding LLMs. You must supply your preferred model API keys as environment variables. Add these to your shell profile (e.g.,
.bashrcor.zshrc):export OPENAI_API_KEY="sk-proj-xxxxxxxxxxxxxxxxxxxxxxxxxxxxxxxx" export ANTHROPIC_API_KEY="sk-ant-xxxxxxxxxxxxxxxxxxxxxxxxxxxxxxxx"Step 2: Initialize a New jcode Workspace
Navigate to an empty folder or your target repository and run the workspace initialization command. This tells jcode to parse the local layout and prepare an isolated runtime manifest:
mkdir my-agent-project cd my-agent-project jcode initThis command creates a hidden configuration workspace called
.jcode/containing a primary configuration file namedconfig.toml. Let's inspect and modify a standard setup configuration:
---# .jcode/config.toml [workspace] name = "my-agent-project" allowed_commands = ["cargo", "npm", "python", "git", "pytest", "go"] max_iterations = 15 [model] provider = "anthropic" default_model = "claude-3-5-sonnet-20241022" temperature = 0.2 max_tokens = 4096 [sandbox] isolate_network = false timeout_seconds = 45Building an Autonomous Programming Workflow
Now that your workspace is instantiated, let's walk through a real-world software maintenance scenario. We will instruct our jcode agent to write a complete Python utility module, write an associated test suit, run the validations, find bugs from execution outputs, and safely refactor the code automatically.
Step 1: Issue the Agent Task
We trigger the agent execution loop by supplying a clear, high-level engineering prompt using the
jcode runinstruction interface:jcode run "Create a robust Python rate limiter using a sliding window log algorithm. Include unit tests using pytest. Ensure it handles sub-millisecond timestamps gracefully."Step 2: Reviewing the Agent Autonomous Execution Trace
Once triggered, the jcode framework takes absolute control over the planning tree. Here is an approximation of what the terminal sequence tracks as the underlying Rust engine coordinates actions:
[INFO] Initializing agent environment... [INFO] Detected OS: Linux (Ubuntu 24.04), Package Manager: apt, Shell: bash [STEP 1/15] Planning task allocation tree... [TOOL CALL] Writing file: rate_limiter.py [TOOL CALL] Writing file: test_rate_limiter.py [STEP 2/15] Executing automated testing validation suite... [SHELL COMMAND] pytest test_rate_limiter.py [EXECUTION OUTPUT] ========================= FAILURES ========================= ____ test_sliding_window_log_edge_case _____________________ > assert limiter.allow_request("user_1") == False E AssertionError: assert True == False [STEP 3/15] Analyzing test failures. Reflection phase initiated... [INFO] Detected boundary edge condition flaw in window timestamps math. [TOOL CALL] Patching file: rate_limiter.py (Applying inline diff) [STEP 4/15] Re-executing testing suite... [SHELL COMMAND] pytest test_rate_limiter.py [EXECUTION OUTPUT] ==================== 4 passed in 0.08s ===================== [SUCCESS] Task fully resolved. Workspace state clean. Halting execution loop.Step 3: Examining the Generated Code Artifacts
Let's view the production code written completely by the jcode programming agent. Check the output of
rate_limiter.py:import time class SlidingWindowRateLimiter: def __init__(self, max_requests: int, window_size_seconds: float): self.max_requests = max_requests self.window_size_seconds = window_size_seconds self.user_logs = {} def allow_request(self, user_id: str) -> bool: current_time = time.time() if user_id not in self.user_logs: self.user_logs[user_id] = [] # Filter timestamps outside the active historical sliding window window_start = current_time - self.window_size_seconds self.user_logs[user_id] = [t for t in self.user_logs[user_id] if t > window_start] if len(self.user_logs[user_id]) < self.max_requests: self.user_logs[user_id].append(current_time) return True return FalseNext, inspect the corresponding automated validation suites written in
test_rate_limiter.py:
---import time import pytest from rate_limiter import SlidingWindowRateLimiter def test_rate_limiter_concurrency_allowance(): limiter = SlidingWindowRateLimiter(max_requests=3, window_size_seconds=1.0) assert limiter.allow_request("dev_user") is True assert limiter.allow_request("dev_user") is True assert limiter.allow_request("dev_user") is True assert limiter.allow_request("dev_user") is False # Throttled def test_rate_limiter_window_expiry(): limiter = SlidingWindowRateLimiter(max_requests=1, window_size_seconds=0.5) assert limiter.allow_request("admin_user") is True time.sleep(0.6) assert limiter.allow_request("admin_user") is True # RefreshedAdvanced Configuration: Creating Custom Agentic Rulesets
For large engineering groups or complex codebases, you may want to enforce strict coding policies, guardrails, or dependency behaviors. jcode supports local rule binding through systemic definition markdown assets. Create a file called
.jcode/rules.mdto define these behavioral rules:# Project Coding Standards & Policies ## Python Style Rules - All newly generated Python files must include explicit type hinting for argument parameters and return conditions. - Document all core classes with complete PEP-257 compliant docstrings. - Never invoke raw raw input formatting pipelines or unvetted third-party system subshells without utilizing structural subprocess escaping methods. ## Testing Rules - Every module must maintain at least an 85% assertion verification target block footprint. - Always use localized mocking modules when testing external system communication gateways or raw databases.When executing future
---jcode runoperational assignments, the Rust engine automatically parses and incorporates these structural directives directly into the agent planning and verification pipeline constraints.Conclusion and Community Call to Action
The jcode framework represents a fundamental evolution in autonomous software engineering tooling. By embedding agentic execution steps directly inside a native, high-performance Rust framework, 1jehuang's project eliminates structural runtime bottlenecks, leaving more room for complex reasoning pipelines. Even in its early release lifecycle, it provides software engineering teams with an incredibly fast, predictable environment for testing the practical boundaries of autonomous code generation.
As an open-source project expanding
jcode: Building High-Performance Autonomous AI Coding Agents from Scratch
The landscape of AI-driven software development is shifting rapidly. While first-generation AI coding tools operated primarily as conversational completions or simple script generators, the community is moving decisively toward autonomous programming agents. These agents don't just suggest code; they plan, execute tests, refactor, and self-correct within a structured harness.
Emerging at the forefront of this shift in May 2026 is jcode, an open-source, Rust-based programming agent framework developed by creator
1jehuang. Rapidly climbing the GitHub Trending charts and capturing the attention of autonomous systems developers, jcode addresses a critical bottleneck in the agentic ecosystem: execution speed, structural reliability, and resource overhead. Written entirely in Rust, it provides a high-performance harness designed to run AI coding agents at scale without the typical latency and memory bloat associated with Python-heavy orchestration layers.In this comprehensive tutorial-style guide, we will break down what jcode is, analyze its internal architecture, compare it to existing frameworks, and walk through an end-to-end installation and configuration process to build your very first autonomous coding agent.
---Understanding the jcode Architecture
To build effective applications with jcode, it is essential to understand how it organizes the execution loop of an AI agent. Traditional agent frameworks rely on high-level scripting abstractions that introduce significant latency, making deep-tree search algorithms (like Monte Carlo Tree Search or complex reflection loops) painfully slow. jcode solves this by using a compiled Rust backend that exposes a highly structured execution harness.
The framework is divided into three primary layers:
- The Environment Layer (The Sandbox): This component manages the operating system context, available package managers, and shell environments. It isolates agent actions, preventing rogue scripts from damaging the host system while providing full feedback loops (stdout, stderr, exit codes) back to the agent.
- The Core Harness (Rust Engine): Written in Rust for maximum concurrency and memory safety, this engine manages agent state transitions, prompt token streaming pipelines, and workspace file parsing. It abstracts token budgets and tool call translations natively.
- The Agent Interface (Extensible Profiles): This layer allows developers to write custom planning algorithms, definition maps, and system instructions. It defines how the agent approaches a problem, splits tasks, and evaluates success.
Feature Comparison: jcode vs. Traditional Frameworks
Before diving into the implementation details, let's look at how jcode positions itself against traditional Python-based agent architectures and standard LLM orchestration environments.
---Feature / Metric jcode (1jehuang) Python-based Agent Frameworks Standard LLM Chat Hooks Core Language Rust Python Python / TypeScript Execution Speed Ultra-high (Compiled, Native Threading) Moderate (Interpreted, Async Overheads) Low (Network Dependent) Memory Management Strict compile-time safety, minimal footprint High runtime consumption, garbage collected Variable depending on wrapper Sandbox Isolation Native OS environment detection & mapping Requires heavy external Docker wrapper No native execution layer Primary Target Autonomous multi-turn software engineering General purpose task automation agents Single-turn text/code generation Prerequisites and Environment Verification
Before installing jcode, you need to ensure your machine meets the minimum system requirements for native compilation and execution. Because jcode evaluates code in real-time, having a stable environment with standard compilers is essential.
System Requirements:
- Operating System: macOS (Intel/Apple Silicon), Linux (Ubuntu 22.04+, Debian, Fedora), or Windows 11 (with PowerShell or WSL2).
- Toolchains: Rust Stable (1.75+ recommended) if building from source.
- Network: Active internet connection to pull model endpoints and fetch external crate dependencies.
Step-by-Step Installation Guide
jcode features an adaptive installer that detects your current operating system, available package managers, and active shell configurations. Select the installation track below that best matches your local development system.
Option A: macOS via Homebrew
If you are on macOS and use the Homebrew package manager, you can install the official tap maintained by 1jehuang directly via your terminal:
# Tap the jcode formula repository brew tap 1jehuang/jcode # Install the binary package brew install jcodeOption B: Linux or macOS via Shell Script
For standard Linux distributions or macOS environments without Homebrew, use the automated installation script. This pulls the latest compiled binary corresponding to your architecture:
curl -fsSL [https://raw.githubusercontent.com/1jehuang/jcode/main/scripts/install.sh](https://raw.githubusercontent.com/1jehuang/jcode/main/scripts/install.sh) | bashOption C: Windows via PowerShell
If you are running natively on a Windows host within a standard administrative PowerShell prompt, execute the following command to download and map the binaries:
irm [https://raw.githubusercontent.com/1jehuang/jcode/main/scripts/install.ps1](https://raw.githubusercontent.com/1jehuang/jcode/main/scripts/install.ps1) | iexOption D: Building From Source (Recommended for Contributors)
If you want to run the cutting-edge development branch or adapt the core Rust source code to custom enterprise parameters, clone the official GitHub repository and compile it locally:
# Clone the project repository git clone [https://github.com/1jehuang/jcode.git](https://github.com/1jehuang/jcode.git) cd jcode # Compile a highly optimized release binary using Cargo cargo build --release # Execute the local release install configuration script ./scripts/install_release.shVerify that your installation was successful by checking the current version of the harness:
---jcode --versionQuickstart: Configuring and Initializing Your Agent Workspace
With jcode successfully installed, the next stage is configuring your active LLM providers and preparing a localized project workspace where your programming agent can safely read, write, and test applications.
Step 1: Exporting LLM API Credentials
jcode acts as an execution harness that routes logic through state-of-the-art coding LLMs. You must supply your preferred model API keys as environment variables. Add these to your shell profile (e.g.,
.bashrcor.zshrc):export OPENAI_API_KEY="sk-proj-xxxxxxxxxxxxxxxxxxxxxxxxxxxxxxxx" export ANTHROPIC_API_KEY="sk-ant-xxxxxxxxxxxxxxxxxxxxxxxxxxxxxxxx"Step 2: Initialize a New jcode Workspace
Navigate to an empty folder or your target repository and run the workspace initialization command. This tells jcode to parse the local layout and prepare an isolated runtime manifest:
mkdir my-agent-project cd my-agent-project jcode initThis command creates a hidden configuration workspace called
.jcode/containing a primary configuration file namedconfig.toml. Let's inspect and modify a standard setup configuration:
---# .jcode/config.toml [workspace] name = "my-agent-project" allowed_commands = ["cargo", "npm", "python", "git", "pytest", "go"] max_iterations = 15 [model] provider = "anthropic" default_model = "claude-3-5-sonnet-20241022" temperature = 0.2 max_tokens = 4096 [sandbox] isolate_network = false timeout_seconds = 45Building an Autonomous Programming Workflow
Now that your workspace is instantiated, let's walk through a real-world software maintenance scenario. We will instruct our jcode agent to write a complete Python utility module, write an associated test suit, run the validations, find bugs from execution outputs, and safely refactor the code automatically.
Step 1: Issue the Agent Task
We trigger the agent execution loop by supplying a clear, high-level engineering prompt using the
jcode runinstruction interface:jcode run "Create a robust Python rate limiter using a sliding window log algorithm. Include unit tests using pytest. Ensure it handles sub-millisecond timestamps gracefully."Step 2: Reviewing the Agent Autonomous Execution Trace
Once triggered, the jcode framework takes absolute control over the planning tree. Here is an approximation of what the terminal sequence tracks as the underlying Rust engine coordinates actions:
[INFO] Initializing agent environment... [INFO] Detected OS: Linux (Ubuntu 24.04), Package Manager: apt, Shell: bash [STEP 1/15] Planning task allocation tree... [TOOL CALL] Writing file: rate_limiter.py [TOOL CALL] Writing file: test_rate_limiter.py [STEP 2/15] Executing automated testing validation suite... [SHELL COMMAND] pytest test_rate_limiter.py [EXECUTION OUTPUT] ========================= FAILURES ========================= ____ test_sliding_window_log_edge_case _____________________ > assert limiter.allow_request("user_1") == False E AssertionError: assert True == False [STEP 3/15] Analyzing test failures. Reflection phase initiated... [INFO] Detected boundary edge condition flaw in window timestamps math. [TOOL CALL] Patching file: rate_limiter.py (Applying inline diff) [STEP 4/15] Re-executing testing suite... [SHELL COMMAND] pytest test_rate_limiter.py [EXECUTION OUTPUT] ==================== 4 passed in 0.08s ===================== [SUCCESS] Task fully resolved. Workspace state clean. Halting execution loop.Step 3: Examining the Generated Code Artifacts
Let's view the production code written completely by the jcode programming agent. Check the output of
rate_limiter.py:import time class SlidingWindowRateLimiter: def __init__(self, max_requests: int, window_size_seconds: float): self.max_requests = max_requests self.window_size_seconds = window_size_seconds self.user_logs = {} def allow_request(self, user_id: str) -> bool: current_time = time.time() if user_id not in self.user_logs: self.user_logs[user_id] = [] # Filter timestamps outside the active historical sliding window window_start = current_time - self.window_size_seconds self.user_logs[user_id] = [t for t in self.user_logs[user_id] if t > window_start] if len(self.user_logs[user_id]) < self.max_requests: self.user_logs[user_id].append(current_time) return True return FalseNext, inspect the corresponding automated validation suites written in
test_rate_limiter.py:
---import time import pytest from rate_limiter import SlidingWindowRateLimiter def test_rate_limiter_concurrency_allowance(): limiter = SlidingWindowRateLimiter(max_requests=3, window_size_seconds=1.0) assert limiter.allow_request("dev_user") is True assert limiter.allow_request("dev_user") is True assert limiter.allow_request("dev_user") is True assert limiter.allow_request("dev_user") is False # Throttled def test_rate_limiter_window_expiry(): limiter = SlidingWindowRateLimiter(max_requests=1, window_size_seconds=0.5) assert limiter.allow_request("admin_user") is True time.sleep(0.6) assert limiter.allow_request("admin_user") is True # RefreshedAdvanced Configuration: Creating Custom Agentic Rulesets
For large engineering groups or complex codebases, you may want to enforce strict coding policies, guardrails, or dependency behaviors. jcode supports local rule binding through systemic definition markdown assets. Create a file called
.jcode/rules.mdto define these behavioral rules:# Project Coding Standards & Policies ## Python Style Rules - All newly generated Python files must include explicit type hinting for argument parameters and return conditions. - Document all core classes with complete PEP-257 compliant docstrings. - Never invoke raw raw input formatting pipelines or unvetted third-party system subshells without utilizing structural subprocess escaping methods. ## Testing Rules - Every module must maintain at least an 85% assertion verification target block footprint. - Always use localized mocking modules when testing external system communication gateways or raw databases.When executing future
---jcode runoperational assignments, the Rust engine automatically parses and incorporates these structural directives directly into the agent planning and verification pipeline constraints.Conclusion and Community Call to Action
The jcode framework represents a fundamental evolution in autonomous software engineering tooling. By embedding agentic execution steps directly inside a native, high-performance Rust framework, 1jehuang's project eliminates structural runtime bottlenecks, leaving more room for complex reasoning pipelines. Even in its early release lifecycle, it provides software engineering teams with an incredibly fast, predictable environment for testing the practical boundaries of autonomous code generation.
As an open-source project expanding daily on the GitHub Trending tracks, the success of jcode depends heavily on active community feedback and real-world implementation logs
jcode: Building High-Performance Autonomous AI Coding Agents from Scratch
The landscape of AI-driven software development is shifting rapidly. While first-generation AI coding tools operated primarily as conversational completions or simple script generators, the community is moving decisively toward autonomous programming agents. These agents don't just suggest code; they plan, execute tests, refactor, and self-correct within a structured harness.
Emerging at the forefront of this shift in May 2026 is jcode, an open-source, Rust-based programming agent framework developed by creator
1jehuang. Rapidly climbing the GitHub Trending charts and capturing the attention of autonomous systems developers, jcode addresses a critical bottleneck in the agentic ecosystem: execution speed, structural reliability, and resource overhead. Written entirely in Rust, it provides a high-performance harness designed to run AI coding agents at scale without the typical latency and memory bloat associated with Python-heavy orchestration layers.In this comprehensive tutorial-style guide, we will break down what jcode is, analyze its internal architecture, compare it to existing frameworks, and walk through an end-to-end installation and configuration process to build your very first autonomous coding agent.
---Understanding the jcode Architecture
To build effective applications with jcode, it is essential to understand how it organizes the execution loop of an AI agent. Traditional agent frameworks rely on high-level scripting abstractions that introduce significant latency, making deep-tree search algorithms (like Monte Carlo Tree Search or complex reflection loops) painfully slow. jcode solves this by using a compiled Rust backend that exposes a highly structured execution harness.
The framework is divided into three primary layers:
- The Environment Layer (The Sandbox): This component manages the operating system context, available package managers, and shell environments. It isolates agent actions, preventing rogue scripts from damaging the host system while providing full feedback loops (stdout, stderr, exit codes) back to the agent.
- The Core Harness (Rust Engine): Written in Rust for maximum concurrency and memory safety, this engine manages agent state transitions, prompt token streaming pipelines, and workspace file parsing. It abstracts token budgets and tool call translations natively.
- The Agent Interface (Extensible Profiles): This layer allows developers to write custom planning algorithms, definition maps, and system instructions. It defines how the agent approaches a problem, splits tasks, and evaluates success.
Feature Comparison: jcode vs. Traditional Frameworks
Before diving into the implementation details, let's look at how jcode positions itself against traditional Python-based agent architectures and standard LLM orchestration environments.
---Feature / Metric jcode (1jehuang) Python-based Agent Frameworks Standard LLM Chat Hooks Core Language Rust Python Python / TypeScript Execution Speed Ultra-high (Compiled, Native Threading) Moderate (Interpreted, Async Overheads) Low (Network Dependent) Memory Management Strict compile-time safety, minimal footprint High runtime consumption, garbage collected Variable depending on wrapper Sandbox Isolation Native OS environment detection & mapping Requires heavy external Docker wrapper No native execution layer Primary Target Autonomous multi-turn software engineering General purpose task automation agents Single-turn text/code generation Prerequisites and Environment Verification
Before installing jcode, you need to ensure your machine meets the minimum system requirements for native compilation and execution. Because jcode evaluates code in real-time, having a stable environment with standard compilers is essential.
System Requirements:
- Operating System: macOS (Intel/Apple Silicon), Linux (Ubuntu 22.04+, Debian, Fedora), or Windows 11 (with PowerShell or WSL2).
- Toolchains: Rust Stable (1.75+ recommended) if building from source.
- Network: Active internet connection to pull model endpoints and fetch external crate dependencies.
Step-by-Step Installation Guide
jcode features an adaptive installer that detects your current operating system, available package managers, and active shell configurations. Select the installation track below that best matches your local development system.
Option A: macOS via Homebrew
If you are on macOS and use the Homebrew package manager, you can install the official tap maintained by 1jehuang directly via your terminal:
# Tap the jcode formula repository brew tap 1jehuang/jcode # Install the binary package brew install jcodeOption B: Linux or macOS via Shell Script
For standard Linux distributions or macOS environments without Homebrew, use the automated installation script. This pulls the latest compiled binary corresponding to your architecture:
curl -fsSL [https://raw.githubusercontent.com/1jehuang/jcode/main/scripts/install.sh](https://raw.githubusercontent.com/1jehuang/jcode/main/scripts/install.sh) | bashOption C: Windows via PowerShell
If you are running natively on a Windows host within a standard administrative PowerShell prompt, execute the following command to download and map the binaries:
irm [https://raw.githubusercontent.com/1jehuang/jcode/main/scripts/install.ps1](https://raw.githubusercontent.com/1jehuang/jcode/main/scripts/install.ps1) | iexOption D: Building From Source (Recommended for Contributors)
If you want to run the cutting-edge development branch or adapt the core Rust source code to custom enterprise parameters, clone the official GitHub repository and compile it locally:
# Clone the project repository git clone [https://github.com/1jehuang/jcode.git](https://github.com/1jehuang/jcode.git) cd jcode # Compile a highly optimized release binary using Cargo cargo build --release # Execute the local release install configuration script ./scripts/install_release.shVerify that your installation was successful by checking the current version of the harness:
---jcode --versionQuickstart: Configuring and Initializing Your Agent Workspace
With jcode successfully installed, the next stage is configuring your active LLM providers and preparing a localized project workspace where your programming agent can safely read, write, and test applications.
Step 1: Exporting LLM API Credentials
jcode acts as an execution harness that routes logic through state-of-the-art coding LLMs. You must supply your preferred model API keys as environment variables. Add these to your shell profile (e.g.,
.bashrcor.zshrc):export OPENAI_API_KEY="sk-proj-xxxxxxxxxxxxxxxxxxxxxxxxxxxxxxxx" export ANTHROPIC_API_KEY="sk-ant-xxxxxxxxxxxxxxxxxxxxxxxxxxxxxxxx"Step 2: Initialize a New jcode Workspace
Navigate to an empty folder or your target repository and run the workspace initialization command. This tells jcode to parse the local layout and prepare an isolated runtime manifest:
mkdir my-agent-project cd my-agent-project jcode initThis command creates a hidden configuration workspace called
.jcode/containing a primary configuration file namedconfig.toml. Let's inspect and modify a standard setup configuration:
---# .jcode/config.toml [workspace] name = "my-agent-project" allowed_commands = ["cargo", "npm", "python", "git", "pytest", "go"] max_iterations = 15 [model] provider = "anthropic" default_model = "claude-3-5-sonnet-20241022" temperature = 0.2 max_tokens = 4096 [sandbox] isolate_network = false timeout_seconds = 45Building an Autonomous Programming Workflow
Now that your workspace is instantiated, let's walk through a real-world software maintenance scenario. We will instruct our jcode agent to write a complete Python utility module, write an associated test suit, run the validations, find bugs from execution outputs, and safely refactor the code automatically.
Step 1: Issue the Agent Task
We trigger the agent execution loop by supplying a clear, high-level engineering prompt using the
jcode runinstruction interface:jcode run "Create a robust Python rate limiter using a sliding window log algorithm. Include unit tests using pytest. Ensure it handles sub-millisecond timestamps gracefully."Step 2: Reviewing the Agent Autonomous Execution Trace
Once triggered, the jcode framework takes absolute control over the planning tree. Here is an approximation of what the terminal sequence tracks as the underlying Rust engine coordinates actions:
[INFO] Initializing agent environment... [INFO] Detected OS: Linux (Ubuntu 24.04), Package Manager: apt, Shell: bash [STEP 1/15] Planning task allocation tree... [TOOL CALL] Writing file: rate_limiter.py [TOOL CALL] Writing file: test_rate_limiter.py [STEP 2/15] Executing automated testing validation suite... [SHELL COMMAND] pytest test_rate_limiter.py [EXECUTION OUTPUT] ========================= FAILURES ========================= ____ test_sliding_window_log_edge_case _____________________ > assert limiter.allow_request("user_1") == False E AssertionError: assert True == False [STEP 3/15] Analyzing test failures. Reflection phase initiated... [INFO] Detected boundary edge condition flaw in window timestamps math. [TOOL CALL] Patching file: rate_limiter.py (Applying inline diff) [STEP 4/15] Re-executing testing suite... [SHELL COMMAND] pytest test_rate_limiter.py [EXECUTION OUTPUT] ==================== 4 passed in 0.08s ===================== [SUCCESS] Task fully resolved. Workspace state clean. Halting execution loop.Step 3: Examining the Generated Code Artifacts
Let's view the production code written completely by the jcode programming agent. Check the output of
rate_limiter.py:import time class SlidingWindowRateLimiter: def __init__(self, max_requests: int, window_size_seconds: float): self.max_requests = max_requests self.window_size_seconds = window_size_seconds self.user_logs = {} def allow_request(self, user_id: str) -> bool: current_time = time.time() if user_id not in self.user_logs: self.user_logs[user_id] = [] # Filter timestamps outside the active historical sliding window window_start = current_time - self.window_size_seconds self.user_logs[user_id] = [t for t in self.user_logs[user_id] if t > window_start] if len(self.user_logs[user_id]) < self.max_requests: self.user_logs[user_id].append(current_time) return True return FalseNext, inspect the corresponding automated validation suites written in
test_rate_limiter.py:
---import time import pytest from rate_limiter import SlidingWindowRateLimiter def test_rate_limiter_concurrency_allowance(): limiter = SlidingWindowRateLimiter(max_requests=3, window_size_seconds=1.0) assert limiter.allow_request("dev_user") is True assert limiter.allow_request("dev_user") is True assert limiter.allow_request("dev_user") is True assert limiter.allow_request("dev_user") is False # Throttled def test_rate_limiter_window_expiry(): limiter = SlidingWindowRateLimiter(max_requests=1, window_size_seconds=0.5) assert limiter.allow_request("admin_user") is True time.sleep(0.6) assert limiter.allow_request("admin_user") is True # RefreshedAdvanced Configuration: Creating Custom Agentic Rulesets
For large engineering groups or complex codebases, you may want to enforce strict coding policies, guardrails, or dependency behaviors. jcode supports local rule binding through systemic definition markdown assets. Create a file called
.jcode/rules.mdto define these behavioral rules:# Project Coding Standards & Policies ## Python Style Rules - All newly generated Python files must include explicit type hinting for argument parameters and return conditions. - Document all core classes with complete PEP-257 compliant docstrings. - Never invoke raw raw input formatting pipelines or unvetted third-party system subshells without utilizing structural subprocess escaping methods. ## Testing Rules - Every module must maintain at least an 85% assertion verification target block footprint. - Always use localized mocking modules when testing external system communication gateways or raw databases.When executing future
---jcode runoperational assignments, the Rust engine automatically parses and incorporates these structural directives directly into the agent planning and verification pipeline constraints.Conclusion and Community Call to Action
The jcode framework represents a fundamental evolution in autonomous software engineering tooling. By embedding agentic execution steps directly inside a native, high-performance Rust framework, 1jehuang's project eliminates structural runtime bottlenecks, leaving more room for complex reasoning pipelines. Even in its early release lifecycle, it provides software engineering teams with an incredibly fast, predictable environment for testing the practical boundaries of autonomous code generation.
As an open-source project expanding daily on the GitHub Trending tracks, the success of jcode depends heavily on active community feedback and real-world implementation logs. To dive deeper into the ecosystem, participate in its growth by trying out these resources:
-
jcode: Building High-Performance Autonomous AI Coding Agents from Scratch
The landscape of AI-driven software development is shifting rapidly. While first-generation AI coding tools operated primarily as conversational completions or simple script generators, the community is moving decisively toward autonomous programming agents. These agents don't just suggest code; they plan, execute tests, refactor, and self-correct within a structured harness.
Emerging at the forefront of this shift in May 2026 is jcode, an open-source, Rust-based programming agent framework developed by creator
1jehuang. Rapidly climbing the GitHub Trending charts and capturing the attention of autonomous systems developers, jcode addresses a critical bottleneck in the agentic ecosystem: execution speed, structural reliability, and resource overhead. Written entirely in Rust, it provides a high-performance harness designed to run AI coding agents at scale without the typical latency and memory bloat associated with Python-heavy orchestration layers.In this comprehensive tutorial-style guide, we will break down what jcode is, analyze its internal architecture, compare it to existing frameworks, and walk through an end-to-end installation and configuration process to build your very first autonomous coding agent.
---Understanding the jcode Architecture
To build effective applications with jcode, it is essential to understand how it organizes the execution loop of an AI agent. Traditional agent frameworks rely on high-level scripting abstractions that introduce significant latency, making deep-tree search algorithms (like Monte Carlo Tree Search or complex reflection loops) painfully slow. jcode solves this by using a compiled Rust backend that exposes a highly structured execution harness.
The framework is divided into three primary layers:
- The Environment Layer (The Sandbox): This component manages the operating system context, available package managers, and shell environments. It isolates agent actions, preventing rogue scripts from damaging the host system while providing full feedback loops (stdout, stderr, exit codes) back to the agent.
- The Core Harness (Rust Engine): Written in Rust for maximum concurrency and memory safety, this engine manages agent state transitions, prompt token streaming pipelines, and workspace file parsing. It abstracts token budgets and tool call translations natively.
- The Agent Interface (Extensible Profiles): This layer allows developers to write custom planning algorithms, definition maps, and system instructions. It defines how the agent approaches a problem, splits tasks, and evaluates success.
Feature Comparison: jcode vs. Traditional Frameworks
Before diving into the implementation details, let's look at how jcode positions itself against traditional Python-based agent architectures and standard LLM orchestration environments.
---Feature / Metric jcode (1jehuang) Python-based Agent Frameworks Standard LLM Chat Hooks Core Language Rust Python Python / TypeScript Execution Speed Ultra-high (Compiled, Native Threading) Moderate (Interpreted, Async Overheads) Low (Network Dependent) Memory Management Strict compile-time safety, minimal footprint High runtime consumption, garbage collected Variable depending on wrapper Sandbox Isolation Native OS environment detection & mapping Requires heavy external Docker wrapper No native execution layer Primary Target Autonomous multi-turn software engineering General purpose task automation agents Single-turn text/code generation Prerequisites and Environment Verification
Before installing jcode, you need to ensure your machine meets the minimum system requirements for native compilation and execution. Because jcode evaluates code in real-time, having a stable environment with standard compilers is essential.
System Requirements:
- Operating System: macOS (Intel/Apple Silicon), Linux (Ubuntu 22.04+, Debian, Fedora), or Windows 11 (with PowerShell or WSL2).
- Toolchains: Rust Stable (1.75+ recommended) if building from source.
- Network: Active internet connection to pull model endpoints and fetch external crate dependencies.
Step-by-Step Installation Guide
jcode features an adaptive installer that detects your current operating system, available package managers, and active shell configurations. Select the installation track below that best matches your local development system.
Option A: macOS via Homebrew
If you are on macOS and use the Homebrew package manager, you can install the official tap maintained by 1jehuang directly via your terminal:
# Tap the jcode formula repository brew tap 1jehuang/jcode # Install the binary package brew install jcodeOption B: Linux or macOS via Shell Script
For standard Linux distributions or macOS environments without Homebrew, use the automated installation script. This pulls the latest compiled binary corresponding to your architecture:
curl -fsSL [https://raw.githubusercontent.com/1jehuang/jcode/main/scripts/install.sh](https://raw.githubusercontent.com/1jehuang/jcode/main/scripts/install.sh) | bashOption C: Windows via PowerShell
If you are running natively on a Windows host within a standard administrative PowerShell prompt, execute the following command to download and map the binaries:
irm [https://raw.githubusercontent.com/1jehuang/jcode/main/scripts/install.ps1](https://raw.githubusercontent.com/1jehuang/jcode/main/scripts/install.ps1) | iexOption D: Building From Source (Recommended for Contributors)
If you want to run the cutting-edge development branch or adapt the core Rust source code to custom enterprise parameters, clone the official GitHub repository and compile it locally:
# Clone the project repository git clone [https://github.com/1jehuang/jcode.git](https://github.com/1jehuang/jcode.git) cd jcode # Compile a highly optimized release binary using Cargo cargo build --release # Execute the local release install configuration script ./scripts/install_release.shVerify that your installation was successful by checking the current version of the harness:
---jcode --versionQuickstart: Configuring and Initializing Your Agent Workspace
With jcode successfully installed, the next stage is configuring your active LLM providers and preparing a localized project workspace where your programming agent can safely read, write, and test applications.
Step 1: Exporting LLM API Credentials
jcode acts as an execution harness that routes logic through state-of-the-art coding LLMs. You must supply your preferred model API keys as environment variables. Add these to your shell profile (e.g.,
.bashrcor.zshrc):export OPENAI_API_KEY="sk-proj-xxxxxxxxxxxxxxxxxxxxxxxxxxxxxxxx" export ANTHROPIC_API_KEY="sk-ant-xxxxxxxxxxxxxxxxxxxxxxxxxxxxxxxx"Step 2: Initialize a New jcode Workspace
Navigate to an empty folder or your target repository and run the workspace initialization command. This tells jcode to parse the local layout and prepare an isolated runtime manifest:
mkdir my-agent-project cd my-agent-project jcode initThis command creates a hidden configuration workspace called
.jcode/containing a primary configuration file namedconfig.toml. Let's inspect and modify a standard setup configuration:
---# .jcode/config.toml [workspace] name = "my-agent-project" allowed_commands = ["cargo", "npm", "python", "git", "pytest", "go"] max_iterations = 15 [model] provider = "anthropic" default_model = "claude-3-5-sonnet-20241022" temperature = 0.2 max_tokens = 4096 [sandbox] isolate_network = false timeout_seconds = 45Building an Autonomous Programming Workflow
Now that your workspace is instantiated, let's walk through a real-world software maintenance scenario. We will instruct our jcode agent to write a complete Python utility module, write an associated test suit, run the validations, find bugs from execution outputs, and safely refactor the code automatically.
Step 1: Issue the Agent Task
We trigger the agent execution loop by supplying a clear, high-level engineering prompt using the
jcode runinstruction interface:jcode run "Create a robust Python rate limiter using a sliding window log algorithm. Include unit tests using pytest. Ensure it handles sub-millisecond timestamps gracefully."Step 2: Reviewing the Agent Autonomous Execution Trace
Once triggered, the jcode framework takes absolute control over the planning tree. Here is an approximation of what the terminal sequence tracks as the underlying Rust engine coordinates actions:
[INFO] Initializing agent environment... [INFO] Detected OS: Linux (Ubuntu 24.04), Package Manager: apt, Shell: bash [STEP 1/15] Planning task allocation tree... [TOOL CALL] Writing file: rate_limiter.py [TOOL CALL] Writing file: test_rate_limiter.py [STEP 2/15] Executing automated testing validation suite... [SHELL COMMAND] pytest test_rate_limiter.py [EXECUTION OUTPUT] ========================= FAILURES ========================= ____ test_sliding_window_log_edge_case _____________________ > assert limiter.allow_request("user_1") == False E AssertionError: assert True == False [STEP 3/15] Analyzing test failures. Reflection phase initiated... [INFO] Detected boundary edge condition flaw in window timestamps math. [TOOL CALL] Patching file: rate_limiter.py (Applying inline diff) [STEP 4/15] Re-executing testing suite... [SHELL COMMAND] pytest test_rate_limiter.py [EXECUTION OUTPUT] ==================== 4 passed in 0.08s ===================== [SUCCESS] Task fully resolved. Workspace state clean. Halting execution loop.Step 3: Examining the Generated Code Artifacts
Let's view the production code written completely by the jcode programming agent. Check the output of
rate_limiter.py:import time class SlidingWindowRateLimiter: def __init__(self, max_requests: int, window_size_seconds: float): self.max_requests = max_requests self.window_size_seconds = window_size_seconds self.user_logs = {} def allow_request(self, user_id: str) -> bool: current_time = time.time() if user_id not in self.user_logs: self.user_logs[user_id] = [] # Filter timestamps outside the active historical sliding window window_start = current_time - self.window_size_seconds self.user_logs[user_id] = [t for t in self.user_logs[user_id] if t > window_start] if len(self.user_logs[user_id]) < self.max_requests: self.user_logs[user_id].append(current_time) return True return FalseNext, inspect the corresponding automated validation suites written in
test_rate_limiter.py:
---import time import pytest from rate_limiter import SlidingWindowRateLimiter def test_rate_limiter_concurrency_allowance(): limiter = SlidingWindowRateLimiter(max_requests=3, window_size_seconds=1.0) assert limiter.allow_request("dev_user") is True assert limiter.allow_request("dev_user") is True assert limiter.allow_request("dev_user") is True assert limiter.allow_request("dev_user") is False # Throttled def test_rate_limiter_window_expiry(): limiter = SlidingWindowRateLimiter(max_requests=1, window_size_seconds=0.5) assert limiter.allow_request("admin_user") is True time.sleep(0.6) assert limiter.allow_request("admin_user") is True # RefreshedAdvanced Configuration: Creating Custom Agentic Rulesets
For large engineering groups or complex codebases, you may want to enforce strict coding policies, guardrails, or dependency behaviors. jcode supports local rule binding through systemic definition markdown assets. Create a file called
.jcode/rules.mdto define these behavioral rules:# Project Coding Standards & Policies ## Python Style Rules - All newly generated Python files must include explicit type hinting for argument parameters and return conditions. - Document all core classes with complete PEP-257 compliant docstrings. - Never invoke raw raw input formatting pipelines or unvetted third-party system subshells without utilizing structural subprocess escaping methods. ## Testing Rules - Every module must maintain at least an 85% assertion verification target block footprint. - Always use localized mocking modules when testing external system communication gateways or raw databases.When executing future
---jcode runoperational assignments, the Rust engine automatically parses and incorporates these structural directives directly into the agent planning and verification pipeline constraints.Conclusion and Community Call to Action
The jcode framework represents a fundamental evolution in autonomous software engineering tooling. By embedding agentic execution steps directly inside a native, high-performance Rust framework, 1jehuang's project eliminates structural runtime bottlenecks, leaving more room for complex reasoning pipelines. Even in its early release lifecycle, it provides software engineering teams with an incredibly fast, predictable environment for testing the practical boundaries of autonomous code generation.
As an open-source project expanding daily on the GitHub Trending tracks, the success of jcode depends heavily on active community feedback and real-world implementation logs. To dive deeper into the ecosystem, participate in its growth by trying out these resources:
- Explore the Repository: Star, fork, and track development lines directly at the official GitHub project home:
jcode: Building High-Performance Autonomous AI Coding Agents from Scratch
The landscape of AI-driven software development is shifting rapidly. While first-generation AI coding tools operated primarily as conversational completions or simple script generators, the community is moving decisively toward autonomous programming agents. These agents don't just suggest code; they plan, execute tests, refactor, and self-correct within a structured harness.
Emerging at the forefront of this shift in May 2026 is jcode, an open-source, Rust-based programming agent framework developed by creator
1jehuang. Rapidly climbing the GitHub Trending charts and capturing the attention of autonomous systems developers, jcode addresses a critical bottleneck in the agentic ecosystem: execution speed, structural reliability, and resource overhead. Written entirely in Rust, it provides a high-performance harness designed to run AI coding agents at scale without the typical latency and memory bloat associated with Python-heavy orchestration layers.In this comprehensive tutorial-style guide, we will break down what jcode is, analyze its internal architecture, compare it to existing frameworks, and walk through an end-to-end installation and configuration process to build your very first autonomous coding agent.
---Understanding the jcode Architecture
To build effective applications with jcode, it is essential to understand how it organizes the execution loop of an AI agent. Traditional agent frameworks rely on high-level scripting abstractions that introduce significant latency, making deep-tree search algorithms (like Monte Carlo Tree Search or complex reflection loops) painfully slow. jcode solves this by using a compiled Rust backend that exposes a highly structured execution harness.
The framework is divided into three primary layers:
- The Environment Layer (The Sandbox): This component manages the operating system context, available package managers, and shell environments. It isolates agent actions, preventing rogue scripts from damaging the host system while providing full feedback loops (stdout, stderr, exit codes) back to the agent.
- The Core Harness (Rust Engine): Written in Rust for maximum concurrency and memory safety, this engine manages agent state transitions, prompt token streaming pipelines, and workspace file parsing. It abstracts token budgets and tool call translations natively.
- The Agent Interface (Extensible Profiles): This layer allows developers to write custom planning algorithms, definition maps, and system instructions. It defines how the agent approaches a problem, splits tasks, and evaluates success.
Feature Comparison: jcode vs. Traditional Frameworks
Before diving into the implementation details, let's look at how jcode positions itself against traditional Python-based agent architectures and standard LLM orchestration environments.
---Feature / Metric jcode (1jehuang) Python-based Agent Frameworks Standard LLM Chat Hooks Core Language Rust Python Python / TypeScript Execution Speed Ultra-high (Compiled, Native Threading) Moderate (Interpreted, Async Overheads) Low (Network Dependent) Memory Management Strict compile-time safety, minimal footprint High runtime consumption, garbage collected Variable depending on wrapper Sandbox Isolation Native OS environment detection & mapping Requires heavy external Docker wrapper No native execution layer Primary Target Autonomous multi-turn software engineering General purpose task automation agents Single-turn text/code generation Prerequisites and Environment Verification
Before installing jcode, you need to ensure your machine meets the minimum system requirements for native compilation and execution. Because jcode evaluates code in real-time, having a stable environment with standard compilers is essential.
System Requirements:
- Operating System: macOS (Intel/Apple Silicon), Linux (Ubuntu 22.04+, Debian, Fedora), or Windows 11 (with PowerShell or WSL2).
- Toolchains: Rust Stable (1.75+ recommended) if building from source.
- Network: Active internet connection to pull model endpoints and fetch external crate dependencies.
Step-by-Step Installation Guide
jcode features an adaptive installer that detects your current operating system, available package managers, and active shell configurations. Select the installation track below that best matches your local development system.
Option A: macOS via Homebrew
If you are on macOS and use the Homebrew package manager, you can install the official tap maintained by 1jehuang directly via your terminal:
# Tap the jcode formula repository brew tap 1jehuang/jcode # Install the binary package brew install jcodeOption B: Linux or macOS via Shell Script
For standard Linux distributions or macOS environments without Homebrew, use the automated installation script. This pulls the latest compiled binary corresponding to your architecture:
curl -fsSL [https://raw.githubusercontent.com/1jehuang/jcode/main/scripts/install.sh](https://raw.githubusercontent.com/1jehuang/jcode/main/scripts/install.sh) | bashOption C: Windows via PowerShell
If you are running natively on a Windows host within a standard administrative PowerShell prompt, execute the following command to download and map the binaries:
irm [https://raw.githubusercontent.com/1jehuang/jcode/main/scripts/install.ps1](https://raw.githubusercontent.com/1jehuang/jcode/main/scripts/install.ps1) | iexOption D: Building From Source (Recommended for Contributors)
If you want to run the cutting-edge development branch or adapt the core Rust source code to custom enterprise parameters, clone the official GitHub repository and compile it locally:
# Clone the project repository git clone [https://github.com/1jehuang/jcode.git](https://github.com/1jehuang/jcode.git) cd jcode # Compile a highly optimized release binary using Cargo cargo build --release # Execute the local release install configuration script ./scripts/install_release.shVerify that your installation was successful by checking the current version of the harness:
---jcode --versionQuickstart: Configuring and Initializing Your Agent Workspace
With jcode successfully installed, the next stage is configuring your active LLM providers and preparing a localized project workspace where your programming agent can safely read, write, and test applications.
Step 1: Exporting LLM API Credentials
jcode acts as an execution harness that routes logic through state-of-the-art coding LLMs. You must supply your preferred model API keys as environment variables. Add these to your shell profile (e.g.,
.bashrcor.zshrc):export OPENAI_API_KEY="sk-proj-xxxxxxxxxxxxxxxxxxxxxxxxxxxxxxxx" export ANTHROPIC_API_KEY="sk-ant-xxxxxxxxxxxxxxxxxxxxxxxxxxxxxxxx"Step 2: Initialize a New jcode Workspace
Navigate to an empty folder or your target repository and run the workspace initialization command. This tells jcode to parse the local layout and prepare an isolated runtime manifest:
mkdir my-agent-project cd my-agent-project jcode initThis command creates a hidden configuration workspace called
.jcode/containing a primary configuration file namedconfig.toml. Let's inspect and modify a standard setup configuration:
---# .jcode/config.toml [workspace] name = "my-agent-project" allowed_commands = ["cargo", "npm", "python", "git", "pytest", "go"] max_iterations = 15 [model] provider = "anthropic" default_model = "claude-3-5-sonnet-20241022" temperature = 0.2 max_tokens = 4096 [sandbox] isolate_network = false timeout_seconds = 45Building an Autonomous Programming Workflow
Now that your workspace is instantiated, let's walk through a real-world software maintenance scenario. We will instruct our jcode agent to write a complete Python utility module, write an associated test suit, run the validations, find bugs from execution outputs, and safely refactor the code automatically.
Step 1: Issue the Agent Task
We trigger the agent execution loop by supplying a clear, high-level engineering prompt using the
jcode runinstruction interface:jcode run "Create a robust Python rate limiter using a sliding window log algorithm. Include unit tests using pytest. Ensure it handles sub-millisecond timestamps gracefully."Step 2: Reviewing the Agent Autonomous Execution Trace
Once triggered, the jcode framework takes absolute control over the planning tree. Here is an approximation of what the terminal sequence tracks as the underlying Rust engine coordinates actions:
[INFO] Initializing agent environment... [INFO] Detected OS: Linux (Ubuntu 24.04), Package Manager: apt, Shell: bash [STEP 1/15] Planning task allocation tree... [TOOL CALL] Writing file: rate_limiter.py [TOOL CALL] Writing file: test_rate_limiter.py [STEP 2/15] Executing automated testing validation suite... [SHELL COMMAND] pytest test_rate_limiter.py [EXECUTION OUTPUT] ========================= FAILURES ========================= ____ test_sliding_window_log_edge_case _____________________ > assert limiter.allow_request("user_1") == False E AssertionError: assert True == False [STEP 3/15] Analyzing test failures. Reflection phase initiated... [INFO] Detected boundary edge condition flaw in window timestamps math. [TOOL CALL] Patching file: rate_limiter.py (Applying inline diff) [STEP 4/15] Re-executing testing suite... [SHELL COMMAND] pytest test_rate_limiter.py [EXECUTION OUTPUT] ==================== 4 passed in 0.08s ===================== [SUCCESS] Task fully resolved. Workspace state clean. Halting execution loop.Step 3: Examining the Generated Code Artifacts
Let's view the production code written completely by the jcode programming agent. Check the output of
rate_limiter.py:import time class SlidingWindowRateLimiter: def __init__(self, max_requests: int, window_size_seconds: float): self.max_requests = max_requests self.window_size_seconds = window_size_seconds self.user_logs = {} def allow_request(self, user_id: str) -> bool: current_time = time.time() if user_id not in self.user_logs: self.user_logs[user_id] = [] # Filter timestamps outside the active historical sliding window window_start = current_time - self.window_size_seconds self.user_logs[user_id] = [t for t in self.user_logs[user_id] if t > window_start] if len(self.user_logs[user_id]) < self.max_requests: self.user_logs[user_id].append(current_time) return True return FalseNext, inspect the corresponding automated validation suites written in
test_rate_limiter.py:
---import time import pytest from rate_limiter import SlidingWindowRateLimiter def test_rate_limiter_concurrency_allowance(): limiter = SlidingWindowRateLimiter(max_requests=3, window_size_seconds=1.0) assert limiter.allow_request("dev_user") is True assert limiter.allow_request("dev_user") is True assert limiter.allow_request("dev_user") is True assert limiter.allow_request("dev_user") is False # Throttled def test_rate_limiter_window_expiry(): limiter = SlidingWindowRateLimiter(max_requests=1, window_size_seconds=0.5) assert limiter.allow_request("admin_user") is True time.sleep(0.6) assert limiter.allow_request("admin_user") is True # RefreshedAdvanced Configuration: Creating Custom Agentic Rulesets
For large engineering groups or complex codebases, you may want to enforce strict coding policies, guardrails, or dependency behaviors. jcode supports local rule binding through systemic definition markdown assets. Create a file called
.jcode/rules.mdto define these behavioral rules:# Project Coding Standards & Policies ## Python Style Rules - All newly generated Python files must include explicit type hinting for argument parameters and return conditions. - Document all core classes with complete PEP-257 compliant docstrings. - Never invoke raw raw input formatting pipelines or unvetted third-party system subshells without utilizing structural subprocess escaping methods. ## Testing Rules - Every module must maintain at least an 85% assertion verification target block footprint. - Always use localized mocking modules when testing external system communication gateways or raw databases.When executing future
---jcode runoperational assignments, the Rust engine automatically parses and incorporates these structural directives directly into the agent planning and verification pipeline constraints.Conclusion and Community Call to Action
The jcode framework represents a fundamental evolution in autonomous software engineering tooling. By embedding agentic execution steps directly inside a native, high-performance Rust framework, 1jehuang's project eliminates structural runtime bottlenecks, leaving more room for complex reasoning pipelines. Even in its early release lifecycle, it provides software engineering teams with an incredibly fast, predictable environment for testing the practical boundaries of autonomous code generation.
As an open-source project expanding daily on the GitHub Trending tracks, the success of jcode depends heavily on active community feedback and real-world implementation logs. To dive deeper into the ecosystem, participate in its growth by trying out these resources:
- Explore the Repository: Star, fork, and track development lines directly at the official GitHub project home: [github.com/1jehuang/jcode](https://github.com/1jehuang/jcode).
- Review the Documentation: Check out the installation parameters and script templates to build custom execution backends.
- Contribute: Submit pull requests to expand platform integrations, improve shell detection capabilities, and add new runtime
jcode: Building High-Performance Autonomous AI Coding Agents from Scratch
The landscape of AI-driven software development is shifting rapidly. While first-generation AI coding tools operated primarily as conversational completions or simple script generators, the community is moving decisively toward autonomous programming agents. These agents don't just suggest code; they plan, execute tests, refactor, and self-correct within a structured harness.
Emerging at the forefront of this shift in May 2026 is jcode, an open-source, Rust-based programming agent framework developed by creator
1jehuang. Rapidly climbing the GitHub Trending charts and capturing the attention of autonomous systems developers, jcode addresses a critical bottleneck in the agentic ecosystem: execution speed, structural reliability, and resource overhead. Written entirely in Rust, it provides a high-performance harness designed to run AI coding agents at scale without the typical latency and memory bloat associated with Python-heavy orchestration layers.In this comprehensive tutorial-style guide, we will break down what jcode is, analyze its internal architecture, compare it to existing frameworks, and walk through an end-to-end installation and configuration process to build your very first autonomous coding agent.
---Understanding the jcode Architecture
To build effective applications with jcode, it is essential to understand how it organizes the execution loop of an AI agent. Traditional agent frameworks rely on high-level scripting abstractions that introduce significant latency, making deep-tree search algorithms (like Monte Carlo Tree Search or complex reflection loops) painfully slow. jcode solves this by using a compiled Rust backend that exposes a highly structured execution harness.
The framework is divided into three primary layers:
- The Environment Layer (The Sandbox): This component manages the operating system context, available package managers, and shell environments. It isolates agent actions, preventing rogue scripts from damaging the host system while providing full feedback loops (stdout, stderr, exit codes) back to the agent.
- The Core Harness (Rust Engine): Written in Rust for maximum concurrency and memory safety, this engine manages agent state transitions, prompt token streaming pipelines, and workspace file parsing. It abstracts token budgets and tool call translations natively.
- The Agent Interface (Extensible Profiles): This layer allows developers to write custom planning algorithms, definition maps, and system instructions. It defines how the agent approaches a problem, splits tasks, and evaluates success.
Feature Comparison: jcode vs. Traditional Frameworks
Before diving into the implementation details, let's look at how jcode positions itself against traditional Python-based agent architectures and standard LLM orchestration environments.
---Feature / Metric jcode (1jehuang) Python-based Agent Frameworks Standard LLM Chat Hooks Core Language Rust Python Python / TypeScript Execution Speed Ultra-high (Compiled, Native Threading) Moderate (Interpreted, Async Overheads) Low (Network Dependent) Memory Management Strict compile-time safety, minimal footprint High runtime consumption, garbage collected Variable depending on wrapper Sandbox Isolation Native OS environment detection & mapping Requires heavy external Docker wrapper No native execution layer Primary Target Autonomous multi-turn software engineering General purpose task automation agents Single-turn text/code generation Prerequisites and Environment Verification
Before installing jcode, you need to ensure your machine meets the minimum system requirements for native compilation and execution. Because jcode evaluates code in real-time, having a stable environment with standard compilers is essential.
System Requirements:
- Operating System: macOS (Intel/Apple Silicon), Linux (Ubuntu 22.04+, Debian, Fedora), or Windows 11 (with PowerShell or WSL2).
- Toolchains: Rust Stable (1.75+ recommended) if building from source.
- Network: Active internet connection to pull model endpoints and fetch external crate dependencies.
Step-by-Step Installation Guide
jcode features an adaptive installer that detects your current operating system, available package managers, and active shell configurations. Select the installation track below that best matches your local development system.
Option A: macOS via Homebrew
If you are on macOS and use the Homebrew package manager, you can install the official tap maintained by 1jehuang directly via your terminal:
# Tap the jcode formula repository brew tap 1jehuang/jcode # Install the binary package brew install jcodeOption B: Linux or macOS via Shell Script
For standard Linux distributions or macOS environments without Homebrew, use the automated installation script. This pulls the latest compiled binary corresponding to your architecture:
curl -fsSL [https://raw.githubusercontent.com/1jehuang/jcode/main/scripts/install.sh](https://raw.githubusercontent.com/1jehuang/jcode/main/scripts/install.sh) | bashOption C: Windows via PowerShell
If you are running natively on a Windows host within a standard administrative PowerShell prompt, execute the following command to download and map the binaries:
irm [https://raw.githubusercontent.com/1jehuang/jcode/main/scripts/install.ps1](https://raw.githubusercontent.com/1jehuang/jcode/main/scripts/install.ps1) | iexOption D: Building From Source (Recommended for Contributors)
If you want to run the cutting-edge development branch or adapt the core Rust source code to custom enterprise parameters, clone the official GitHub repository and compile it locally:
# Clone the project repository git clone [https://github.com/1jehuang/jcode.git](https://github.com/1jehuang/jcode.git) cd jcode # Compile a highly optimized release binary using Cargo cargo build --release # Execute the local release install configuration script ./scripts/install_release.shVerify that your installation was successful by checking the current version of the harness:
---jcode --versionQuickstart: Configuring and Initializing Your Agent Workspace
With jcode successfully installed, the next stage is configuring your active LLM providers and preparing a localized project workspace where your programming agent can safely read, write, and test applications.
Step 1: Exporting LLM API Credentials
jcode acts as an execution harness that routes logic through state-of-the-art coding LLMs. You must supply your preferred model API keys as environment variables. Add these to your shell profile (e.g.,
.bashrcor.zshrc):export OPENAI_API_KEY="sk-proj-xxxxxxxxxxxxxxxxxxxxxxxxxxxxxxxx" export ANTHROPIC_API_KEY="sk-ant-xxxxxxxxxxxxxxxxxxxxxxxxxxxxxxxx"Step 2: Initialize a New jcode Workspace
Navigate to an empty folder or your target repository and run the workspace initialization command. This tells jcode to parse the local layout and prepare an isolated runtime manifest:
mkdir my-agent-project cd my-agent-project jcode initThis command creates a hidden configuration workspace called
.jcode/containing a primary configuration file namedconfig.toml. Let's inspect and modify a standard setup configuration:
---# .jcode/config.toml [workspace] name = "my-agent-project" allowed_commands = ["cargo", "npm", "python", "git", "pytest", "go"] max_iterations = 15 [model] provider = "anthropic" default_model = "claude-3-5-sonnet-20241022" temperature = 0.2 max_tokens = 4096 [sandbox] isolate_network = false timeout_seconds = 45Building an Autonomous Programming Workflow
Now that your workspace is instantiated, let's walk through a real-world software maintenance scenario. We will instruct our jcode agent to write a complete Python utility module, write an associated test suit, run the validations, find bugs from execution outputs, and safely refactor the code automatically.
Step 1: Issue the Agent Task
We trigger the agent execution loop by supplying a clear, high-level engineering prompt using the
jcode runinstruction interface:jcode run "Create a robust Python rate limiter using a sliding window log algorithm. Include unit tests using pytest. Ensure it handles sub-millisecond timestamps gracefully."Step 2: Reviewing the Agent Autonomous Execution Trace
Once triggered, the jcode framework takes absolute control over the planning tree. Here is an approximation of what the terminal sequence tracks as the underlying Rust engine coordinates actions:
[INFO] Initializing agent environment... [INFO] Detected OS: Linux (Ubuntu 24.04), Package Manager: apt, Shell: bash [STEP 1/15] Planning task allocation tree... [TOOL CALL] Writing file: rate_limiter.py [TOOL CALL] Writing file: test_rate_limiter.py [STEP 2/15] Executing automated testing validation suite... [SHELL COMMAND] pytest test_rate_limiter.py [EXECUTION OUTPUT] ========================= FAILURES ========================= ____ test_sliding_window_log_edge_case _____________________ > assert limiter.allow_request("user_1") == False E AssertionError: assert True == False [STEP 3/15] Analyzing test failures. Reflection phase initiated... [INFO] Detected boundary edge condition flaw in window timestamps math. [TOOL CALL] Patching file: rate_limiter.py (Applying inline diff) [STEP 4/15] Re-executing testing suite... [SHELL COMMAND] pytest test_rate_limiter.py [EXECUTION OUTPUT] ==================== 4 passed in 0.08s ===================== [SUCCESS] Task fully resolved. Workspace state clean. Halting execution loop.Step 3: Examining the Generated Code Artifacts
Let's view the production code written completely by the jcode programming agent. Check the output of
rate_limiter.py:import time class SlidingWindowRateLimiter: def __init__(self, max_requests: int, window_size_seconds: float): self.max_requests = max_requests self.window_size_seconds = window_size_seconds self.user_logs = {} def allow_request(self, user_id: str) -> bool: current_time = time.time() if user_id not in self.user_logs: self.user_logs[user_id] = [] # Filter timestamps outside the active historical sliding window window_start = current_time - self.window_size_seconds self.user_logs[user_id] = [t for t in self.user_logs[user_id] if t > window_start] if len(self.user_logs[user_id]) < self.max_requests: self.user_logs[user_id].append(current_time) return True return FalseNext, inspect the corresponding automated validation suites written in
test_rate_limiter.py:
---import time import pytest from rate_limiter import SlidingWindowRateLimiter def test_rate_limiter_concurrency_allowance(): limiter = SlidingWindowRateLimiter(max_requests=3, window_size_seconds=1.0) assert limiter.allow_request("dev_user") is True assert limiter.allow_request("dev_user") is True assert limiter.allow_request("dev_user") is True assert limiter.allow_request("dev_user") is False # Throttled def test_rate_limiter_window_expiry(): limiter = SlidingWindowRateLimiter(max_requests=1, window_size_seconds=0.5) assert limiter.allow_request("admin_user") is True time.sleep(0.6) assert limiter.allow_request("admin_user") is True # RefreshedAdvanced Configuration: Creating Custom Agentic Rulesets
For large engineering groups or complex codebases, you may want to enforce strict coding policies, guardrails, or dependency behaviors. jcode supports local rule binding through systemic definition markdown assets. Create a file called
.jcode/rules.mdto define these behavioral rules:# Project Coding Standards & Policies ## Python Style Rules - All newly generated Python files must include explicit type hinting for argument parameters and return conditions. - Document all core classes with complete PEP-257 compliant docstrings. - Never invoke raw raw input formatting pipelines or unvetted third-party system subshells without utilizing structural subprocess escaping methods. ## Testing Rules - Every module must maintain at least an 85% assertion verification target block footprint. - Always use localized mocking modules when testing external system communication gateways or raw databases.When executing future
---jcode runoperational assignments, the Rust engine automatically parses and incorporates these structural directives directly into the agent planning and verification pipeline constraints.Conclusion and Community Call to Action
The jcode framework represents a fundamental evolution in autonomous software engineering tooling. By embedding agentic execution steps directly inside a native, high-performance Rust framework, 1jehuang's project eliminates structural runtime bottlenecks, leaving more room for complex reasoning pipelines. Even in its early release lifecycle, it provides software engineering teams with an incredibly fast, predictable environment for testing the practical boundaries of autonomous code generation.
As an open-source project expanding daily on the GitHub Trending tracks, the success of jcode depends heavily on active community feedback and real-world implementation logs. To dive deeper into the ecosystem, participate in its growth by trying out these resources:
- Explore the Repository: Star, fork, and track development lines directly at the official GitHub project home: [github.com/1jehuang/jcode](https://github.com/1jehuang/jcode).
- Review the Documentation: Check out the installation parameters and script templates to build custom execution backends.
- Contribute: Submit pull requests to expand platform integrations, improve shell detection capabilities, and add new runtime sandboxing layers.
- The Environment Layer (The Sandbox): This component manages the operating system context, available package managers, and shell environments. It isolates agent actions, preventing rogue scripts from damaging the host system while providing full